How to Add Social Login to WordPress for Higher User Engagement
The social login concept has become increasingly popular with the growing number of social media users. Social login makes the process of joining a website much easier than conventional methods. Hence, it has been a great technique to increase user engagement on WordPress websites as well.
If you own a WordPress website or planning to create one, a social login option can help convert more visitors into leads. There are several ways to add this to your website.
In this post, we'll demonstrate how to add social login to WordPress using the WP User Frontend plugin. Let's get started.
What Is Social Login and How It Works?
Social login is also known as social sign-in or social sign-on. It lets users register or sign in to a website without going through the steps of creating an account. Instead, they can instantly log in or sign up with a social account. It's a straightforward substitute for the convetional sign-up or sign-in process.

Say you have a website where people must log in to access its resources. So, new users need to create an account, and returning users have to log back, right?
But you can help them skip this complexity by providing the social login option. They will get to choose one of their existing social accounts to connect with your site and an account will be created automatically.
This means they can use any account like Twitter, Facebook, LinkedIn, Gmail, etc., to enter your website without any delay.
Similarly, those who need to log back into your website, won't require any username or password if using social login. They can use the same social account they used the first time, and sign in every time with a single click.
Reasons to Add Social Login to a Website
The ever-increasing number of social media users has made social login a prevalent option for today's websites. Besides providing all the user benefits, it facilitates the admins as well. If you're still skeptical about adding it to your site, here are some stats that may help you decide:
1. Ease of Registration
At this point, you already know that social login offers a simplified and easy registration process. Users can log in or register more quickly with this. It creates a good first impression and a better user experience.
2. More Sign-up Opportunities
According to a research, 77% of users believe social login should be offered by any website. This clearly indicates – if your website doesn't offer it, a risk of losing a huge number of prospects is there.
3. Less Bounce Rate
A study shows, 92% would rather leave a website instead of resetting or recovering their login information if they’ve forgotten their passwords. With social login-enabled websites, customers no longer have to remember other account details.
4. Lower Chance of Fake Accounts
Many people create accounts using fake details either just because of laziness or to attack your website. But social logins can minimize this chance significantly. You get more accurate data and improve your target marketing. (However, social sites also have fake accounts and someone may use them to remain anonymous).
5. Decreased Cart Abandonments
Forced account creation is a key reason why people leave their carts without completing their shopping. It's evident, the checkout process should be as uninterrupted as possible. And a social sign-in option can help a lot in this regard.
How to Add Social Login to WordPress: Step-by-Step Guide

There are several ways to include social login functionality in a WordPress website. As we mentioned earlier, you can do it using WP User Frontend Pro plugin.
From guest posting, content and menu restriction, user profile, and directory website, to subscription management – WP User Frontend Pro comes with a wide range of features. So, if your website needs any such feature besides social login, you will get them all in this one single plugin.
WP User Frontend Pro offers 20+ modules. The Social Login & Registration module is one of them. It takes you three steps to enable this feature on your site.
- Activating a Module
- Enabling a Setting
- Authorizing the App (Created on a Social Platform)
Let's see how to complete these steps.
Step 1: Activate the Social Login & Registration Module
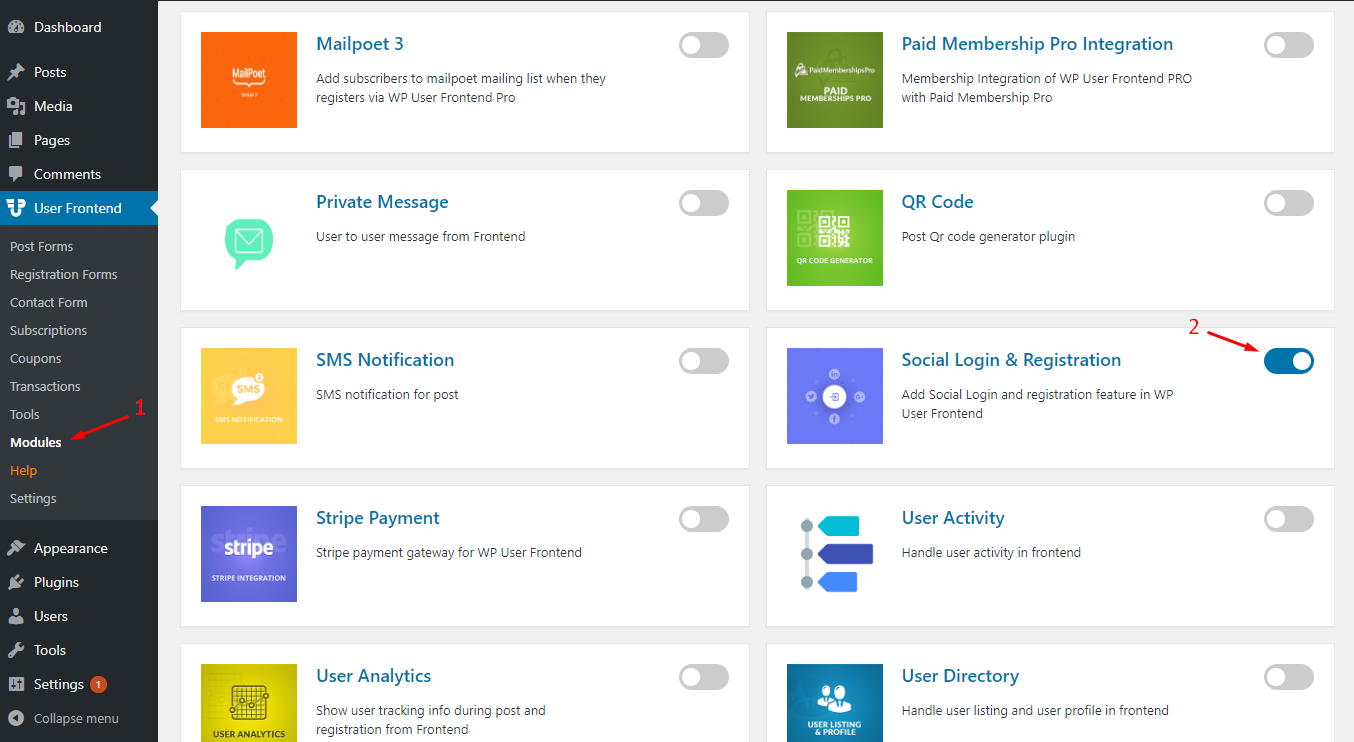
Navigate to WP Admin Dashboard > User Frontend > Modules. Find the Social Login & Registration module and turn on the toggle button on the top right corner.
Step 2: Enable the Social Login Setting
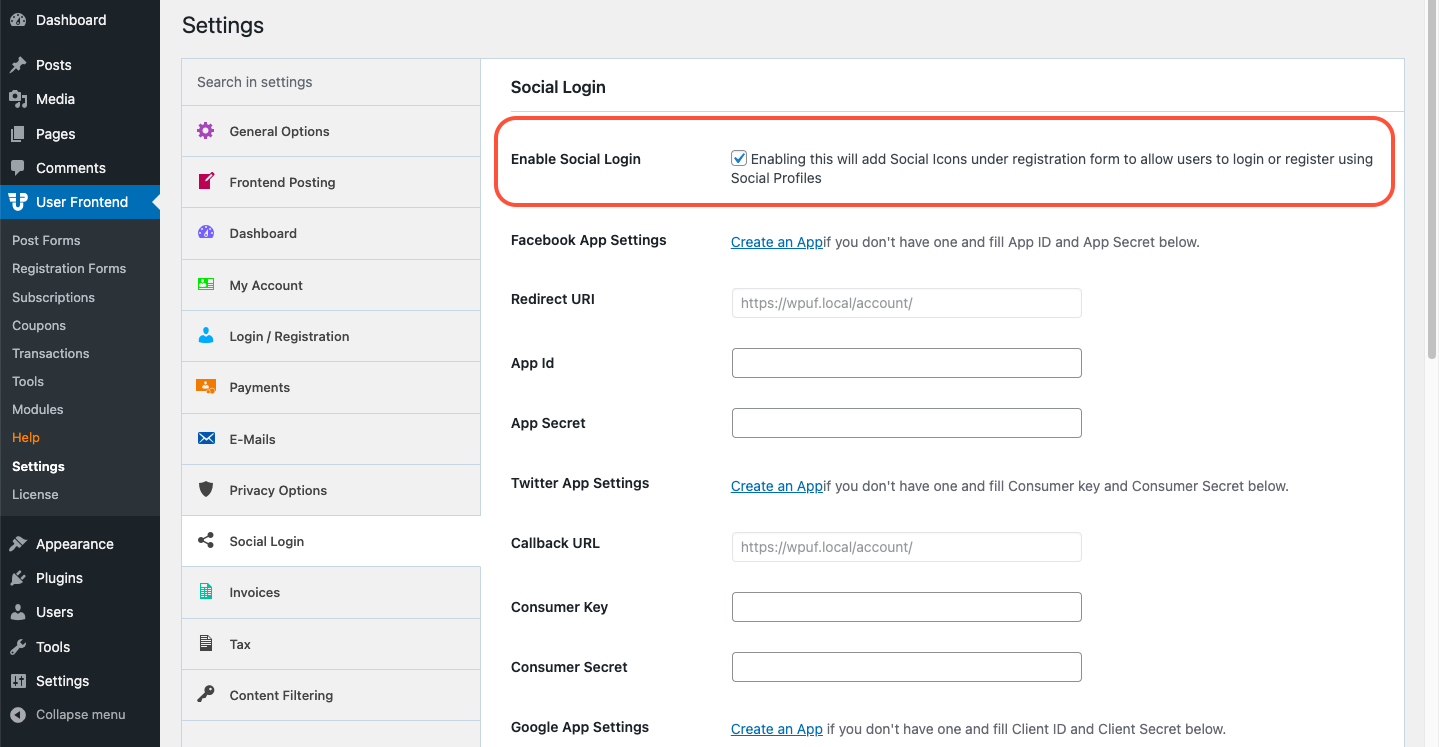
Now, navigate to WP Admin Dashboard → User Frontend→ Settings → Social Login and checkmark the box beside the Enable Social Login option.
Step 3: Authorizing the Apps
You can see separate fields for Facebook, Twitter, Google, and LinkedIn App Settings in the WP User Frontend. You need to fill only those fields under a platform you want to provide to your users. Let's say you want to enable the Facebook Login option.
Then insert App ID and App Secret under the Facebook App Settings only. Keep the rest three blanks. Looking for a Twitter Login? Insert the Consumer Key and Consumer Secret under the Twitter App Settings.
No worries, we're going to show all the configurations one by one so that you can have a clearer idea. So now, we're breaking up 3rd Step into four different sections –
- Facebook Login
- Twitter Login
- Google Login
- LinkedIn Login
Jump to the ones you want to offer to your users. The basic procedure overall is the same. First, we need to create an app on those platforms. And then collect that App ID and the Secret Key to put into our WP User Frontend settings. Let's start with Facebook then.
(1) Configuring Facebook Login
So, you need the App ID and App Secret provided by Facebook. You can easily get it by clicking on the ‘Create an App‘ link indicated in the screenshot above or going directly to https://developers.facebook.com/apps/.
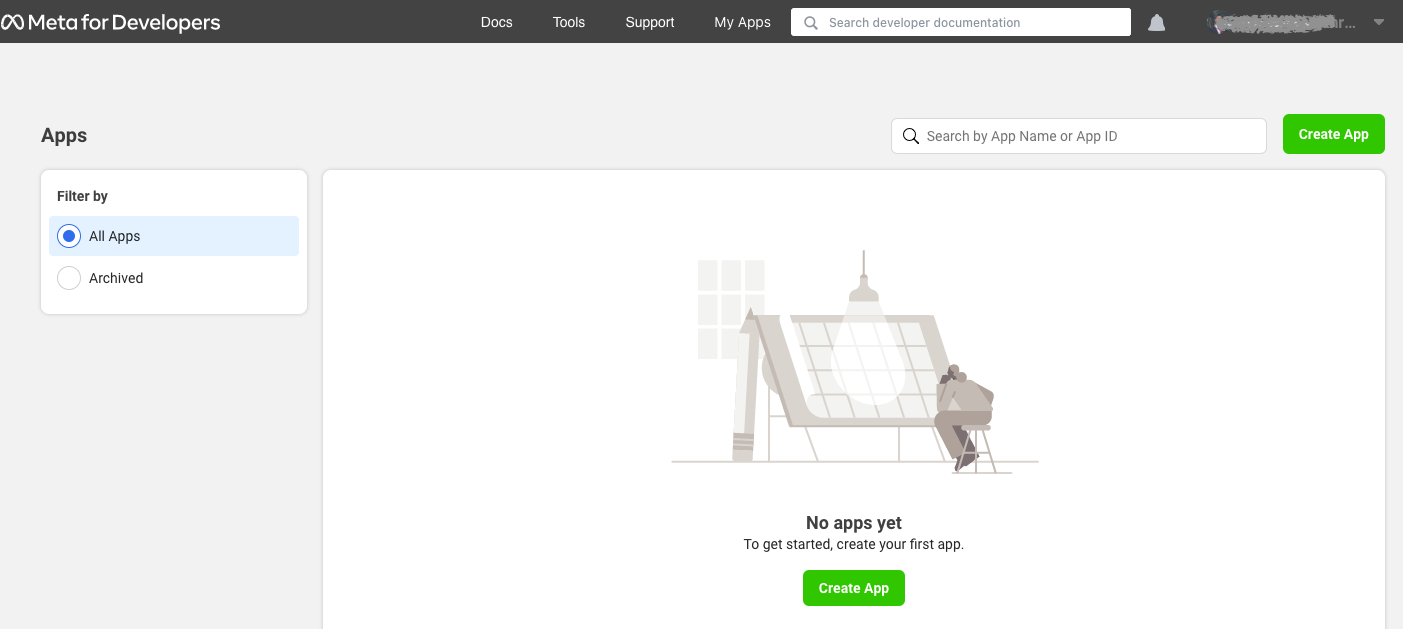
Get Started by creating or verifying your account (if not done already). From your Meta for Developers dashboard, click the ‘Create App' button.
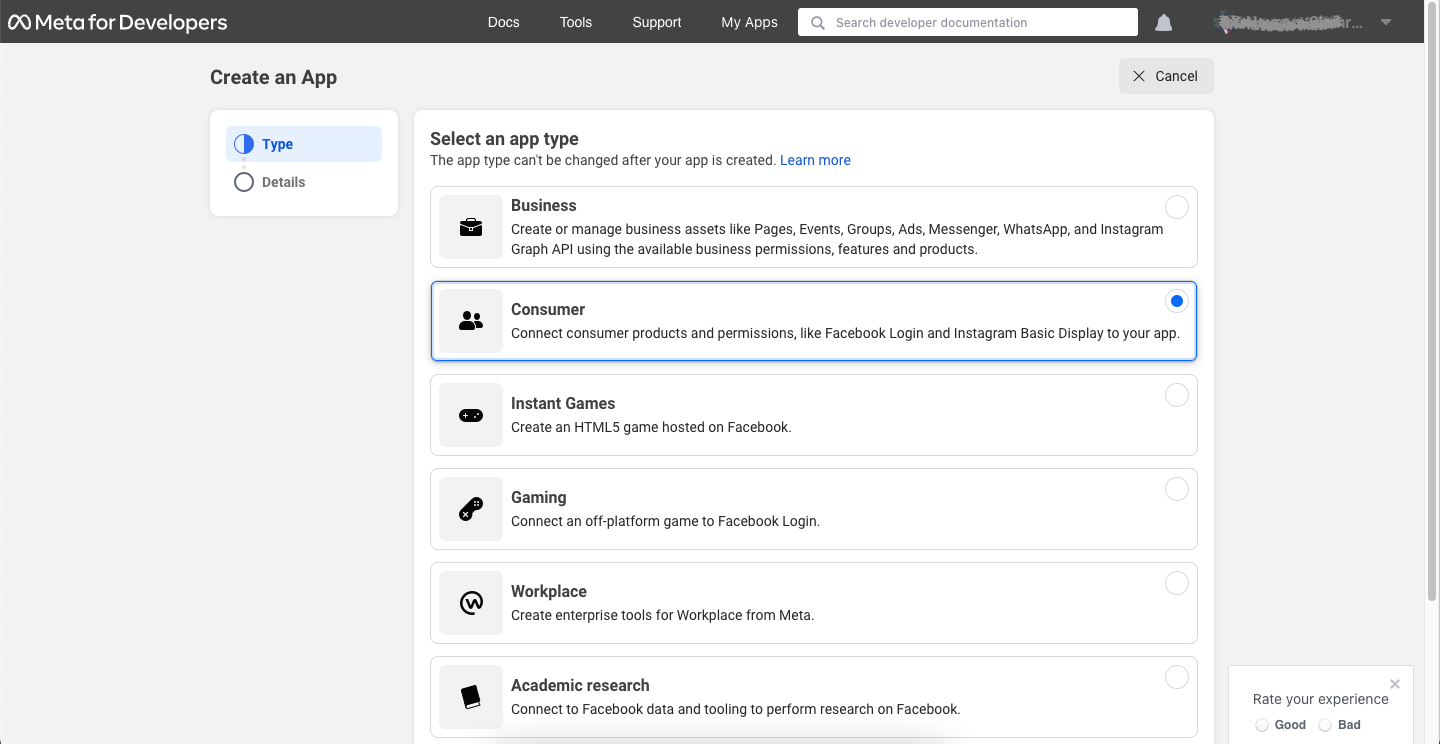
Now, select the Consumer app type from the list. (All the options have got help texts under them so choosing the right one won't be a problem).
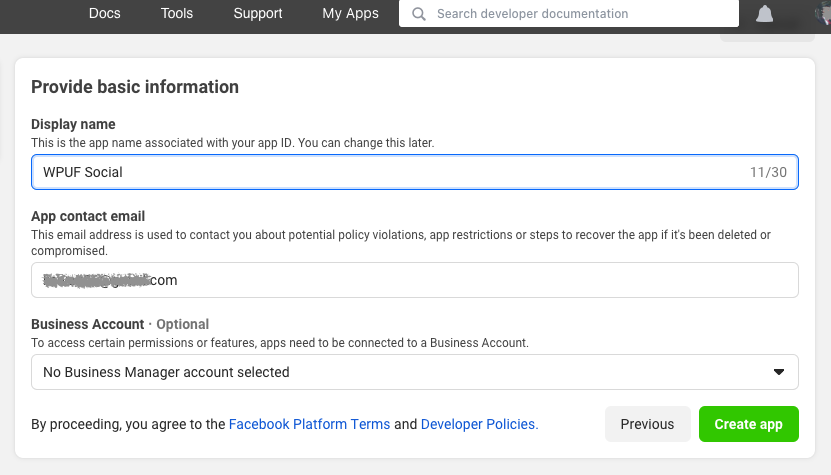
In the next step, Facebook will ask for some basic info like App Name, Contact Email, etc. Fill them up and press the Create App button.
On the next screen, you'll find the Facebook Login option. Select it and then you'll need to choose the platform type.
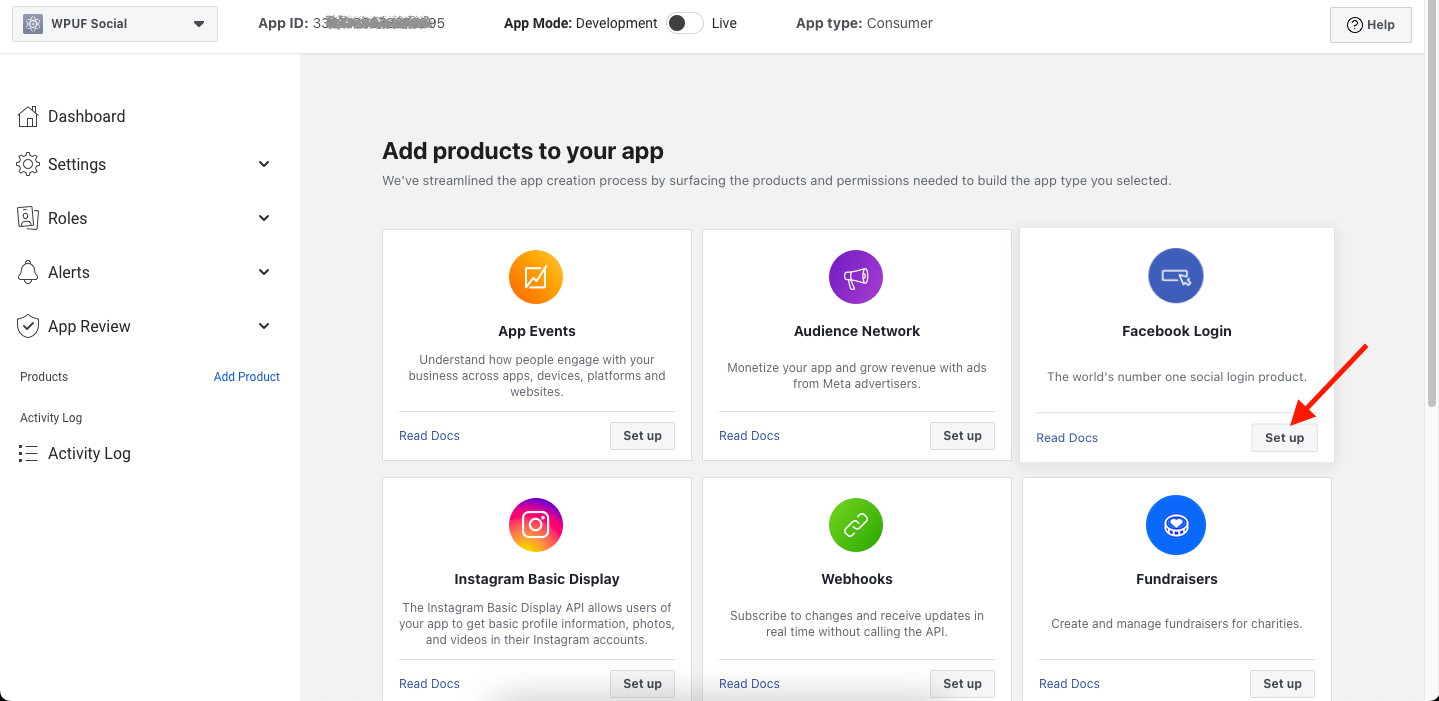
Since you're setting it up for a WordPress website, just choose the Web (with the www icon) option here. It will take you to Facebook's default Quickstart settings. You can skip that part since WP User Frontend will do the job for you. Instead, just go to Settings > Basic and you should find an App ID and an App Secret here.
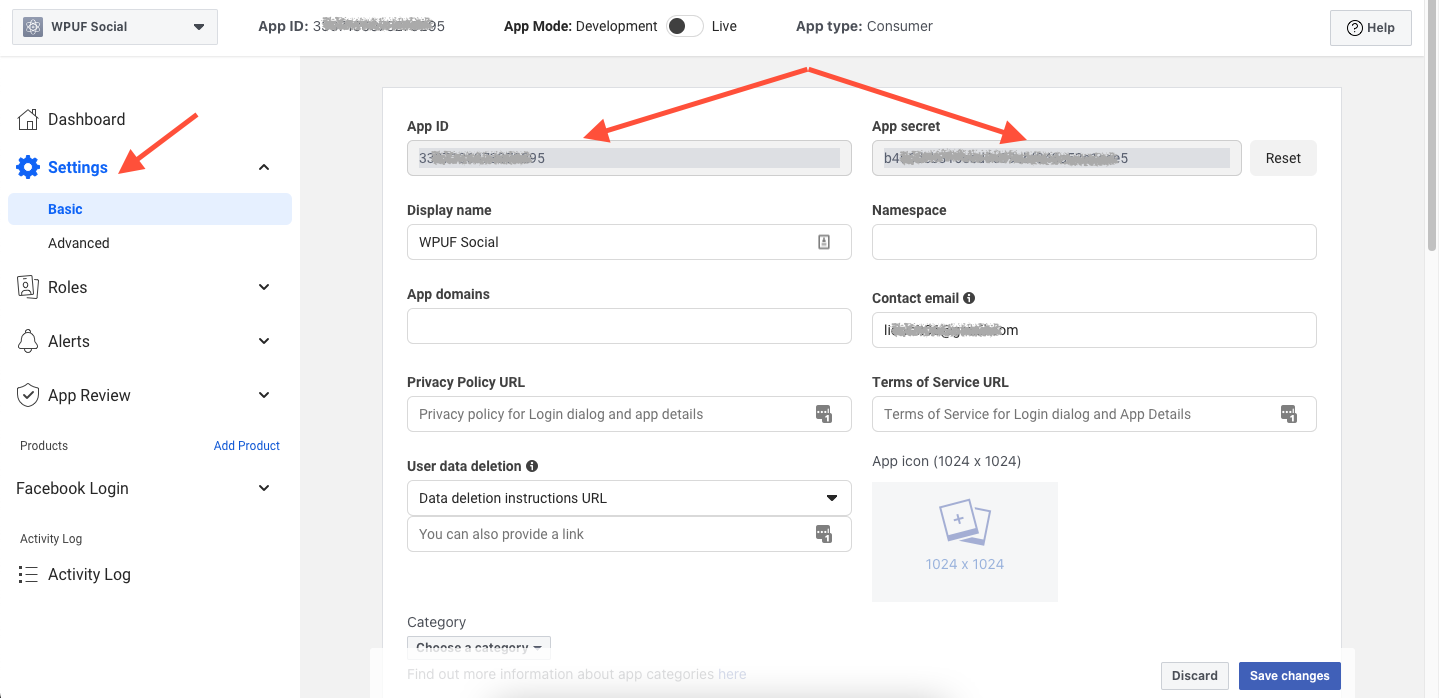
Yes, we've got what we need. Just have to copy these two items now and paste them into respective fields in the WP User Frontend settings page (shown in the image below).
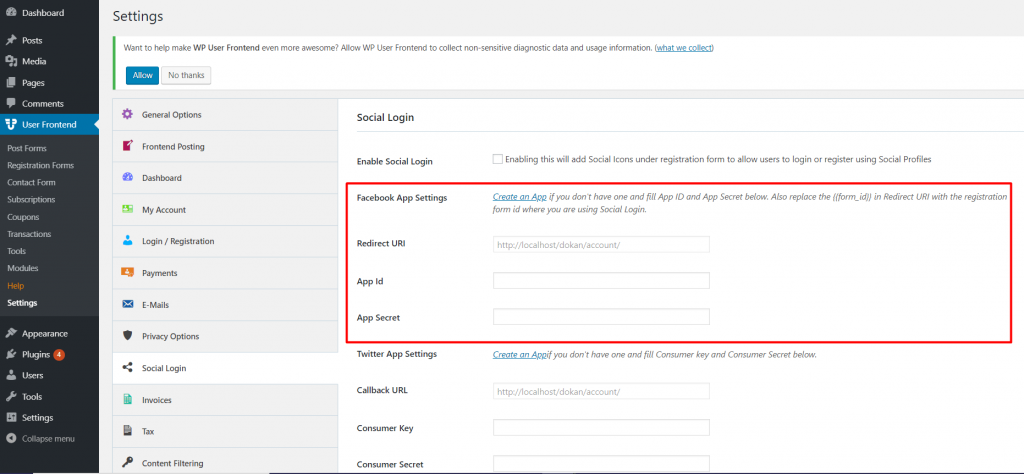
Don't forget to click on Save Changes! And you're all set configuring the Facebook registration/login for your website.
(2) Configuring Twitter Login
You can configure the Twitter login for your website in a similar way. But if you're tired of looking at those screenshots, well, our media team has got you covered. Here's an explanatory video tutorial on how to configure the Twitter login for your WordPress site. So, check this out and you'll be able to include it on your site easily.
(3) Configuring Google Login
Want to integrate Google sign-in? Let's get back to the WP User Frontend dashboard then. To enable the Login with Google option, we need to get the Client ID and Client Secret, right? Click the link associated (Create an App) first. It will take you to the Google Cloud dashboard. Create a project from there.
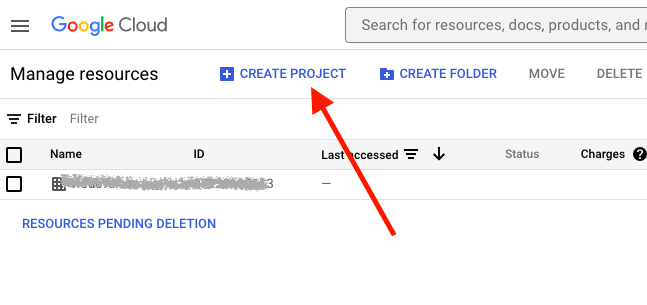
Type your project name and other info, and hit the CREATE button. Then from the hamburger menu icon (on the top left corner), go to APIs & Services > OAuth consent screen.
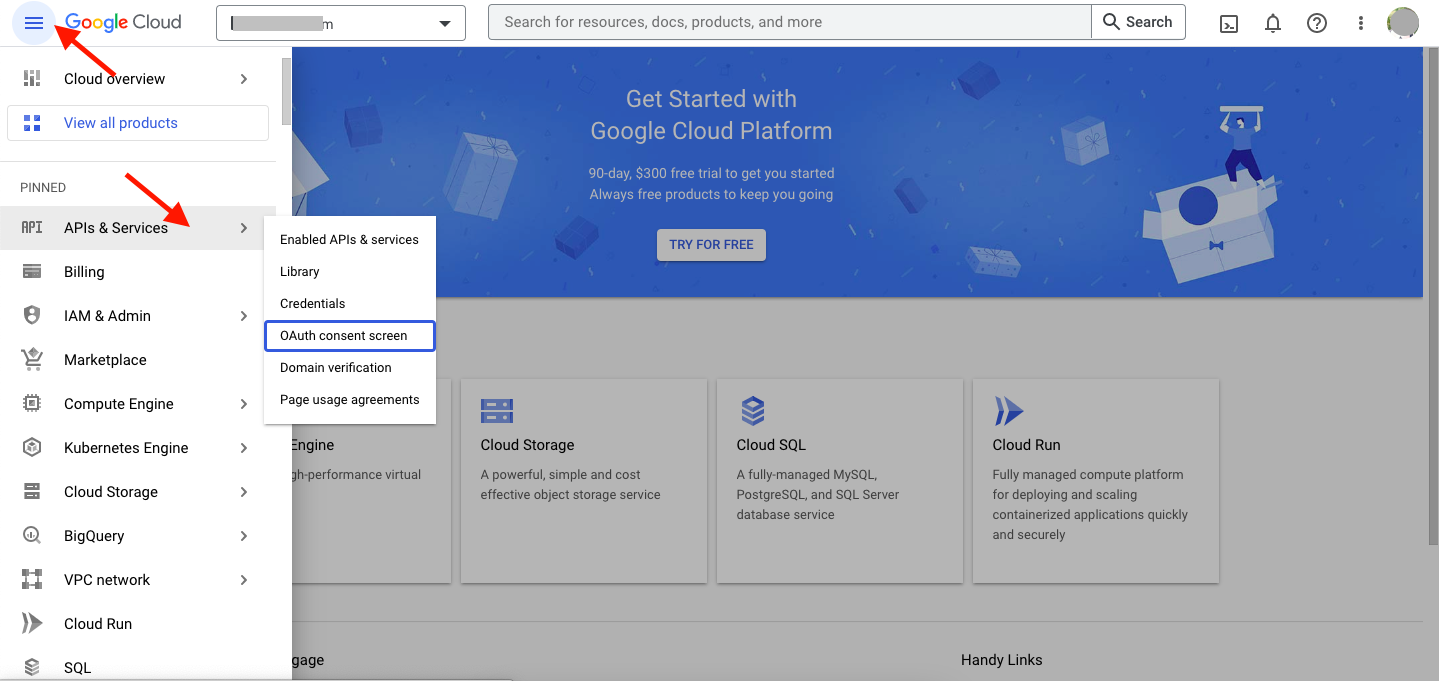
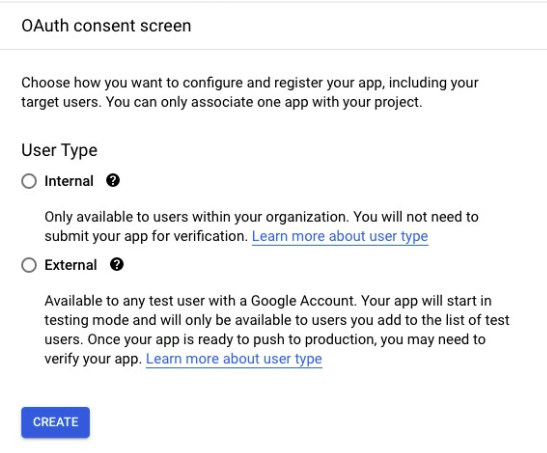
Configure the OAuth (Open Authorization) consent screen which Google will display to the users while connecting their Google account with your site. You should give the details of your website and the policies in the following steps. Once you set this up, Google will show you a summary.
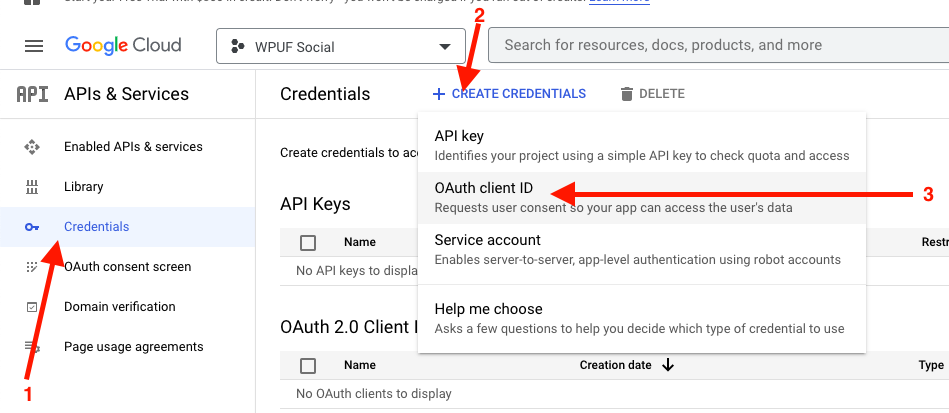
Next up, the Credentials. You should see the menu on the left side. Enter there and click on CREATE CREDENTIALS > OAuth client ID (marked in the image serially).
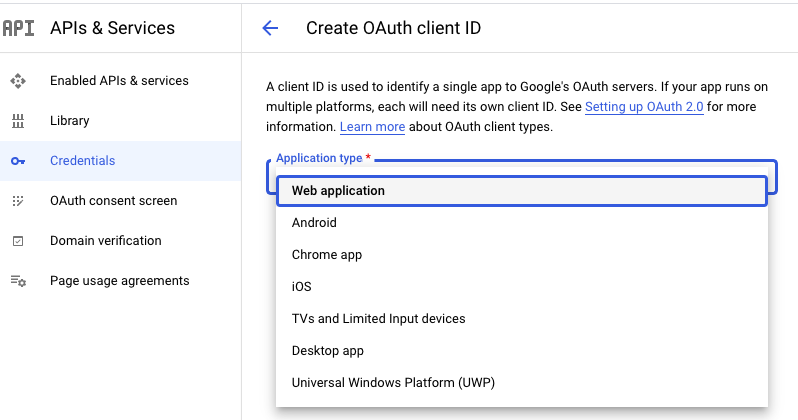
From the dropdown, select the Web application as your Application type. Set a name for it and scroll down all the way to hit the CREATE button.
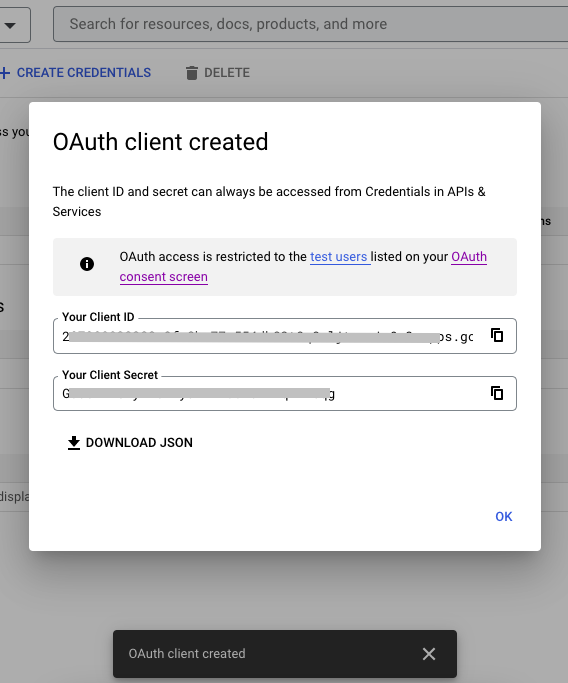
A pop-up will appear with your Client ID and Client Secret. Copy them from here and paste them on the WP User Frontend settings page accordingly.
And this is it. We're good to go with Google Login for your website.
(4) Configuring LinkedIn Login
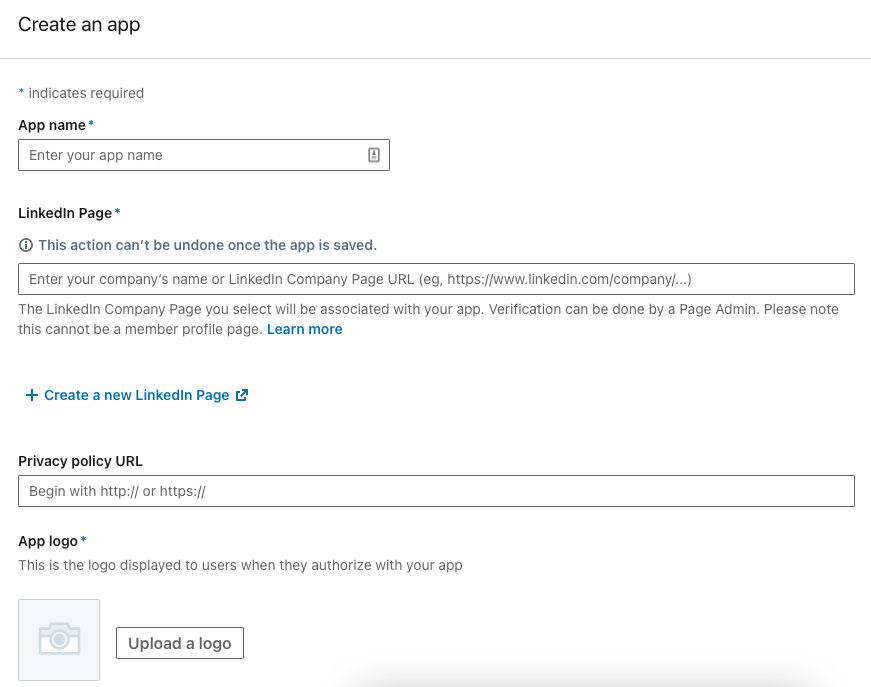
So again, we start from the WP User Frontend settings page. Click on the Create an App link from here, to land on LinkedIn Developers. Like all the other platforms, start with their Create App button.
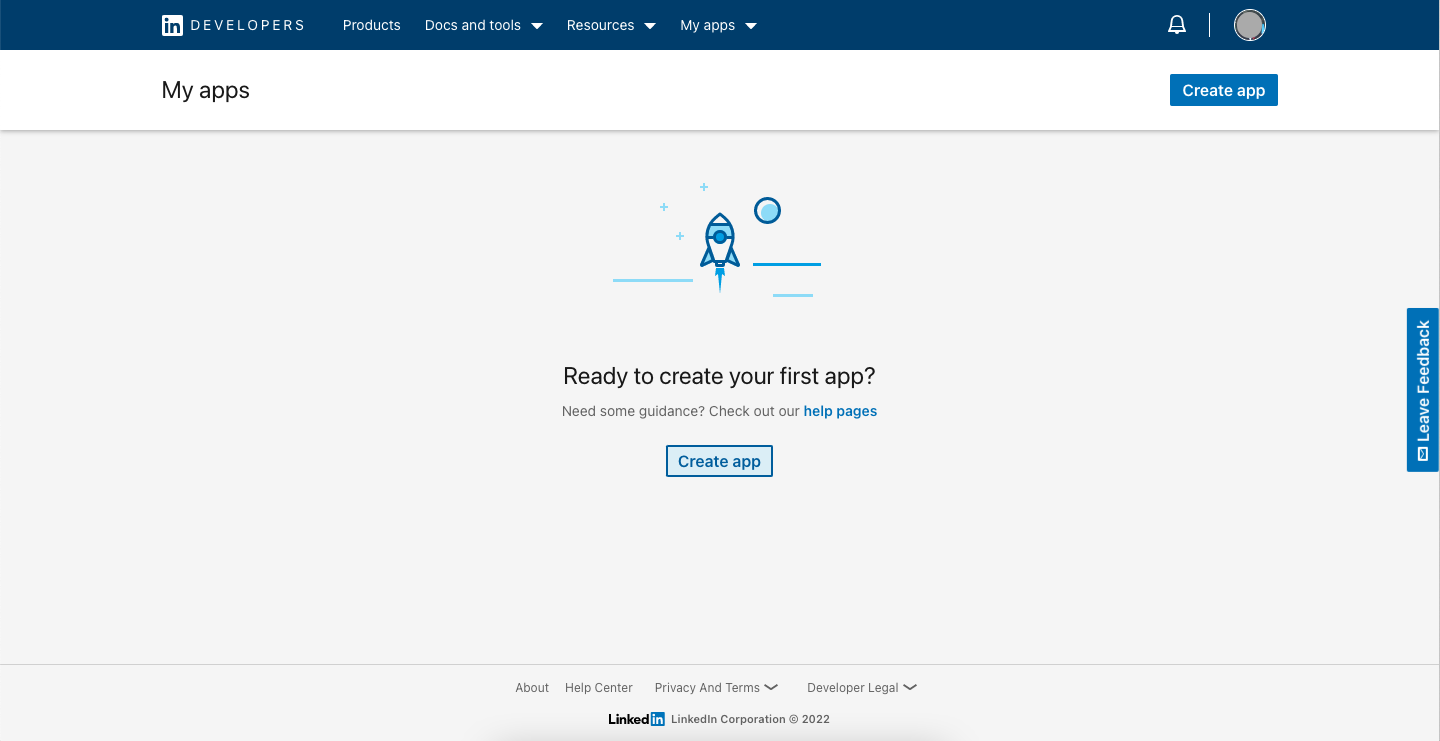
Insert all the information in the required fields. LinkedIn requires an App logo that will show up when users connect their LinkedIn account with your site. So, upload an image file (can be your website logo).
Once done, go to the Auth tab on your LinkedIn Developers dashboard and you'll find the Client ID and Client Secret there.
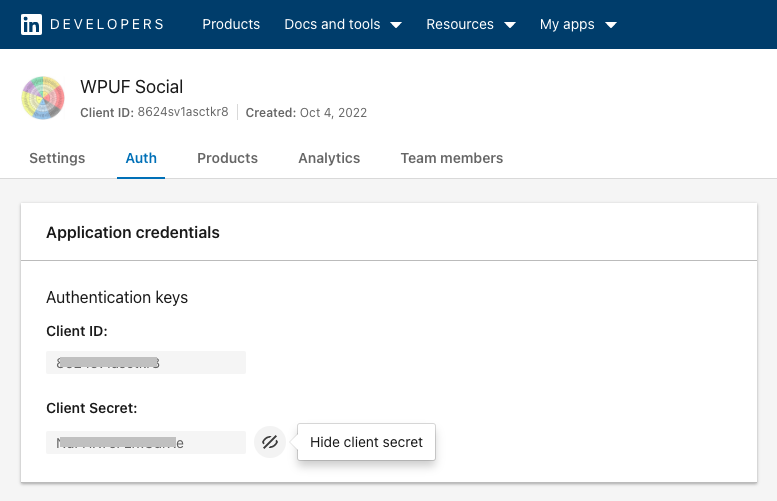
Just like every other time, paste them into the respective fields on the WP User Frontend settings page. And congratulations! You've successfully configured LinkedIn Login for your website now.
Wondering how the login buttons will appear on the front end? Here's a view of the login page with some social login options enabled (you can see the area marked in red).
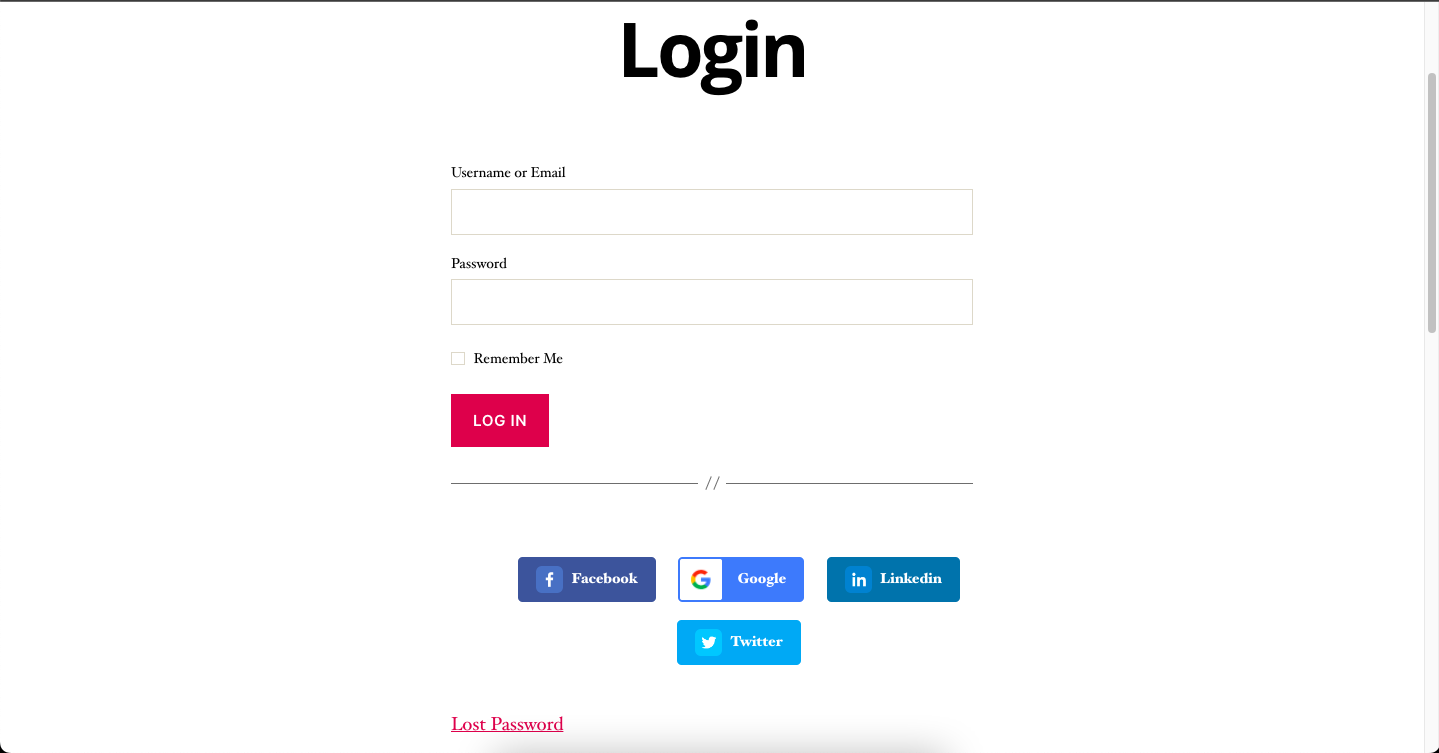
So, if you configured all four platforms we've just shown, you should see something like this on your website login page. Four options are available for users to log in or register to your site.
FAQ on How to Add Social Login to WordPress
Hope you are satisfied with the tutorial covered above. In this section, we'll answer to some additional questions that may poke your minds related to our today's topic – how to add social login to WordPress.
Yes, with WP User Frontend Pro you can enable Twitter, Facebook, Google, LinkedIn, and Instagram on your WordPress site.
There's no fixed rule for this, it's totally up to you. But try not to limit the options. Because everyone may not use the same platform. Or may not be comfortable connecting a specific social channel with your website. Try to understand your audience and provide options accordingly.
Not at all. If you're using any plan of WP User Frontend Pro, you get to enable this without any extra cost.
Closing Up on How to Add Social Login in WordPress
Social media login provides benefits for both you and your website visitors. Yes, there are some known disadvantages as the need to rely on third-party uptime, people may use false information on social media, etc. But we can say this is a nice-to-have feature for modern websites. And it can surely increase user interaction or engagement on your site.
Hope you've got the idea of whether social login is important for your website or not. Or are you using it already? Either way, share your opinion with us about it. It will help us as well as other readers to make more informed decisions on this topic.

