In the Basic configuration for Dokan, you need to set up the plugin and customize the settings per your needs. This includes configuring the payment options, shipping options, necessary Dokan settings, and the overall look and feel of the marketplace.
Here are the settings that we are going to configure in this doc:
- Enable Vendor Registration Form
- Permalink Setup
- Necessary Dokan Settings
- Customizing the Marketplace Layout and Design
- WooCommerce Settings
- Configure Payment Options
- Set up Shipping Options
- Configure Tax Settings
To get started with the basic configuration of Dokan, you will need to have a self-hosted WordPress website, Dokan Lite, a Dokan Pro plugin, WooCommerce, and a payment gateway account.
Once these requirements are met, you can install and activate the Dokan plugin on your website and begin the basic configuration process.
Below is the explanation of each step mentioned above.
Enable Vendor Registration Form
Dokan has integrated the Vendor Registration form with WooCommerce’s Customer Registration form.
By default, the Registration Form is disabled after installing WooCommerce for the first time. So, the form needs to be enabled manually by enabling the “Allow customers to create an account on the “My account” page” option from the WordPress Admin Dashboard > WooCommerce > Settings > Accounts & Privacy screen.
After that, a registration form will appear on the “My Account” page, and users need to select the “I am a vendor” option to register as a vendor on the marketplace.
If you want to create a separate vendor registration form, they can create that using the following shortcode:
[dokan-vendor-registration]That shortcode will create a form like the one below:
Also, if you want to remove the “I am a vendor” option from the My Account page, you can add the following code snippet at the bottom of the child theme’s functions.php file.
remove_action( 'woocommerce_register_form', 'dokan_seller_reg_form_fields' );Note: If you do not have a child theme, you can add the code using Code Snippets plugin.
Permalink Setup
Dokan follows a specific permalink structure for its default pages. If the proper setting is not followed, it will create a 404 error while visiting those pages. To avoid that error, the marketplace/WordPress site permalink should be /%postname%/, and it can be setup from the WP Admin Dashboard > Settings > Permalinks screen.
Necessary Dokan Settings
After installing and activating the Dokan plugin, a Setup Wizard has been triggered by Dokan automatically that contains the necessary settings. If you have skipped that part and want to run again, then hover over the “Question (?)” sign and click on the “Run Setup Wizard” option.
You can read the Dokan Admin Setup Wizard doc for further information.
Setting up Necessary Pages
Dokan has three default pages that are created automatically after activating the plugin. However, if there is any prevention by any plugins/themes, sometimes those pages are not generated automatically.
In that case, those pages may need to be set up manually. You can read the Installed Pages doc contains more information.
Customizing the Marketplace Layout and Design
The layout and design of a marketplace depend on themes. As Dokan is a WordPress plugin based on WooCommerce, you can choose any theme to make a better look and feel for your marketplace. But without proper compatibility, a theme can break the Dokan plugin page’s design. So, using a compatible theme on the site is recommended. Here is a list of themes that advertise their theme to be compatible with the Dokan plugin.
Once you have completed these steps, your marketplace should be set up and ready to use. You can then invite vendors to sign up and start selling on your marketplace.
It’s important to note that basic configuration alone may not be enough to fully utilize the plugin, and further customization or advanced configuration might be needed to get the best performance of the plugin.
WooCommerce Settings
Dokan Multivendor is based on WooCommerce. It comes with several built-in WooCommerce functions, such as Payment, Shipping, and Tax. These are essential features that you need for the smooth operation of your marketplace. So you need to configure these WC settings to use Dokan properly.
If you are creating an online multivendor store using the Dokan plugin, there are a few things to configure in WooCommerce to make your multivendor platform fully functional. In this documentation, we will walk you through the General settings of WooCommerce and describe different sections from it.
To get started, just navigate to the WooCommerce > Settings section from your WP dashboard.
Store Address
You must have already filled in this information while installing WooCommerce. If not, you won’t probably want to leave it empty as this address signifies where your marketplace is located. It also determines default tax rates and customer locations.
General options
- Selling Location(s): In this section, you can choose whether you are selling to all countries or to specific countries. You can also choose multiple countries at once.
- Shipping Location(s): This section lets you select the countries you sell to. You can also disable shipping and all shipping calculations.
- Default Customer Address: This will help the system calculate tax and shipping based on customers’ –
- Shop base address – the customer’s location is the same location as your shop.
- No location by default – leaves location empty, so no taxes are calculated until the customer provides an address.
- Geolocate – finds customer’s current location and calculates taxes accordingly.
- Geolocate with page caching support – same as geolocating, just uses Ajax on top. You may notice your website URLs have a ?v=xxxxx appended to them. This is normal to prevent static caching of prices.
- Enable Taxes: This allows you to enable or disable taxes on your store. Disabling taxes hides the tax settings page.
- Enable Coupons: Enable or disable coupons on your store. Coupons can be applied from the admin edit order screen (for unpaid orders), cart, and checkout pages.
- Enable the use of coupon codes – select to enable the use of coupons in your store.
- Calculate coupon discounts sequentially – changes the coupon calculation logic to apply coupons in sequence on top of one another. When applying multiple coupons, this will apply the first coupon to the full price and the second coupon to the discounted price, and so on.
Currency options
This determines how prices are displayed on the front end.
- Currency: You can choose the default currency for the store, one only.
- Currency Position: Set the default currency position for prices: Left, Right, Left/Right with space
- Thousand Separator: Choose the symbol to use for the thousand separators: 1,000 or 1.000
- Decimal Separator: Choose the symbol to use for the decimal separator: 100.00 or 100,00
- Number of Decimals: Choose how many numbers to display to the right of the decimal when displaying prices: 100.00 or 100
That’s all. You are done setting up the general WooCommerce settings.
Configure Payment Options
When it comes to handling payments for your Dokan-powered multivendor marketplace, you will need to rely on WooCommerce a lot as functionalities related to payments are mostly controlled by WooCommerce.
To configure different payment methods, go to the WooCommerce > Settings > Payments section from your WordPress Admin Dashboard.
You will find all the installed payment gateways here. The payment methods can be dragged and dropped to control the order, which determines how they appear in front of the customer during checkout.
Also, all the payment gateways will appear on this page when a WooCommerce-supported payment gateway plugin is installed and activated on the site.
In this documentation, we will show how the default payment methods work. It is important to note that the default WooCommerce payment methods are offline methods, and all of them are non-adaptive.
What is an Adaptive and Non-Adaptive Payment Method?
Dokan supports two types of payment methods. One is adaptive, and the other is the non-adaptive payment method. If an order is placed using an adaptive payment gateway, the vendor earnings and admin commission will be transferred automatically after that.
On the other hand, if an order is placed using a payment gateway that is non-adaptive, the entire order amount will be transferred to the admin account. Vendors can see the value of their earnings from the Vendor Dashboard > Withdraw screen.
Admin can set a minimum withdrawal limit for submitting a withdrawal request. When a vendor reaches that limit, they can send a withdrawal request to the admin. Then the admin needs to transfer/send that amount to the respective vendor’s account based on the request and mark the request as approved to adjust the vendor dashboard earnings value.
This documentation shows how you can manage vendor withdrawal requests manually.
Direct Bank Transfer
Direct Bank Transfer, also known as Bank Account Clearing System (BACS), is a payment gateway that does not require any online payment to be made during the checkout process.
When customers choose to pay using Direct Bank Transfer, their orders are put On Hold until payment clears outside the website.
As the owner of the site or marketplace, it is crucial to ensure that payments have been successfully cleared from the bank accounts before processing orders in WooCommerce. This verification step is necessary to guarantee that you receive the payment before shipping an order and marking it as Processing or Complete.
To enable this payment method –
- Navigate to the WP Admin Dashboard > WooCommerce > Settings > Payments screen.
- Click the Finish Set Up button to configure/setup the Direct Bank Transfer payment method.
- Configure your settings:
- Enable/Disable – Enable to use; Disable to turn off
- Title – Choose the title shown to customers during checkout
- Description –This will be visible to customers when they choose Direct Bank Transfer
- Instructions – Explain how to make payment to your bank account(s)
- Account Details – Enter the account name and number, bank name, routing number, IBAN, and/or SWIFT/BIC numbers shown to customers on the Order Received page and in Order emails after checking out.
Lastly, Save the Changes.
Note: Bank account details will show on both the Order Received page and the order email sent to the customer.
Order Received page:
This information is also added to the email that is sent to the customer once the order has been received.
Check Payments
Check Payments is a payment gateway that does not involve making online payments. When customers choose this option, their orders are put On Hold until the cheque payment clears outside the website.
As the owner of the site or marketplace, it is imperative to ensure that the cheques have been cleared before processing orders in WooCommerce. It is essential to verify that you have received the payment before shipping an order and marking it as Complete.
To enable this payment method –
- Navigate to the WP Admin Dashboard > WooCommerce > Settings > Payments screen.
- Click the Finish Set Up button to configure/set up the Check Payments payment method.
- Configure your settings:
- Enable/Disable – Enable to use; Disable to turn off
- Title – Choose the title shown to customers during checkout
- Description –Add info shown to customers if they choose Check
- Instructions – Explain how to pay by Check
- Save changes
Cash on Delivery
Cash on Delivery (COD) is another payment method that does not involve online transactions. When customers choose this option, their orders are initially set to Processing.
Upon delivery, the payment is collected, and once received, the order status needs to be manually updated to Completed.
To enable this payment method –
- Navigate to the WP Admin Dashboard > WooCommerce > Settings > Payments screen.
- Click the Finish Set Up button to configure/setup the Check Payments payment method.
- Configure your settings:
- Enable COD – Enable to use. Disable turning off
- Title – Choose the title shown to customers during checkout
- Description –Add info shown to customers if they choose Cash on Delivery
- Instructions – Explain how to pay via Cash on Delivery
- Enable for shipping methods – Choose which shipping methods and rates will offer Cash on Delivery
- Accept for virtual orders – Tick box to allow COD for virtual products (e.g. orders of a product that is virtual or downloadable)
- Hit Save changes, and you are done!
Adaptive Payment Gateways
If you use an adaptive payment gateway, the money will be split between you (the admin) and your vendors automatically after the payment for an order is done by the customer. The adaptive payment gateways are available as modules with the premium plans of the Dokan plugin. You can find more information in the following documentation:
- Dokan Stripe Connect
- Dokan Stripe Express
- Dokan PayPal Marketplace
- Dokan Mangopay
- Dokan Razorpay
- Dokan Wirecard Connect
Conversely, if you use any of the payment gateways as described above (Direct Bank Transfer, Check Payments, & Cash On Delivery) or any other WooCommerce-supported payment gateways, it will work as a non-adaptive method.
Exception Case
However, there is an exception for the “Cash On Delivery” payment method. It is a bit tricky for marketplaces. Because the payment will be collected by the delivering party. If the admin is delivering the products to the end customer, everything is fine. The admin can keep his commission and send the vendor the rest of the money after delivering an order.
The problem comes when vendors deliver orders. They will collect the whole amount of an order. So, how can an admin collect their commission? To solve this problem, Dokan brought the Reverse Withdrawal feature. You can read about the feature from the Reverse Withdrawal documentation.
Set up Shipping Options
Shipping options configuration is also an essential part of running a marketplace. Here we are going to show you two types of shipping configurations- WooCommerce Shipping and Dokan Shipping
WooCommerce Shipping
The shipping functionality is being handled by WooCommerce. So you are free to use any WooCommerce compatible payment gateways with Dokan. WooCommerce already has some built in shipping gateways, these can only be configured by the admin and will work for each vendor. The vendors will not be able to configure any shipping charges if you use any shipping gateway other than Dokan Shipping.
To know more about how WooCommerce shipping gateway works and how to configure them, please read their official documentation.
You need the Dokan Premium version to activate this feature.
Dokan Shipping
Dokan plugin has the most advanced feature to enable the sellers to add shipping costs from the frontend. Using this feature is optional. If you do not like this feature and want to use the old school WooCommerce shipping classes, then no action is required.
The state based shipping option of Dokan plugin can be found on wp-admin → WooCommerce → Settings → Shipping → Dokan Shipping.

Click on the enable checkbox and hit save. If you want to apply taxes on then you can select taxable else you can select none.
Please refer to the new Dokan Zone-based Shipping Documentation to figure out the next steps.
The job of the admin is finished here. Now the next job is to the sellers.
Configure Tax Settings
Dokan uses WooCommerce’s built-in Tax system that allows marketplace owner/site admin to configure taxes from the backend. These will be applied to all vendors’ products according to tax classes, but vendors are unable to set up taxes from the Vendor Dashboard like the admin.
The Dokan Support Team is available to assist you with configuring tax rates in the WooCommerce settings and explaining how the platform handles taxes, VAT, or GST based on those settings. However, please note that we cannot determine when or what you should charge in terms of taxes.
As we are not tax experts, our guidance is limited to advising you on the usage of our plugin. For specific advice on tax collection, VAT, GST, and similar matters, we highly recommend consulting a tax advisor or accountant who can provide tailored guidance based on your specific requirements.
Since each business is unique, it is not possible for us to cover all possible scenarios and circumstances.
Admin Configuration:
Navigate to WP Admin > WooCommerce > Settings > General screen. From there, check the Enable Taxes box and hit the Save Changes button.
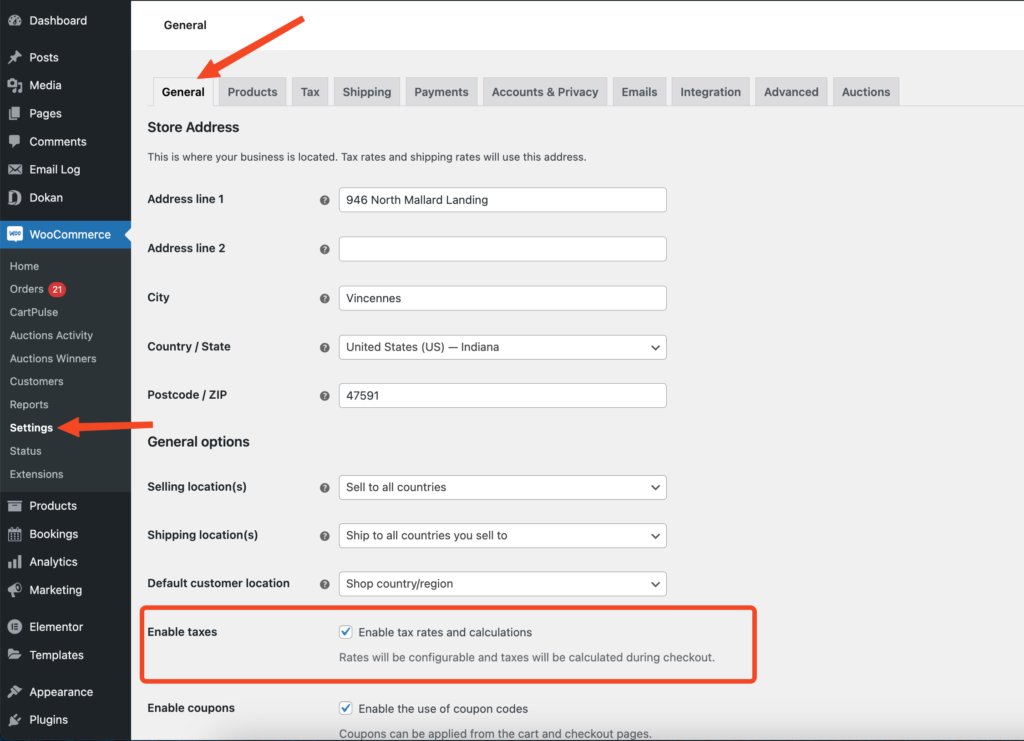
This will open up a new tab in the Settings screen, named Tax.
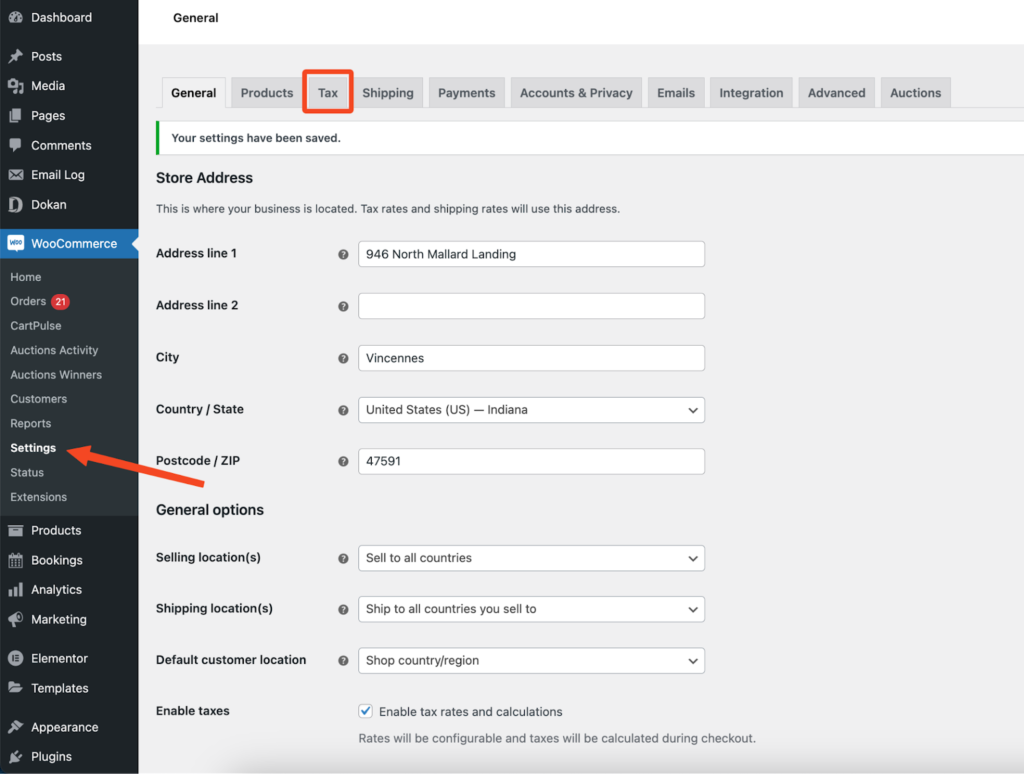
Click on the Tax tab and you will find some general settings. According to your requirements, you can configure the tax settings.
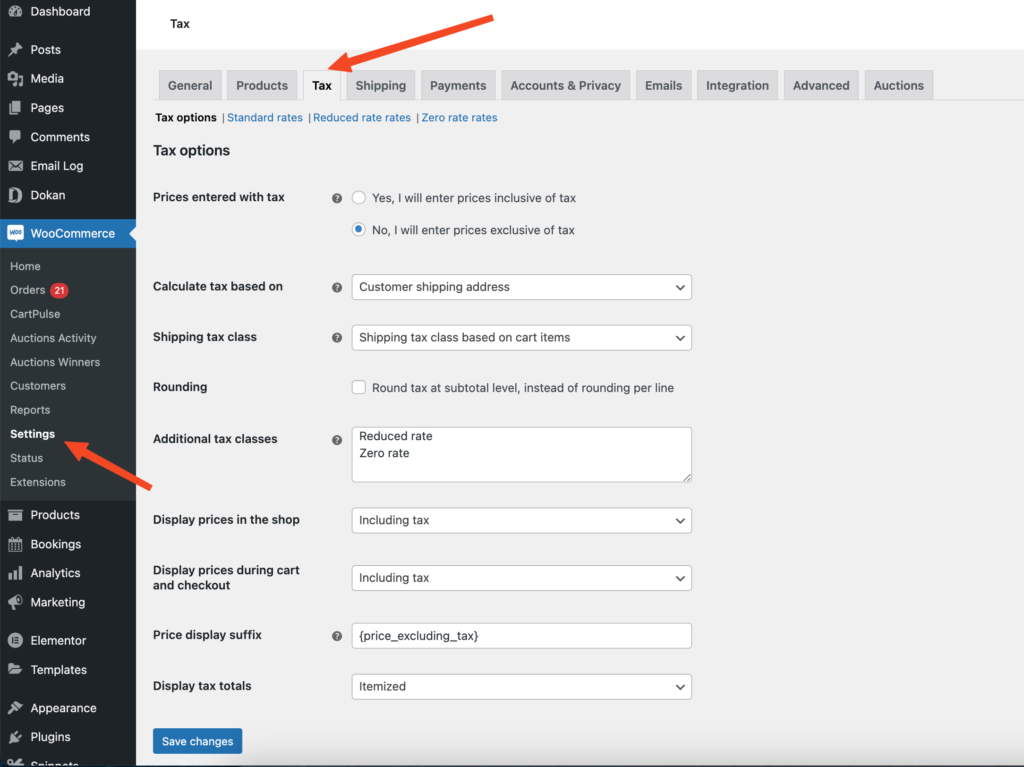
Prices entered with tax:
This particular setting holds significant importance in the tax management of your marketplace, as it directly impacts how you input product prices in the future.
- Selecting the option “Yes, I will enter prices inclusive of tax” implies that all product prices will be entered using the base tax rate of your marketplace.
- As an illustration, let’s consider the scenario in the US (United States). When you select the option to enter prices inclusive of tax, you would input prices with the 20% tax rate already included. For instance, if you enter a product price of $9.99, it would already encompass $1.67 in tax. Consequently, a customer in the US (United States) would pay the defined amount of $9.99, while a customer in the DE (Germany), being outside the tax zone, would only pay $8.32.
- As an illustration, let’s consider the scenario in the US (United States). When you select the option to enter prices inclusive of tax, you would input prices with the 20% tax rate already included. For instance, if you enter a product price of $9.99, it would already encompass $1.67 in tax. Consequently, a customer in the US (United States) would pay the defined amount of $9.99, while a customer in the DE (Germany), being outside the tax zone, would only pay $8.32.
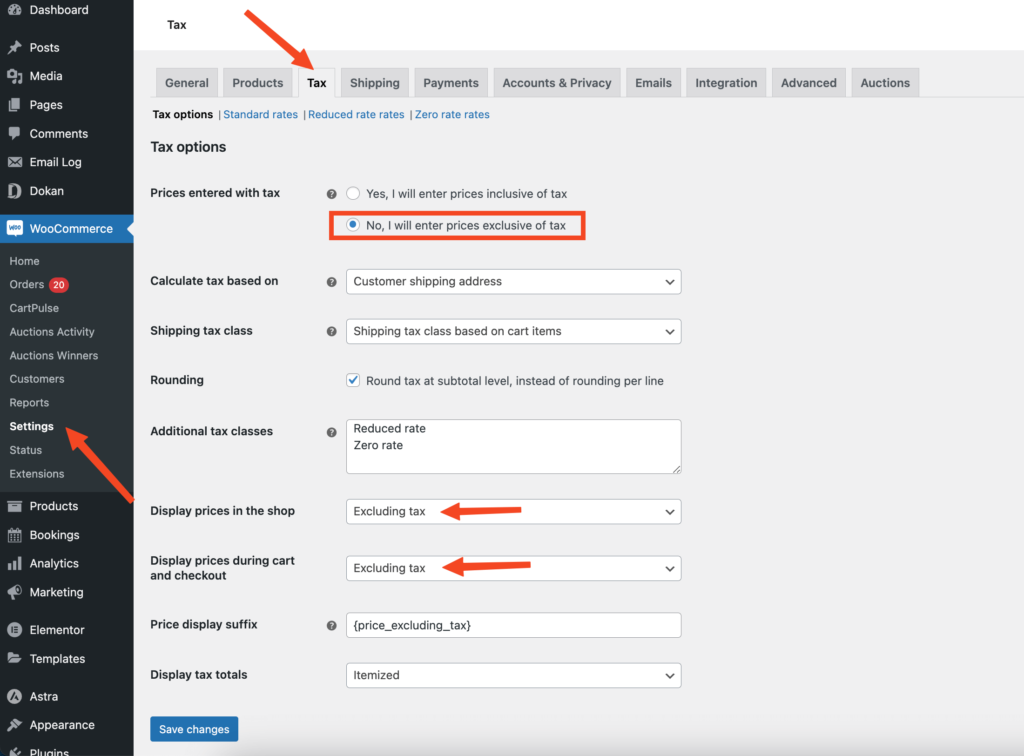
- Opting for “No, I will enter prices exclusive of tax” signifies that your product prices should be entered without including the tax amount.
- Referring to the previous example, a shop based in the US (United States) would enter $8.32 as the product price. During the checkout process, a tax rate of 20% would be added on top of this base price, resulting in a total payable amount of $9.99.
The tax calculation for tax-inclusive prices is:
tax_amount = price – ( price / ( ( tax_rate_% / 100 ) + 1 ) )
The tax calculation for tax-exclusive prices is:
tax_amount = price * ( tax_rate_% / 100 )
Calculate Tax Based On
This setting determines the address used for tax calculations, and you have the following options to choose from:
- Customer billing address
- Customer shipping address (default)
- Store base address
If you select the “Store base address” option, taxes will always be calculated based on your marketplace location, which is configured in the WP Admin > WooCommerce > Settings > General screen. It will not take into account your customer’s location for tax calculation purposes.
Shipping tax class
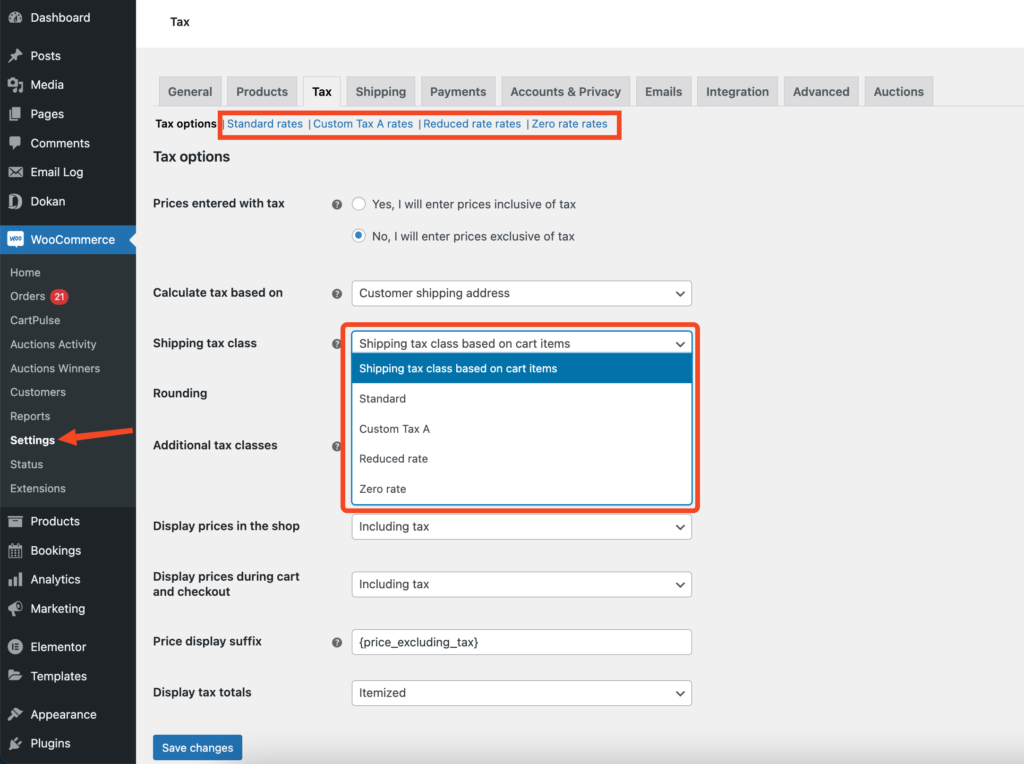
In the majority of setups, the tax class for shipping is determined by inheriting it from the item being shipped. If you prefer the shipping tax to be calculated based on a specific tax class, you have the option to select it or leave it as is. By default, the shipping tax is calculated based on the items in the cart.
If there are multiple items in the cart, the highest tax class assigned to any of the items will be applied to the shipping tax calculation.
Let’s consider an example where there are three items: A (with a 20% tax rate), B (with a 10% tax rate), and C (with a 5% tax rate). If item A has the highest tax class among them, then the shipping tax will be applied at the rate of 20%.
Rounding
Enabling the option to “Round tax at the subtotal level, instead of per line,” means that the rounding calculation will be applied to the overall subtotal. It is important to refer to your tax jurisdiction to determine if this method of rounding is applicable.
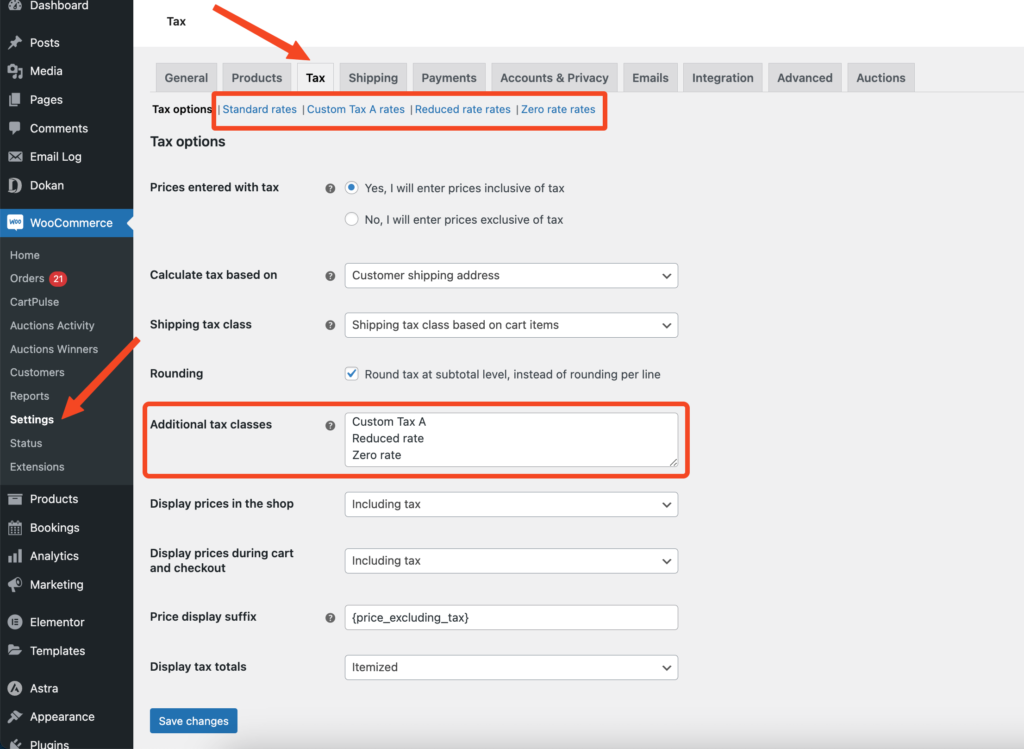
Additional Tax Classes
You have the flexibility to include additional tax classes based on your specific requirements. By default, two tax classes named “Reduced rate” and “Zero rate” are already included. These tax classes can be assigned to your products accordingly.
By default, the “Standard Tax Class” is assigned to products if the Tax Status is enabled or set to “Taxable” at the product level. If you sell goods that fall under a different tax class (such as products that are taxable except for zero-rated products), you can add those classes here. Additionally, you can assign tax rates to the available additional tax classes. Each class is listed at the top of the tax settings page, allowing you to click on a class to view the tax rates associated with it.
Display Prices in the Shop
This setting determines the way prices are presented in your shop/catalog. You can choose between “Including tax” or “Excluding tax.”
If you enter prices without tax, we recommend selecting the “Excluding Tax” option. On the other hand, if you input prices that already include tax, we suggest choosing the “Including Tax” option.
Display Prices During Cart and Checkout
This option controls the display of prices on your cart and checkout pages, operating independently from your catalog prices. You have the choice between displaying prices inclusive of tax or exclusive of tax.
Note: To ensure accurate tax calculations when using a tax table that distinguishes between different locations, it is necessary to complete the address field. By providing the relevant address information, you enable the system to perform precise tax calculations based on the specified location.
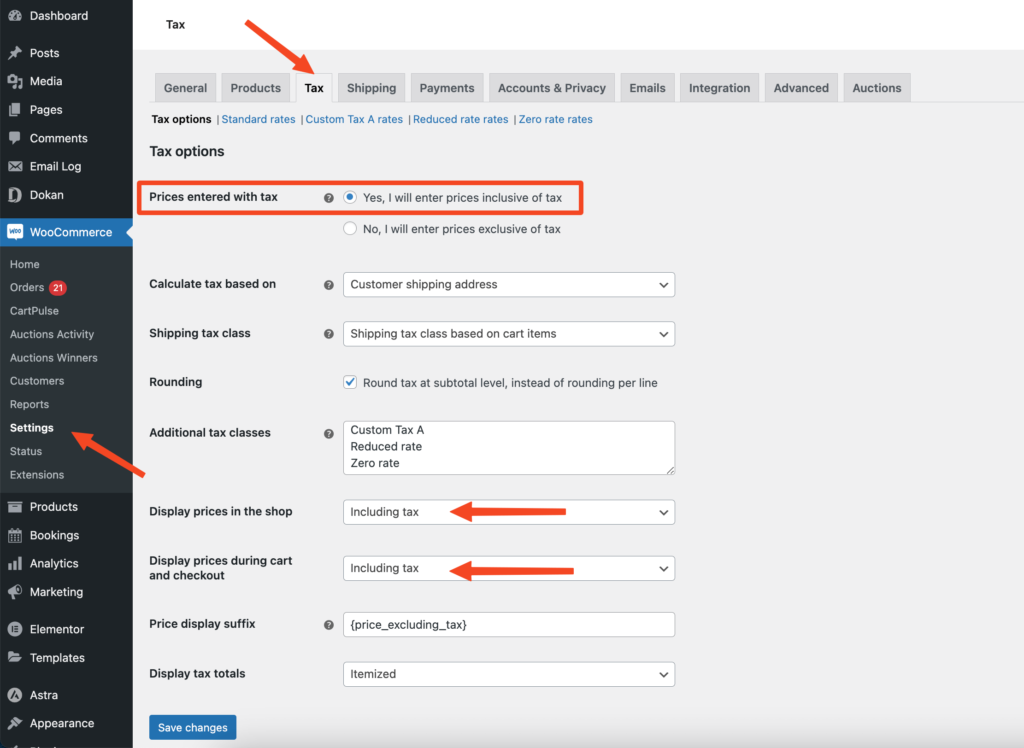
Settings when prices is Including tax.
Customers may see an off-by-one rounding error if these settings are not consistent for a particular combination of product prices and tax rates. This occurs when the calculated price (whether including taxes or not) has more decimal precision than the shop allows for display, and as a result, prices are rounded.
Price Display Suffix
This option allows you to customize the display format to your preference, such as “Prices include __% tax/VAT” or any suitable text for your store. You can utilize two placeholders to incorporate additional text after the price:
- {price_including_tax}
- {price_excluding_tax}
For instance, if you wish to display “Price incl. VAT: {price_including_tax}”, it will be rendered as “Price incl. VAT: $15” (assuming $15 is the price). By employing these placeholders, you can provide supplementary information about how the price appears when taxes are included or excluded, offering clarity to customers.
Display Tax Totals
This setting determines whether multiple taxes are presented as a single total or as an itemized list during the checkout process.
Setting up tax rates
Tax classes are listed at the top of the tax screen. You can click on a tax class to view the associated tax rates.
Within the tax rates table, you have the ability to define tax rates, with each rate represented in its own row. To begin, click on “Insert Row” to add a new tax rate entry.
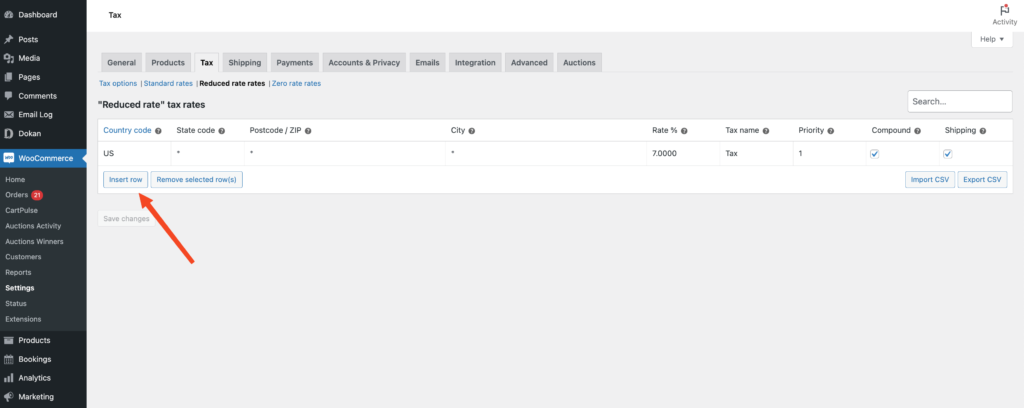
The wildcard character (*) is used to signify “apply to any.” This means that the rule or condition will be applied regardless of the specific value entered in that particular field. However, if you choose to replace the wildcard character with a specific value, the customer will need to enter an exact match for the condition to be met. For example, if you set “Cape Town” as the city but a customer types “Capetown,” it will not be considered a match, and the corresponding tax rate will not apply to their address.
Every tax rate possesses the following attributes:
- Country Code – The 2-digit country code is used to specify the rate for a particular country. For example, “US” represents the United States. Alternatively, leaving the field blank (*) applies the rate to all countries.
- State Code – The 2-digit state code is used to indicate the rate for a specific state. For instance, in the case of the United States, a 2-digit abbreviation such as “NY” represents New York. Conversely, leaving the field blank (*) applies the rate to all states.
- ZIP/Postcode – Enter postcodes for the rate. You may separate multiple values with a semi-colon (;), use wildcards to match several postcodes (e.g. PE* would match all postcodes starting with PE) and use numeric ranges (e.g. 2000…3000). Leave blank (*) to apply to all postcodes.
- City – Semi-colon separated list of cities for the rate. Leave blank (*) to apply to all cities.
- Rate % – Enter the tax rate, for example, 20.000 for a tax rate of 20%.
- Tax Name – Name your tax, e.g. VAT
- Priority – Select a priority for this tax rate. Keep in mind that only one matching rate per priority will be utilized. If you wish to define multiple tax rates for a single area, you need to assign a different priority to each rate.
- Compound – If this rate is intended to be compound, meaning it is applied on top of all previous taxes, please check the corresponding box.
- Shipping – If this rate should be applied to shipping as well, please check the respective box.
Importing and exporting rates
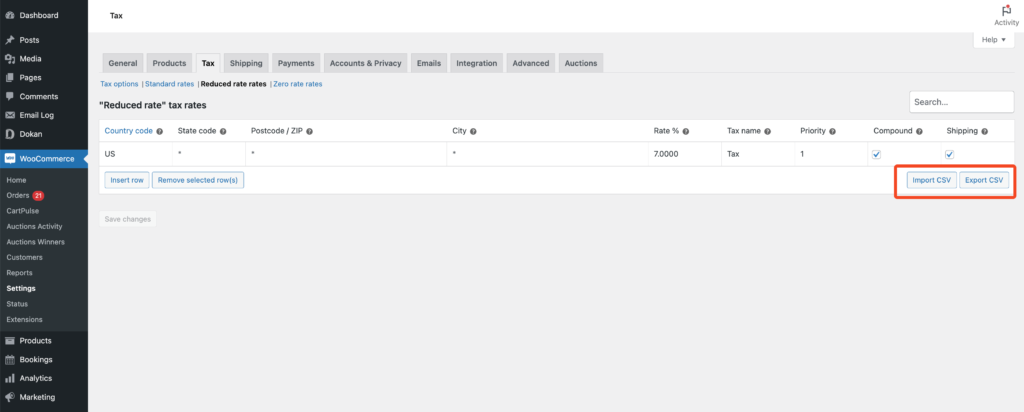
Below the table containing the tax rates, you will find both an “Import CSV” button and an “Export CSV” button. These buttons allow you to import tax rates from a CSV file or export the existing tax rates to a CSV file, respectively.
Vendor Configuration
Once you have finished configuring your tax settings, the Dokan tax class will be included among the other tax classes on the product edit form.
To access this, navigate to the Vendor Dashboard and go to the Products screen. From there, select the Edit option for the desired product. In the Shipping and Tax tab, you will find the tax rates displayed, including the Dokan tax class.
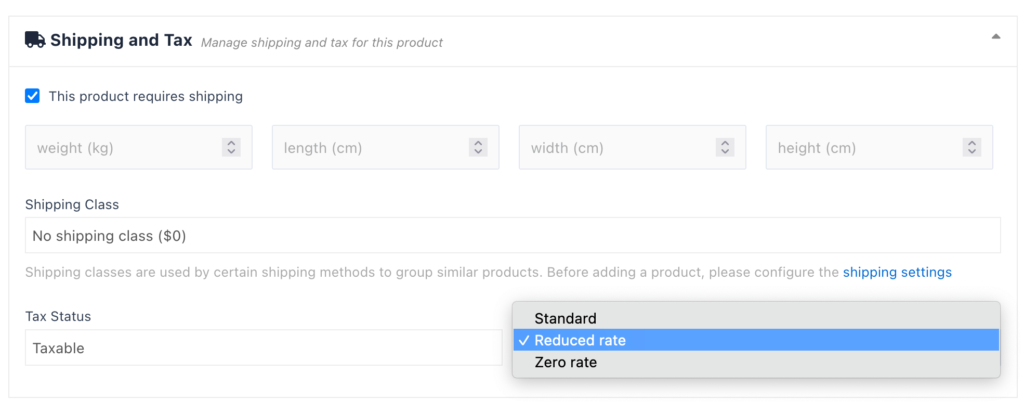
The vendor simply needs to choose the appropriate tax classes from the drop-down menu and click on the Save Product button. Once saved, the selected taxes will be automatically applied to the checkout page for that specific product.