

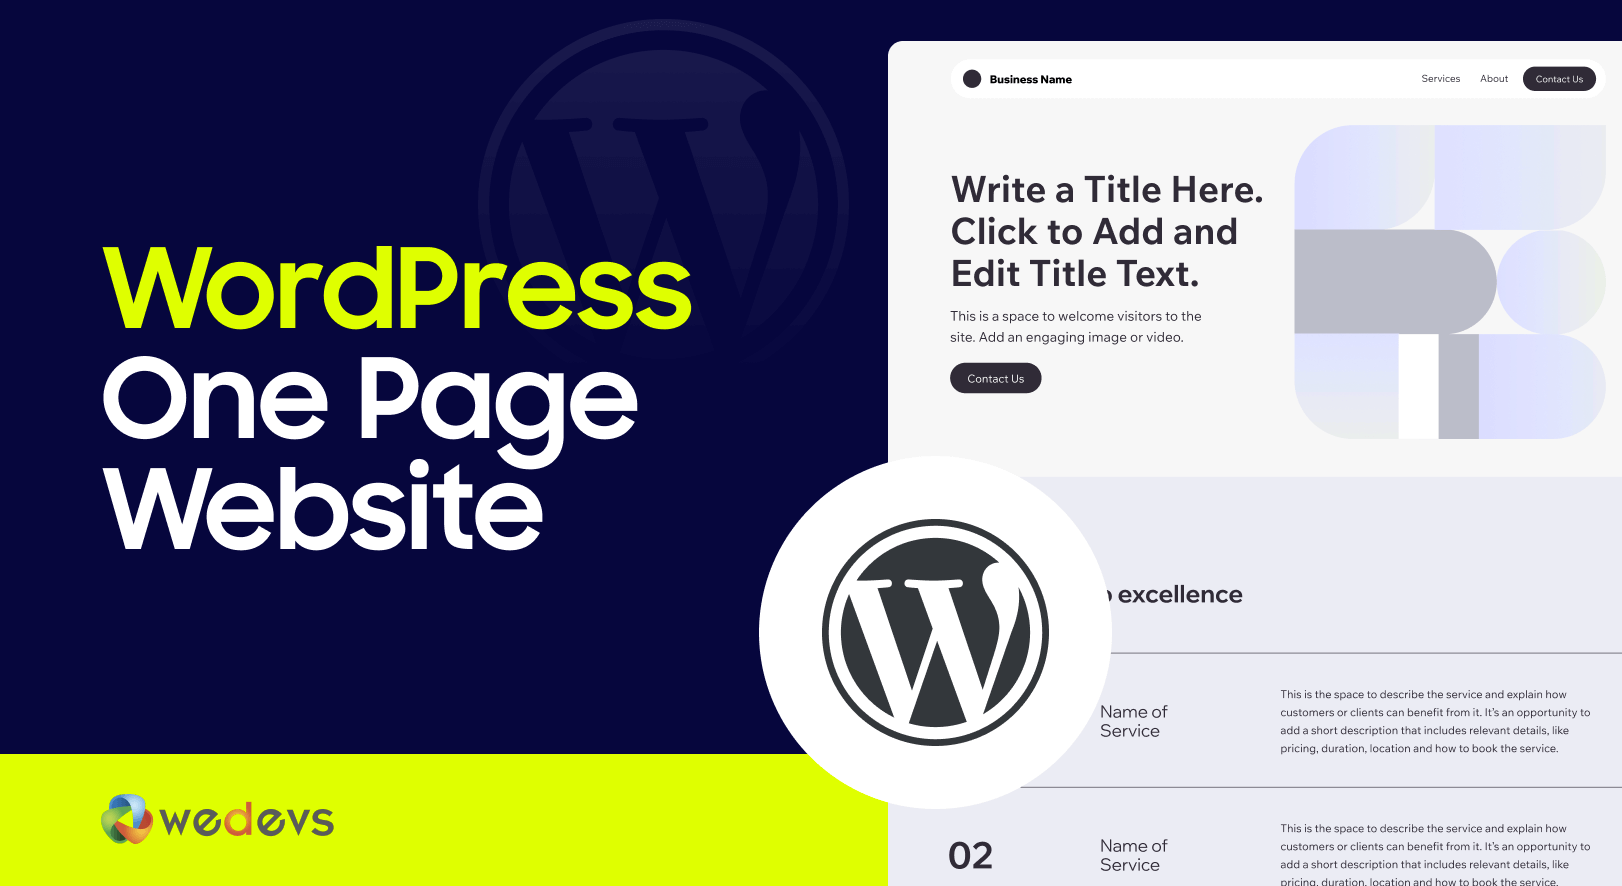
How to Create a One Page Website on WordPress – 7 Easy Steps
Not every website needs to have tons of pages. Sometimes, one is enough. Especially when you want to keep things clean and simple.
A one page website is perfect for portfolios, landing pages, small businesses, or personal brands. It puts everything in one place. No clicking around. No getting lost. Just scroll and done.
In this guide, we'll show you how to create a one page website on WordPress. Step by step. No coding. No fuss. Let’s get started!
What is a One Page Website?
Let's imagine you land on a website and don’t have to click around to find what you need. Everything you’re looking for is right there, all on one page. That’s what a one-page website is.
It’s a site where all the content, like your About section, Services, Contact details, and anything else, fits neatly on one long, scrollable page. No need to jump between different pages. You just scroll down, and everything’s laid out for you in one continuous flow.
It’s kind of like reading through a magazine, but online. Everything is right there, easy to find, and you get the full story in one go. This setup is perfect for personal portfolios, small businesses, or even event pages that don’t need a ton of complex sections.
Why You Should Create a One Page Website
When you're visiting a one page website, you'll like it. Because you'll find everything in one place without clicking through endless menus. That’s the beauty of a one-page website. It keeps things simple, direct, and engaging.
Let us show you a few reasons why you should create a one page website:

I. Easy for Visitors to Navigate
Nobody likes getting lost in a website. With a one-page design, everything is in one place. Visitors don’t have to jump between different pages to find information.
They just scroll down and get a smooth, uninterrupted experience. This makes it easier for them to understand your message without distractions.
II. Loads Faster, Keeps Users Engaged
A slow website can make visitors leave before they even see your content. Since a one-page website has fewer elements to load, it’s much faster than a traditional multi-page site. Faster load times improve the user experience and also help with SEO, as search engines prefer speedier sites.
III. Works Great on Mobile Devices
Most people browse websites on their phones. Clicking tiny links and waiting for pages to load can be frustrating.
A one-page site solves this problem by allowing users to scroll effortlessly, which makes it a better experience for mobile visitors. Plus, Google favors mobile-friendly websites, which can help you rank higher in search results.
IV. Tells a Better Story
A one-page website lets you guide visitors through a structured journey. Instead of making them figure out where to go next, you control the flow. Y
ou can start with an introduction, showcase your services or products, and end with a strong call-to-action – all in a smooth, logical order. This makes it easier to connect with your audience.
V. Easier to Manage and Update
With a multi-page website, you have to update different sections separately, which can be time-consuming. A one-page site is much simpler.
If you need to change something, you just edit one page. This is especially helpful for small businesses, freelancers, or event pages that don’t need a lot of extra content.
How to Create a One Page Website on WordPress – 7 Easy Steps
Building a one-page website in WordPress is easier than you might think. You don’t need to be a coding expert or a web designer. With the right tools and a simple step-by-step approach, you can create a stunning one-page site in no time.
Let’s break it down into seven easy steps:
- Buy a Domain and Hosting Plan
- Install WordPress
- Choose a Theme
- Install a Page Builder
- Add and Customize Required Sections
- Optimize Your Site for SEO and Security
- Publish Your One Page Website
Now, let's get into the details!
Step 01 – Buy a Domain and Hosting Plan
Before you start building your website, you need two things: a domain name and a hosting plan.
- Domain Name – This is your website’s address (e.g., yourwebsite.com). Choose a name that is short, easy to remember, and relevant to your business or brand.
- Hosting Plan – This is where your website’s files will be stored. A good hosting provider ensures your site loads quickly and stays online without issues.
When choosing a hosting provider, look for:
- Fast performance
- Reliable uptime
- Easy WordPress installation
- Good customer support
Some popular hosting options are SiteGround, Bluehost, and Hostinger. Most of these providers offer domain registration along with hosting, so you can get everything in one place.
Once you purchase your domain and hosting, you’ll get login details for your hosting dashboard. Keep them safe, as you’ll need them for the next steps.
Step 02 – Install WordPress
Once you have your domain and hosting ready, the next step is to install WordPress. Most hosting providers offer a quick and easy way to do this.
How to Install WordPress:
- Log into Your Hosting Dashboard – Your hosting provider will give you access to a control panel (like cPanel or a custom dashboard).
- Find the WordPress Installer – Look for an option like “One-Click WordPress Install” or “WordPress Installer.”
- Choose Your Domain – Select the domain where you want to install WordPress.
- Set Up Login Details – Create a username and password for your WordPress admin panel.
- Complete the Installation – Click “Install” and wait a few seconds. Once it’s done, you’ll get a link to log into your website.
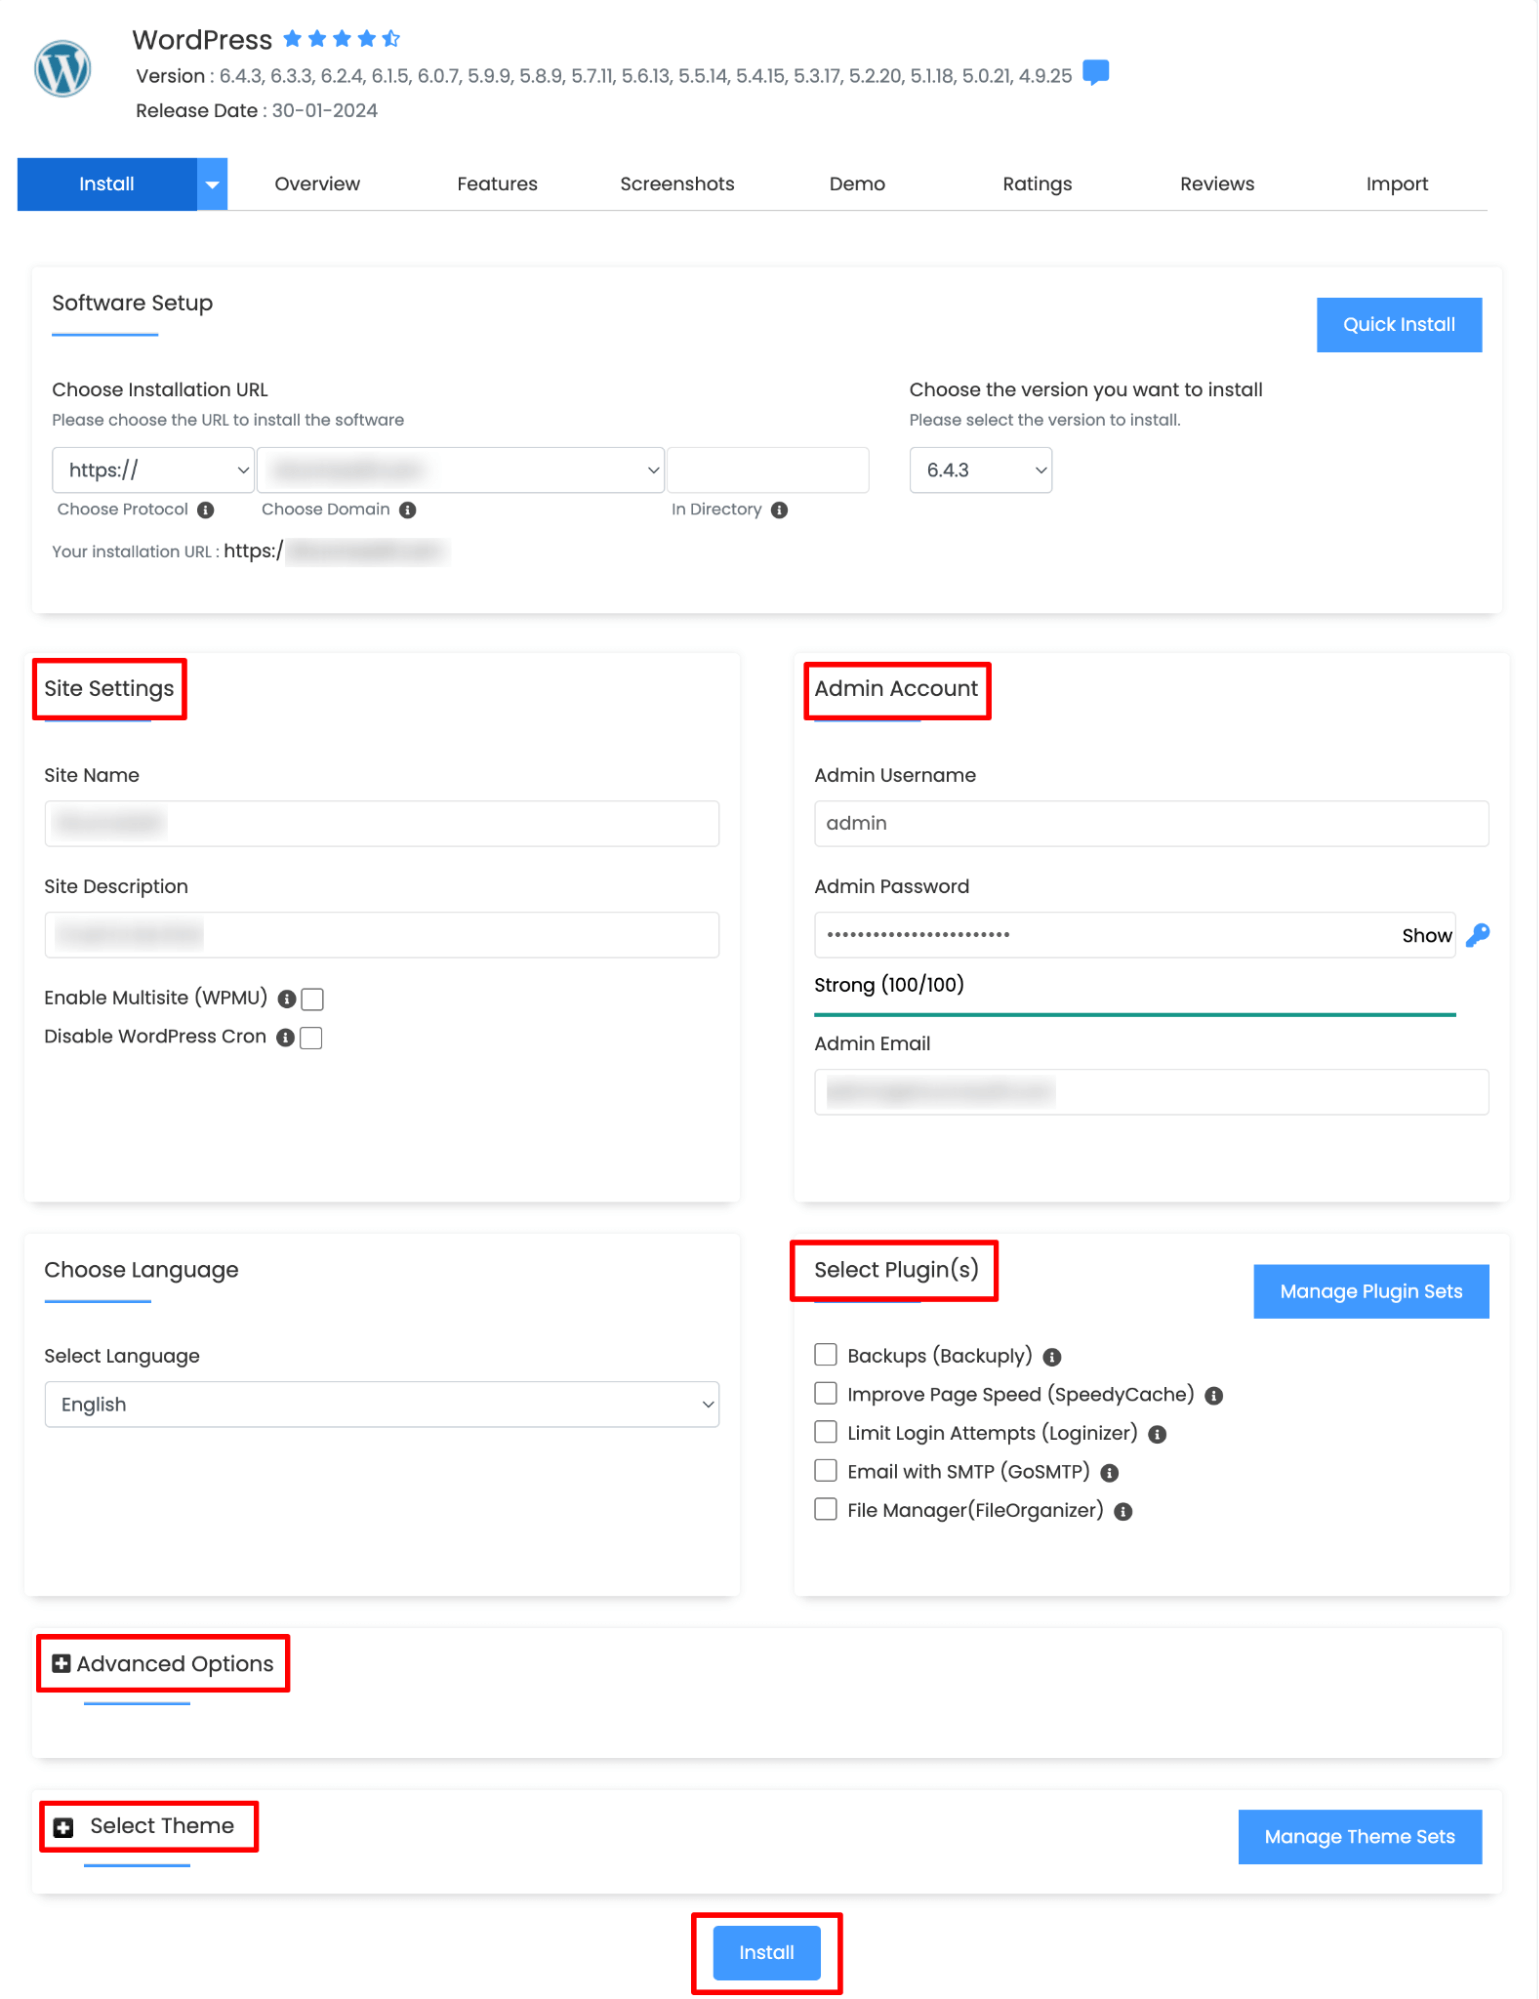
Your WordPress site is now live! You can access your dashboard by going to yourwebsite.com/wp-admin and logging in with the details you set up.
Now, it’s time to pick a theme to give your website a great look. Ready for the next step?
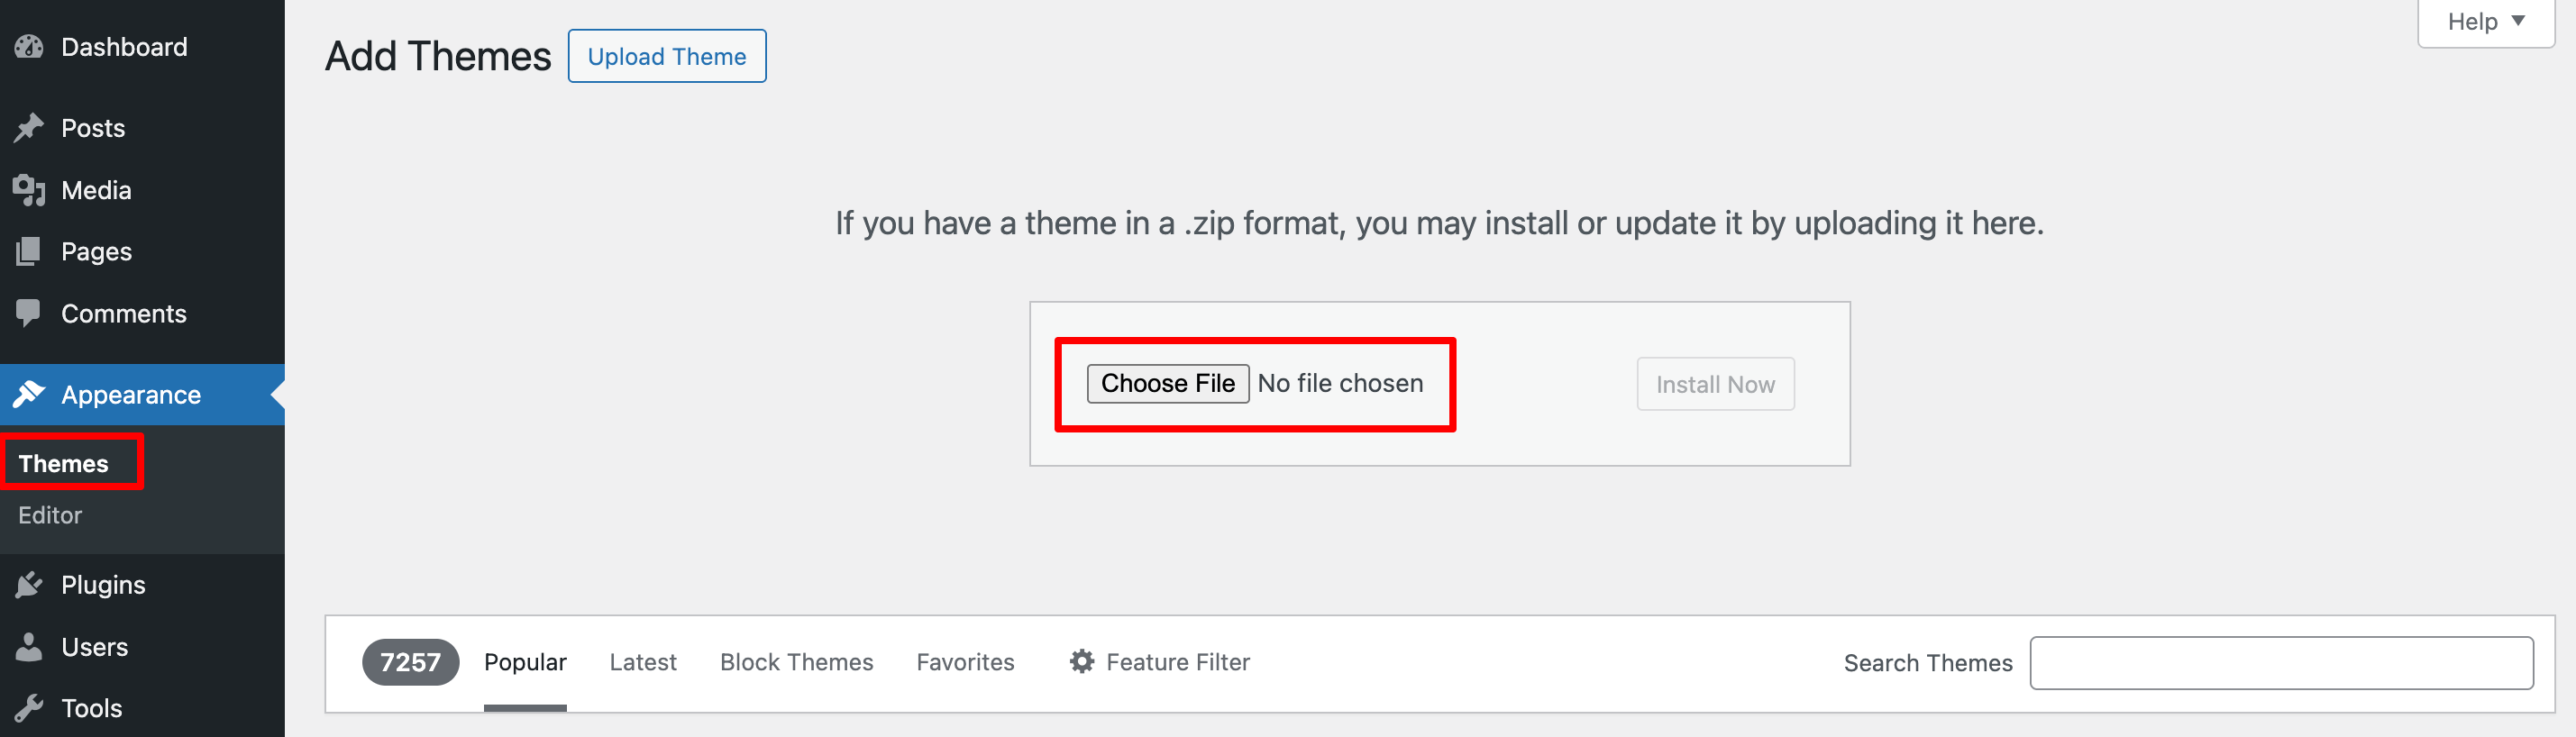
Step 03 – Choose a Theme
Now that WordPress is installed, it’s time to pick a theme. A theme controls how your website looks and feels. Since you’re creating a one-page website, you need a theme that supports smooth scrolling and a clean layout.
How to Choose the Right Theme for a One Page Website:
- Look for One-Page Themes – Some WordPress themes are designed specifically for one-page websites. These often come with built-in sections for services, about, contact, and more.
- Check for Page Builder Compatibility – If you plan to customize your site easily, choose a theme that works well with page builders like Elementor or WPBakery.
- Make Sure It’s Responsive – Your website should look great on all devices, including mobile phones and tablets.
- Consider Speed and SEO – A lightweight theme helps your site load faster, which improves both user experience and SEO.
Recommended One-Page Themes
- Astra – Fast, lightweight, and works well with page builders.
- OceanWP – Highly customizable and mobile-friendly.
- GeneratePress – A stylish WordPress theme with a modern look.
Once you’ve picked a theme, install and activate it from your WordPress dashboard under Appearance > Themes.
Now, let’s move on to the next step – installing a page builder to start designing your site. Ready?
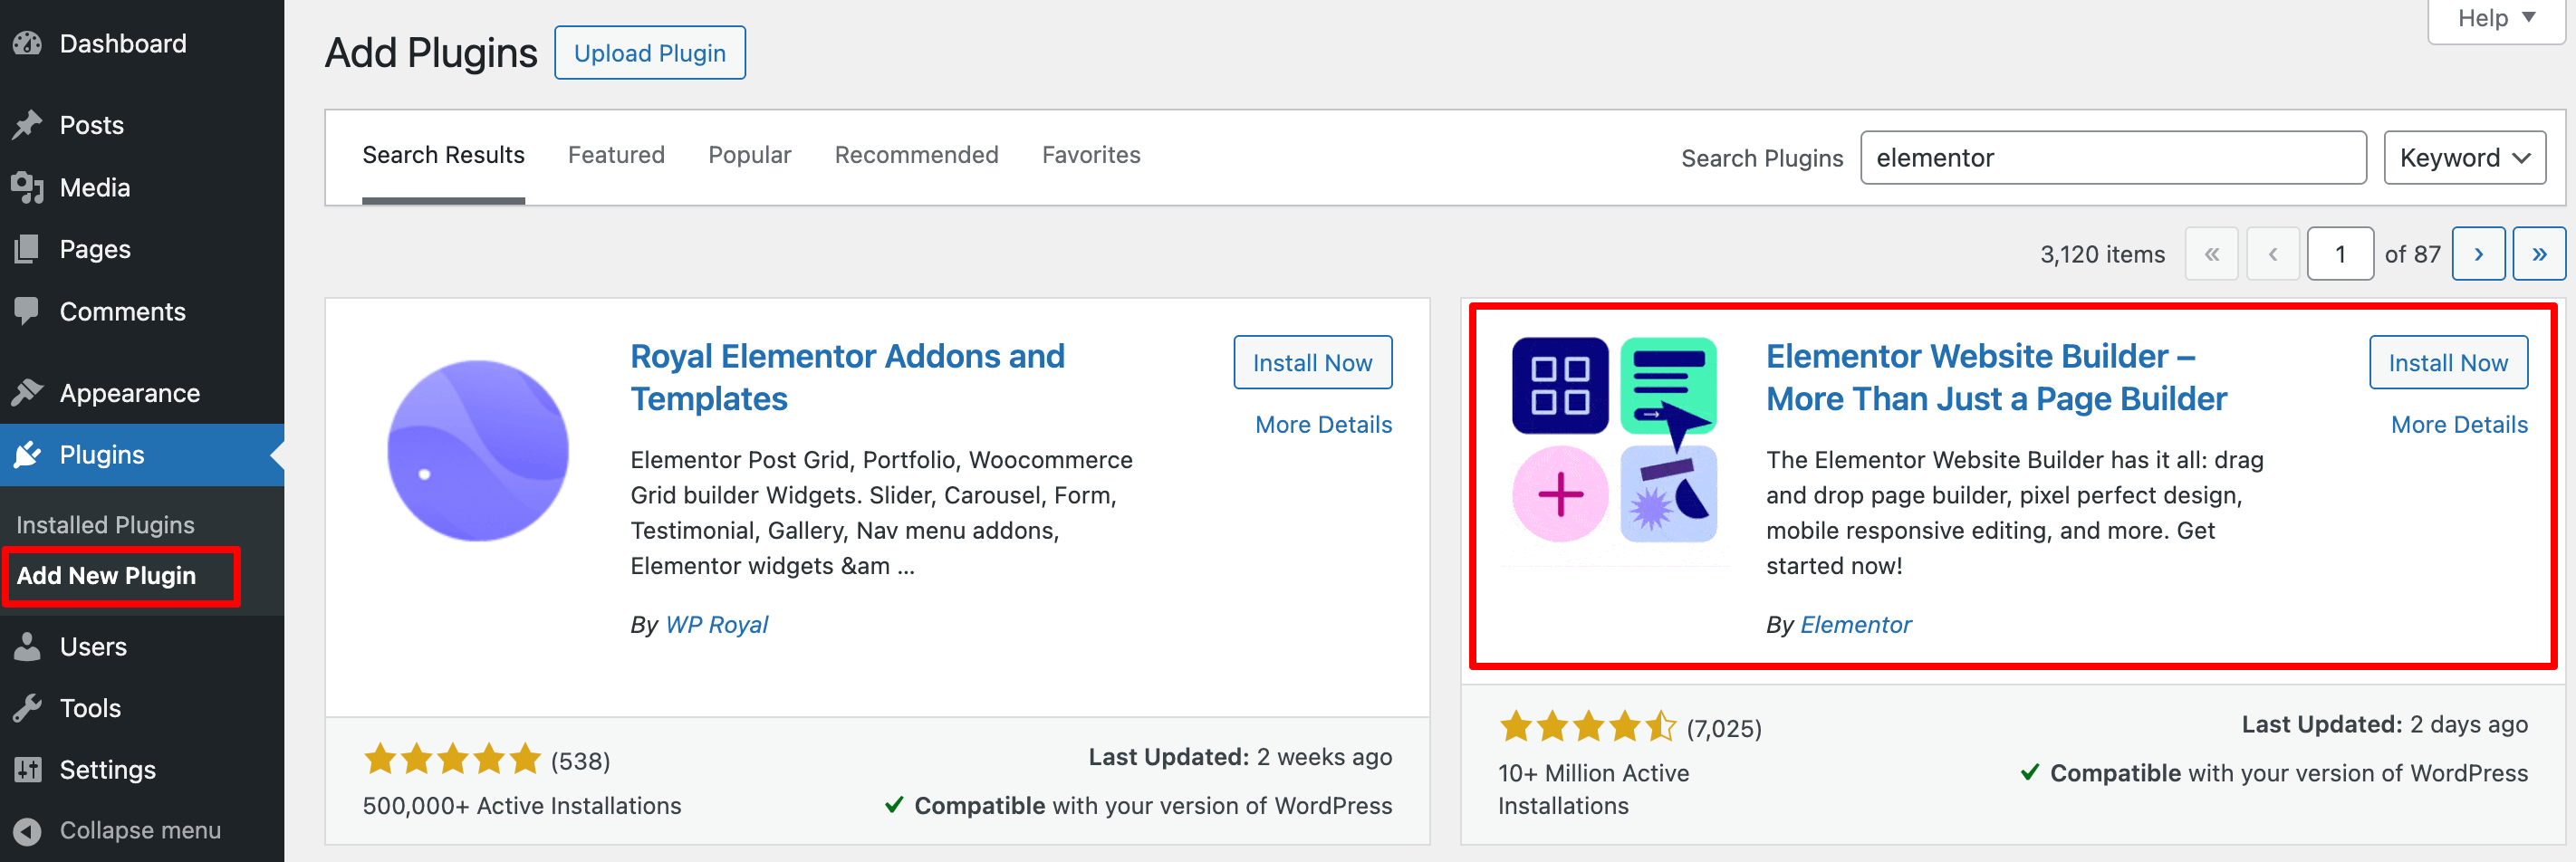
Step 04 – Install a Page Builder
A page builder makes it easy to design your one-page website without touching any code. Instead of struggling with complex settings, you can simply drag and drop elements to create your layout.
Why Use a Page Builder?
- Easy to use – No coding required.
- Drag-and-drop editing – Customize your site visually.
- Pre-made templates – Start with a design and tweak it as needed.
- Responsive design – Ensures your site looks great on all devices.
Best Page Builders for a One-Page Website
- Elementor – The most popular option with a free version and lots of customization tools.
- Beaver Builder – A simple yet powerful page builder.
- Brizy – A beginner-friendly option with an intuitive interface.
How to Install a Page Builder:
- Go to WordPress Dashboard > Plugins > Add New.
- Search for your chosen page builder (e.g., Elementor).
- Click “Install” and then “Activate.”
- Once activated, go to Pages > Add New and select Edit with [Your Page Builder].
Now, your website is ready for customization! Next, we’ll add the necessary sections and arrange them to create a smooth, one-page layout. Let’s move on!
Step 05 – Add and Customize Required Sections
Now it’s time to build your one-page layout. A well-structured one-page website includes different sections instead of separate pages. Each section should provide key information and guide visitors smoothly through your content.
These are the required sections that your one page website should have:
(i) Site Identity
First, you need to fix your site identity, like your site name, logo, tagline, header, footer, etc.
To do that, navigate to your WordPress dashboard -> Appearance and click on the Customize button of your activated theme.
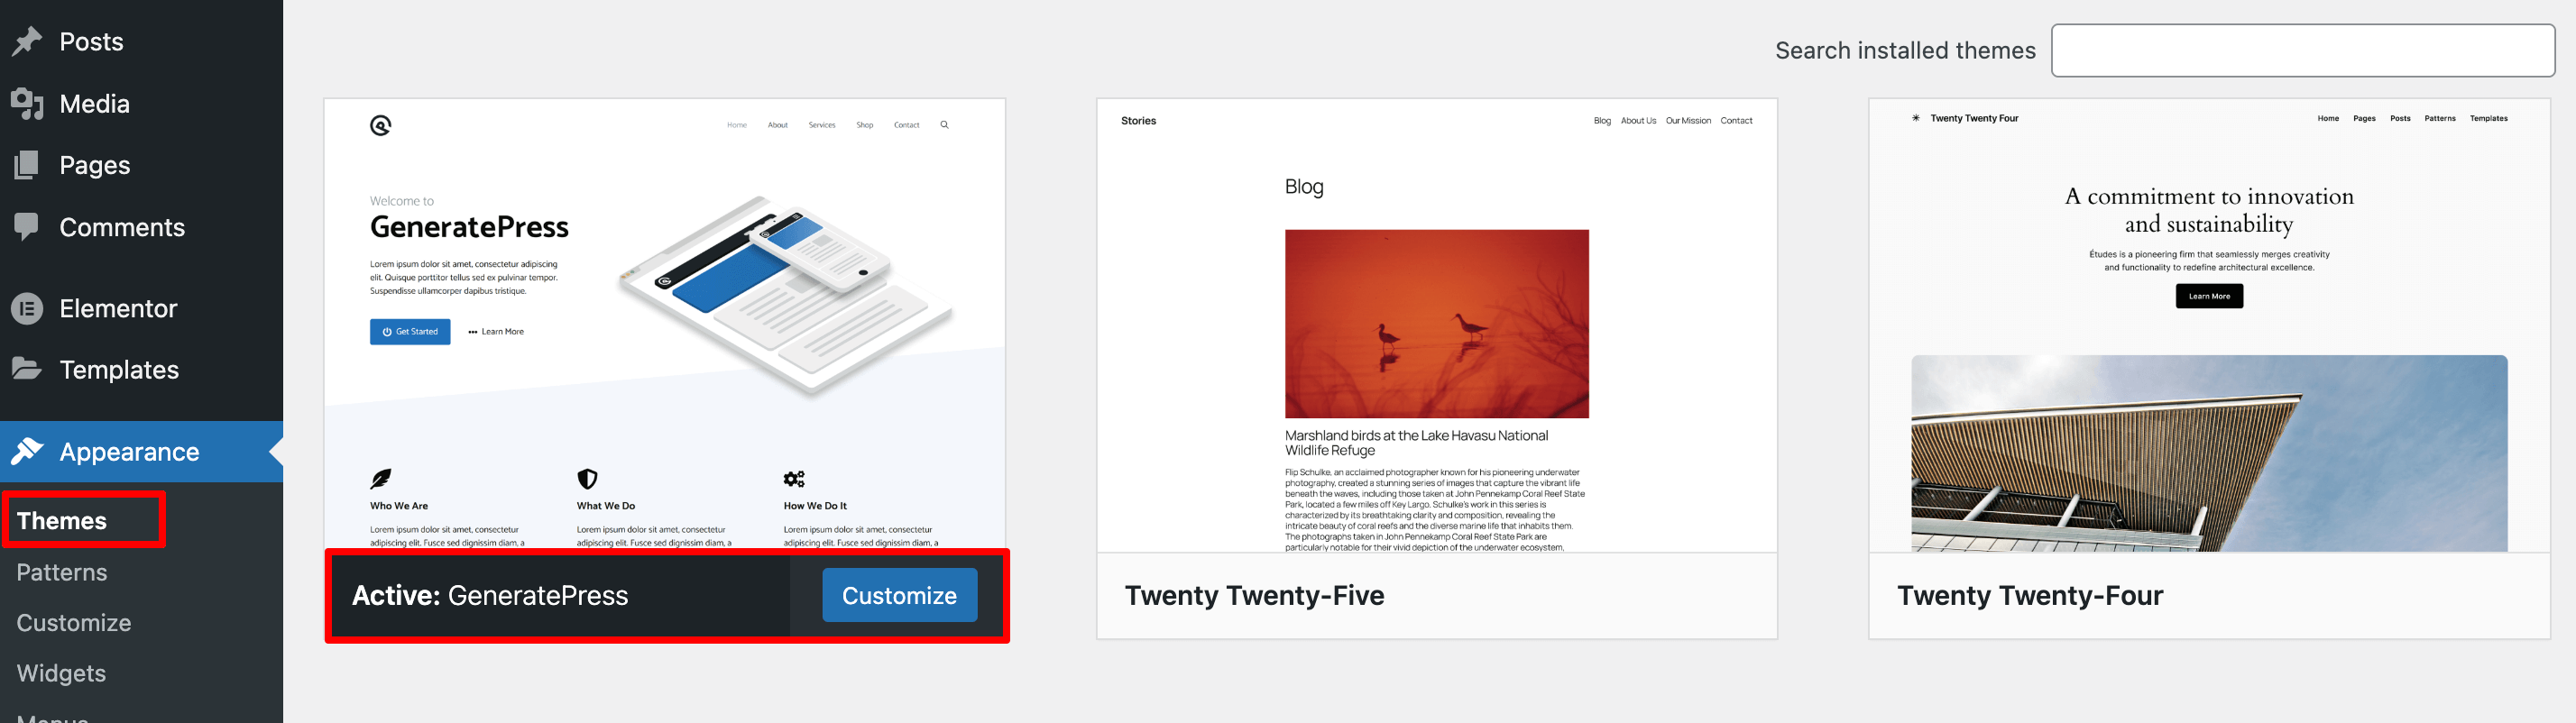
After clicking on the Customize button, you'll be redirected to a new interface. From this interface, click on the ‘Site Identity‘ option.
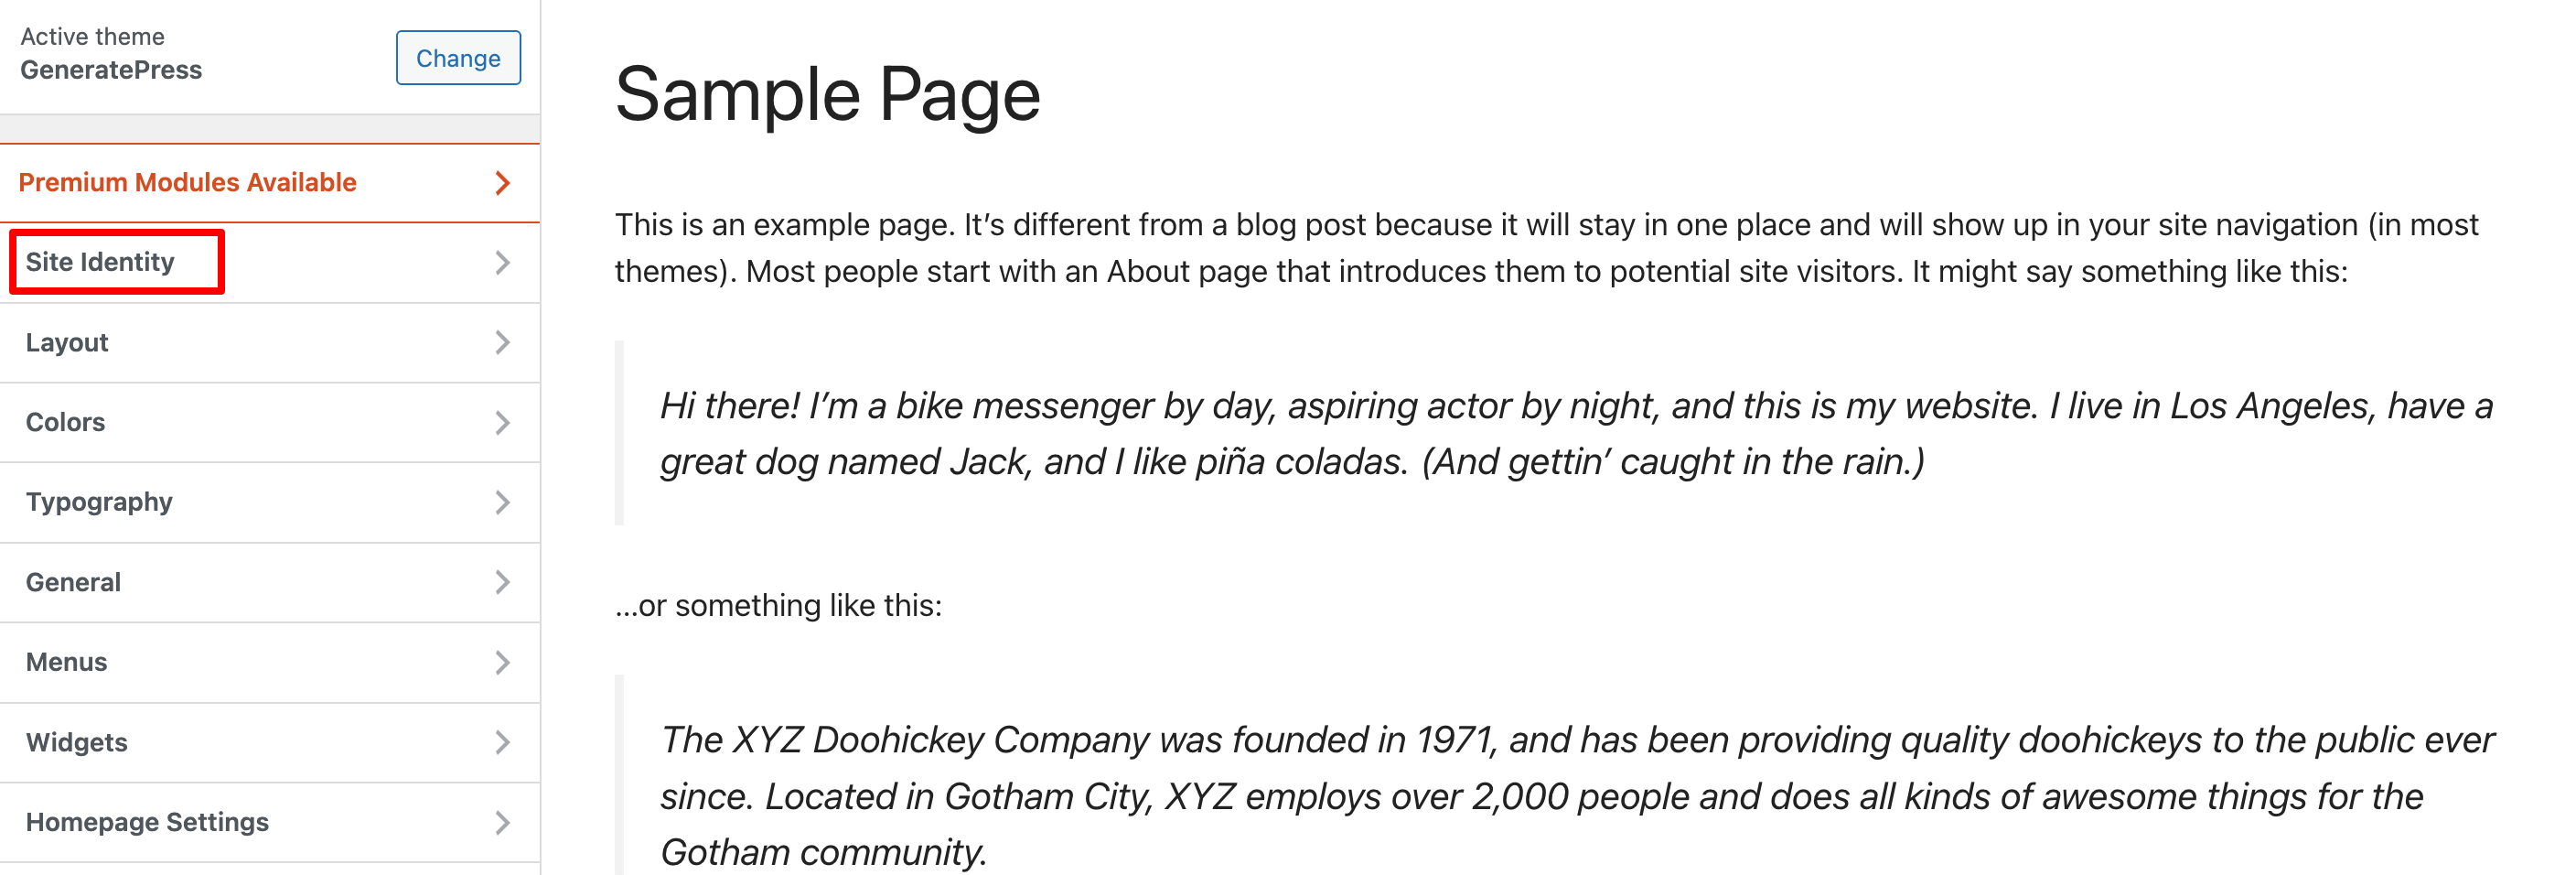
Now change the ‘Site Title‘, ‘Tagline‘, ‘Logo‘, and ‘Site Icon‘.
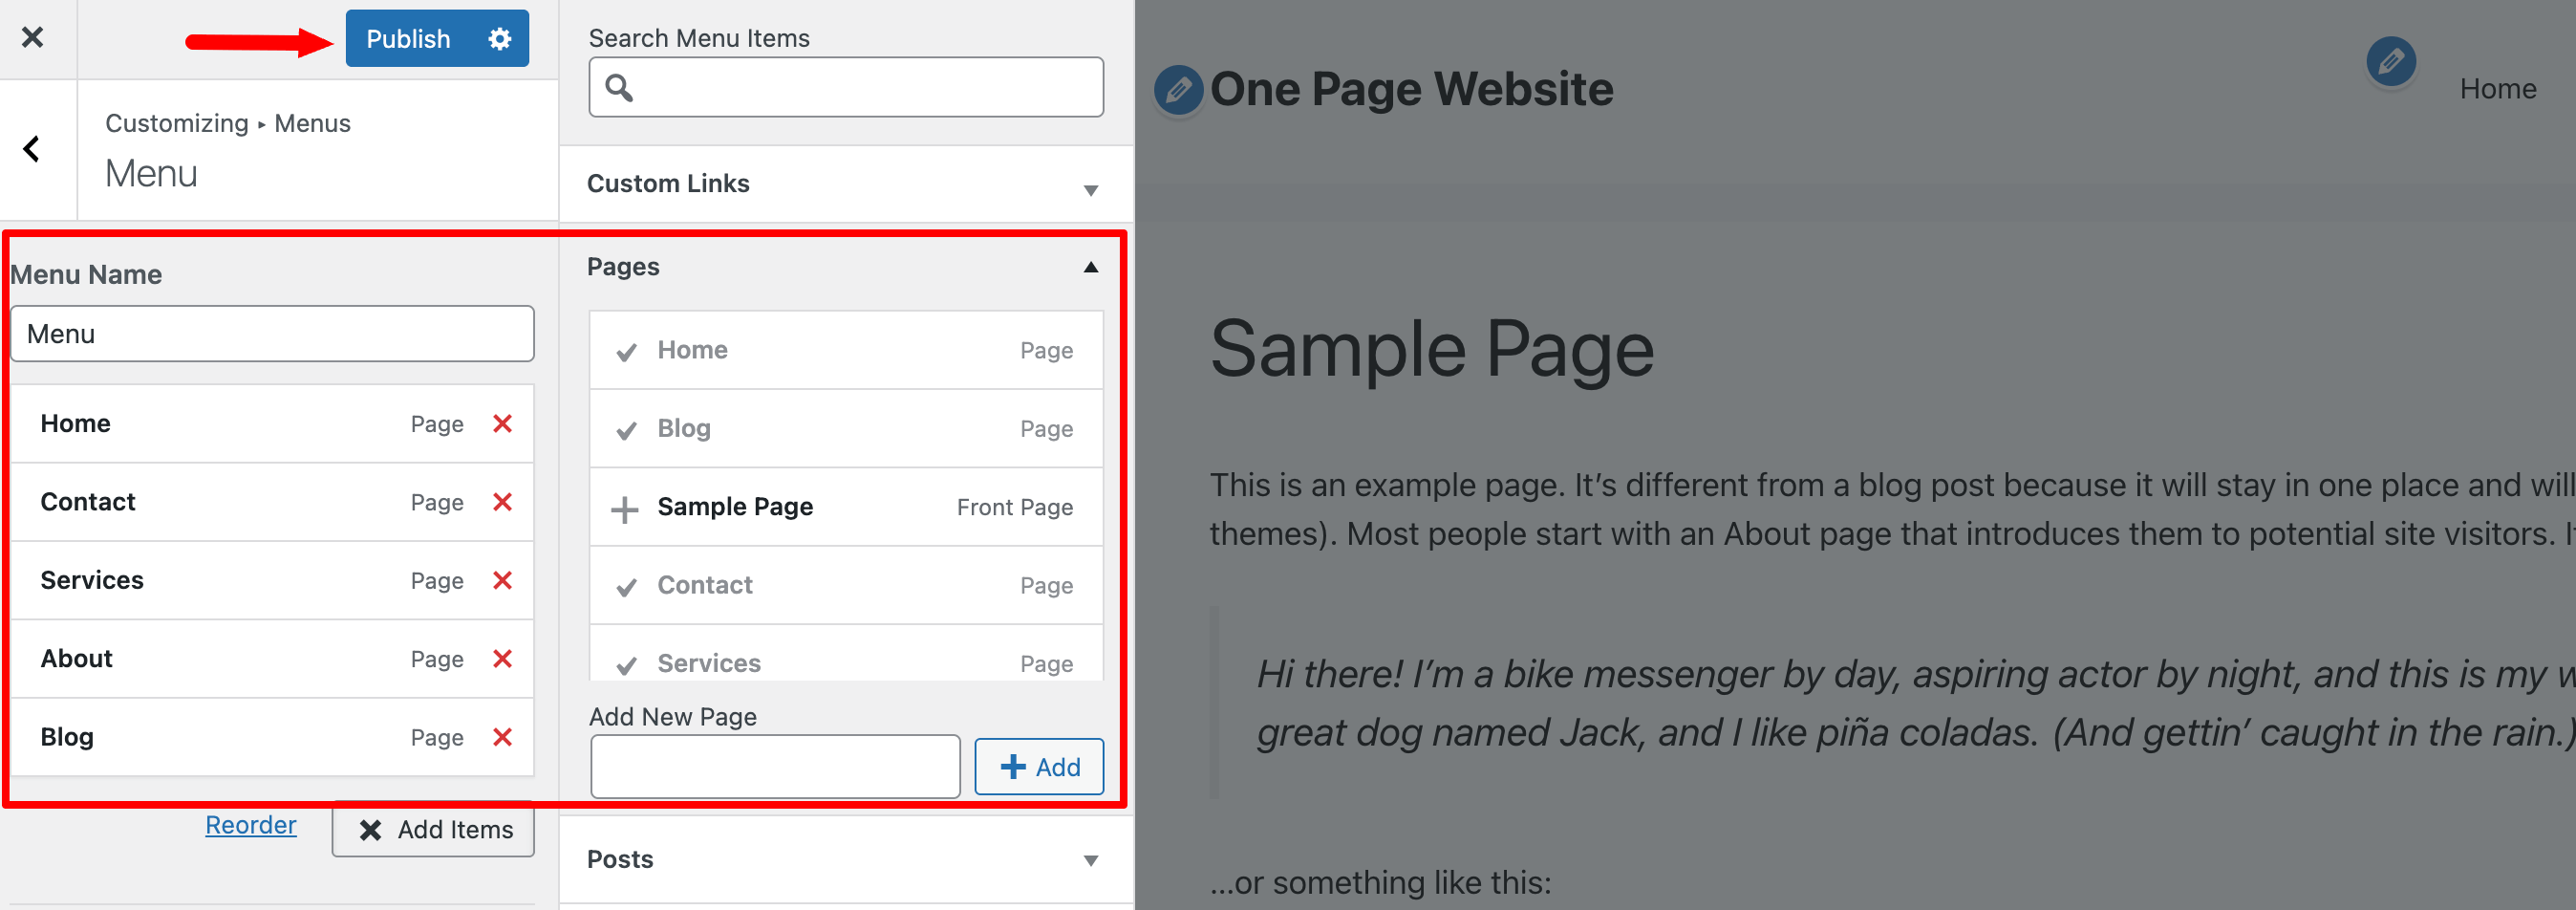
Now, you need to add the menus. To do that, click on the ‘Menus‘ option.
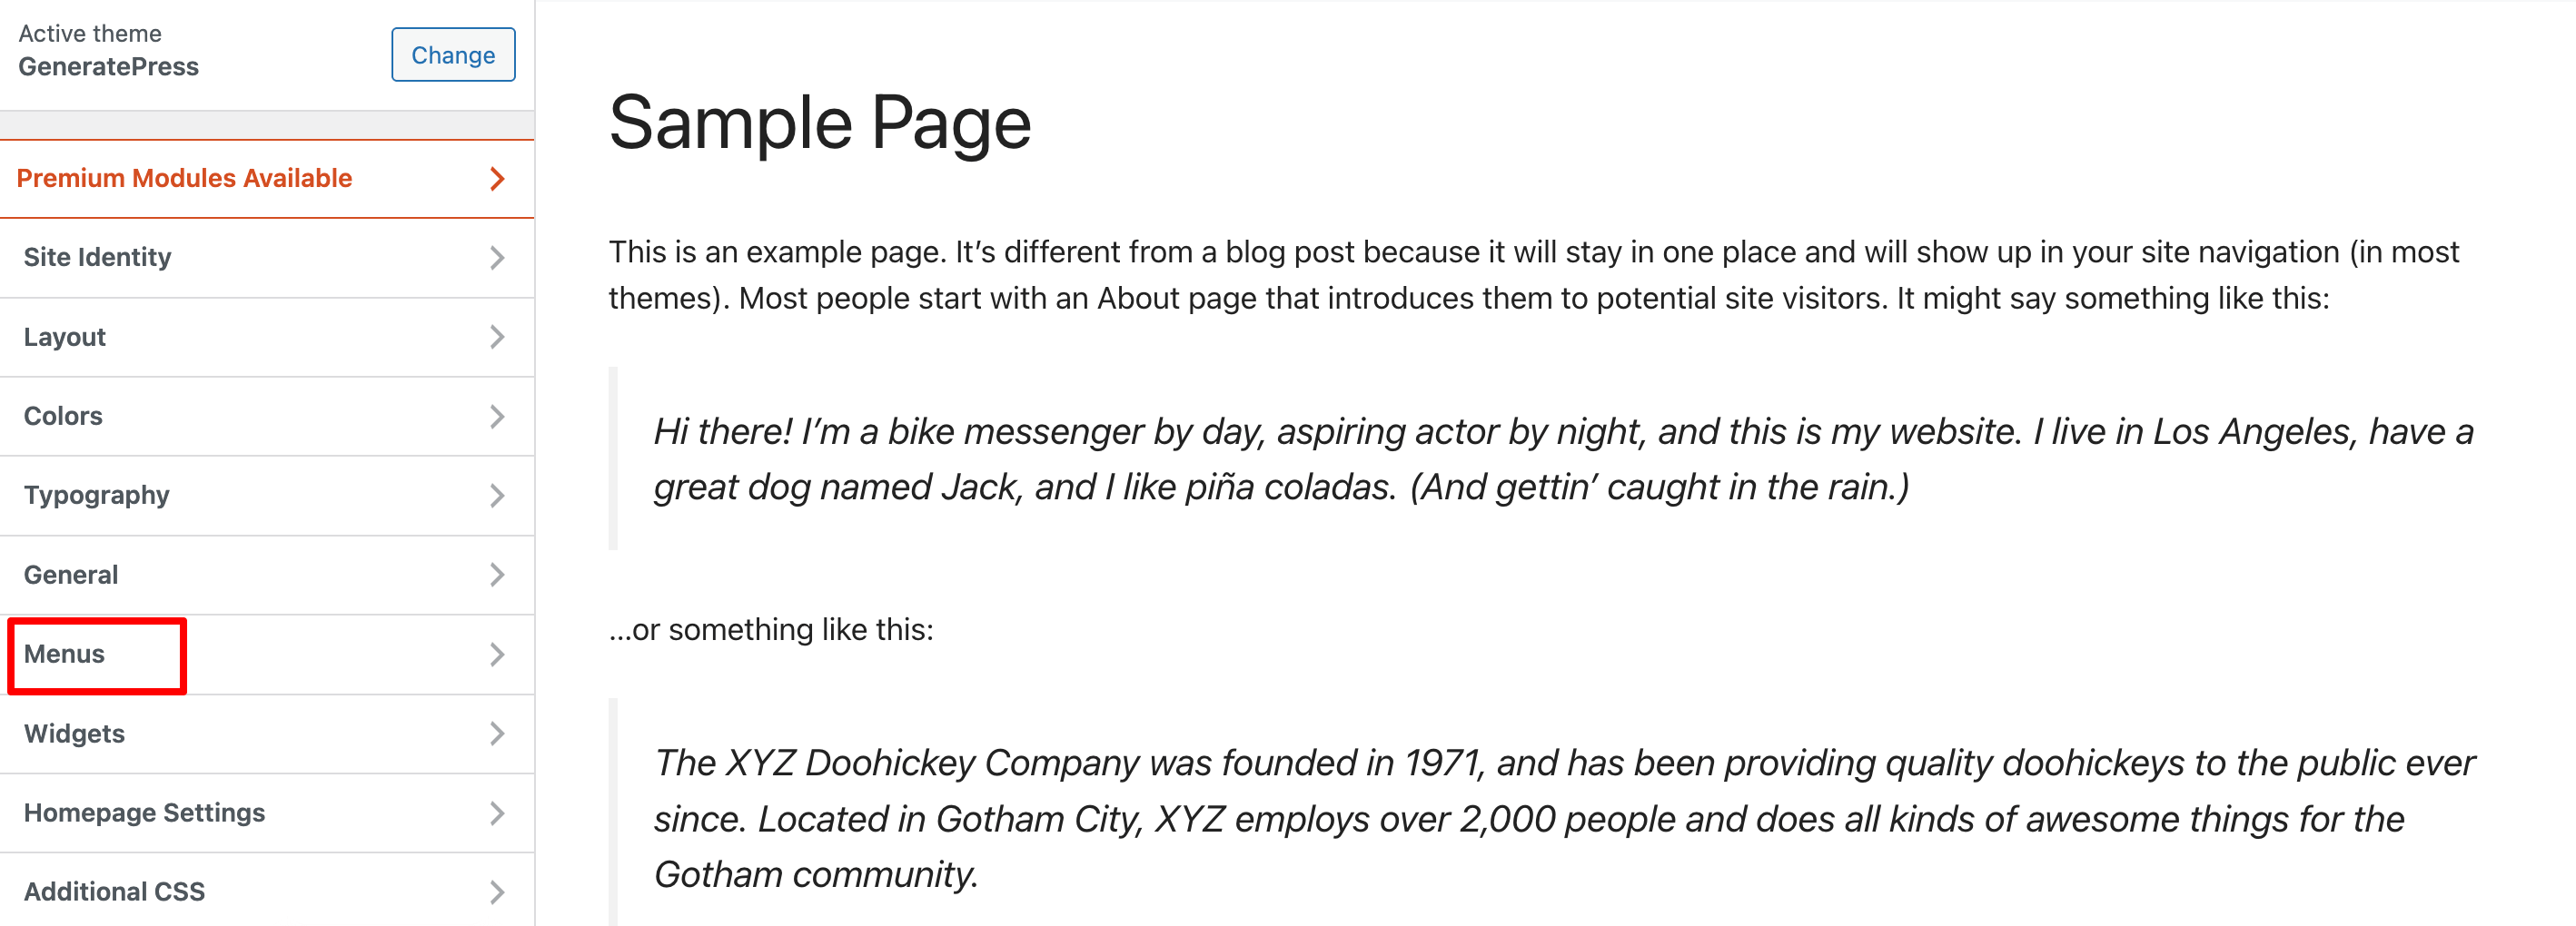
You need to insert a name for the menu and tick the ‘Primary Menu' box if you want to make this menu as your main menu.
Then click on the ‘Next‘ button.
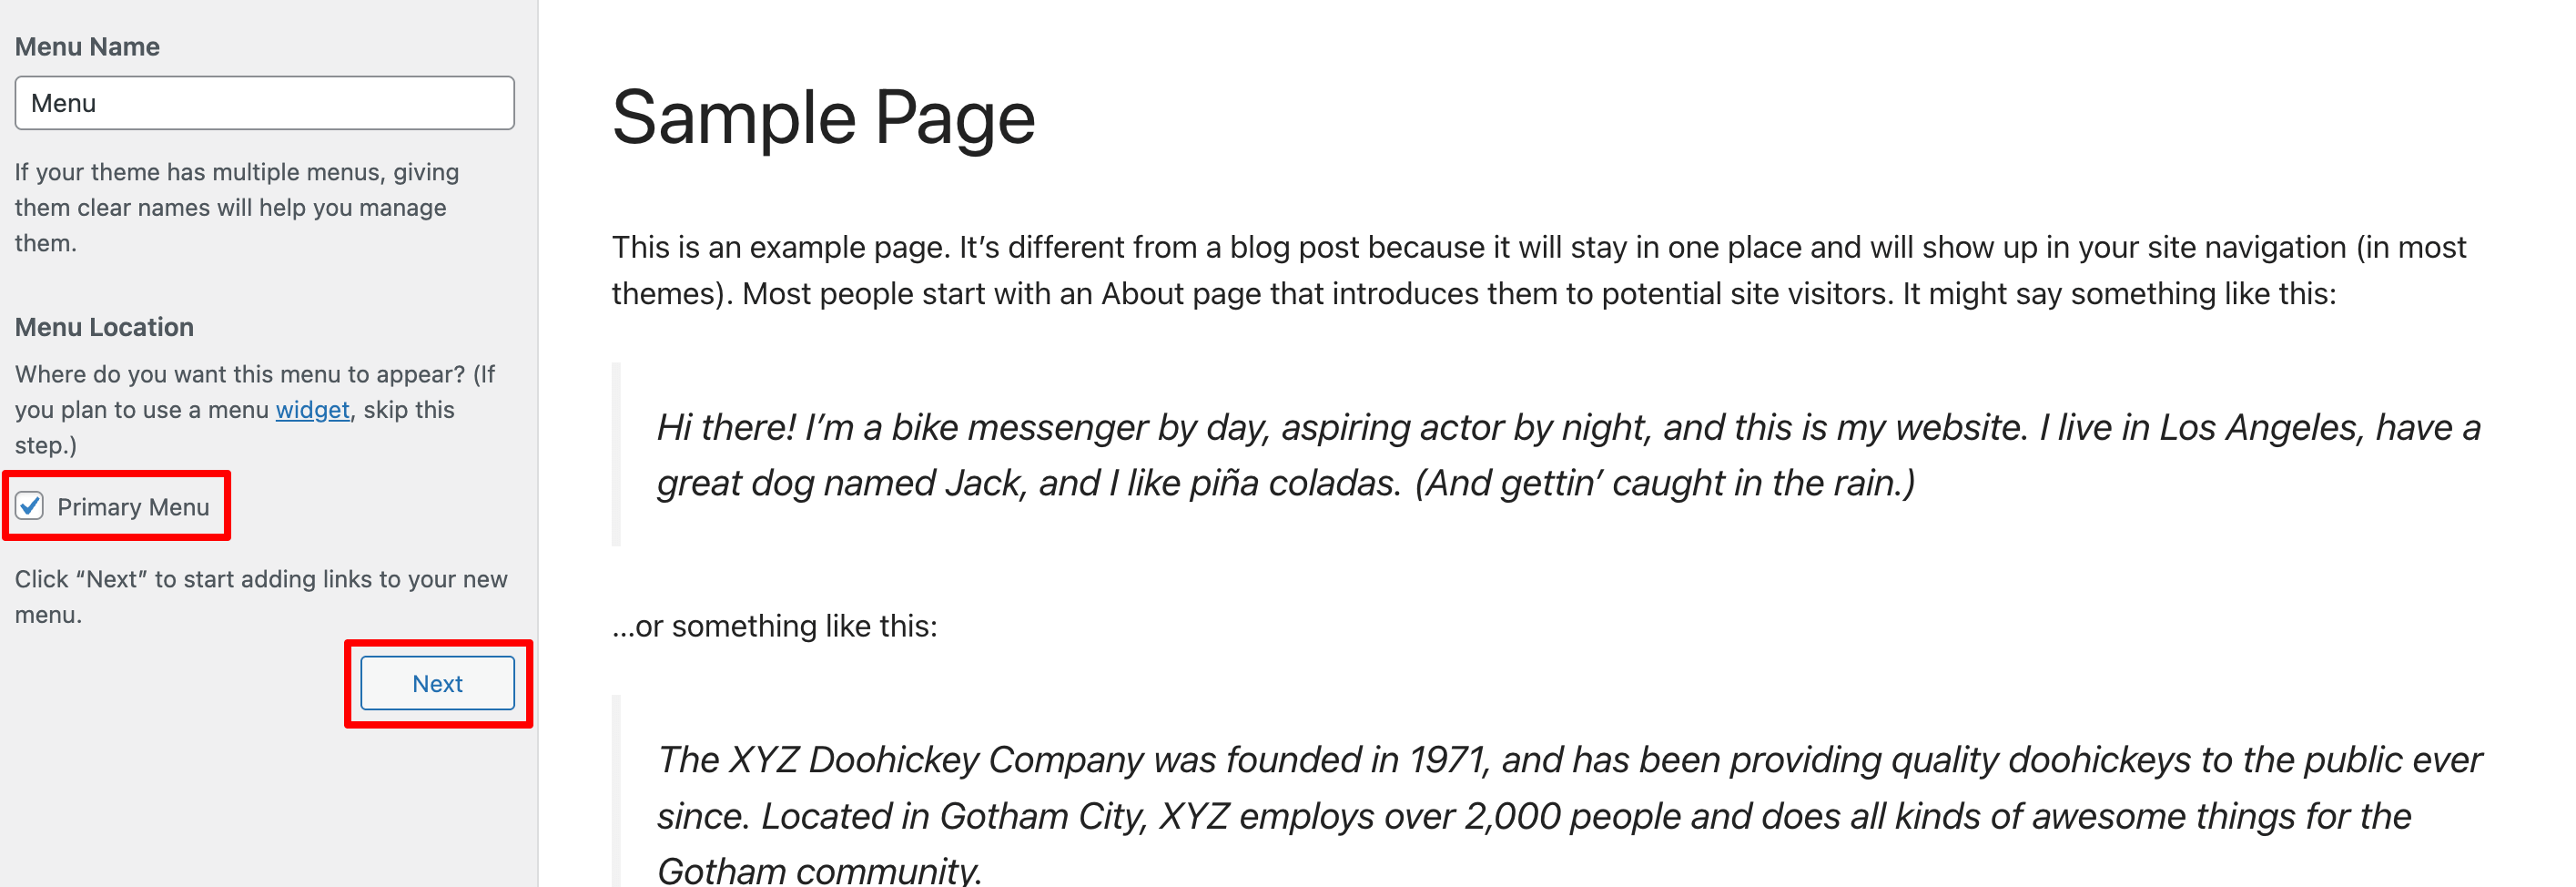
You will be redirected to this page. Now, add new menu options and finally hit the ‘Publish‘ button.
(ii) Hero Section
After configuring the basic things of your site, then go to your WordPress dashboard -> Pages -> Add New Page, and give this page a name.
Then hit the ‘Edit with Elementor‘ button.
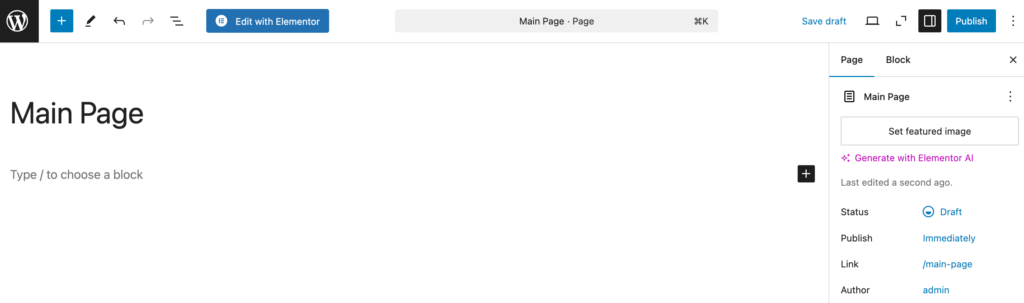
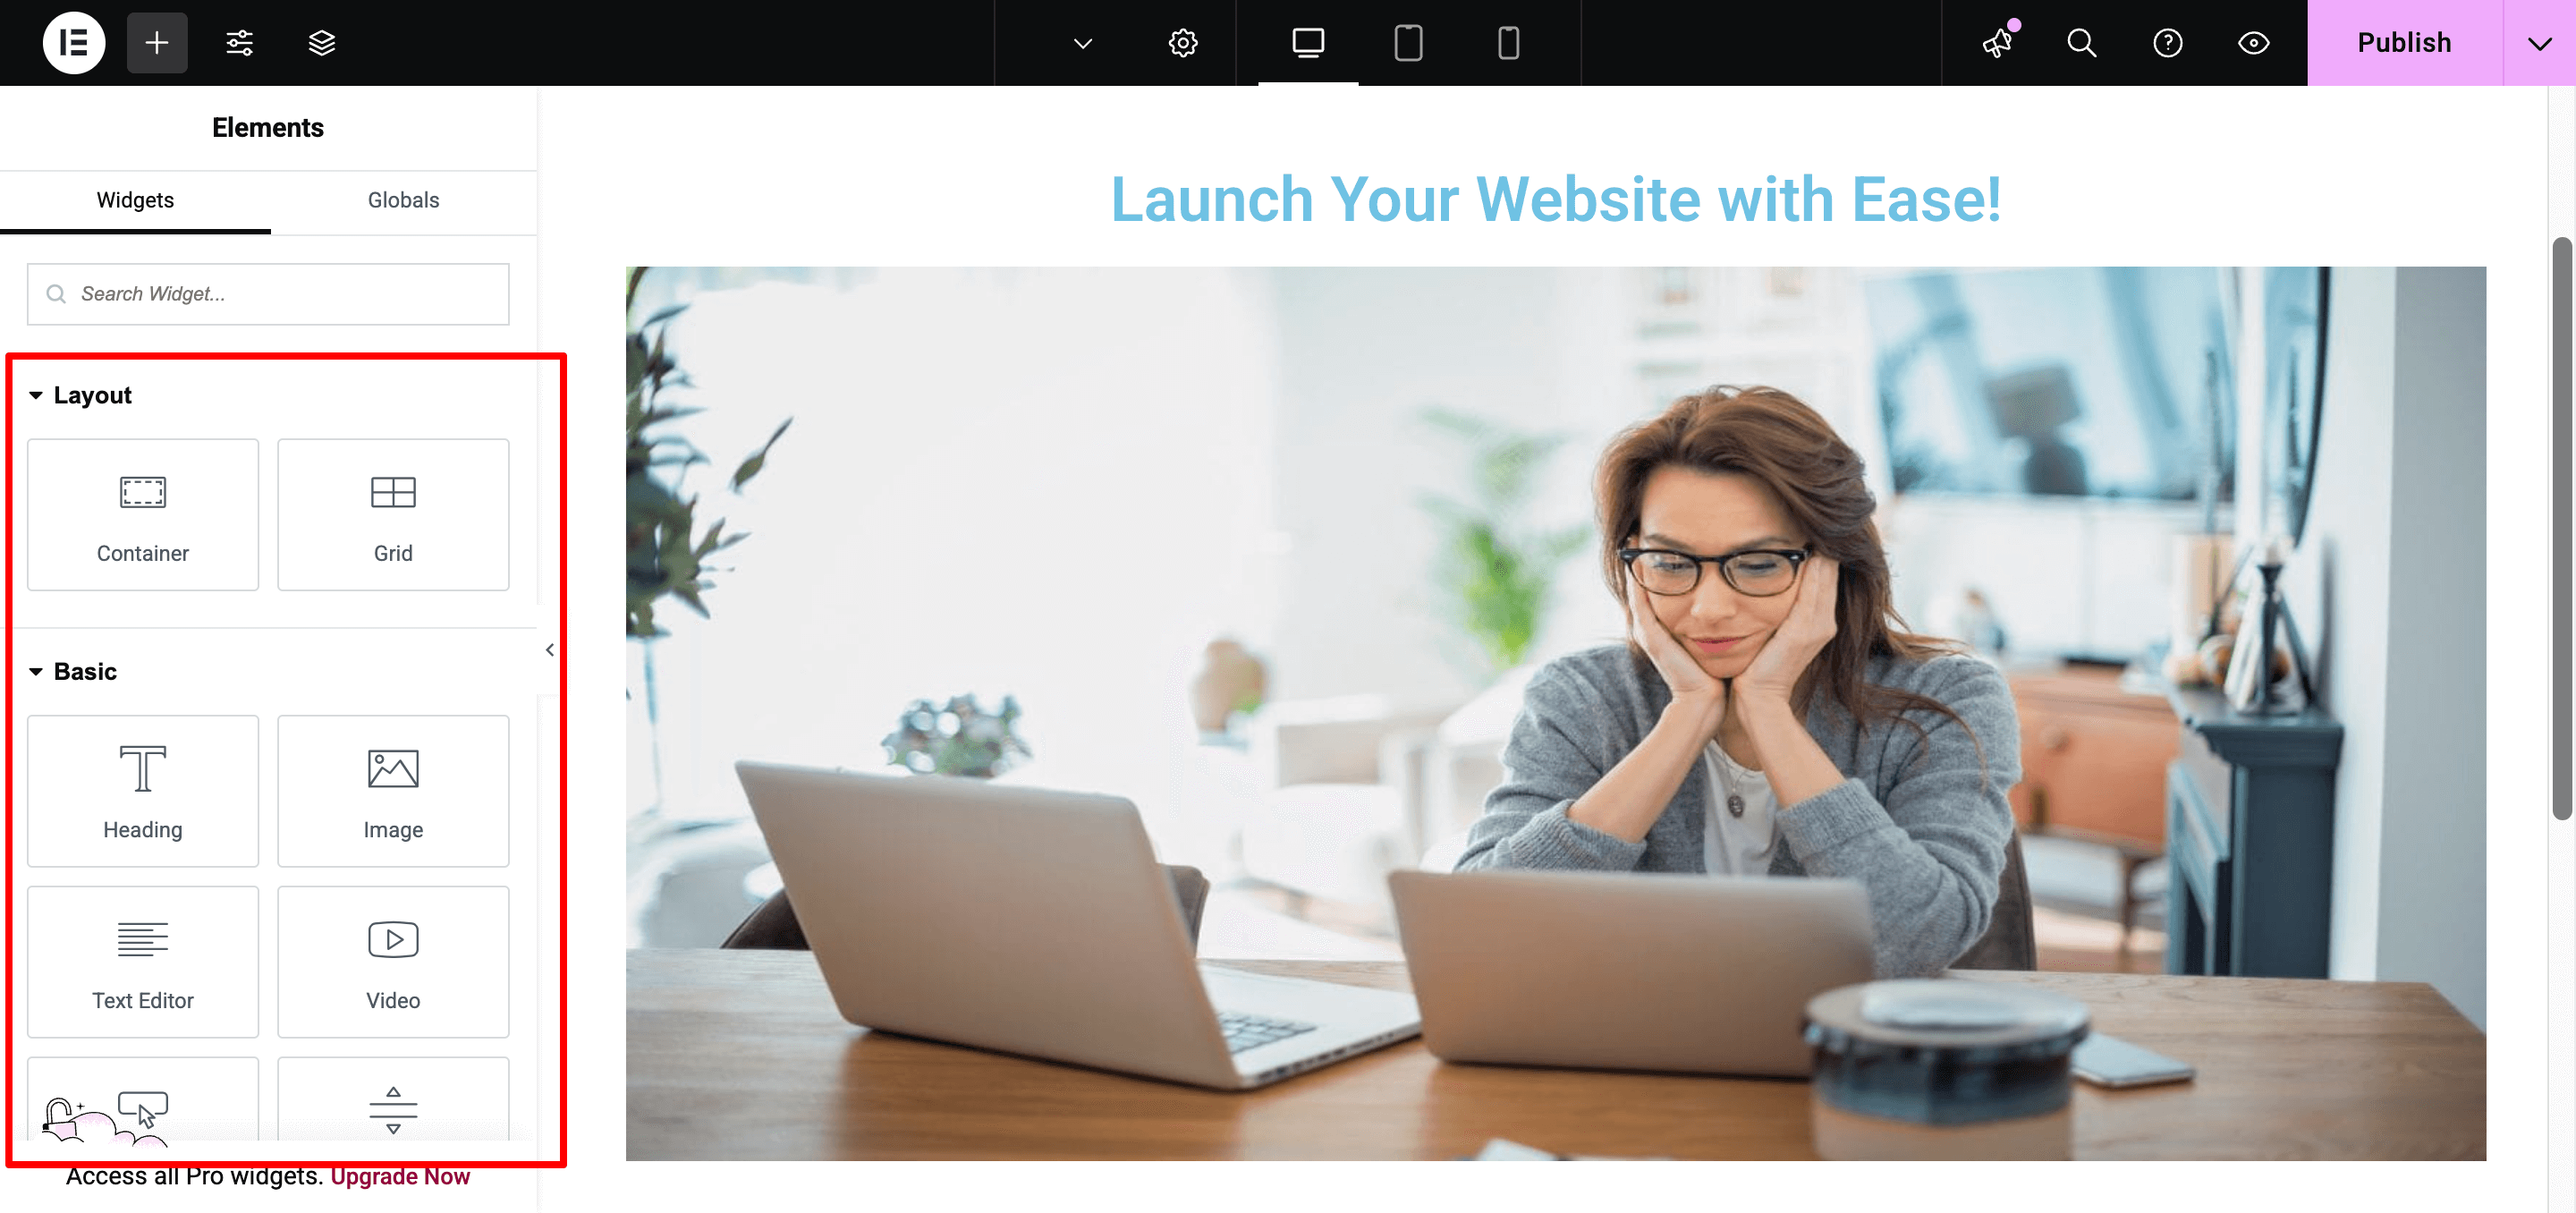
Now design the hero section of your one page website.
The hero section is the first thing visitors see when they land on your website. It sets the tone and grabs attention immediately. This section usually includes a headline, subheadline, background image, and a call-to-action button.
What Should Be in a Hero Section?
- A clear and bold headline that explains what your site is about.
- A short subheadline with additional details or value proposition.
- A visually appealing background (image or video).
- A call-to-action button (e.g., “Get Started” or “Learn More”).
(iii) About Section
This section tells visitors who you are and what you do. It builds credibility and connects with your audience.
What Should Be in an About Section?
- A short introduction about your business or yourself.
- A mission statement or key values.
- An image or a short video to make it engaging.
(iv) Services/Features Section
This section highlights what you offer. It can be services, products, or key features of your business.
What Should Be in a Services/Features Section?
- A short heading that defines your services or features.
- A list of key offerings with brief descriptions.
- Icons or images to enhance readability.
(v) Testimonials/Social Proof Section
A testimonials section builds trust by showing real customer feedback or client reviews.
What Should Be in a Testimonials Section?
- Short, authentic customer reviews.
- Customer names and images (if available).
- Ratings or success stories.
(vi) Contact Section
This section helps visitors reach out to you easily. It provides your contact details and a form for inquiries.
What Should Be in a Contact Section?
- A simple contact form with name, email, and message fields.
- Your email address and phone number.
- Social media links (if relevant).
- A Google Maps embed (if you have a physical location).
Step 06 – Optimize Your Site for SEO and Security
A one-page website needs to be fast, visible on search engines, and safe from threats. SEO helps people find your site, while security protects it from hackers and spam. Let’s break it down.
SEO Optimization for a One-Page Website
- Use the Right Keywords – Add relevant keywords in your headings, content, and image alt texts.
- Write a Clear Meta Title and Description – This is what users see on Google. Keep it short, catchy, and include your main keyword.
- Optimize Images – Large images slow down your site. Use a plugin like Smush to compress images without losing quality.
- Improve Page Speed – A slow site drives visitors away. Use a caching plugin to boost your website speed.
If you want to use an SEO plugin to optimize your one page website, check out our blog on best WordPress SEO plugins and choose the most suited plugin for you according to your requirements.
Security Tips to Keep Your Site Safe
- Install a Security Plugin – Plugins like Wordfence or Sucuri protect your site from hackers.
- Enable SSL (HTTPS) – SSL encrypts data and builds trust. Most hosting providers offer free SSL certificates.
- Use Strong Login Credentials – Avoid common usernames like “admin” and use a strong password.
- Keep Everything Updated – Always update WordPress, plugins, and themes to fix security vulnerabilities.
- Enable Backups – Set up automatic backups using UpdraftPlus or Jetpack in case anything goes wrong.
Wondering which plugin you should use to secure your site? Check this blog and find the best security plugin for you.
Once your site is optimized for SEO and security, it’s time for the final step—publishing your website! Let’s move forward.
Step 07 – Publish Your One Page Website
Now that your website is designed, optimized, and secured, it’s time to make it live! Publishing is the final step, but before you hit the button, do a quick check to ensure everything looks perfect.
Final Checklist Before Publishing
- Check Your Content – Proofread all text to fix typos or errors.
- Test Links and Buttons – Make sure all buttons and menu links work properly.
- Preview on Mobile and Desktop – Ensure your site looks good on different devices.
- Test Page Speed – Use Google PageSpeed Insights or GTmetrix to check loading time.
- Set Up Google Search Console – Submit your site to Google so it can be indexed faster.
How to Publish Your Website
- Go to Your WordPress Dashboard.
- Click on Pages > Your One Page Website.
- Click the “Publish” Button.
That’s it! Your one-page website is now live. Share your link, promote it on social media, and keep improving it based on feedback.
Your website is never truly “finished.” Keep updating content, improving SEO, and maintaining security to keep it running smoothly.
Conclusion
Creating a one-page website on WordPress is simple if you follow the right steps. You just need a domain, hosting, a good theme, and a page builder to design your layout. Adding the right sections, optimizing for SEO, and securing your site will make it both functional and professional.
One-page websites work best when they are clean, fast, and easy to navigate. Keep improving your content, updating your design, and monitoring performance to get the best results.
Now that your site is live, share it, promote it, and start attracting visitors!