The Complete Beginner’s Tutorial to Creating an AI Bot on Facebook Messenger
AI or Artificial Intelligence has become a buzzword these days. And Facebook chatbots are no exception to artificially intelligent technologies. For a smooth and well-rounded marketing strategy, this is something you can't steer clear of.
Moving forward, using a chatbot has become a standard when it comes to prompt customer support and happiness. In this article, we will define you what a Facebook chatbot is and how you can set a chatbot for your facebook page's messenger. Now, let's go ahead.
What Is a Facebook Messenger Chatbot?
Facebook messenger chatbot is an artificially trained bot that mimics human intelligence level and converses with your visitors or customers without even the need for any human assistance.
For this purpose, chatbots always try to hide the fact that they are artificially trained bots when they are serving or reacting to its users.
Why Do You Need a Facebook Messenger Chatbot?
As a business professional, you should streamline your marketing and customer support system with a facebook messenger chatbot to have an edge over your competitors.
The users of Facebook Messenger is almost equal to the entire number of users of Instagram, Twitter, and Snapchat together.
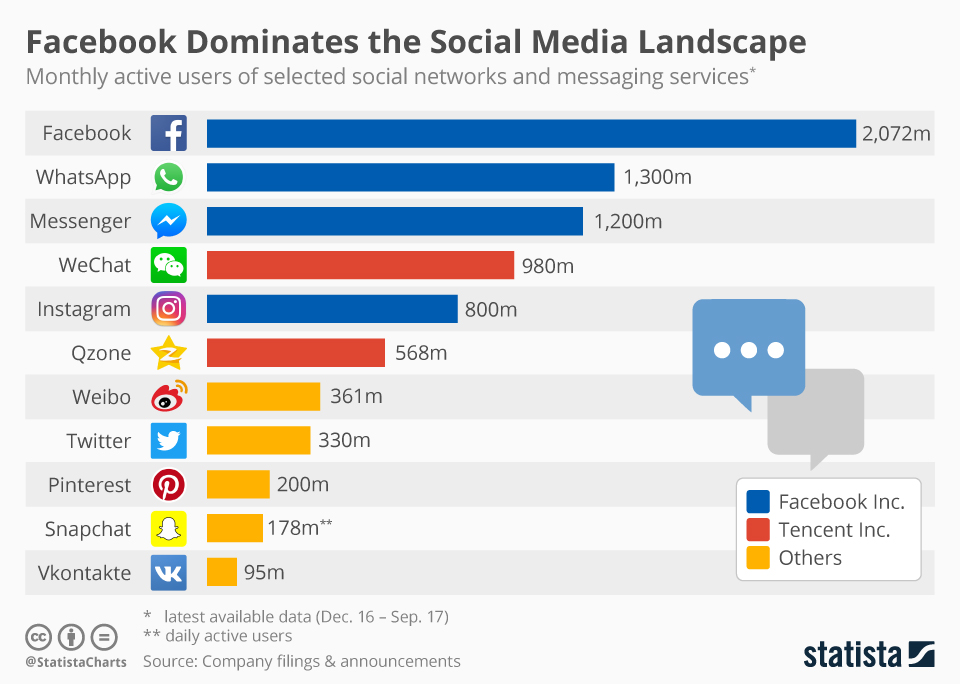
Thus, you should definitely take the advantages of the Facebook messenger to your good book.
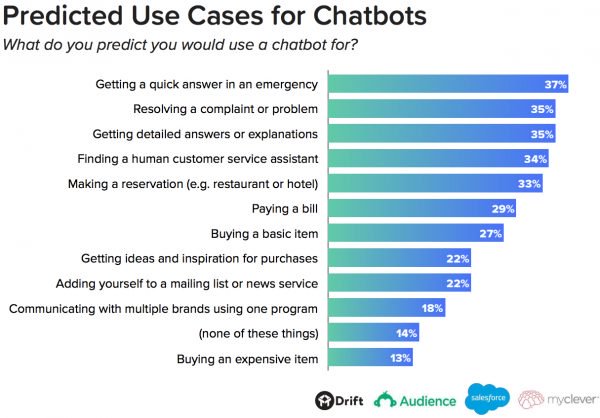
Here are some of the predicted use cases for chatbots that can be pretty useful for you:
- Getting a quick answer in an emergency.
- Resolving a complaint or problem.
- Getting detailed answers or explanations.
- Finding a human customer service assistant.
- Making a reservation (e.g. restaurant or hotel).
- Paying a bill.
- Buying a basic item.
- Getting ideas and inspiration for purchases.
- Adding yourself to a mailing list or news service.
- Communicating with multiple brands using one program.
Here Are Some of the Basic Benefits of Facebook Page Bots:
Chatbots are a proven way to provide a far more personalized experience and ensure much more customer engagement. Here are a few benefits:
- Mobile friendly customer service.
- Integration to e-Commerce platforms to increase sales.
- Automatic sending and receiving text and images.
- Parsing information to actionable steps.
- Providing answers with predetermined questions.
- Being able to send bulk push notifications.
- Offering in-depth analysis performance of the chatbots.
- Chatbots become smarter with more usages.
How to Create a Basic & Simple Facebook Messenger Bot
We assume that you already have a Facebook page. If you have one, you can easily set a basic facebook auto reply bot from the page settings. Now, let's begin the facebook messenger chat bot tutorial:
First off, click on the dropdown button and select the page that your are going to set the chatbot for.
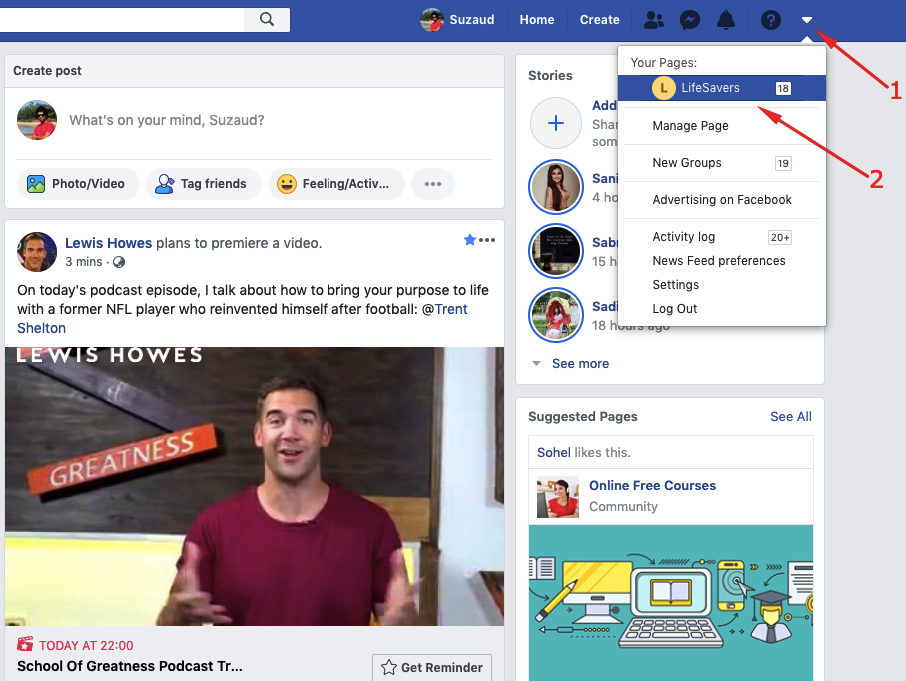
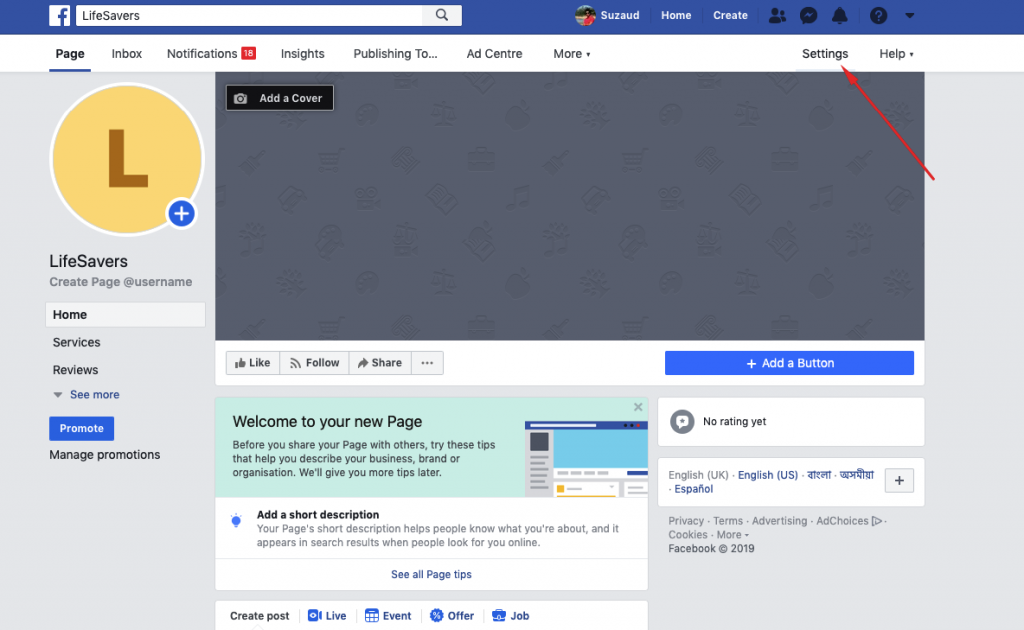
Click on the Settings option.
Next, click on the Messaging option:
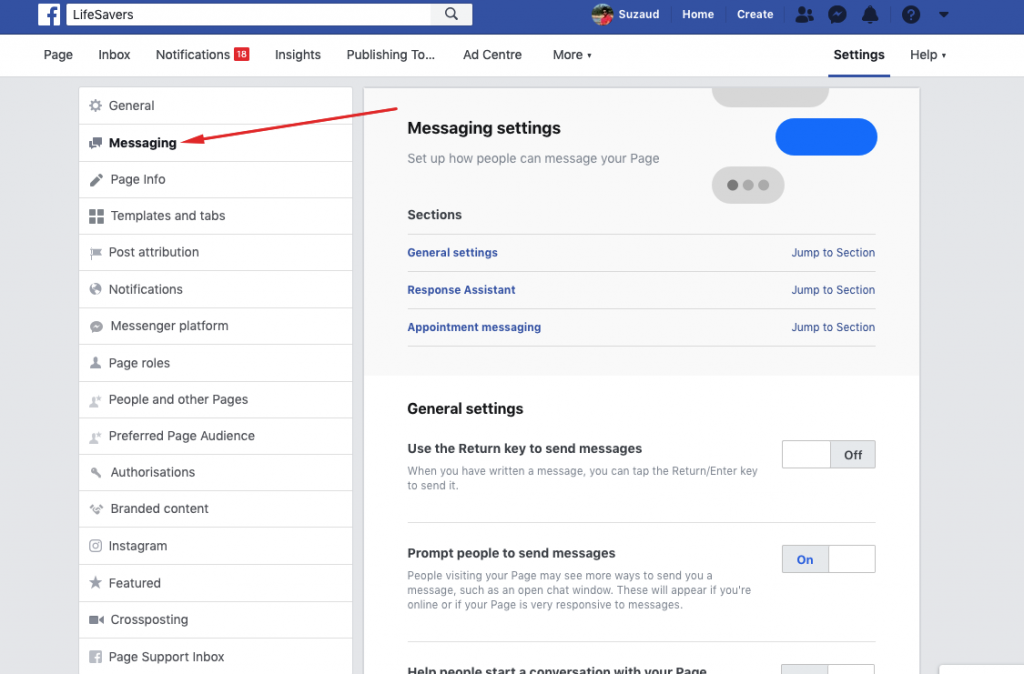
After that, You will get 3 settings for the chatbot:
- General Settings
- Response Assistant
- Appointment Messaging
Configuring General Settings
Now, turn on the “Prompt people to send messages” and “Help people start a conversation with your Page” toggle bars.
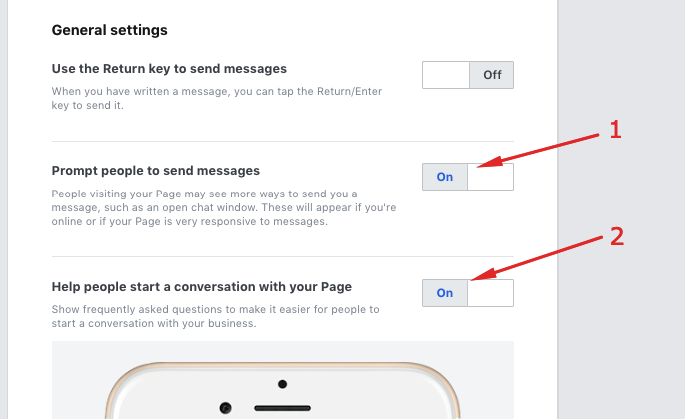
Prompt people to send messages
This will help your people with a number of ways (Such as open chat window) to send you messages while you are online.
Help people start a conversation with your Page
This option will help your audience use frequently asked questions to begin a conversation with you with ease. The coolest part is that you can edit the FAQs (Frequently Asked Questions) with your own taste and can add multiple questions as well.
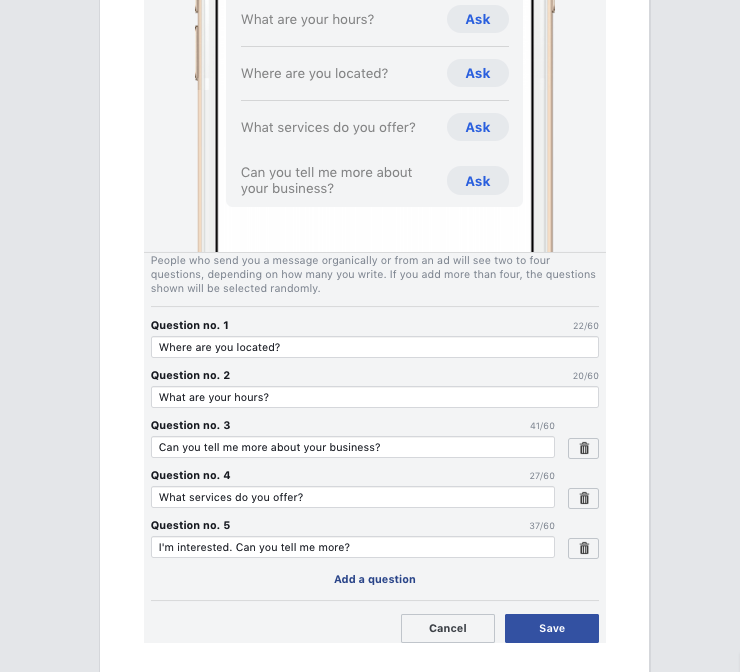
After finishing editing, don't forget to save the changes.
Configuring Response Assistant
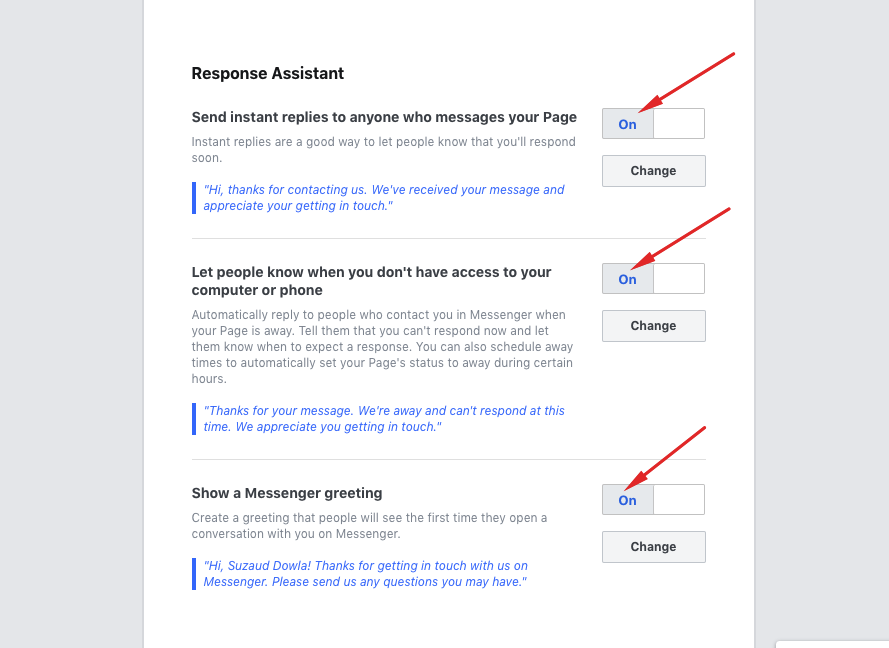
This is the most effective and useful part of the Facebook messaging settings. In this section, you will get three more options. They are:
- Send instant replies to anyone who messages your Page.
- Let people know when you don't have access to your computer or phone.
- Show a Messenger greeting.
You will have to turn the toggle bar on in order to keep them functioning as indicated below with red marks:
Send instant replies to anyone who messages your Page
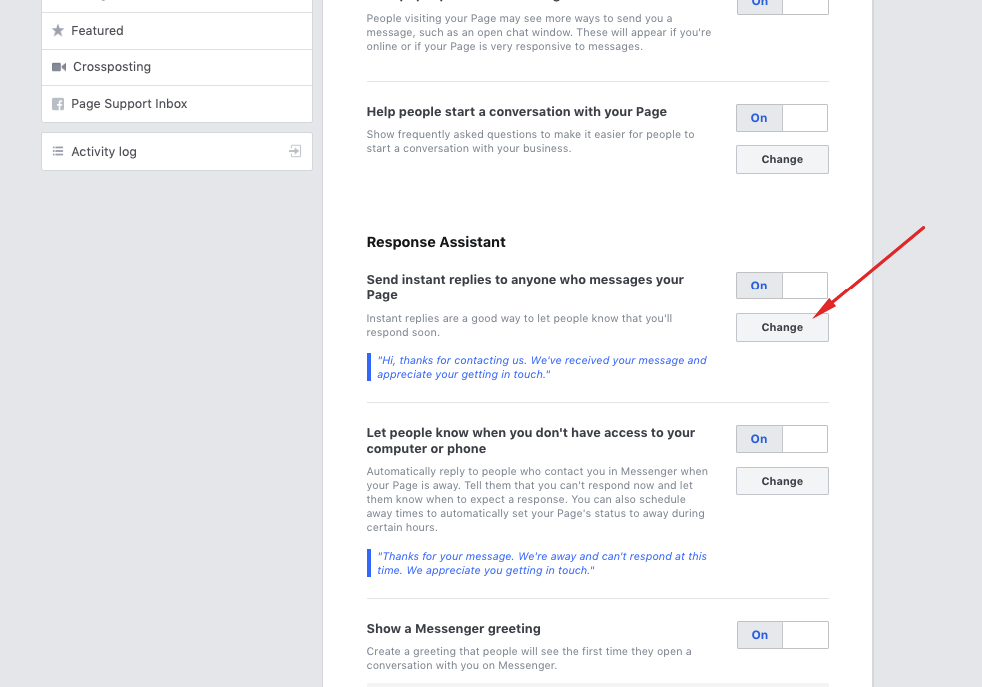
After turning the toggle bar on, your audience will get instant messages showing that you will respond to them as soon as possible. However, you can easily edit them with the Change button:
Now, you will get the message editing option with a preview of the message:
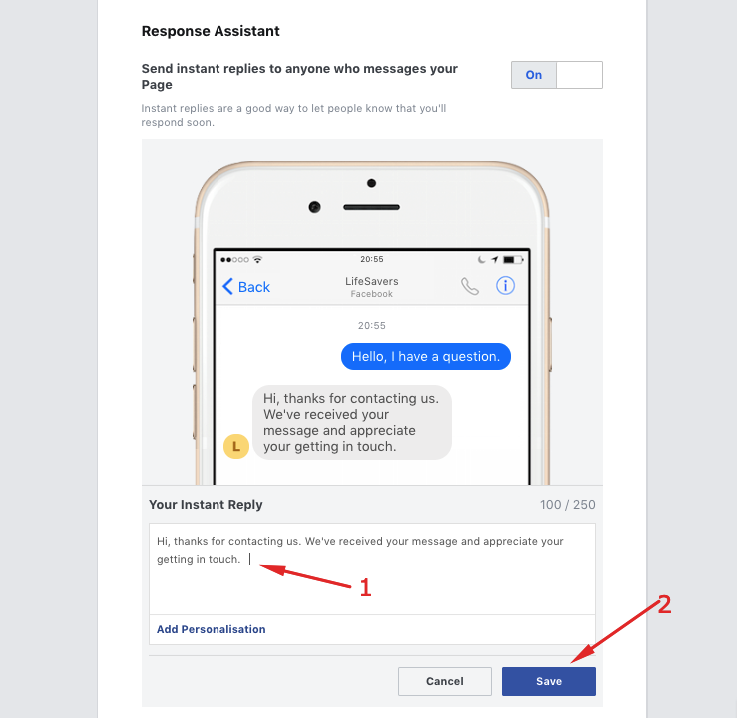
Edit the message in the way you want. You can also add personalizations in the message text using the ‘Change‘ button. Finally, hit the ‘Save‘ button.
Let people know when you don't have access to your computer or phone
With this option, you can let your visitors know that you are not in front of your device and thus can't give them support instantly.
Show a Messenger greeting
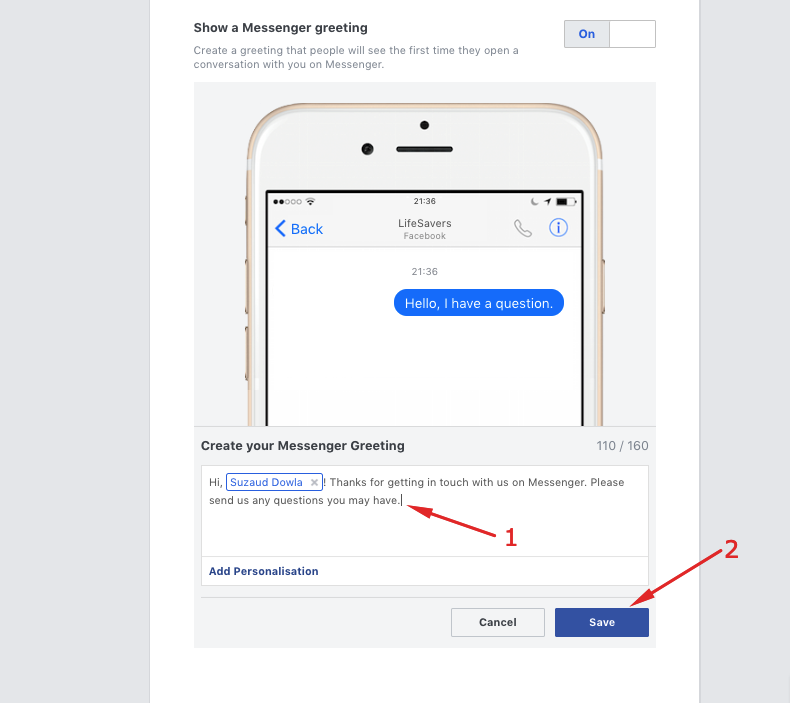
You should use this option if you would like to greet your visitor who is on the first time with your page's messenger. You can also edit this option, personalize and save it at your disposal.
And that's it! You have created a basic Facebook bot for your business page.
How to Create an Advanced Facebook Messenger Bot with Chatfuel
You can easily create a Facebook Messenger with Chatfuel while having fun during the process.
I'll not only show you the walkthrough of creating a messenger bot but also guide you with a strategy so that you can grow a good number of audience with it.
It will take only a few minutes to set up the bot but you will later discover a lot of great and exciting ways to maneuver it more efficiently.
Step 1: Sign up for a Chatfuel Account with Your Facbook Account
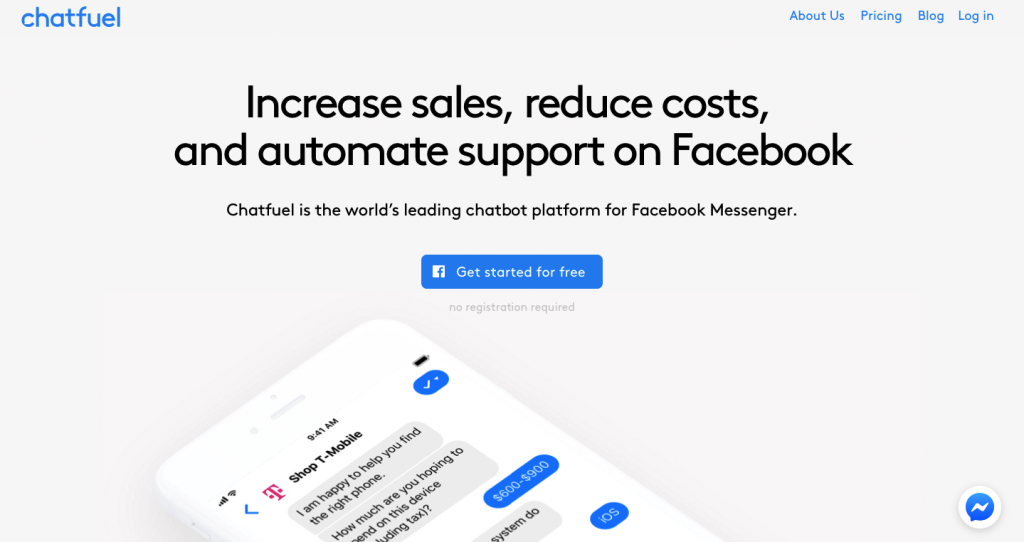
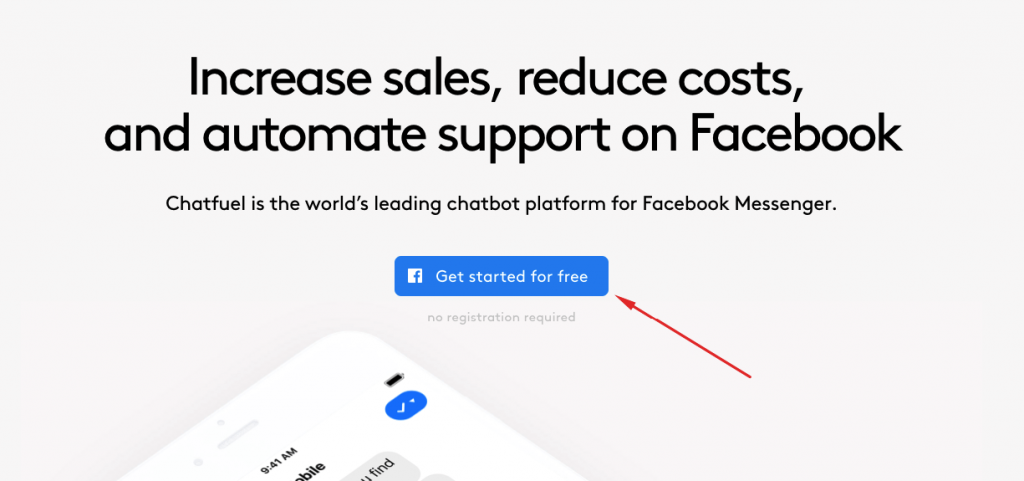
First off, visit the homepage of Chatfuel and click on the “Get started for free” button.
After that, you will be prompted to log in to your Facebook account and you will then have to confirm your Facebook account ID to proceed.
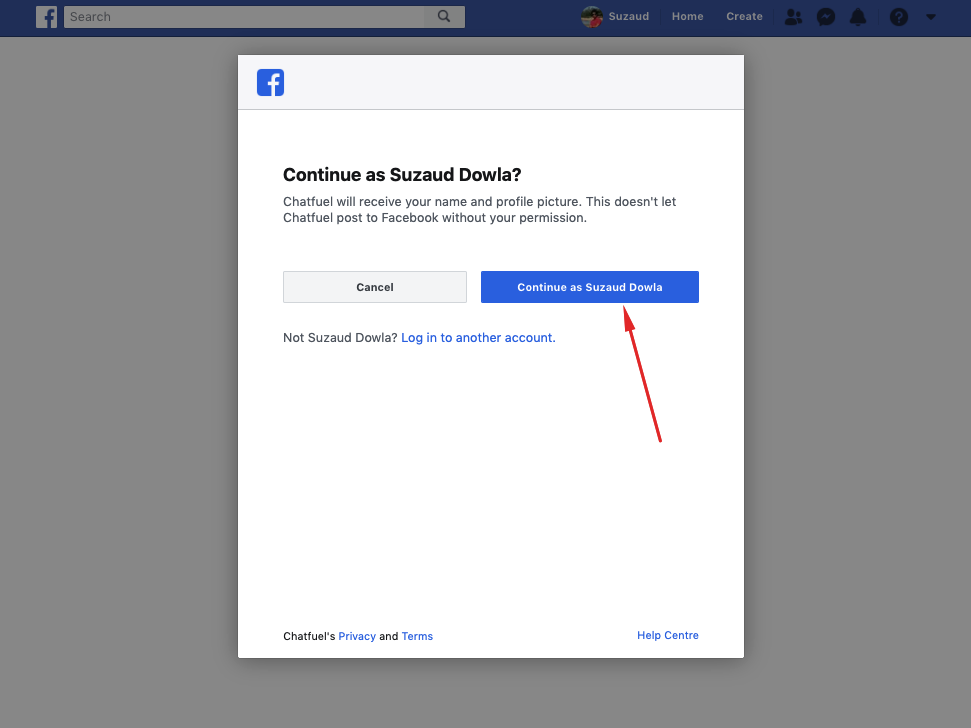
Chatfuel will receive your profile picture, email and name. However, it will not let the app publish itself on your Facebook timeline. So, rest assured!
Step 2: Link Your Facebook page
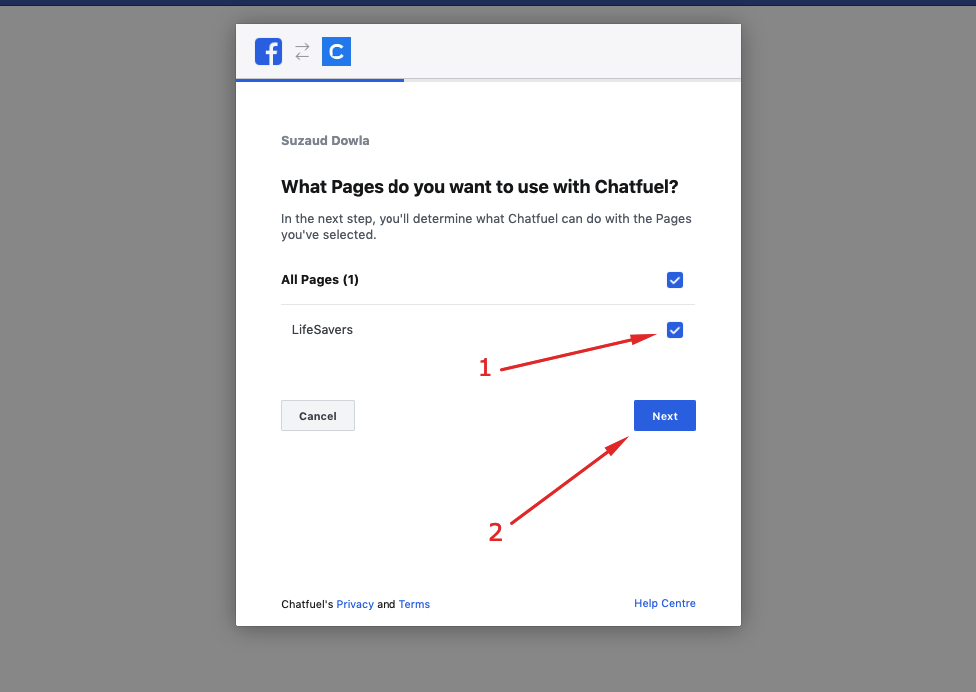
At this stage, you will have to link your Facebook page. To do so, select your Facebook page by checking it and then hit the ‘Next' button to go forward:
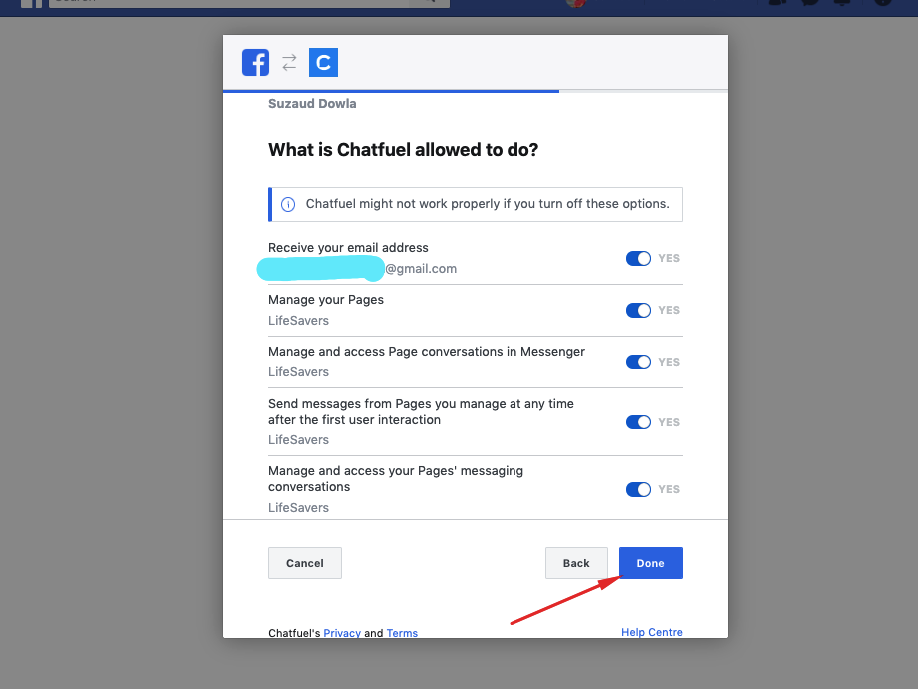
Next, Chatfuel will show you all the details that they will do for your pages. Keep all the toggle bars turned on. Now, hit the ‘Done‘ button to go to the next step:
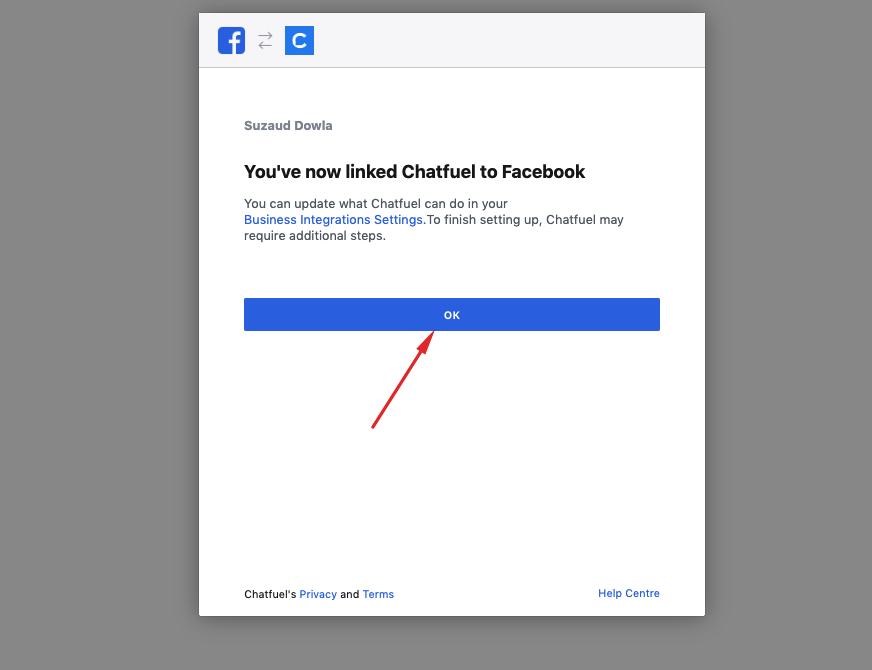
Then, you will get a success message showing that you have now linked Chatfuel to Facebook. Click ‘Ok' to proceed:
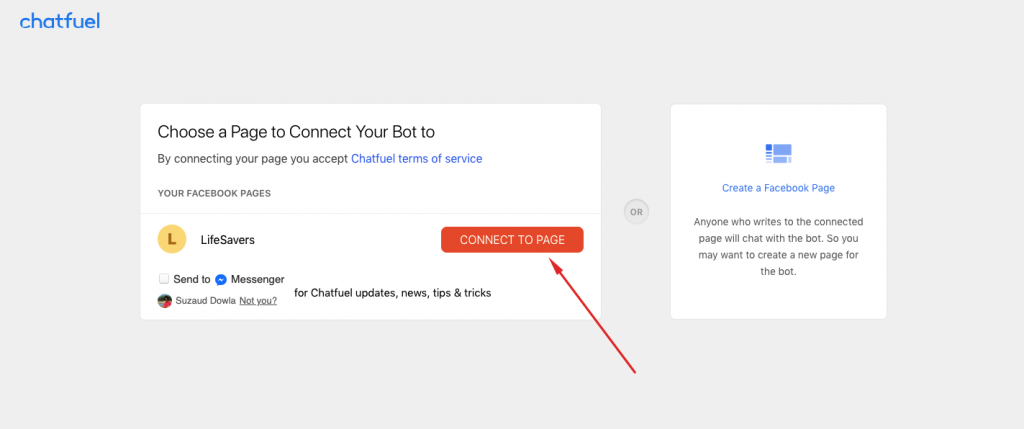
After the successful Facebook login, you will be taken to the Chatfuel account dashboard. Now, to finalize the addition of your Facebook page hit the ‘CONNECT TO PAGE‘ button.
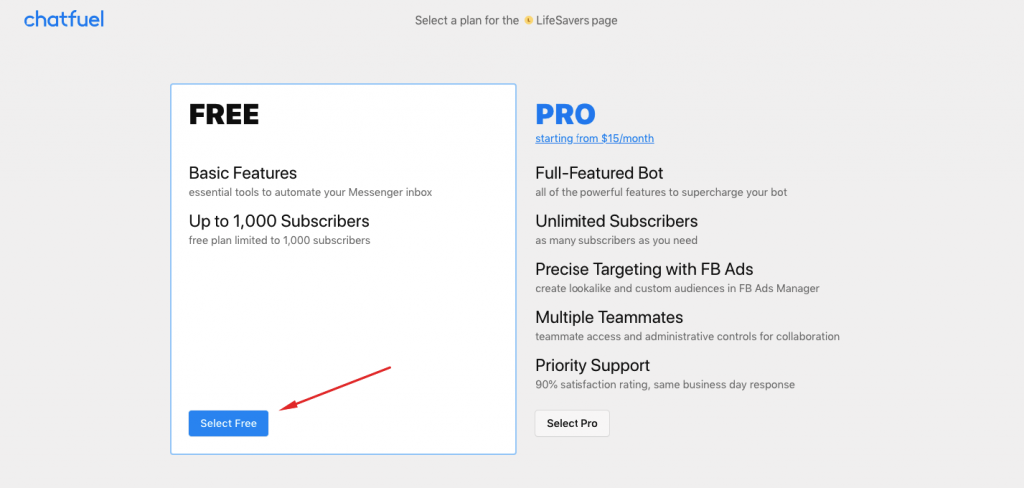
For now, we will be using the free version. You can later buy the PRO version down the road:
Step 3: Create a Messenger Greeting
Now, you will have to create a welcome message to greet your customers (We have already shown it though). This is very important because it guides your users on what to do next without thinking much.
- Go back to your Facebook page > Settings > Messaging
- Now switch the Show a Messenger Greeting toggle bar to Yes
- Now, click Change
- Now type the greeting message for your user, and then save the changes.
Step 4: Create a welcome message
You have to configure a welcome message for each session your users start a chat session with the bot. Fortunately, in Chatfuel, you can easily greet your customers with a welcome message using your first name. Follow these steps:
- Navigate to your Chatfuel dashboard and then click on Welcome Message
- Add your preferred welcome text to the box. For example, “Hi {{first name}}, may I know what are you looking for?”
That's all. You don't even save the changes by hands because it is saved automatically. To check how it works, you can visit your Facebook page and use the Message button to test its efficacy.
Step 5: Create a default reply
Sometimes, your Chatbot will fail to answer too critical questions. To answer these types of questions, you will have to set default answers to help them what to do next. For example, you can set the replies to contact your support team, rephrase their question, use email or phone number to contact the helpdesk, etc.
Follow these steps:
- Go back to your Chatfuel dashboard and select the Default Answer button.
- Now you will find a set of placeholder texts. Change the texts to something more friendly. For example: (“Pardon me. I’m can not help you out but I am forwarding your queries to the customer care department. Please be patient.”)
Again, your changes are saved automatically.
Step 6: Unleash the Power of AI
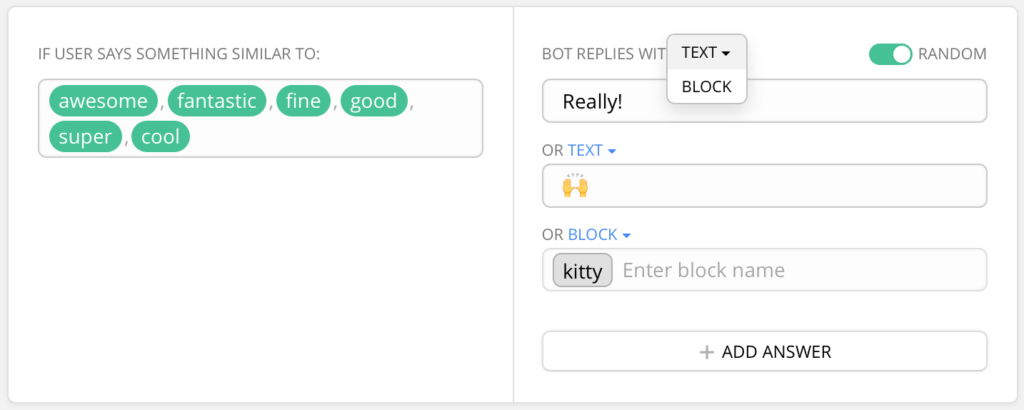
You will feel the greatness of Chatbots when they can understand almost all the queries your customer ask. And this is where the concept of AI comes to the play. Since Chatfuel uses keywords to train its AI system you will have to feed some keywords to get the most of its AI system.
Follow these steps to train the AI system of the Chatbot:
- Navigate to the Chatfuel dashboard, select Set Up AI > Add AI Rule
- Now add a keyword that your customers are likely to use like ‘Refund policy’ in the If User Says Something Similar To box
- In the accompanying Bot Replies with Text box, enter a useful reply like “We have no question asked policy but it is void until the product has the valid license period,” together with a link to your refund policy documentation page.
- Now that you know the process of adding keywords, you should keep training the bots for as many keywords as possible so that the AI system gets more efficient over time.
Bonus Tips:
You can take help from your customer care department to get the most frequently asked queries from the user to train the AI system.
Step: 7 Add a Message button to your Facebook page
The Message button does not appear automatically and so you have to set it up manually in order to make it work. Follow these steps:
- Log in to your Facebook account > Select your page > Add a Button.
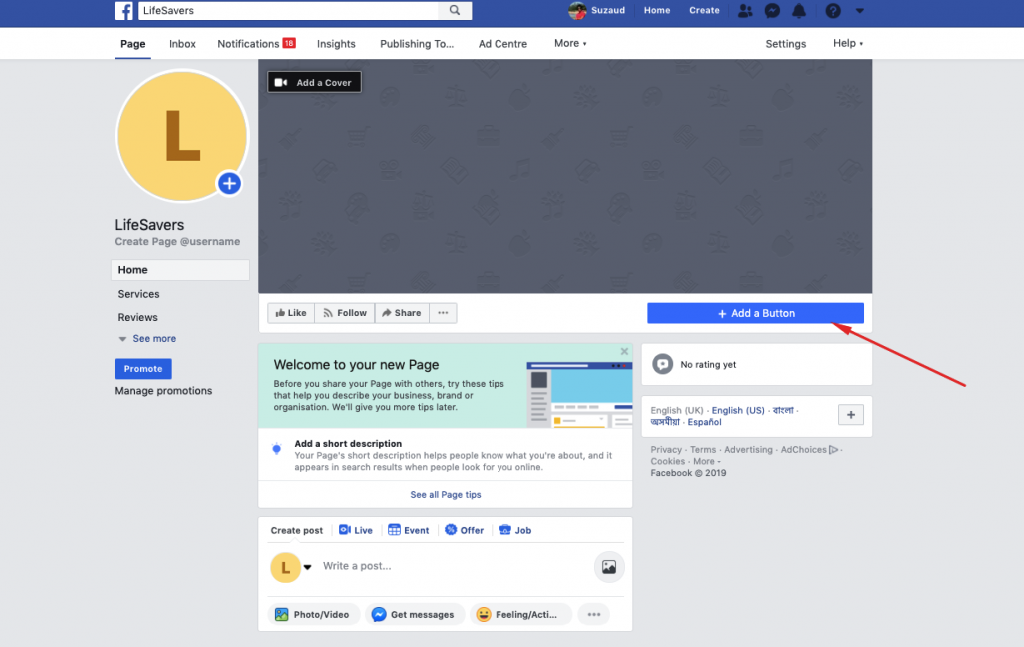
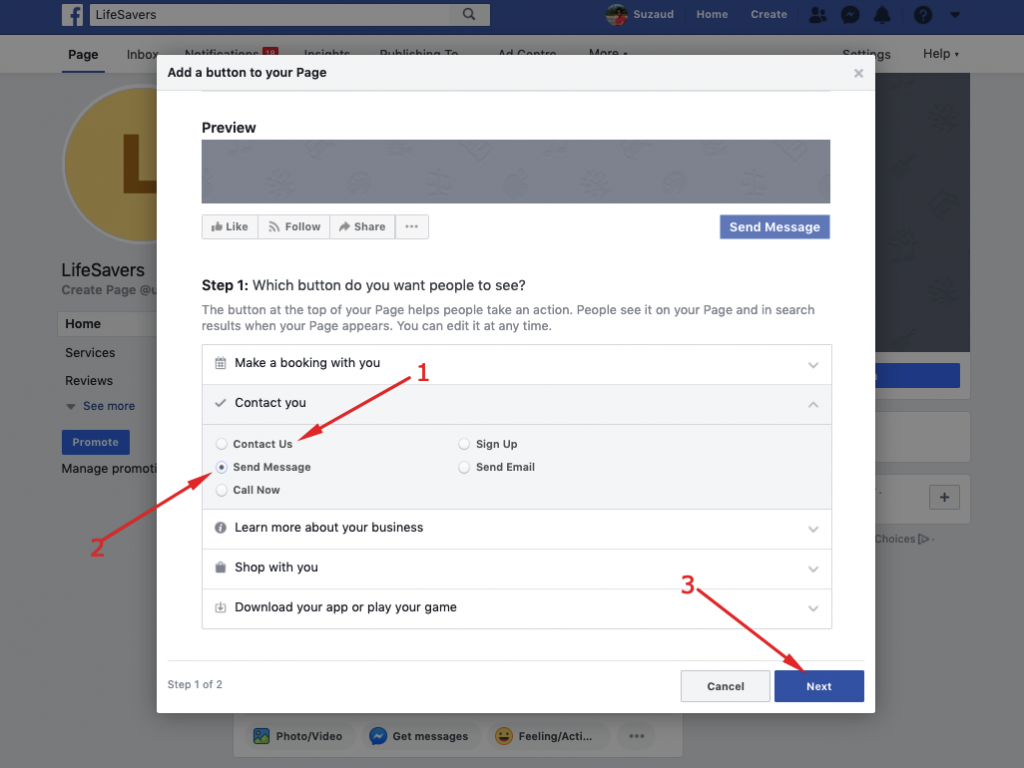
- You will get a popup window, select Contact You and Send Message option from therein:
- Select Messenger and hit the Finish button.
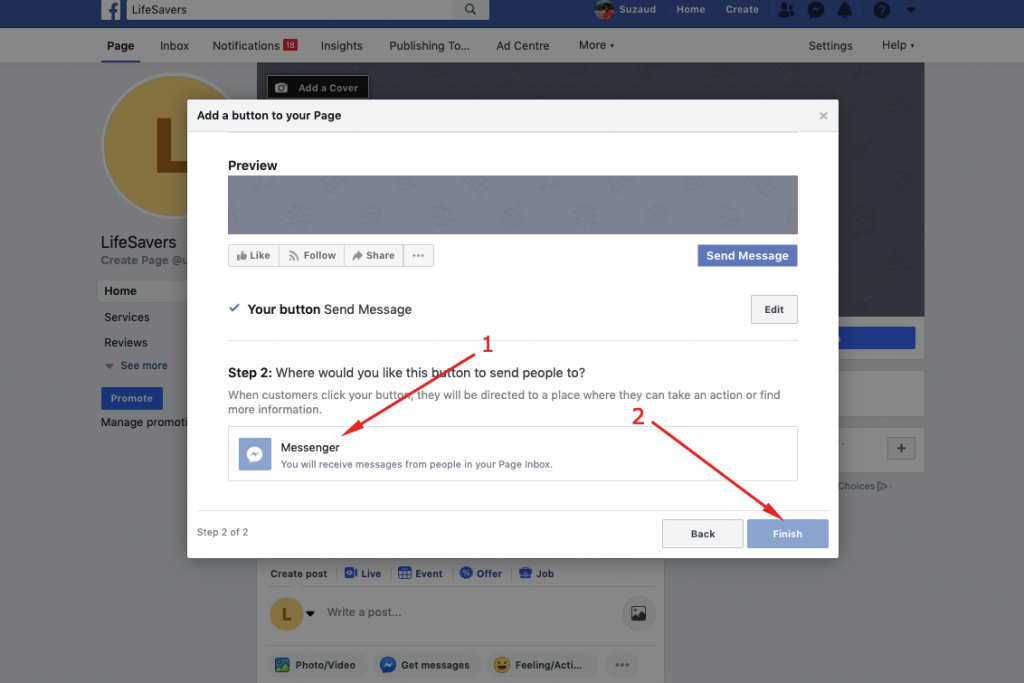
Now, the Send Message button will be discoverable publicly and your users can start chatting with the bot.
Bonus Tips:
The best part of Chatfuel is that you can embed it on your website to conduct messenger-based marketing.
To this end, you can follow their tutorial and documentation so that you can use Chatfuel on your website.
Ending Thoughts
We hope that this guide will help you set the Facebook messenger bot well on your website. Besides, the user interface of Chatfuel is also friendly enough and you will find everything under your belt quickly.
Finally, I would like to say that building the AI Facebook messenger bot will not cost you arms and legs and it is actually worth the investment. That's because you don't have to spend too much on hiring new customer support employees.

