How to Limit Login Attempts in WordPress (Plugin+Code)
Your WordPress site is like your home in the online world. Just as you'd lock your doors to keep out intruders, it's essential to secure your website against cyber threats.
One smart way to do this is by limiting login attempts. It's like setting up a guard at the gate, ready to stop anyone trying to sneak in. And as you know, WordPress is a common target for every hacker. A recent statistic on WordPress security shared by Colorlib shows that
At least 13,000 WordPress websites get hacked every day.
So, to protect your website, you must limit login attempts for your WordPress website.
If you are wondering how to limit login attempts, no worries. In this step-by-step tutorial, we are going to show you how to limit login attempts in WordPress under 10 minutes, guaranteed.
Excited? Awesome. Let's get started!
Why You Should Limit Login Attempts in WordPress
The main reason to limit login attempts on your site is to secure your website. Here are 3 main reasons to limit login attempts:
(I) Stops Brute-Force Attacks
Brute-force attacks are a common tactic where hackers use automated tools to guess usernames and passwords repeatedly until they gain access.
By default, WordPress allows unlimited attempts, making it easy for attackers to succeed through trial and error. Limiting attempts significantly reduces the chances of a successful brute-force attack.
(II) Prevents Credential Stuffing
Credential stuffing involves using stolen username and password combinations (from other data breaches) to try logging in to different websites.
With limited attempts, even if stolen credentials are used, the attacker gets locked out before guessing the right ones.
(III) Reduces Security Burden
Unlimited attempts can lead to a flood of login requests, overwhelming your server and impacting website performance.
Limiting attempts reduces the number of failed logins, lessening the strain on your server's resources.
Also Read: A Detailed WordPress Website Security Checklist
2 Easy Ways to Limit Login Attempts in WordPress

Now you know why you should limit login attempts. It's time to show you how to do that. Mainly there are two ways to limit login attempts in WordPress. They are:
- Limit Login Attempts Using a Plugin
- Limit Login Attempts Manually
We will show you both ways with the required screenshots and code. So, without any further ado, let's get started with the tutorial!
Method 01: Limit Login Attempts in WordPress Using a Plugin
There are several WordPress limit login attempts plugins available, to be honest. You can go to the WordPress plugin repository and simply search for the plugin – “WordPress limit login plugins” and you'll get a number of plugins. Choose a trusted plugin as per your choice.
However, in this tutorial, we are going to use the “Limit Login Attempts Reloaded” plugin to show you how to limit login attempts for your WordPress site. This is the most popular plugin in this category with more than 2+ Million active installs and an unbelievable 4.9 out of 5 ratings.
Now let's get started with the tutorial!
Step 01: Install the Limit Login Attempts Reloaded Plugin
Log in to your WordPress backend and navigate to Plugins -> Add New Plugin. There is a search box to search for the plugin. Type in the plugin name – Limit Login Attempts Reloaded and then install the plugin from the search result.
Finally, activate the plugin to use it on your site.

Step 02: Configure the Limit Login Attempts Reloaded Plugin
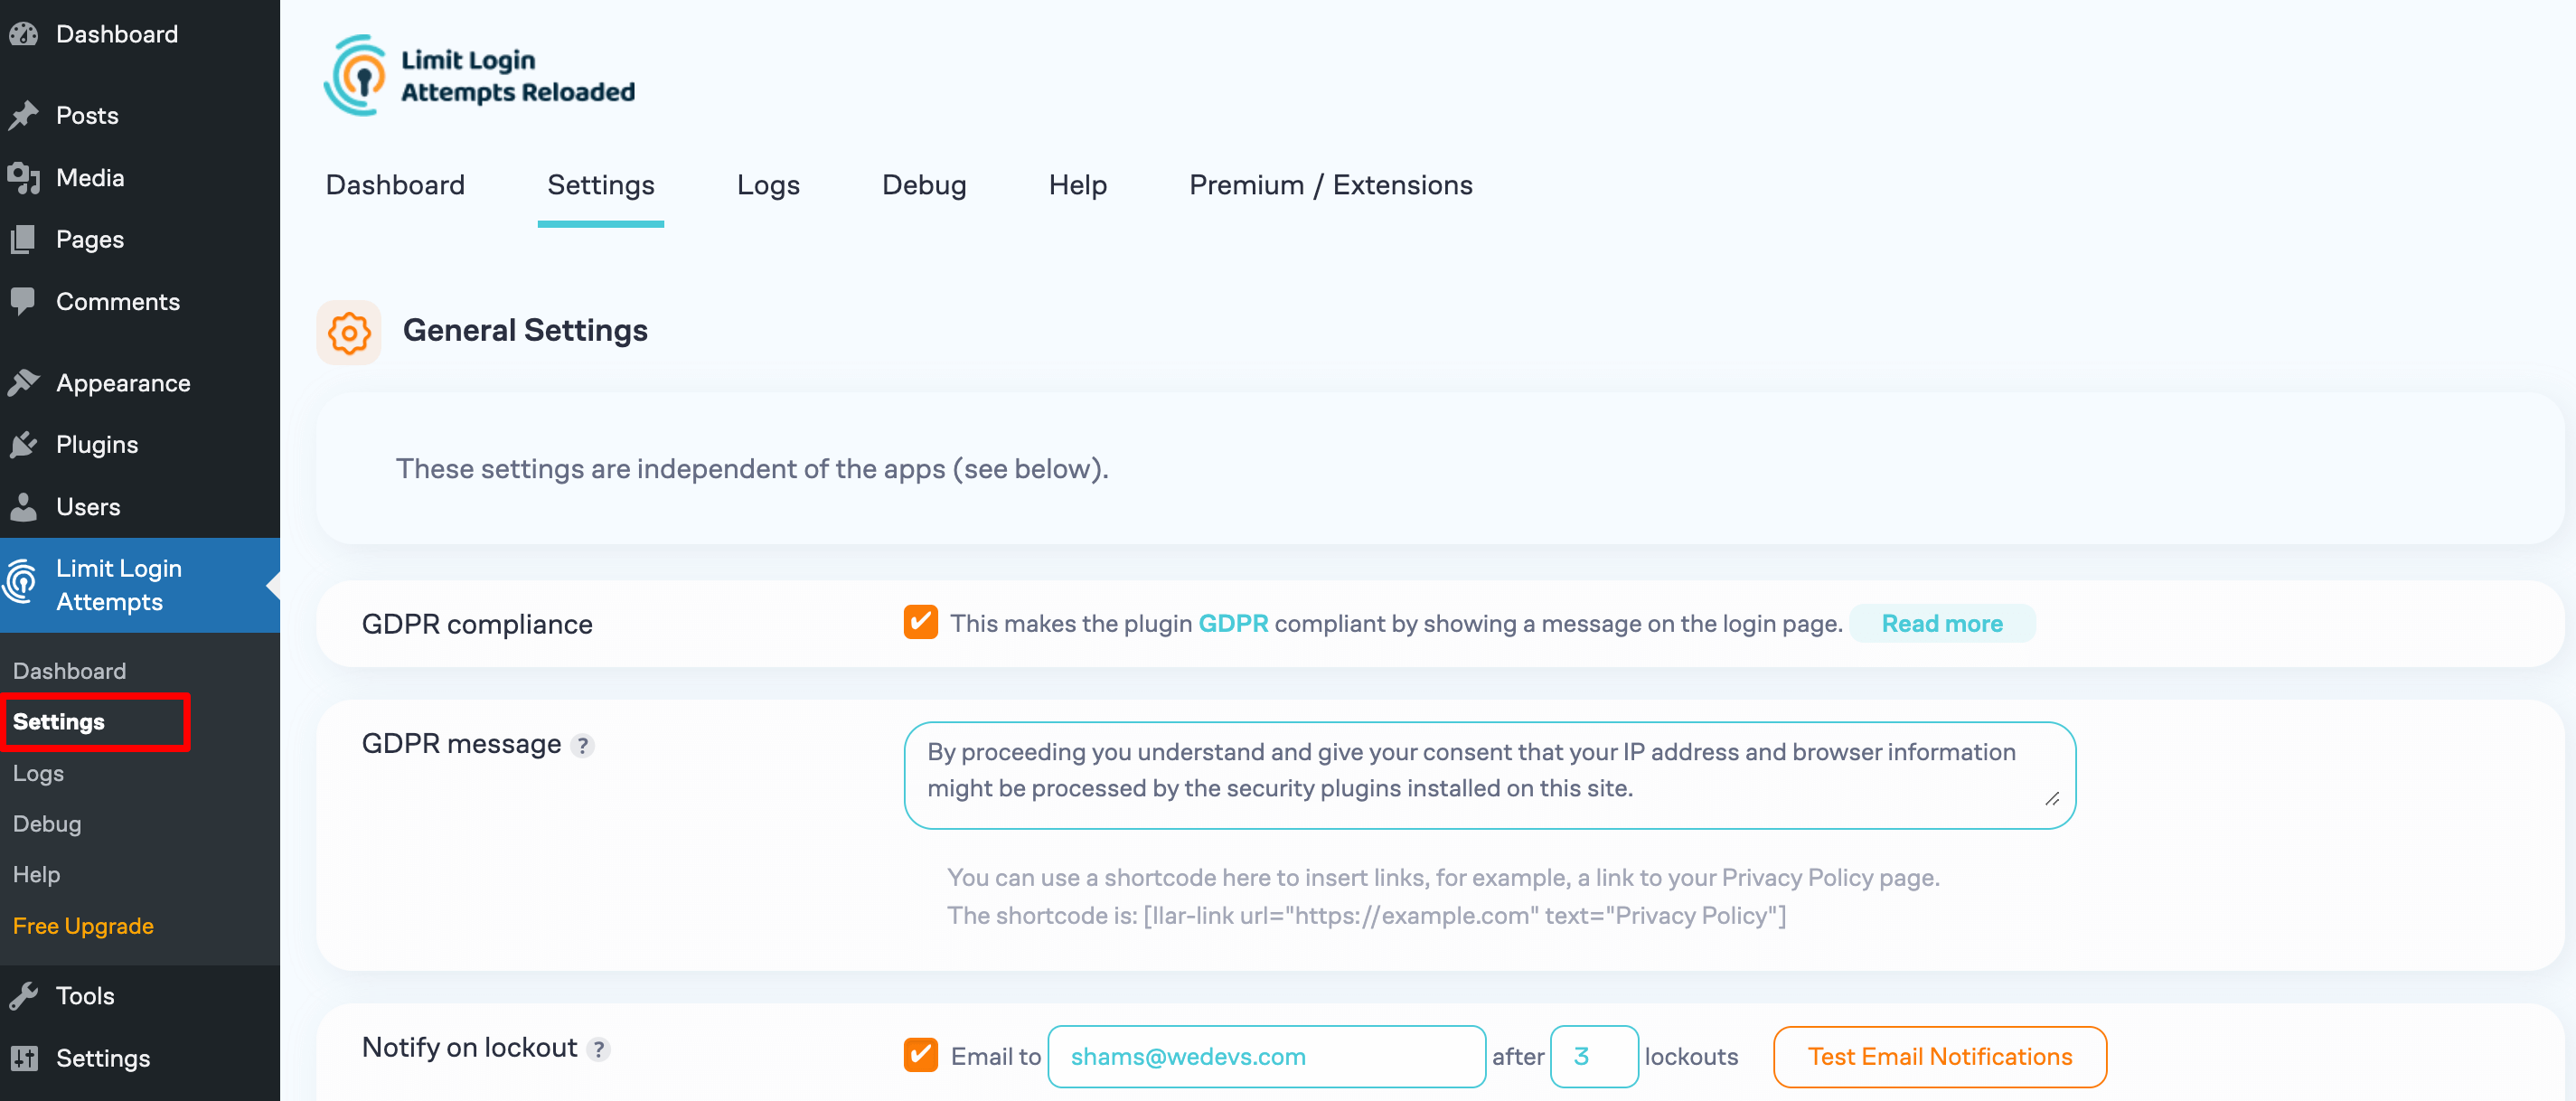
After activating the plugin, navigate to your WordPress dashboard. There you'll find a new option on the left panel – Limit Login Attempts.
Now hover on the Limit Login Attempts option and click on the Settings button. It will take you to a new interface.
Here you can click the GDPR compliance option to show the GDPR message on your login page. Also, you should insert your email here to get updates on who is locked out from your site.
Now scroll down a bit and focus on the Local App segment.
There are a few options to configure:
- Allowed retries: Number of failed attempts allowed before locking out.
- Minutes lockout: Lockout time in minutes.
- Lockout time: After the specified number of lockouts the lockout time will increase by specified hours.
- Hours until retries are reset: Time in hours before blocks are removed.
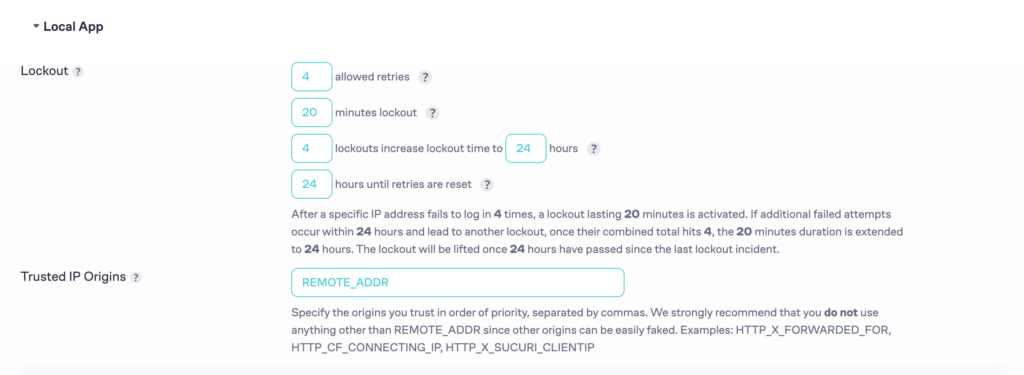
After configuring these options, don't forget to hit the Save Settings button to save all the changes.
Step 03: Check If It's Working
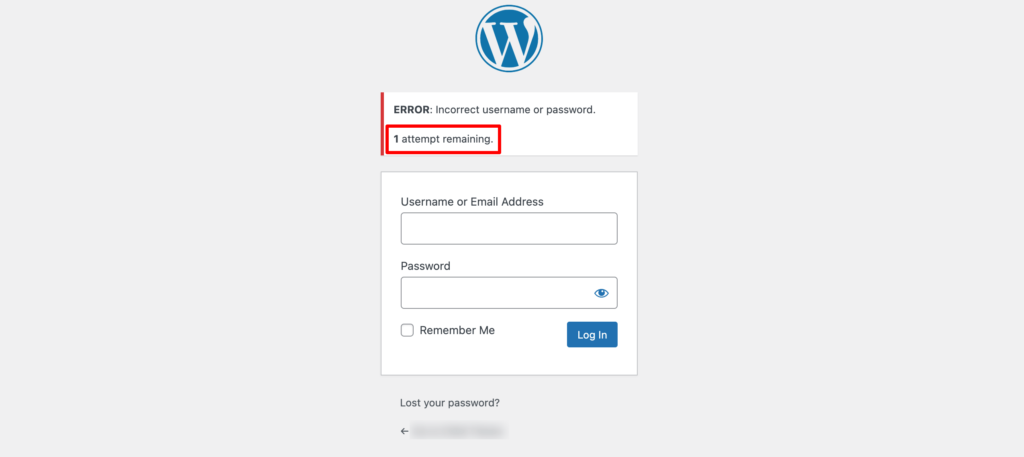
Now log out from your WordPress website and try to log in again with the wrong credentials. If it shows how many attempts remaining or locks you out, we can say that it's perfectly working.
Now navigate to Limit Login Attempts -> Dashboard to check the failed login report.
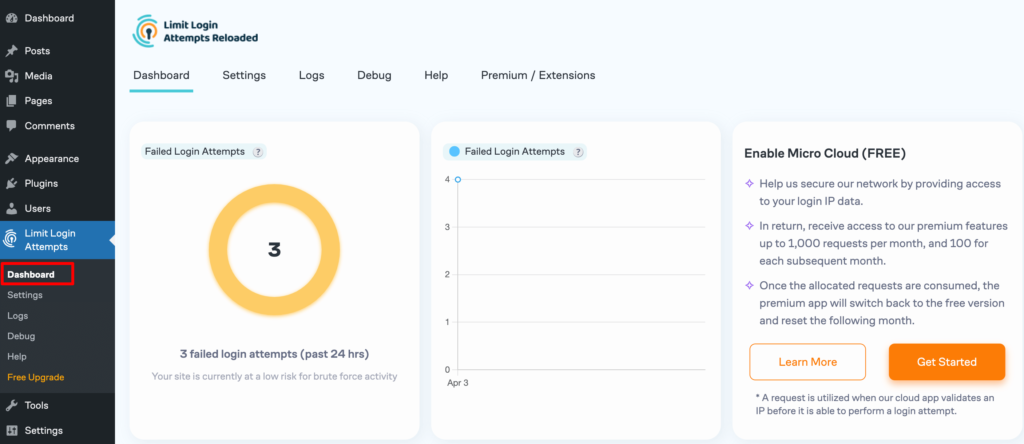
That's all!
That's how you can limit login attempts on your website using a WordPress plugin.
Method 02: Limit Login Attempts Manually (Coding)
If you don't want to add an extra plugin to limit login attempts, you can do so by accessing your functions.php file.
To do that, you need to log in to your control panel (cPanel). Then navigate to File Manager -> public_html -> wp-content -> themes -> your currently activated theme.
There you'll find the functions.php file.
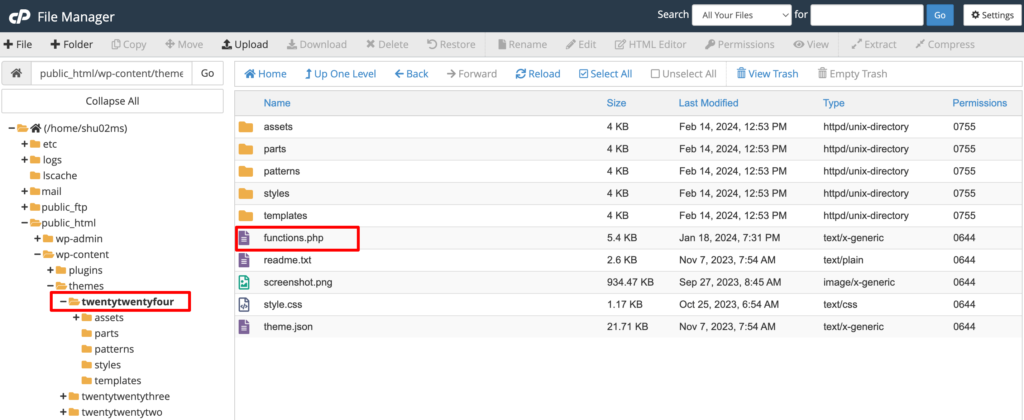
Click on the file and paste this code at the bottom of the file.
Finally, save the file to complete this process.
function check_attempted_login( $user, $username, $password ) {
    if ( get_transient( 'attempted_login' ) ) {
        $datas = get_transient( 'attempted_login' );

        if ( $datas['tried'] >= 3 ) {
            $until = get_option( '_transient_timeout_' . 'attempted_login' );
            $time = time_to_go( $until );

            return new WP_Error( 'too_many_tried',  sprintf( __( '<strong>ERROR</strong>: You have reached authentication limit, you will be able to try again in %1$s.' ) , $time ) );
        }
    }

    return $user;
}
add_filter( 'authenticate', 'check_attempted_login', 30, 3 );
function login_failed( $username ) {
    if ( get_transient( 'attempted_login' ) ) {
        $datas = get_transient( 'attempted_login' );
        $datas['tried']++;

        if ( $datas['tried'] <= 3 )
            set_transient( 'attempted_login', $datas , 300 );
    } else {
        $datas = array(
            'tried'     => 1
        );
        set_transient( 'attempted_login', $datas , 300 );
    }
}
add_action( 'wp_login_failed', 'login_failed', 10, 1 );

function time_to_go($timestamp)
{

    // converting the mysql timestamp to php time
    $periods = array(
        "second",
        "minute",
        "hour",
        "day",
        "week",
        "month",
        "year"
    );
    $lengths = array(
        "60",
        "60",
        "24",
        "7",
        "4.35",
        "12"
    );
    $current_timestamp = time();
    $difference = abs($current_timestamp - $timestamp);
    for ($i = 0; $difference >= $lengths[$i] && $i < count($lengths) - 1; $i ++) {
        $difference /= $lengths[$i];
    }
    $difference = round($difference);
    if (isset($difference)) {
        if ($difference != 1)
            $periods[$i] .= "s";
            $output = "$difference $periods[$i]";
            return $output;
    }
}
Now log out from your WordPress site and again try to log in with the wrong credentials. If it locks you out from your website, that means you have successfully implemented the limit login attempts feature for your WordPress website.
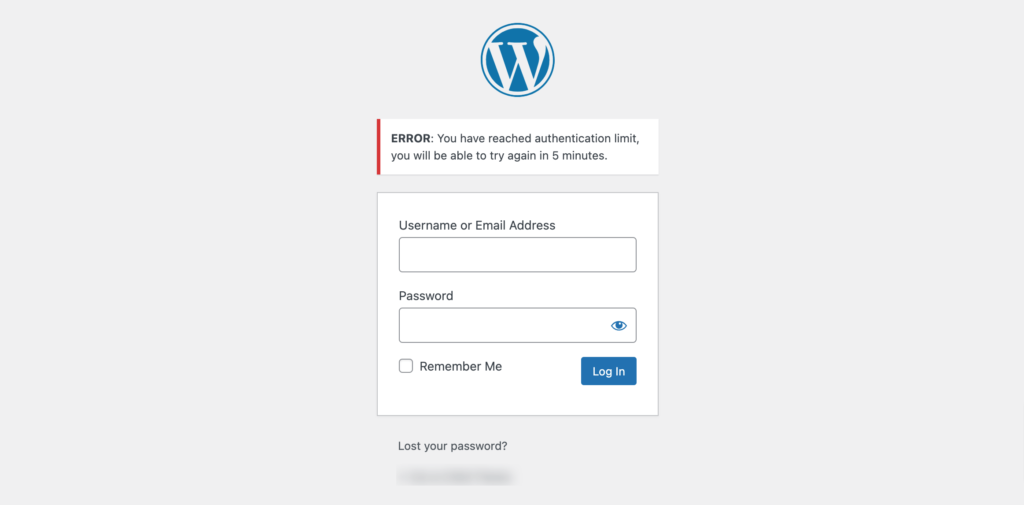
Congratulations!
Now you know how to limit login attempts in WordPress with and without using a plugin.
Bonus: Best Practices to Improve Your Login Security
Improving login security on your WordPress site is crucial to safeguard your website and its data from unauthorized access.
Here are some best practices to enhance your login security:
- Set a Strong Login Password: Use a complex and unique password for your WordPress login. Avoid common passwords like “password123” or easily guessable phrases. Opt for a mix of uppercase and lowercase letters, numbers, and special characters. Longer passwords are generally more secure. Additionally, consider using a password manager to generate and securely store your passwords.
- Use reCAPTCHA: Integrate reCAPTCHA into your login page to prevent automated bots from attempting to brute force their way into your site. reCAPTCHA requires users to verify that they are human by completing a simple challenge, such as selecting images or solving puzzles. This helps block malicious bots while allowing legitimate users to access your site without hindrance.
- Implement Two-Factor Authentication (2FA): Enable two-factor authentication for an extra layer of security beyond just a password. With 2FA, users are required to provide a second form of verification, such as a temporary code sent to their mobile device or generated by an authentication app, in addition to their password. This significantly reduces the risk of unauthorized access, even if passwords are compromised.
- Disable Inactive Users: Regularly review and disable inactive user accounts to minimize the risk of unauthorized access. Unused or dormant accounts can be easy targets for hackers to exploit. Consider implementing automated processes to deactivate accounts that have been inactive for a specified period or require users to periodically confirm their activity.
By implementing these best practices, you can significantly improve the login security of your WordPress site, reducing the risk of unauthorized access and enhancing overall protection against malicious activities.
Wrapping up the How to Limit Login Attempts in WordPress
That's it for our guide on limiting login attempts in WordPress! Remember, this simple step can make a big difference in keeping your site safe from online threats. It's like putting a lock on your digital door – essential for protecting your valuable information.
As you go forward with your website, keep security in mind. Stay updated on the latest security tips and be ready to adjust your measures as needed. After all, keeping your site safe is an ongoing job.
So, feel confident in strengthening your site's security. By limiting login attempts, you're not just protecting yourself, but also your visitors. Here's to a safer, happier WordPress community – one step at a time. Stay safe and keep thriving online!