

How to Automatically Share Your Old WordPress Posts on Social Media
Do you want to auto share WordPress posts to social media? You have come to the right place.
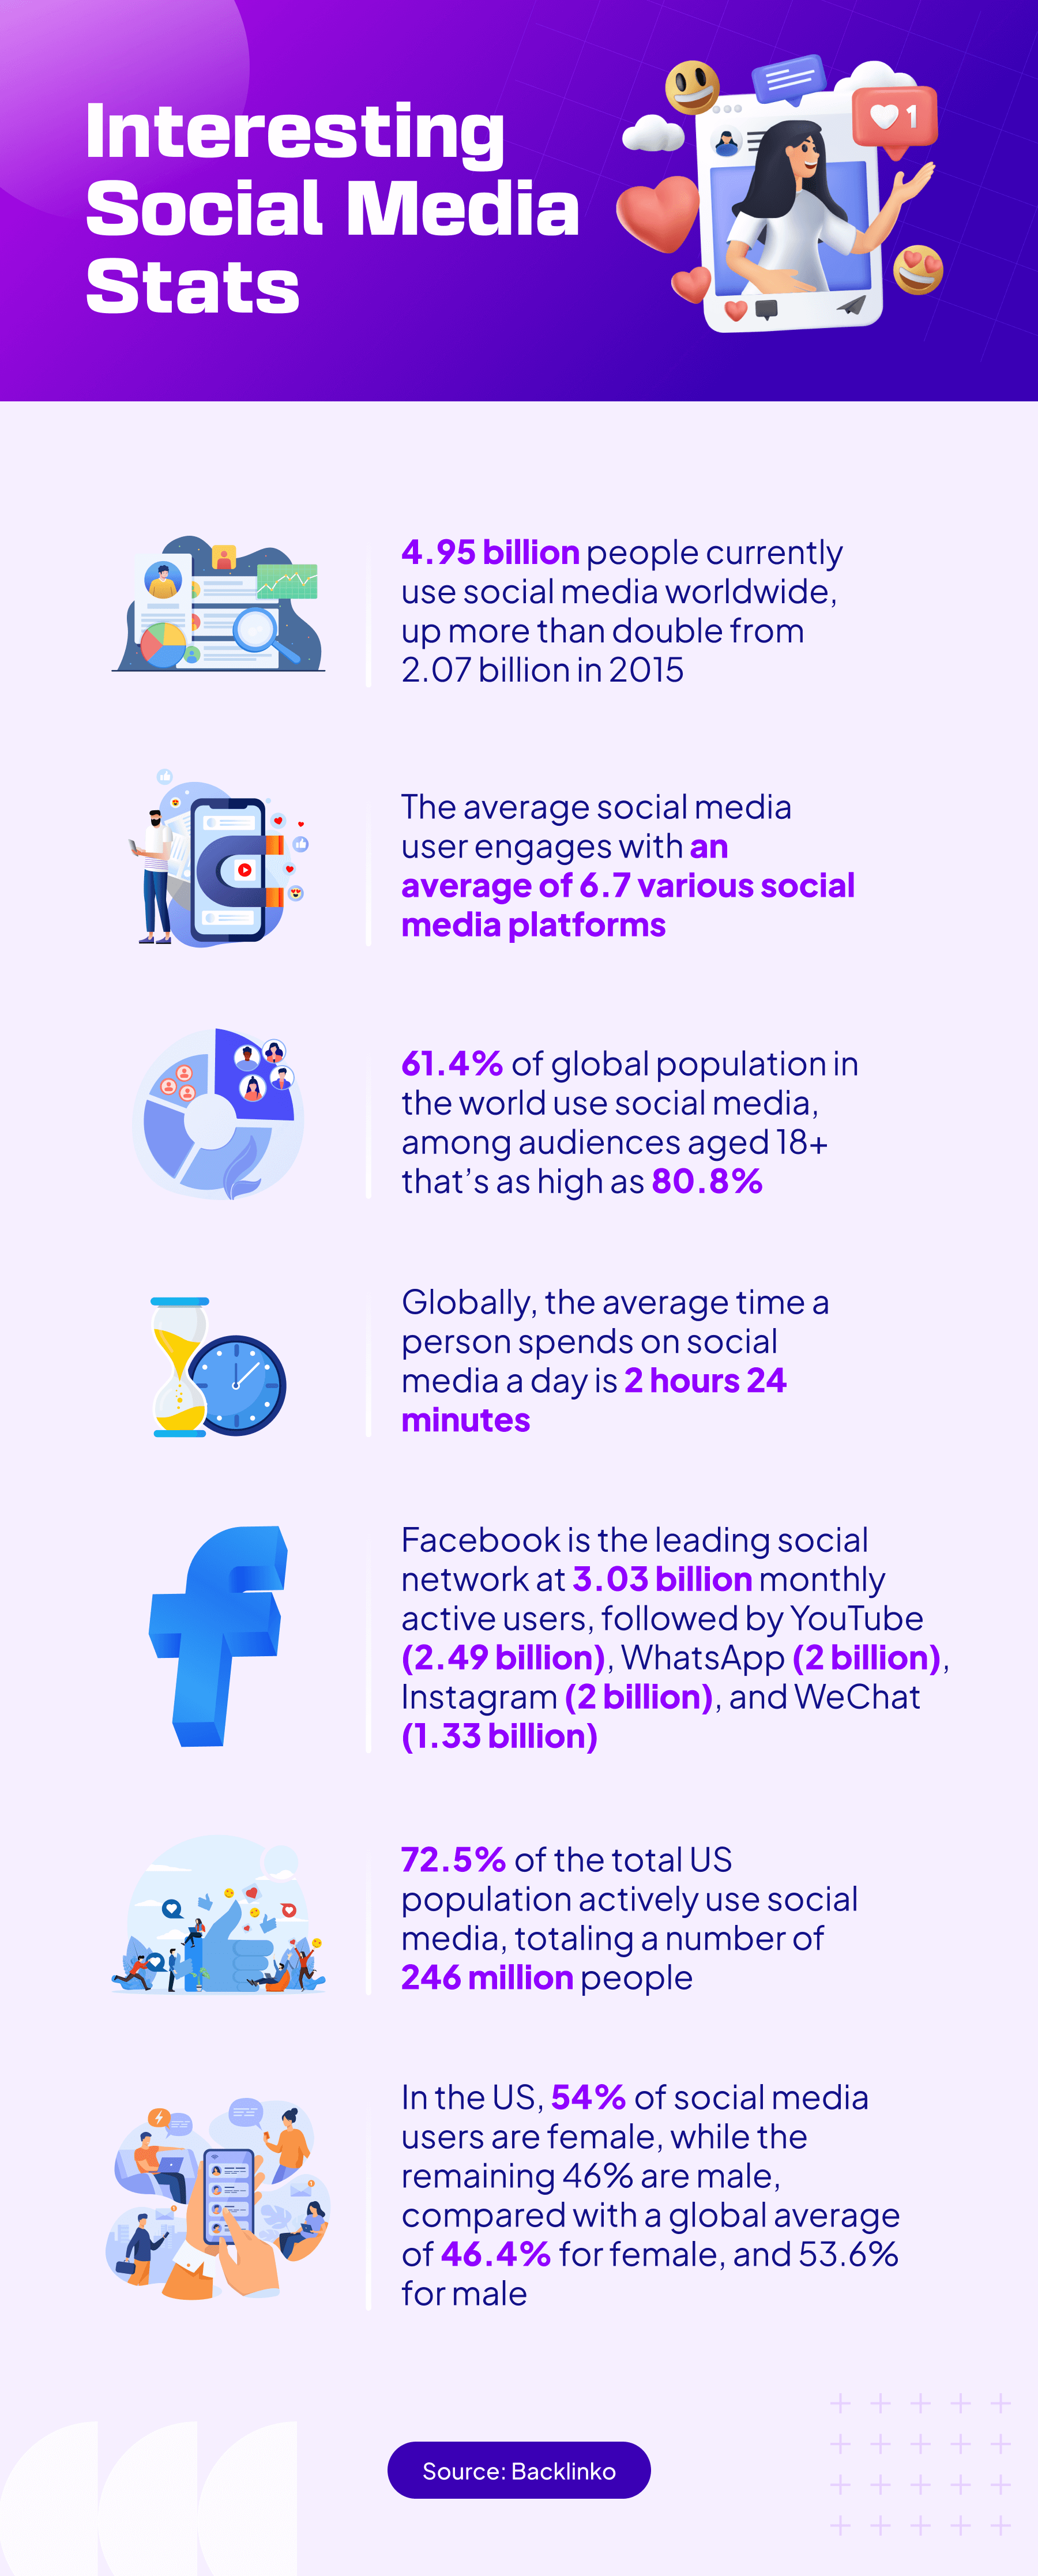
As of July 2024, the number of people using social media is 5.17 billion (source: Backlinko). That's more than half of the global population. The number has surely crossed 5.5 billion by now!! This is your cue to leverage social media to gain visibility for your brand and website.
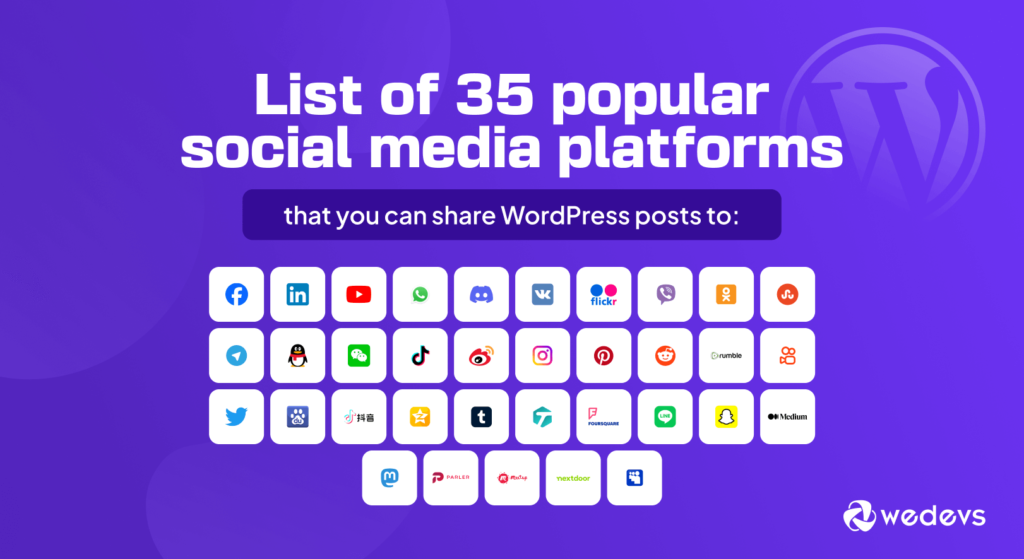
There are quite a few popular social media platforms including Facebook, X (formerly known as Twitter), Linkedin, Quora, Reddit, Mastodon, etc. With so many options, you may find it tough to use all of them to post your website content.
But what if you can automatically share WordPress posts to these social media platforms? If you are a WordPress user, then you are in luck. You can easily share your posts automatically to the social platforms of your choice.
How?
In this write-up, we are going to show you how to share WordPress posts to social media automatically right after your post is live.
So, let's get started!
The Benefits of Sharing WordPress Posts to Social Media
76% of people use their Facebook feed to find interesting content, and 43% of consumers are more likely to buy a product they learned about on social media.
This should tell you how important it is to share your posts and content to social media. There are more benefits of using social media to promote your content-
- You get free traffic, as most of the social media platforms let you post content without any cost
- Increase visibility for your posts and brand
- Keep your consumers in the loop about new updates and create a better relationship with them
- Boost your Search Engine Rankings
- Create a community around your brand/site
People working to get their brand noticed, use social media to the fullest. So, why not you?
You can share your WordPress content to social media in two ways-
- Manually
- Automatically
However, there are downsides of sharing posts manually.
Downsides of Sharing Posts Manually
If you are posting only in 1 or 2 or even 3 social media platforms, then you can post manually. But if you want to get more visibility and use as many social media platforms as possible, then going manually will not do the job. Because –
- It takes a lot of time as you have to post one at a time
- You may forget to post on one of the social platforms by mistake
- You can also forget to share the post after making it live
- To do it manually, you may need to hire a social media expert which will increase your budget
- Posting manually will harm your productivity and efficiency
Imagine you are publishing 10-20 or even 100 posts a day. Is it possible to share them one by one to every social media platform?
Hell no!
Benefits of Sharing Posts Automatically
On the other hand, posting automatically-
- Saves you a lot of time
- All the posts will be shared on every social media platform
- There is no need to hire a social media expert
- Increase productivity and efficiency
- Boost visibility of your brand.
Now we will share the ways you can auto share WordPress posts to social media.
How to Auto Share WordPress Posts to Social Media

We are at the crucial part of our blog. Now we will show you how to auto share WordPress posts to social media platforms.
We are going to show you the process using two plugins-
- Revive Social
- Jetpack Social
Both of this plugin are very popular and have a healthy number of active installations.
We will start with-
Using Revive Social Plugin to Share WordPress Posts
We are going to show you the automatic post-sharing process using the Revive Old Posts plugin.
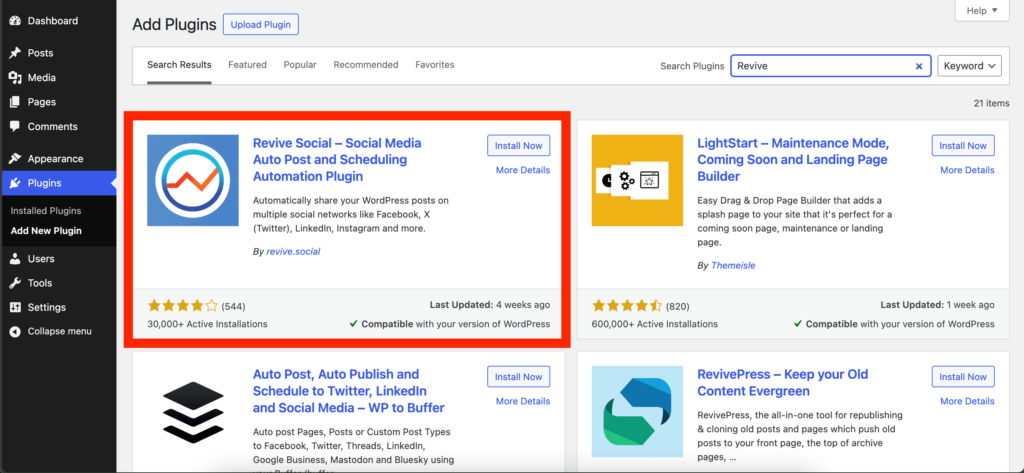
Step 1: Install and Activate the Revive Social Plugin
Firstly, you need to install and activate the Revive Social plugin from the WordPress dashboard. Just go to WP-Admin –> Plugins –> Add New. There search for the Revive Social plugin. Install and activate it.
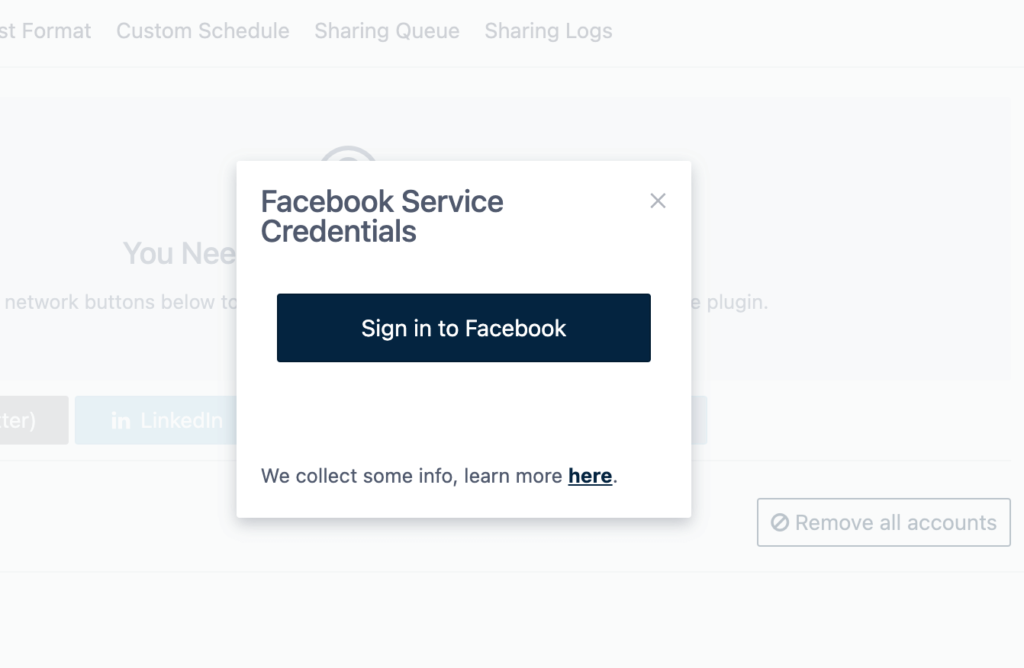
Step 2: Connect Your Social Media Account
Next, you need to connect your social media account. In the free version, you can connect Facebook and X (Formerly known as Twitter).

We are going to connect to Facebook. Just type your credentials to connect to your Facebook account.
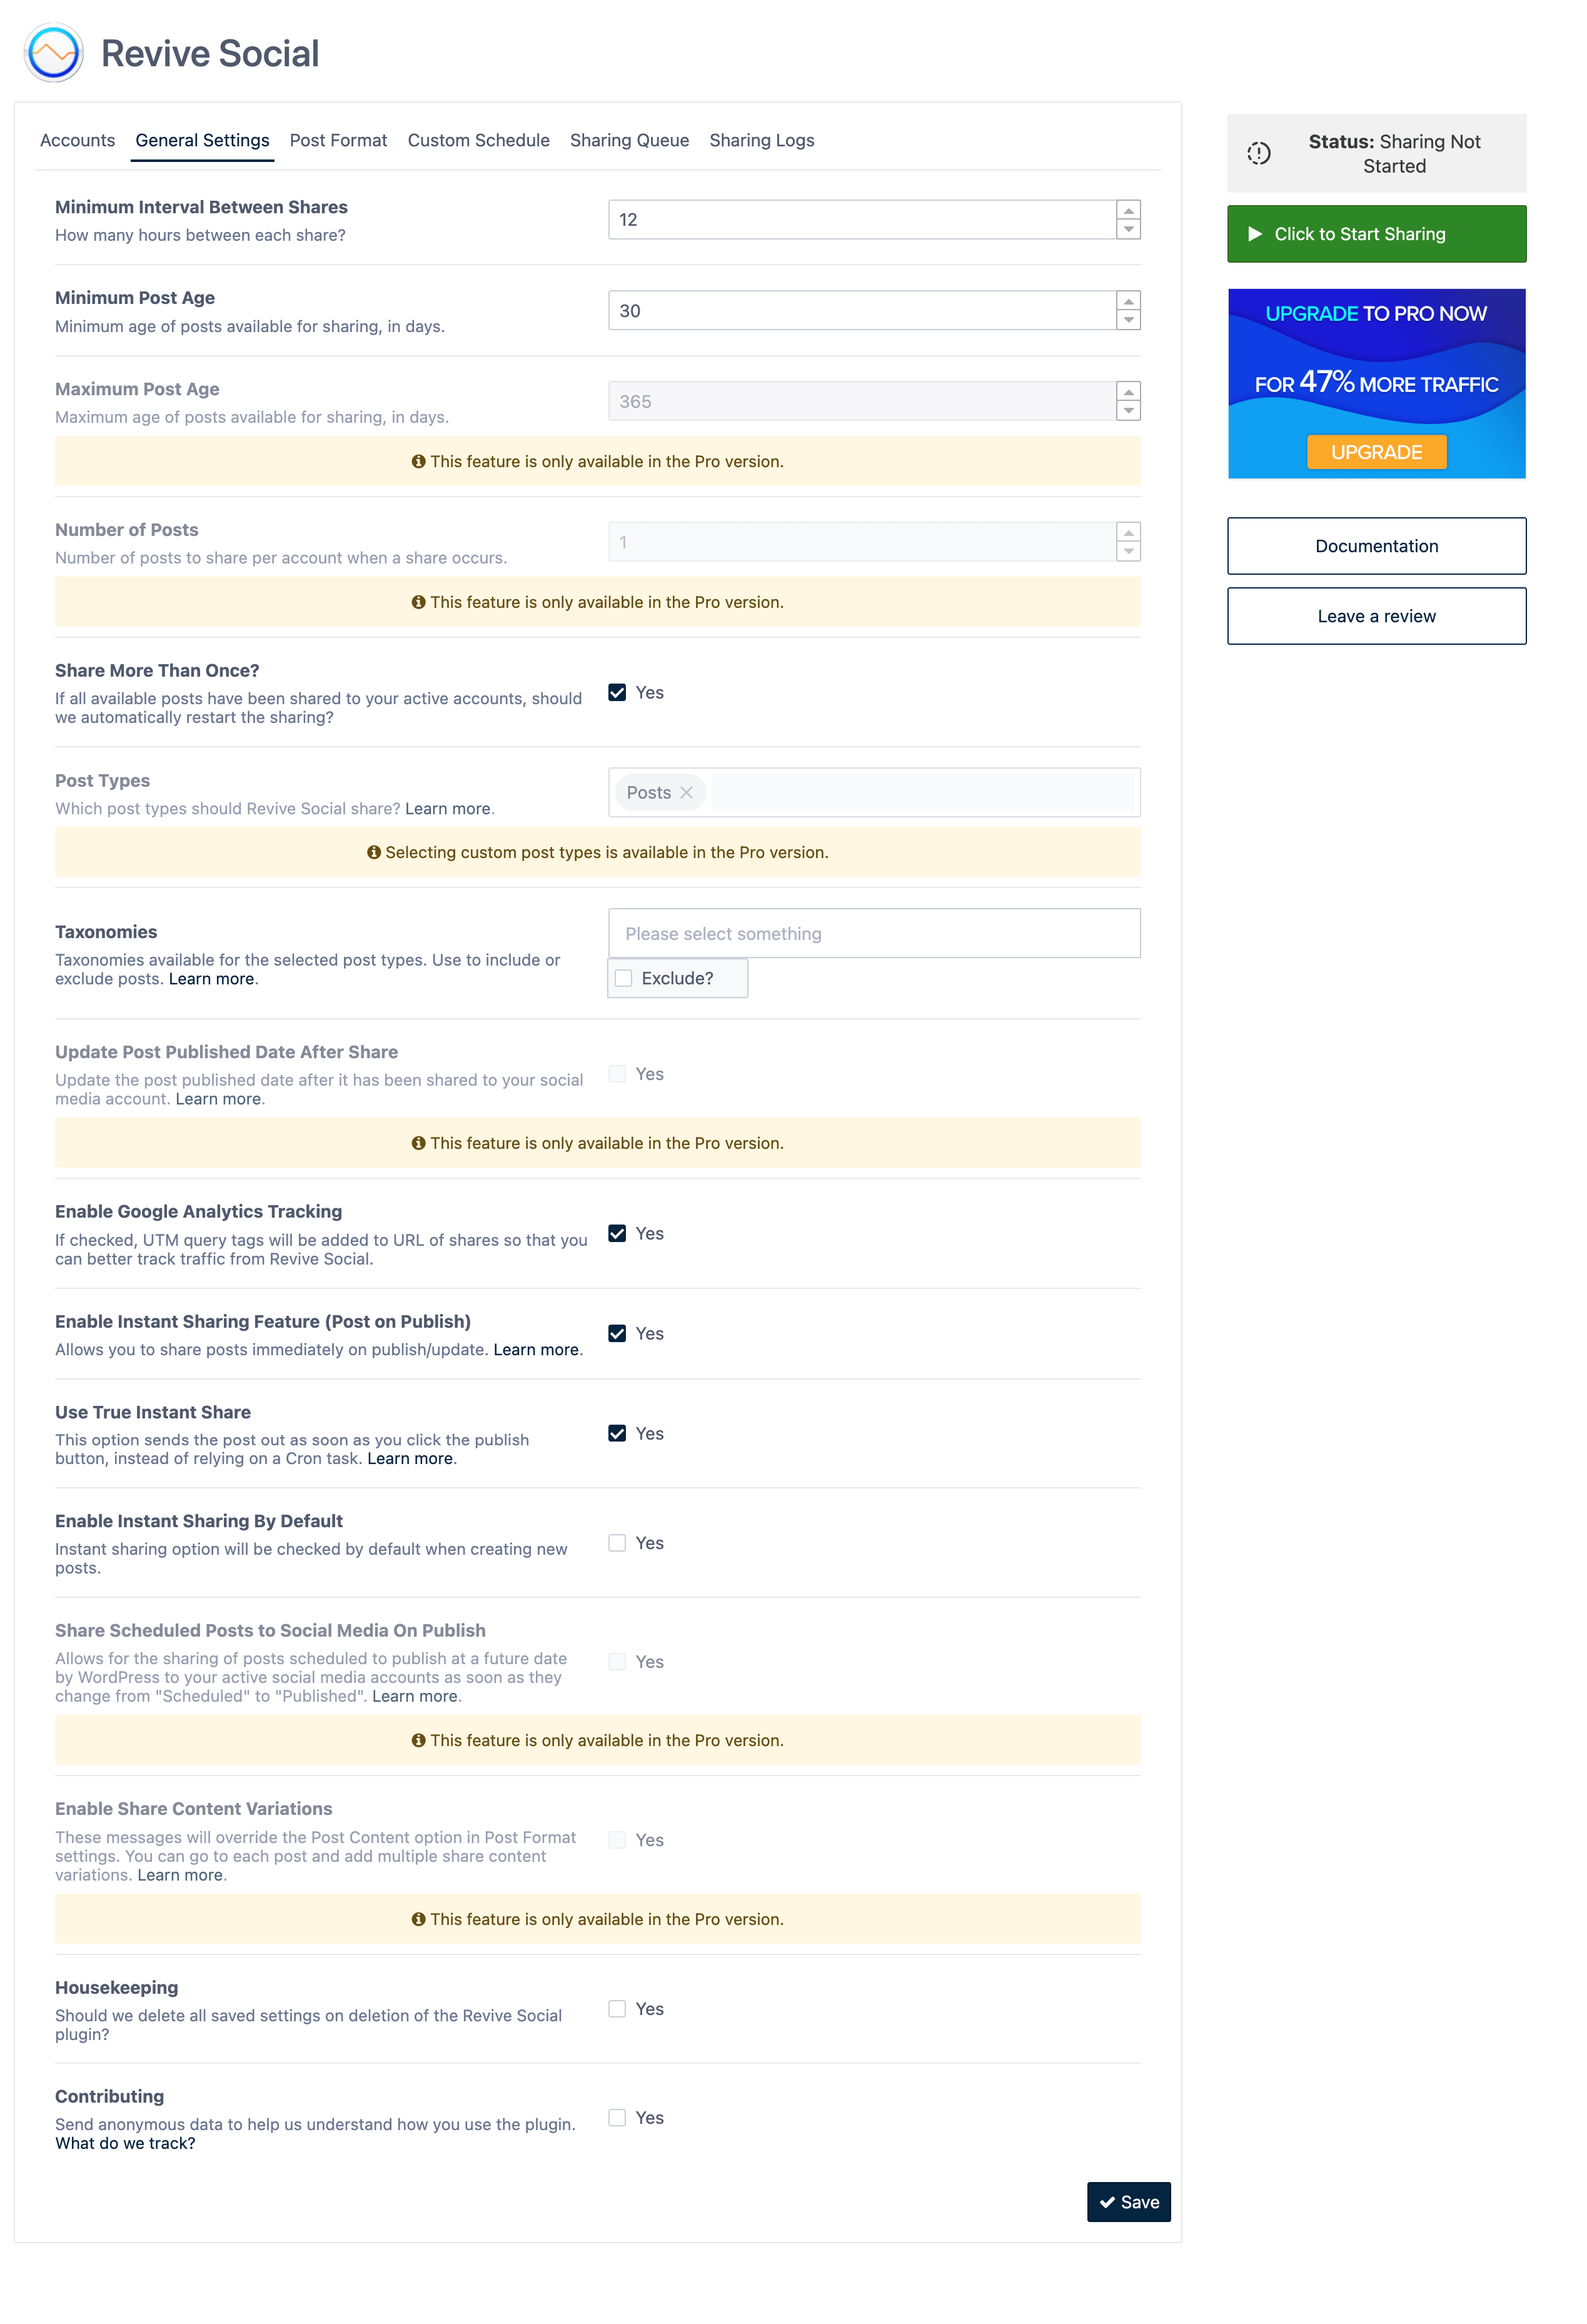
Step 3: Configure the General Settings
Now you need to configure the general settings. You can set the ‘Minimum Interval Between Shares’. This is how many hours the plugin will wait in between sharing each post. Also, set the ‘Minimum Post Age’. This is the number of days that need to pass before the post is considered ‘old.’
If you want to share old posts again after all your old content has been shared, simply check the box next to ‘Share More Than Once.’ You can also add categories that are located next to Taxonomies.
Also, check Google Analytics to track your posts and check the box next to ‘Enable Instant Sharing Feature” to share the posts right after they are published.
Step 4: Customize Post Format
Now you need to customize how your posts will look while sharing to social media accounts. In the Post Format section, write the maximum characters of the message, enable the include link option to get more traffic, and add hashtags.
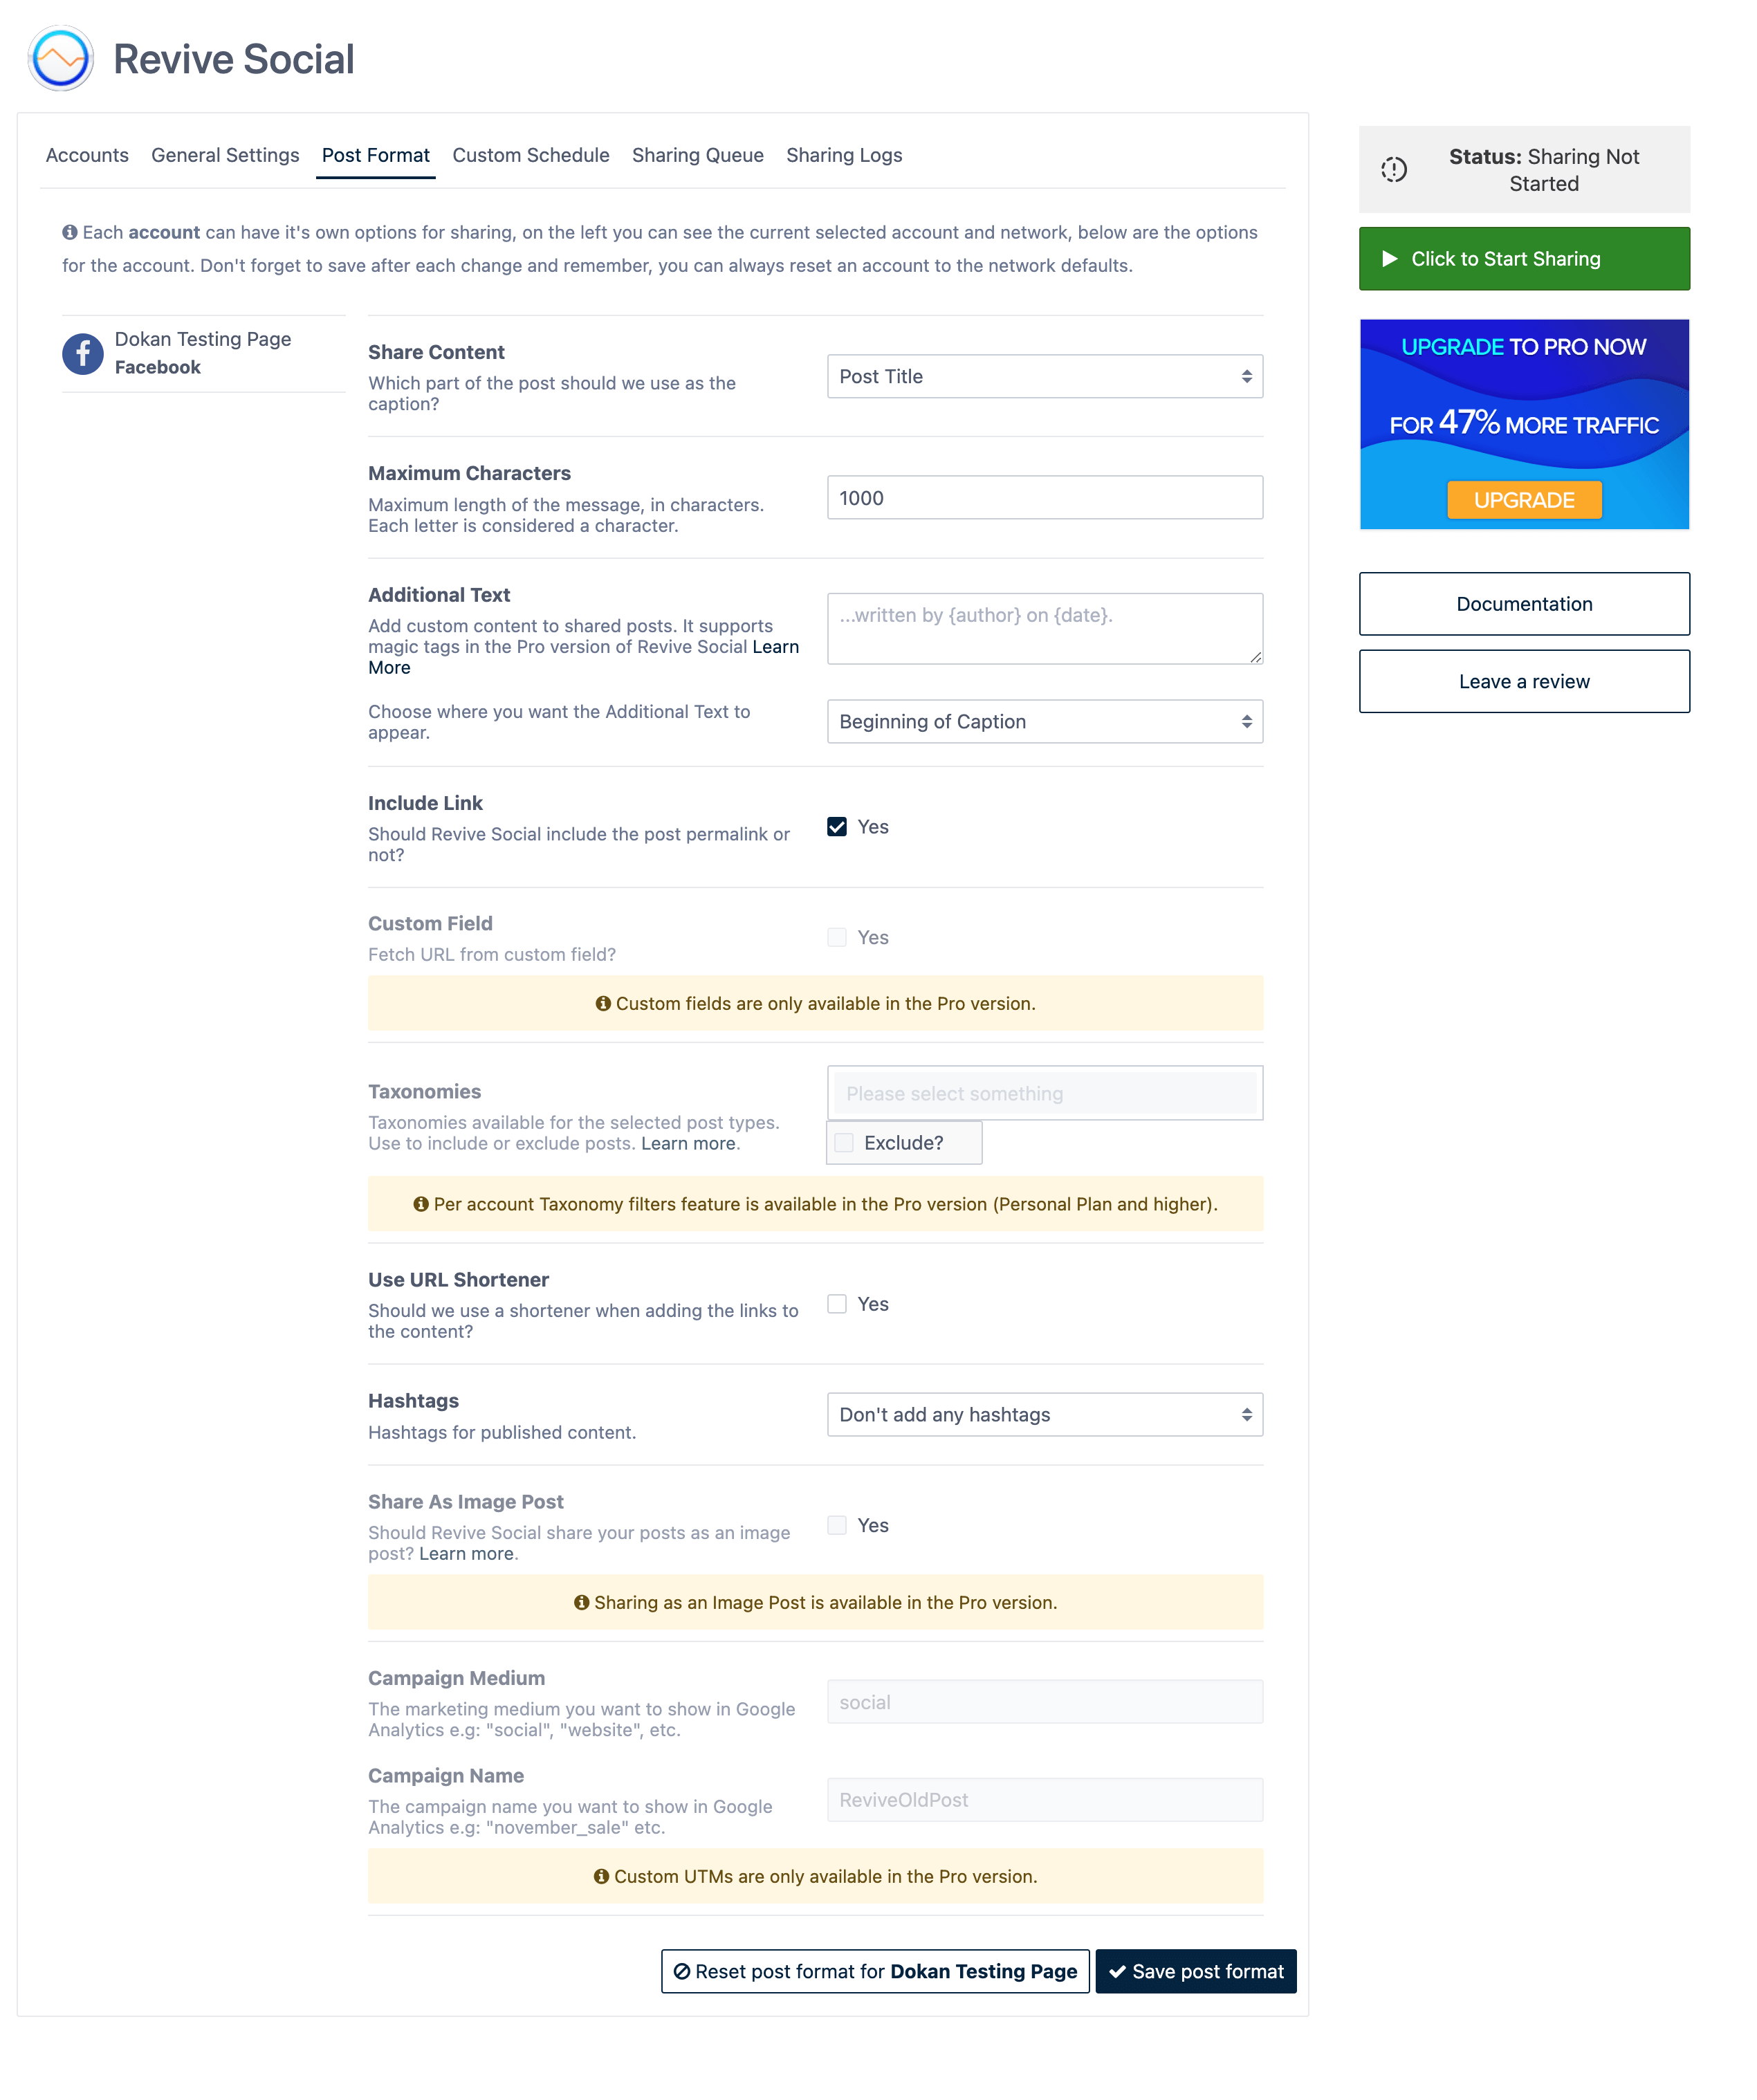
Click the ‘Save post format’ button to save your settings.
Step 5: Start Sharing
When you are done with the customizations, click on the Start Sharing button to get your posts shared. You will see the post list waiting to be shared in the “Sharing Queue” tab.
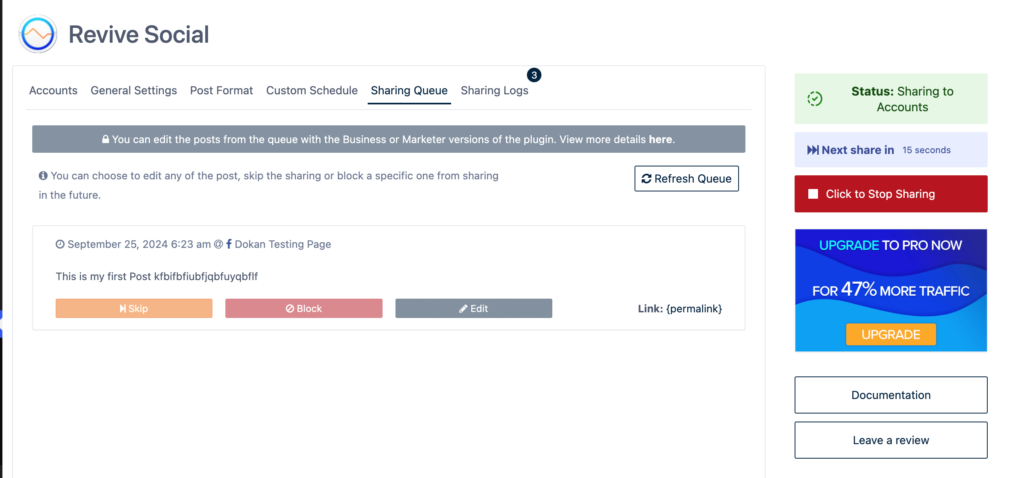
And this is how you can share posts automatically using the Revive Social plugin.
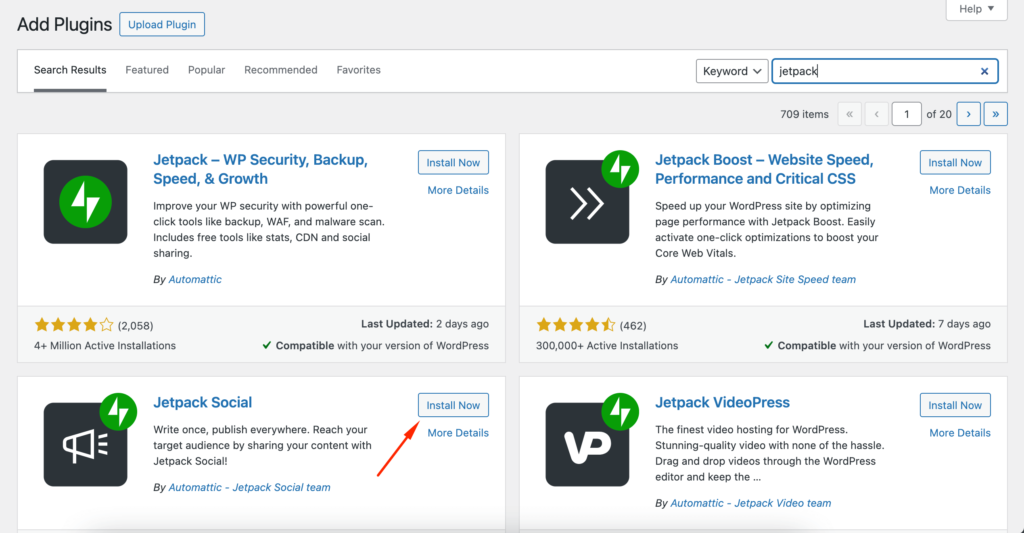
Using Jetpack Social
You can also use the popular Jetpack Social plugin to share your posts. Just install the plugin from the WordPress dashboard and activate it.
To find the social media profiles, you need to connect your account. Then you will be redirected to the social profiles where you can configure the social media profiles to share your posts.
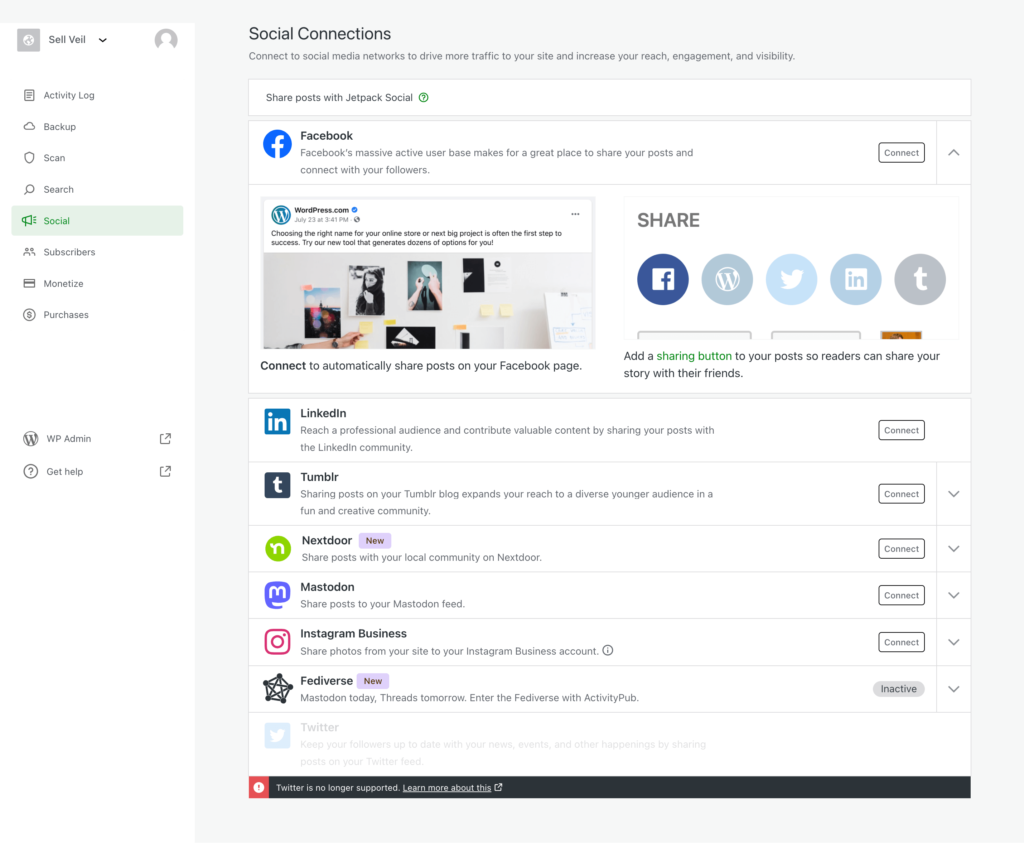
You can see this document on how to connect to the social profiles using Jetapck Social plugin.
Bonus: Popular WordPress Post Sharing Plugins
Other than Revive Old Posts and Jetpack, there are a few other noteworthy WordPress post-sharing plugins-
- Blog2Social: You can auto-post, cross-post, and schedule content across 13 social media networks. It includes a social media calendar, customization options for each post, and integration with Google Analytics for tracking. Free version available; Pro version starts at $69 per year.
- FS Poster: Supports auto-posting to 21 social networks, including major platforms and niche ones like Reddit and Medium. It also provides detailed analytics, scheduling options, and the ability to repost old content. The free version is available; the Pro version starts at $45.
- Social Auto Poster: Automatically shares your content on major social networks, including Facebook, Twitter, LinkedIn, and Pinterest. It offers scheduling, bulk posting, and support for custom post types. Premium version is available for $39.
- Nelio Content: Combines an editorial calendar with social media auto-posting capabilities. It supports multiple networks, including Facebook, Twitter, LinkedIn, and Google My Business, and provides a content assistant to help with post creation. The free version is available; the Pro version starts at $29 per month.
Take Advantage of Social Media to Get More Traffic
So, we are at the end of the article and hopefully, you now know how to share WordPress posts automatically to social media.
However, if you are not sure about installing another plugin to your WordPress website, then you can use online tools like CoSchedule and Buffer. Both are very popular online content-sharing platforms. You can schedule posts to share them automatically at the scheduled time.
Also, if you have any problem while setting up the plugins, then do let us know in the comment section.