Your team's files probably live in Google Drive. The brand guide is a PDF, the homepage copy is a Google Doc, and the sitemap is a Google Sheet. But the tasks live in your project manager, so people keep asking the same question: "Where's the latest file?"
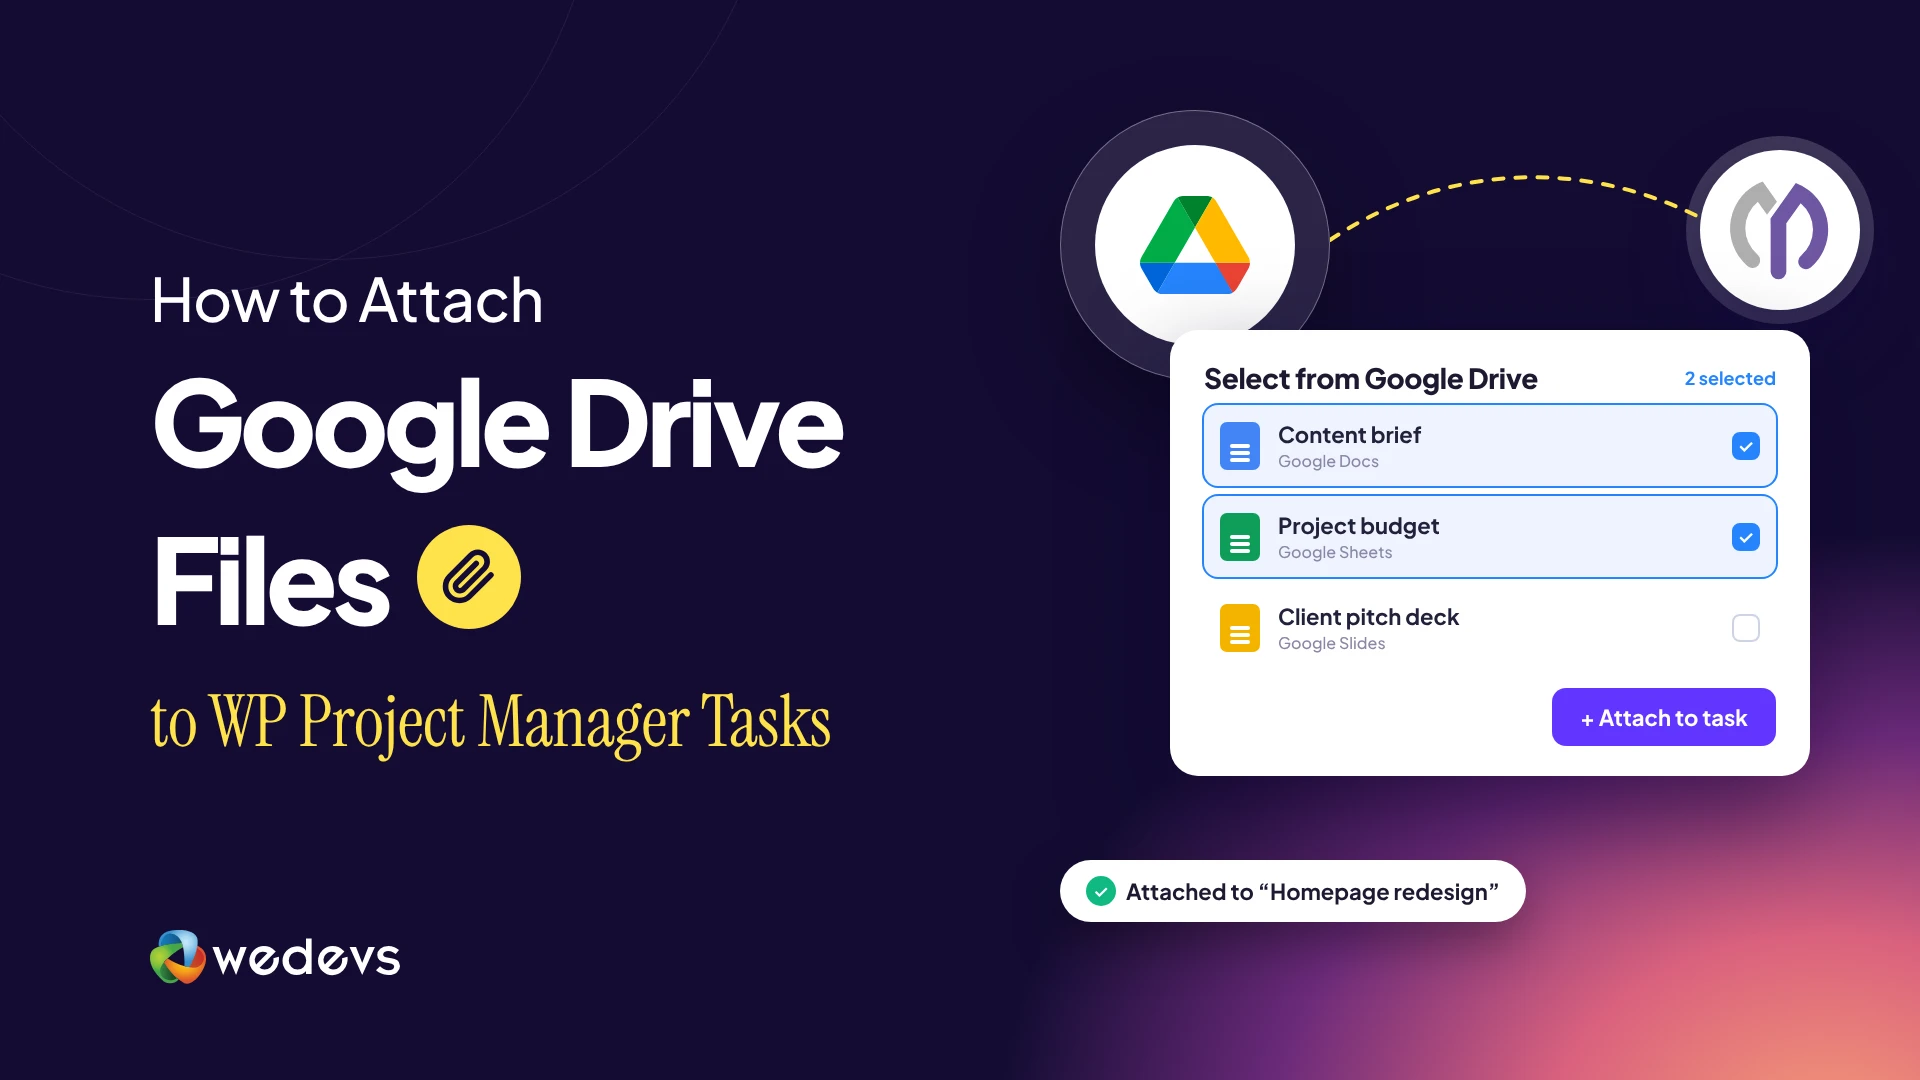
WP Project Manager solves this with its Google Drive integration. You can attach Google Drive files to WP Project Manager tasks and comments, right where the work happens. The files stay in Drive, and the task keeps a link that opens them in one click.
In this blog post, we'll show you how the Google Drive integration works and how to set it up step by step. We'll connect Google once as an admin, connect a user account, and attach the files for a real website project. Let's get started!
How Does Google Drive Work with WP Project Manager?
The integration is part of the Google Workspace settings in WP Project Manager. It uses your own Google Cloud project, so the connection belongs to you, not to a third-party service.
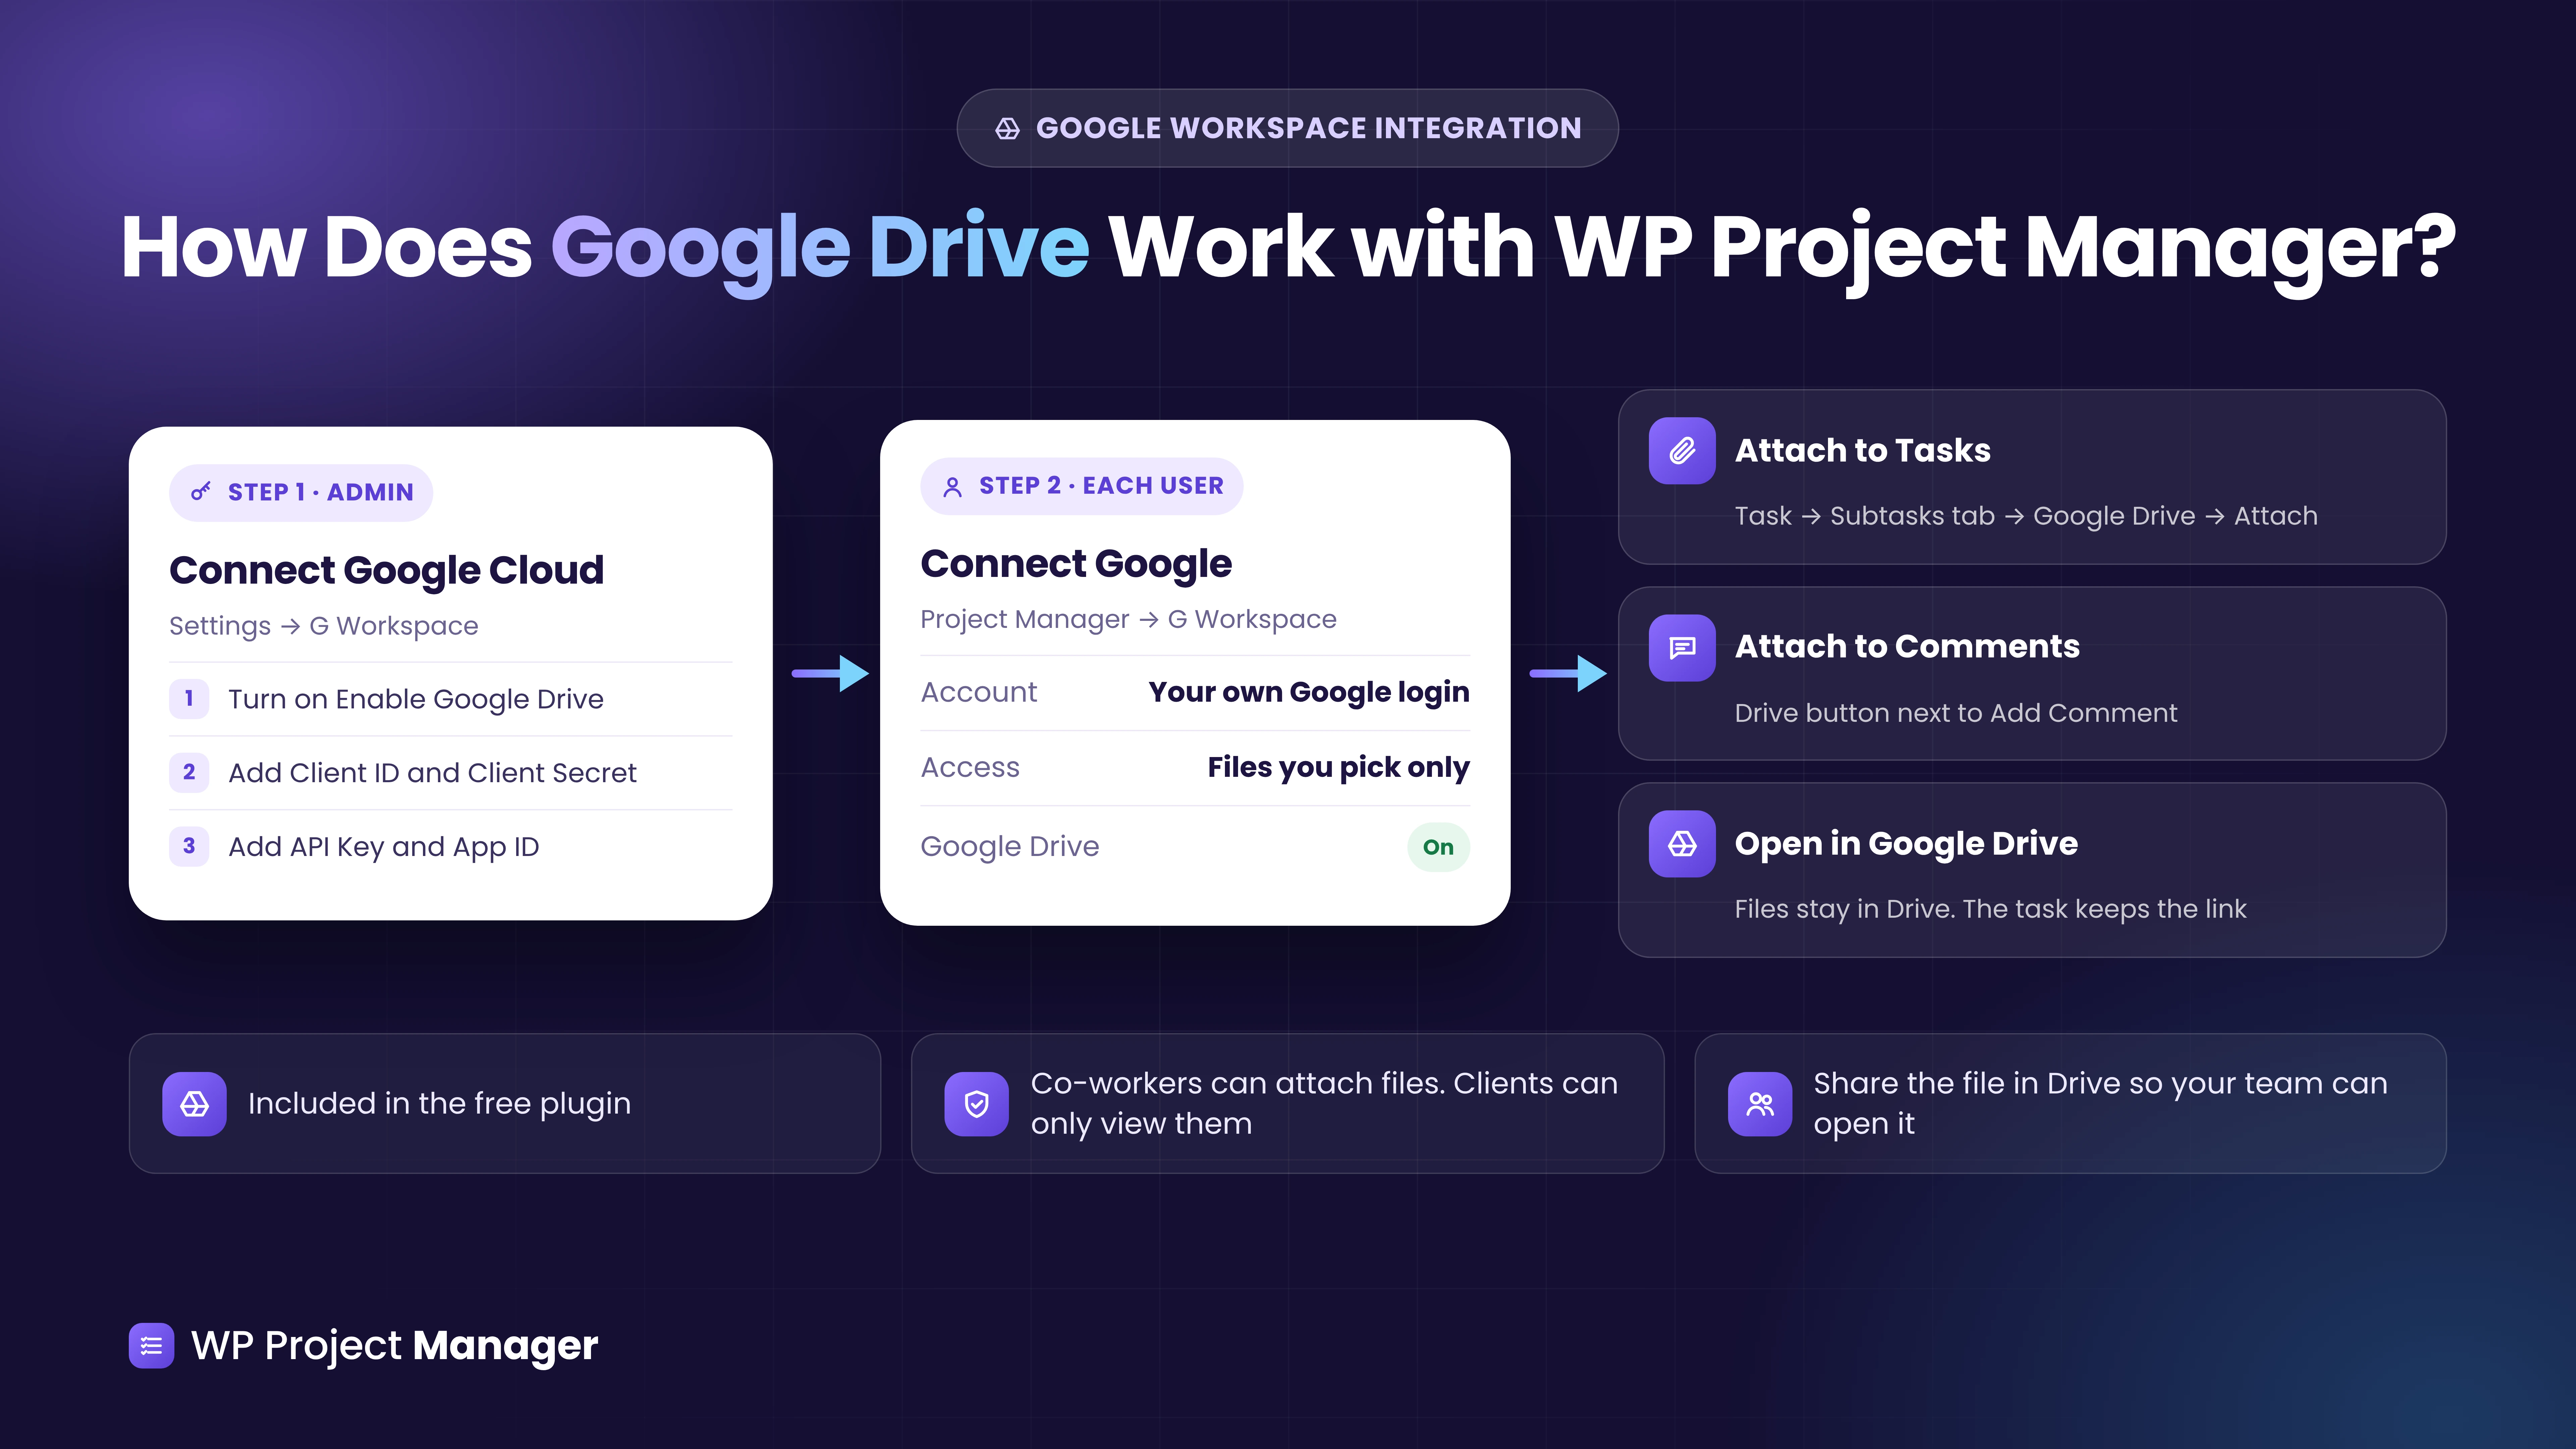
It works in three stages:
- Admin setup: An administrator turns on Google Drive and adds the Google Cloud keys once, under Project Manager > Settings > G Workspace.
- User connection: Each team member connects their own Google account from Project Manager > G Workspace.
- Attaching files: Team members pick files from Google Drive and attach them to tasks and comments.
WP Project Manager asks only for access to the files you pick. It doesn't copy your files to WordPress or change their sharing settings in Drive.
Why Attach Google Drive Files to Your Tasks?
Linking Drive files to tasks keeps the work and the files together. Here's what you gain.
a. Every File Is Where the Work Is
Your team doesn't need to search Drive folders or old emails. The files for a task sit on the task itself.
b. Always the Latest Version
The task links to the file in Drive, not a copy. When someone edits the Google Doc, everyone opens the newest version.
c. No Extra Storage on Your Site
Large PDFs, videos, and design files stay in Google Drive. Your WordPress media library and server stay light.
d. Files in Comments, Too
When you share an update, you can attach a Drive file to the comment. The file and the conversation stay side by side.
e. Control Over Who Can Attach
Managers and co-workers can attach files. Clients can see the attached files but can't add new ones, so your project stays tidy.
What You Need Before You Start
Get these few things ready before you follow along. You'll copy a few keys, but you won't need to write any code.
- A WordPress website where you have administrator access.
- WP Project Manager (free), installed and activated.
- A Google account that can create a project in the Google Cloud Console.
- The Google Drive files you want to attach.
Note: Google Drive is part of the free WP Project Manager plugin. Google Calendar sync and Google Meet sit on the same settings page and come with WP Project Manager Pro.
This tutorial uses WP Project Manager 4.1.2, with WP Project Manager Pro 4.1.2 active on the same site. Once the plugin is ready, start following the tutorial explained below.
How to Attach Google Drive Files to WP Project Manager Tasks (Step-by-Step)
We'll use one example throughout the tutorial:
| Item | Example |
|---|---|
| Agency | BrightDesk Studio, a WordPress web studio |
| Project | Maple & Co. Bakery – Website Launch |
| Task | Collect logo, brand colors and copy |
| Drive files | Maple & Co. – Brand Guidelines.pdf, Homepage Copy – v2 (Google Doc), and Sitemap & Page List (Google Sheet) |
Use your own project, task, and files. The steps stay the same.
Step 01: Open the Google Workspace Settings
Navigate to Project Manager > Settings and click G Workspace under Integrations. You'll land on the Google Workspace page.
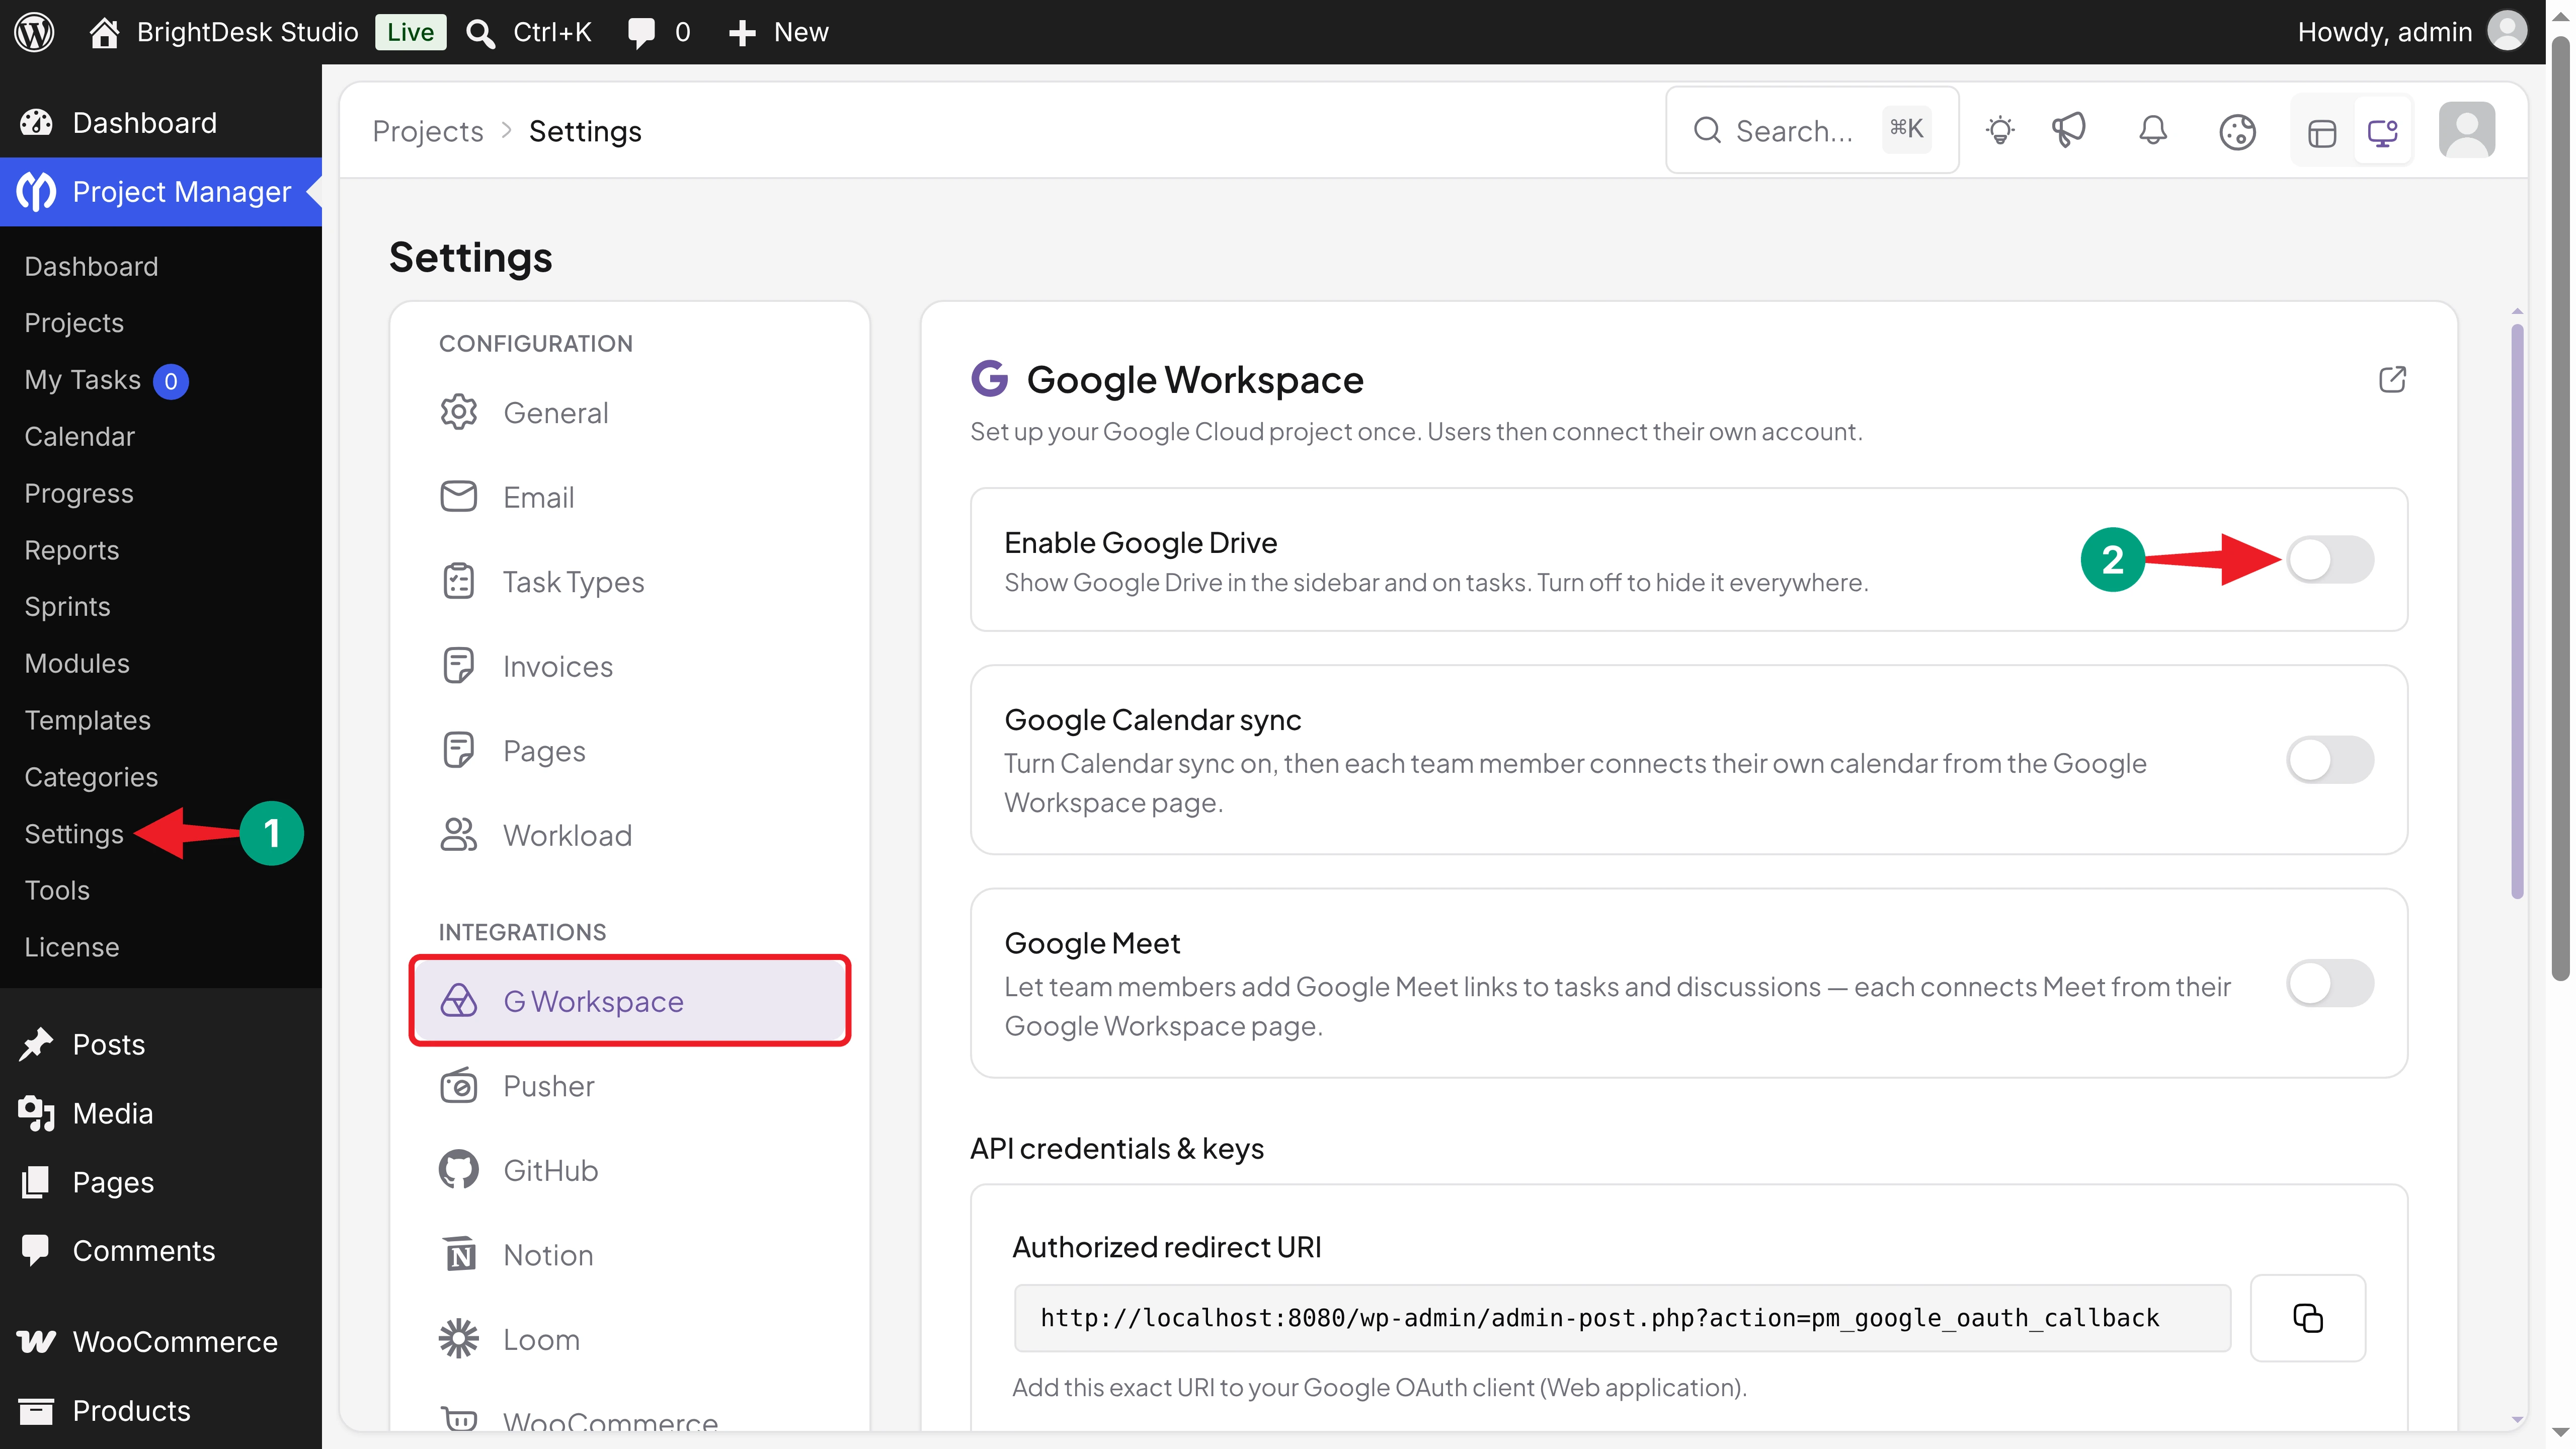
The page says it all: "Set up your Google Cloud project once. Users then connect their own account."
Step 02: Enable Google Drive
Toggle on Enable Google Drive. You'll see a Google Drive enabled. message, and a new option appears below it.
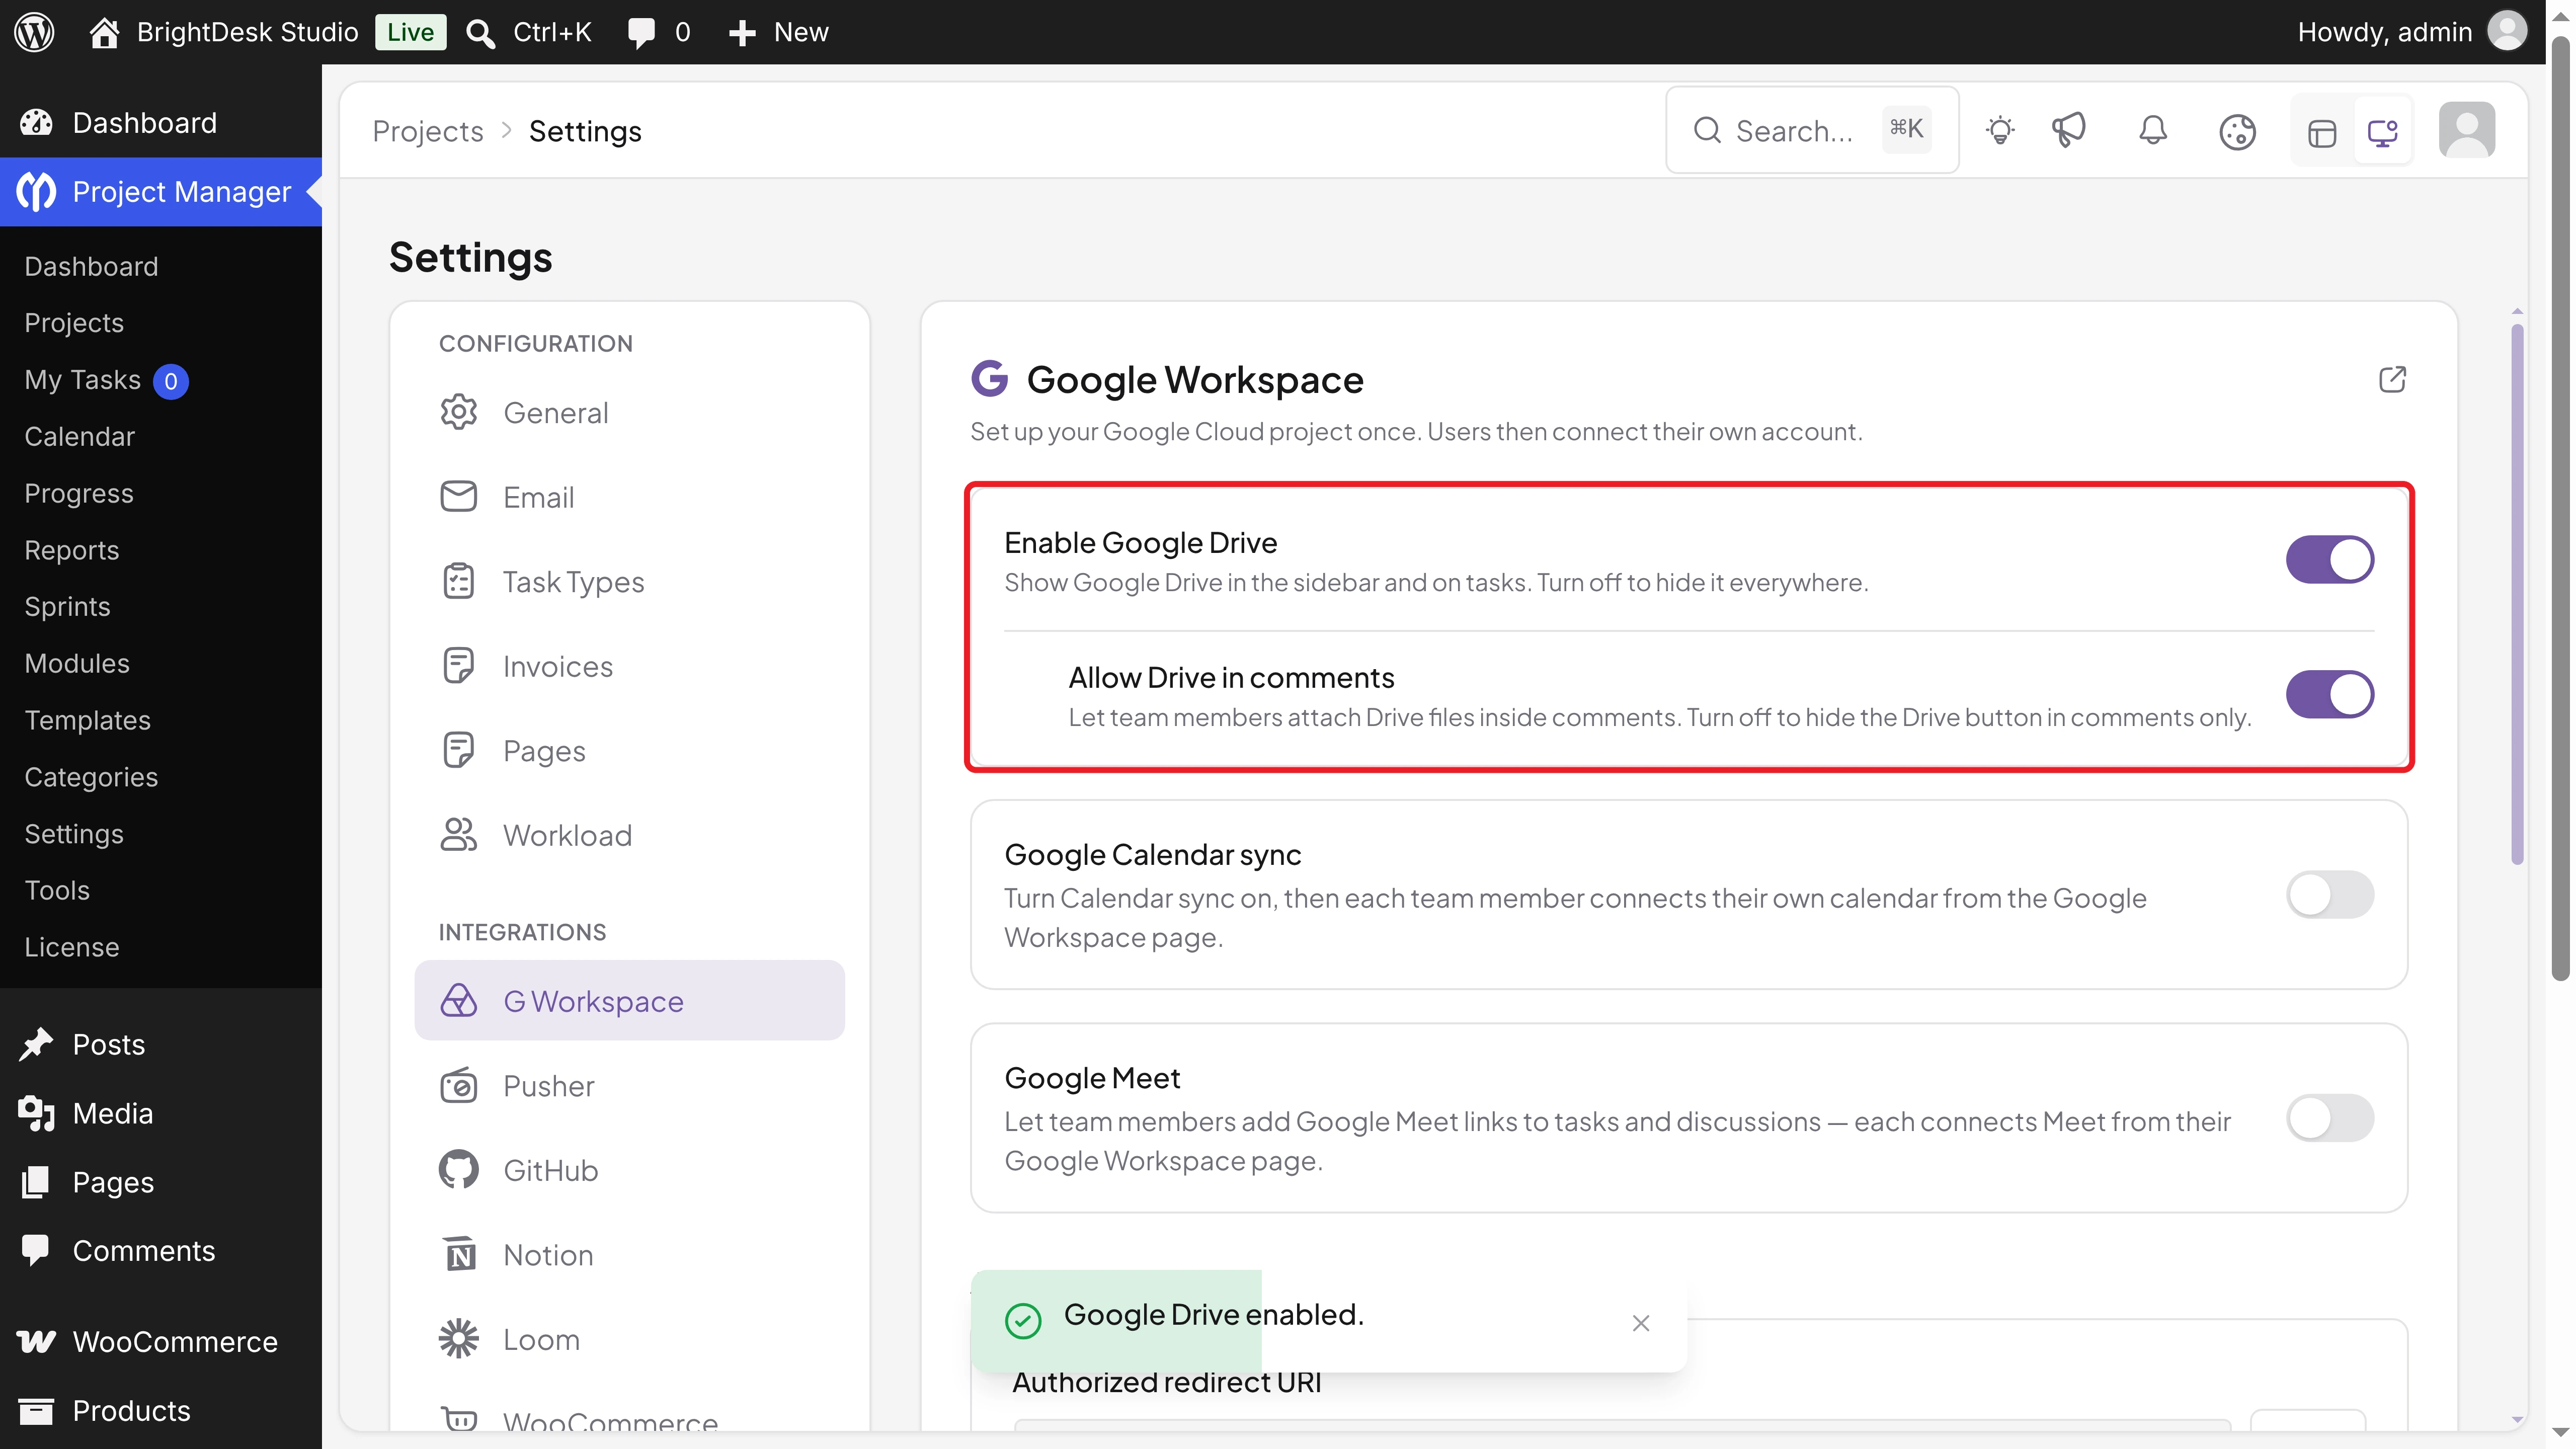
Allow Drive in comments is on by default. Keep it on if your team should attach Drive files to comments. Turn it off to hide the Drive button in comments only.
Tip: Turning off Enable Google Drive later hides Drive everywhere, for every user. Your attached files aren't deleted.
Step 03: Create Your Google Cloud Credentials
Now you need four values from Google: a Client ID, a Client Secret, an API Key, and an App ID. Scroll down to API credentials & keys and click the copy icon next to Authorized redirect URI first. It shows your own site address.
Then open the Google Cloud Console in a new tab (there's also an Open Google Cloud Console link next to the save button) and follow these steps:
Create a Project and Turn On the APIs
Create a new project, or select an existing one. Then go to APIs & Services > Library, and enable the Google Picker API and the Google Drive API.
Set Up the Consent Screen
Set up the OAuth consent screen with your app name and support email. This is the screen your team sees when they connect their Google accounts. If your team uses Google Workspace, choose Internal so only your organization can connect.
Create the OAuth Client
Go to Credentials, click Create credentials > OAuth client ID, and choose Web application. Paste the redirect URI you copied under Authorized redirect URIs and click Create. Google shows your Client ID and Client Secret.
Create the API Key and Find the App ID
Click Create credentials > API key to get your API Key. Then find your project number on the project's dashboard, under Project info. That number is your App ID.
Very Important: Keep the Client Secret private. Don't share it in emails, tickets, or screenshots.
Step 04: Add the API Credentials and Save
Go back to WP Project Manager and paste the four values:
- Client ID: Ends with
.apps.googleusercontent.com. - Client Secret: Starts with
GOCSPX-. - API Key: Used by the Google Picker, the window where you choose files.
- App ID (project number): Your Google Cloud project number.
Click Save credentials. You'll see a Google Workspace settings saved. message.
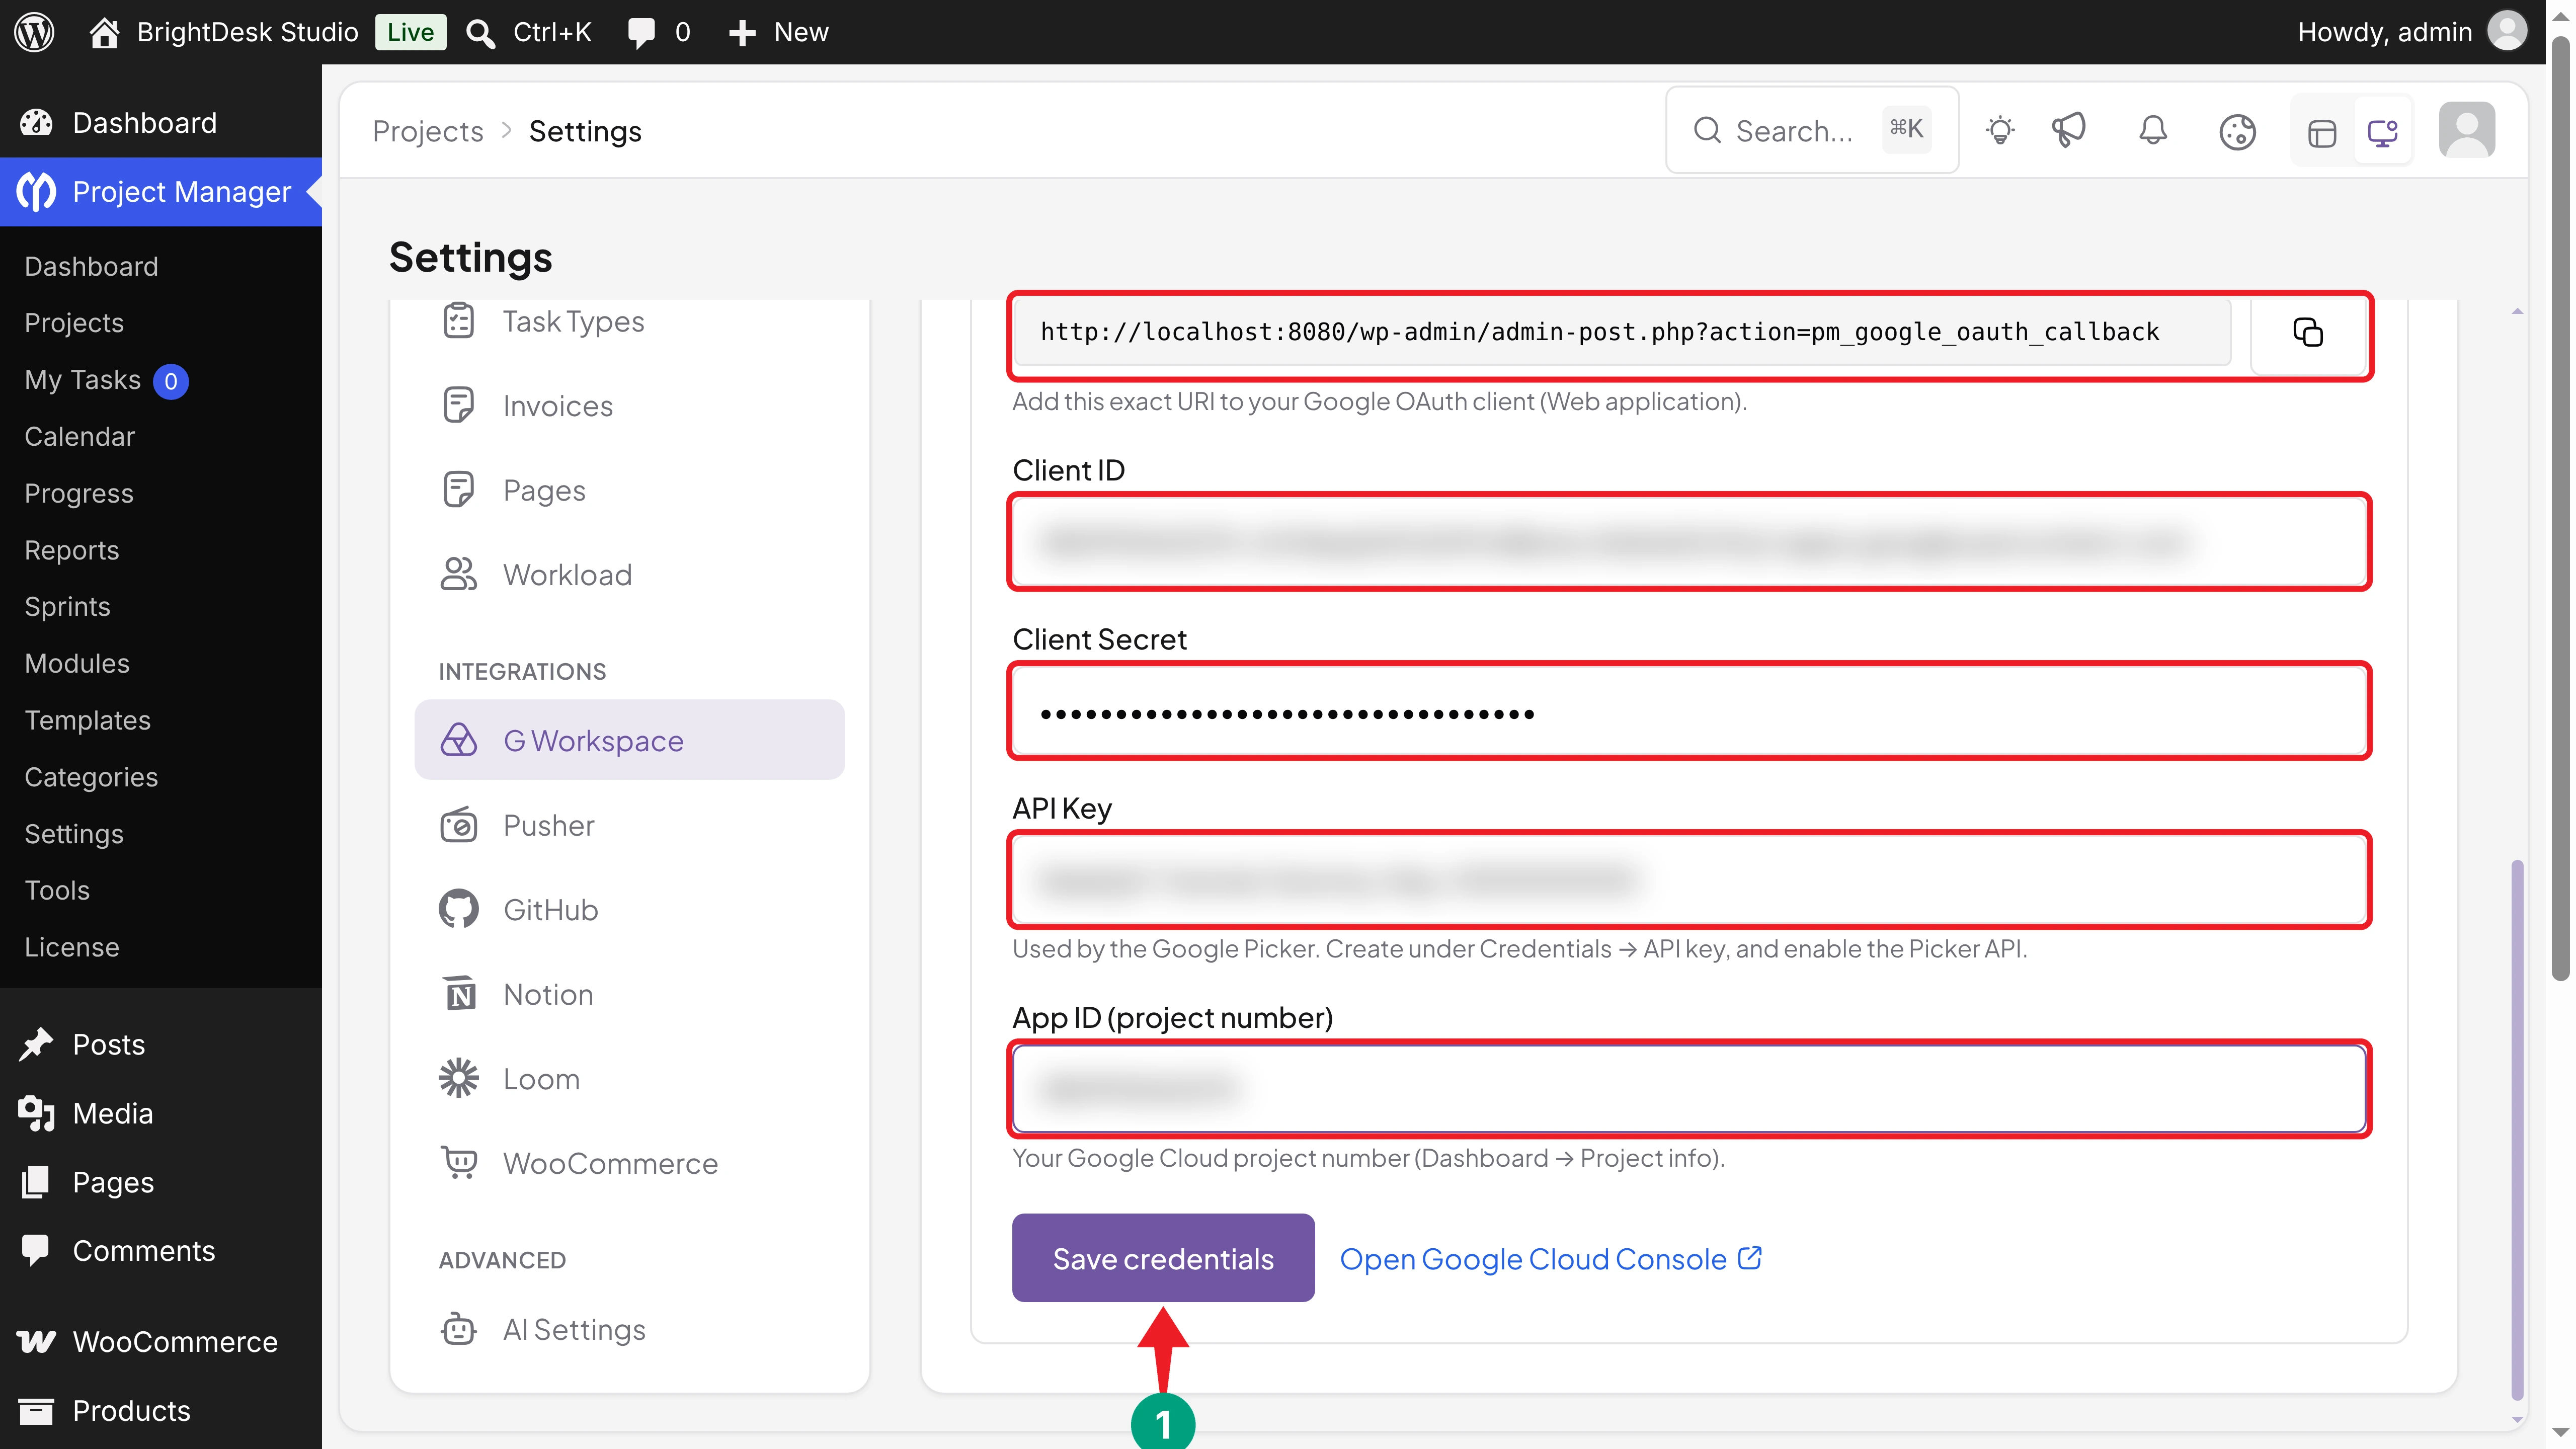
After you save, the Client Secret field shows (saved — leave blank to keep). The secret is stored encrypted, and you don't need to enter it again unless you change it.
Step 05: Connect Your Google Account
Now each team member connects their own Google account. Go to Project Manager > G Workspace. This menu item appears once Google Drive is enabled.
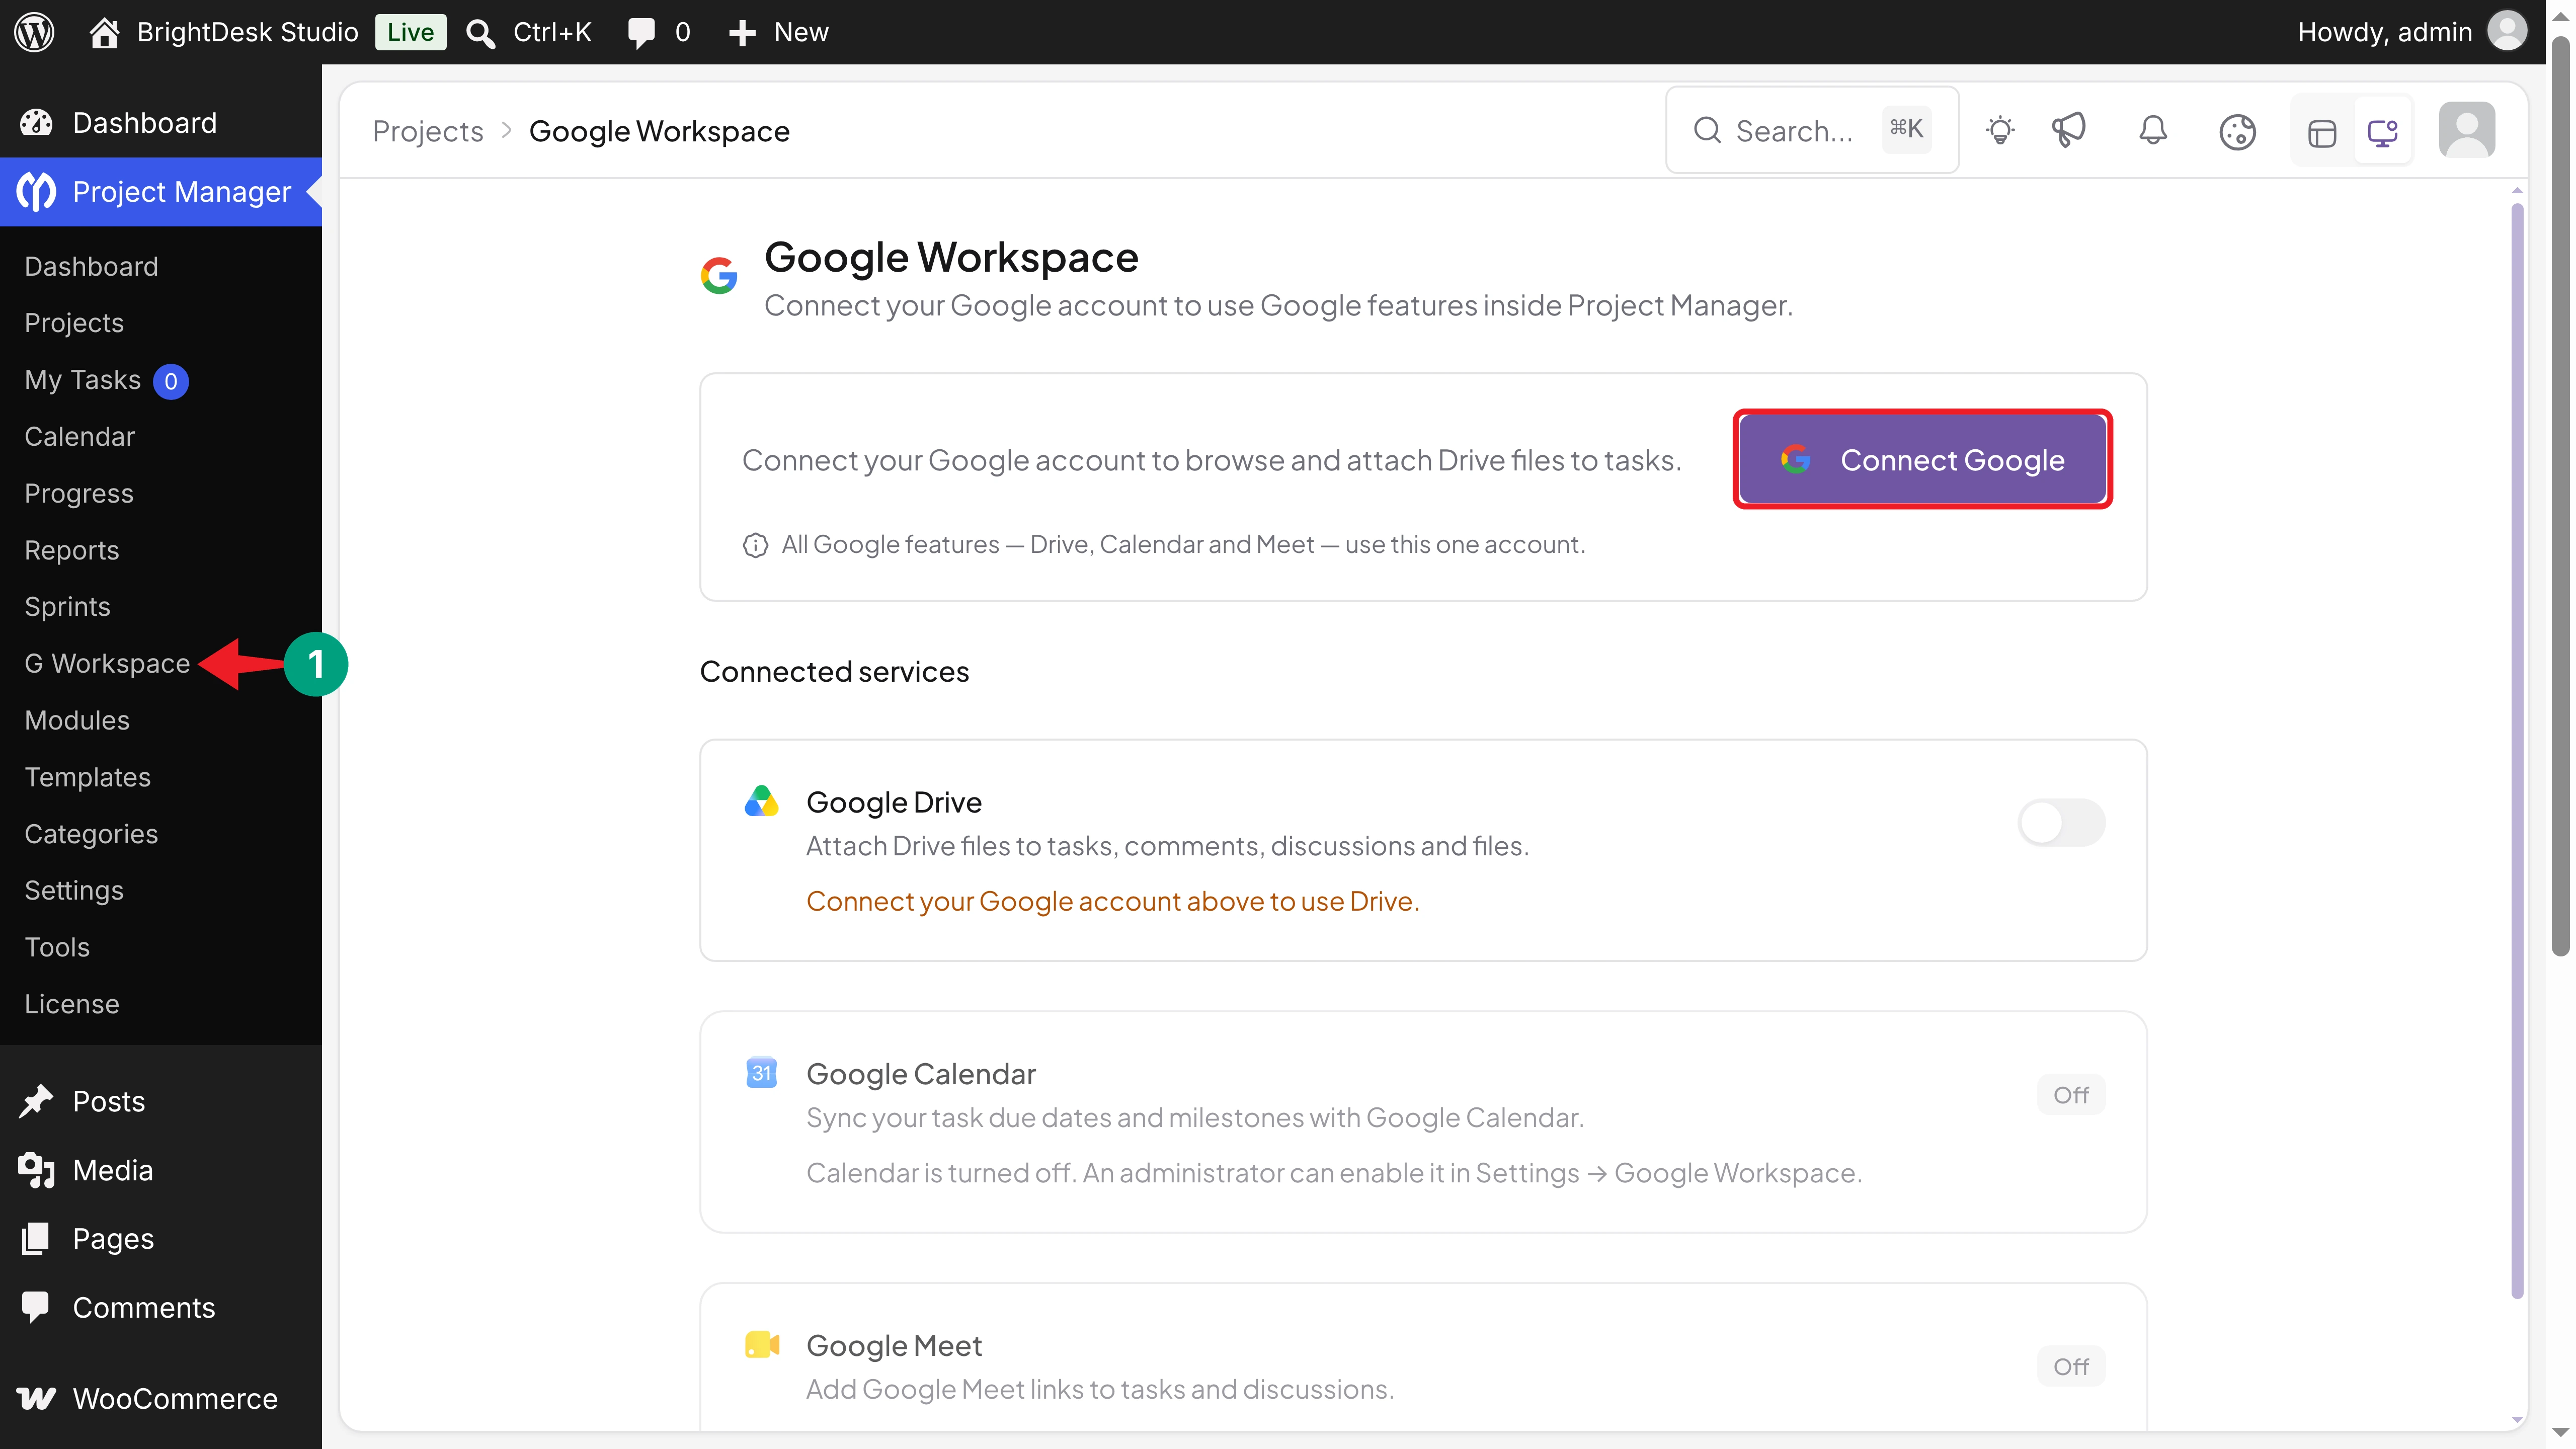
Click Connect Google. Google asks you to choose an account and allow access, then sends you back to WP Project Manager.
The page now shows Connected as with your Google email, and the Google Drive switch under Connected services is on.
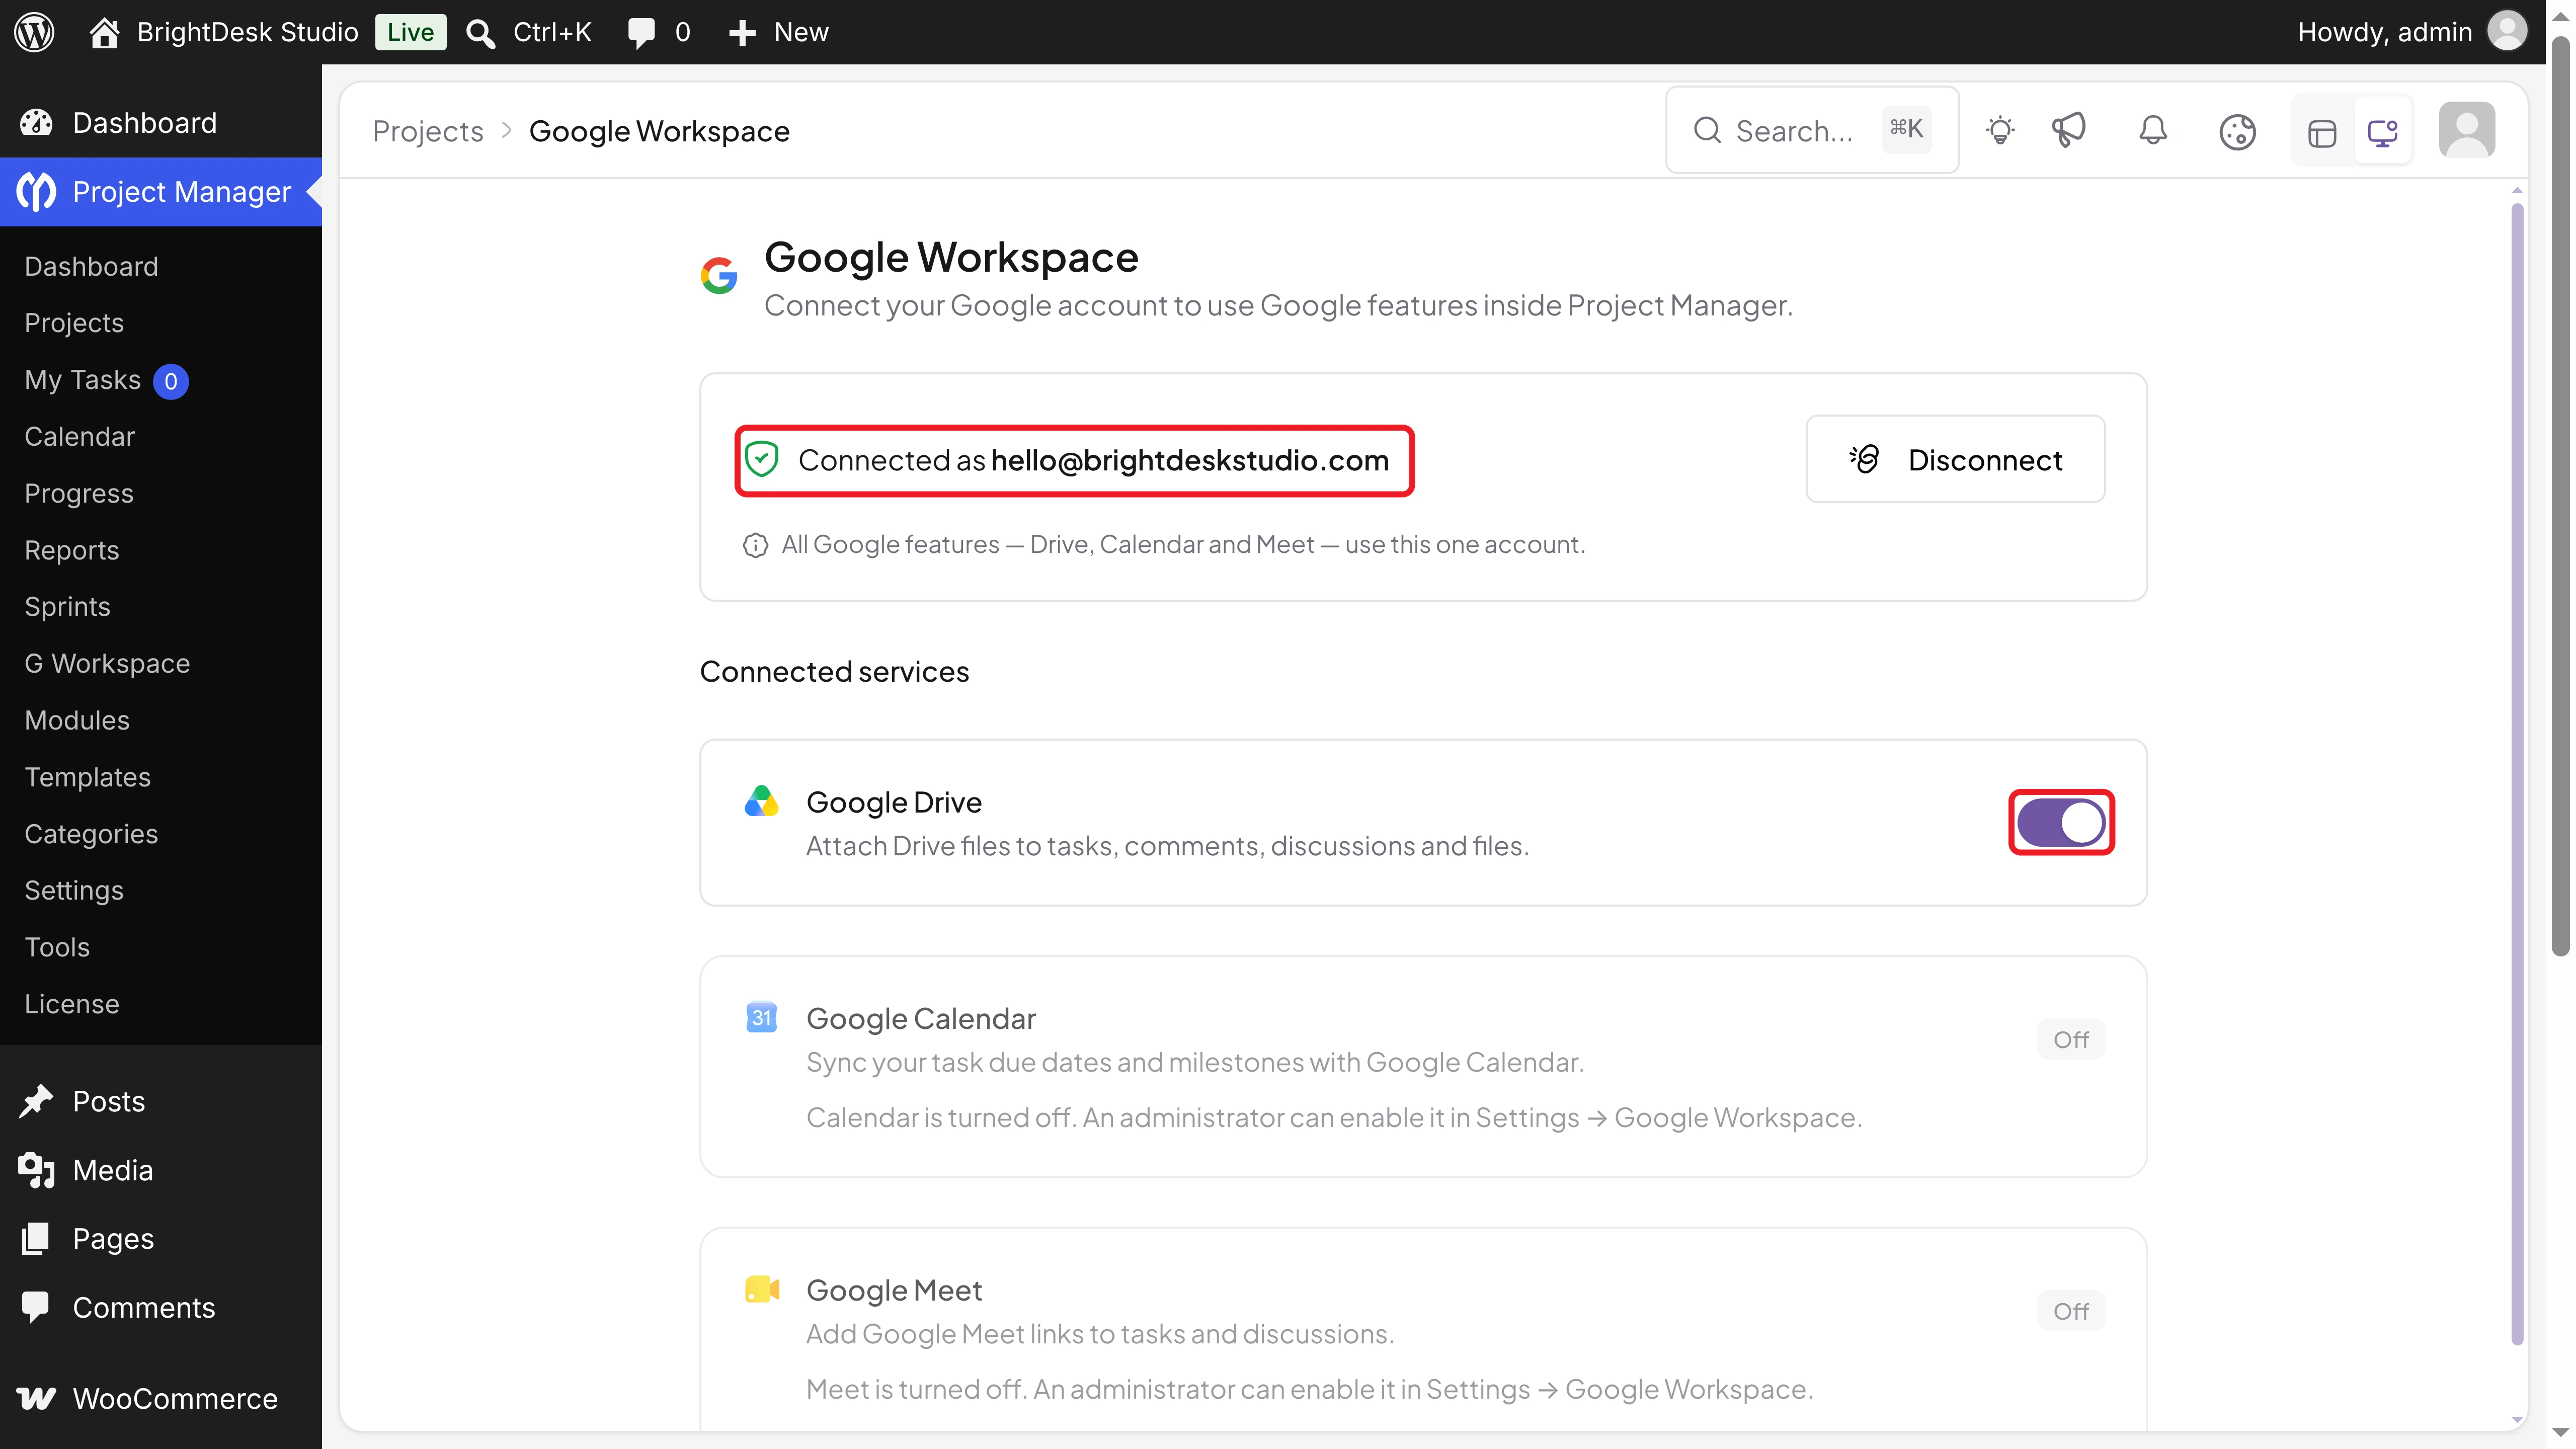
Note: All Google features (Drive, Calendar, and Meet) use this one account. Use Disconnect to remove it, or turn off the Google Drive switch to stop using Drive without disconnecting.
Step 06: Open the Google Drive Section in a Task
Open your project and click the task you want to attach files to. We've opened Collect logo, brand colors and copy.
In the task window, click the Subtasks tab. You'll find the Google Drive section at the top, with No Drive files yet.
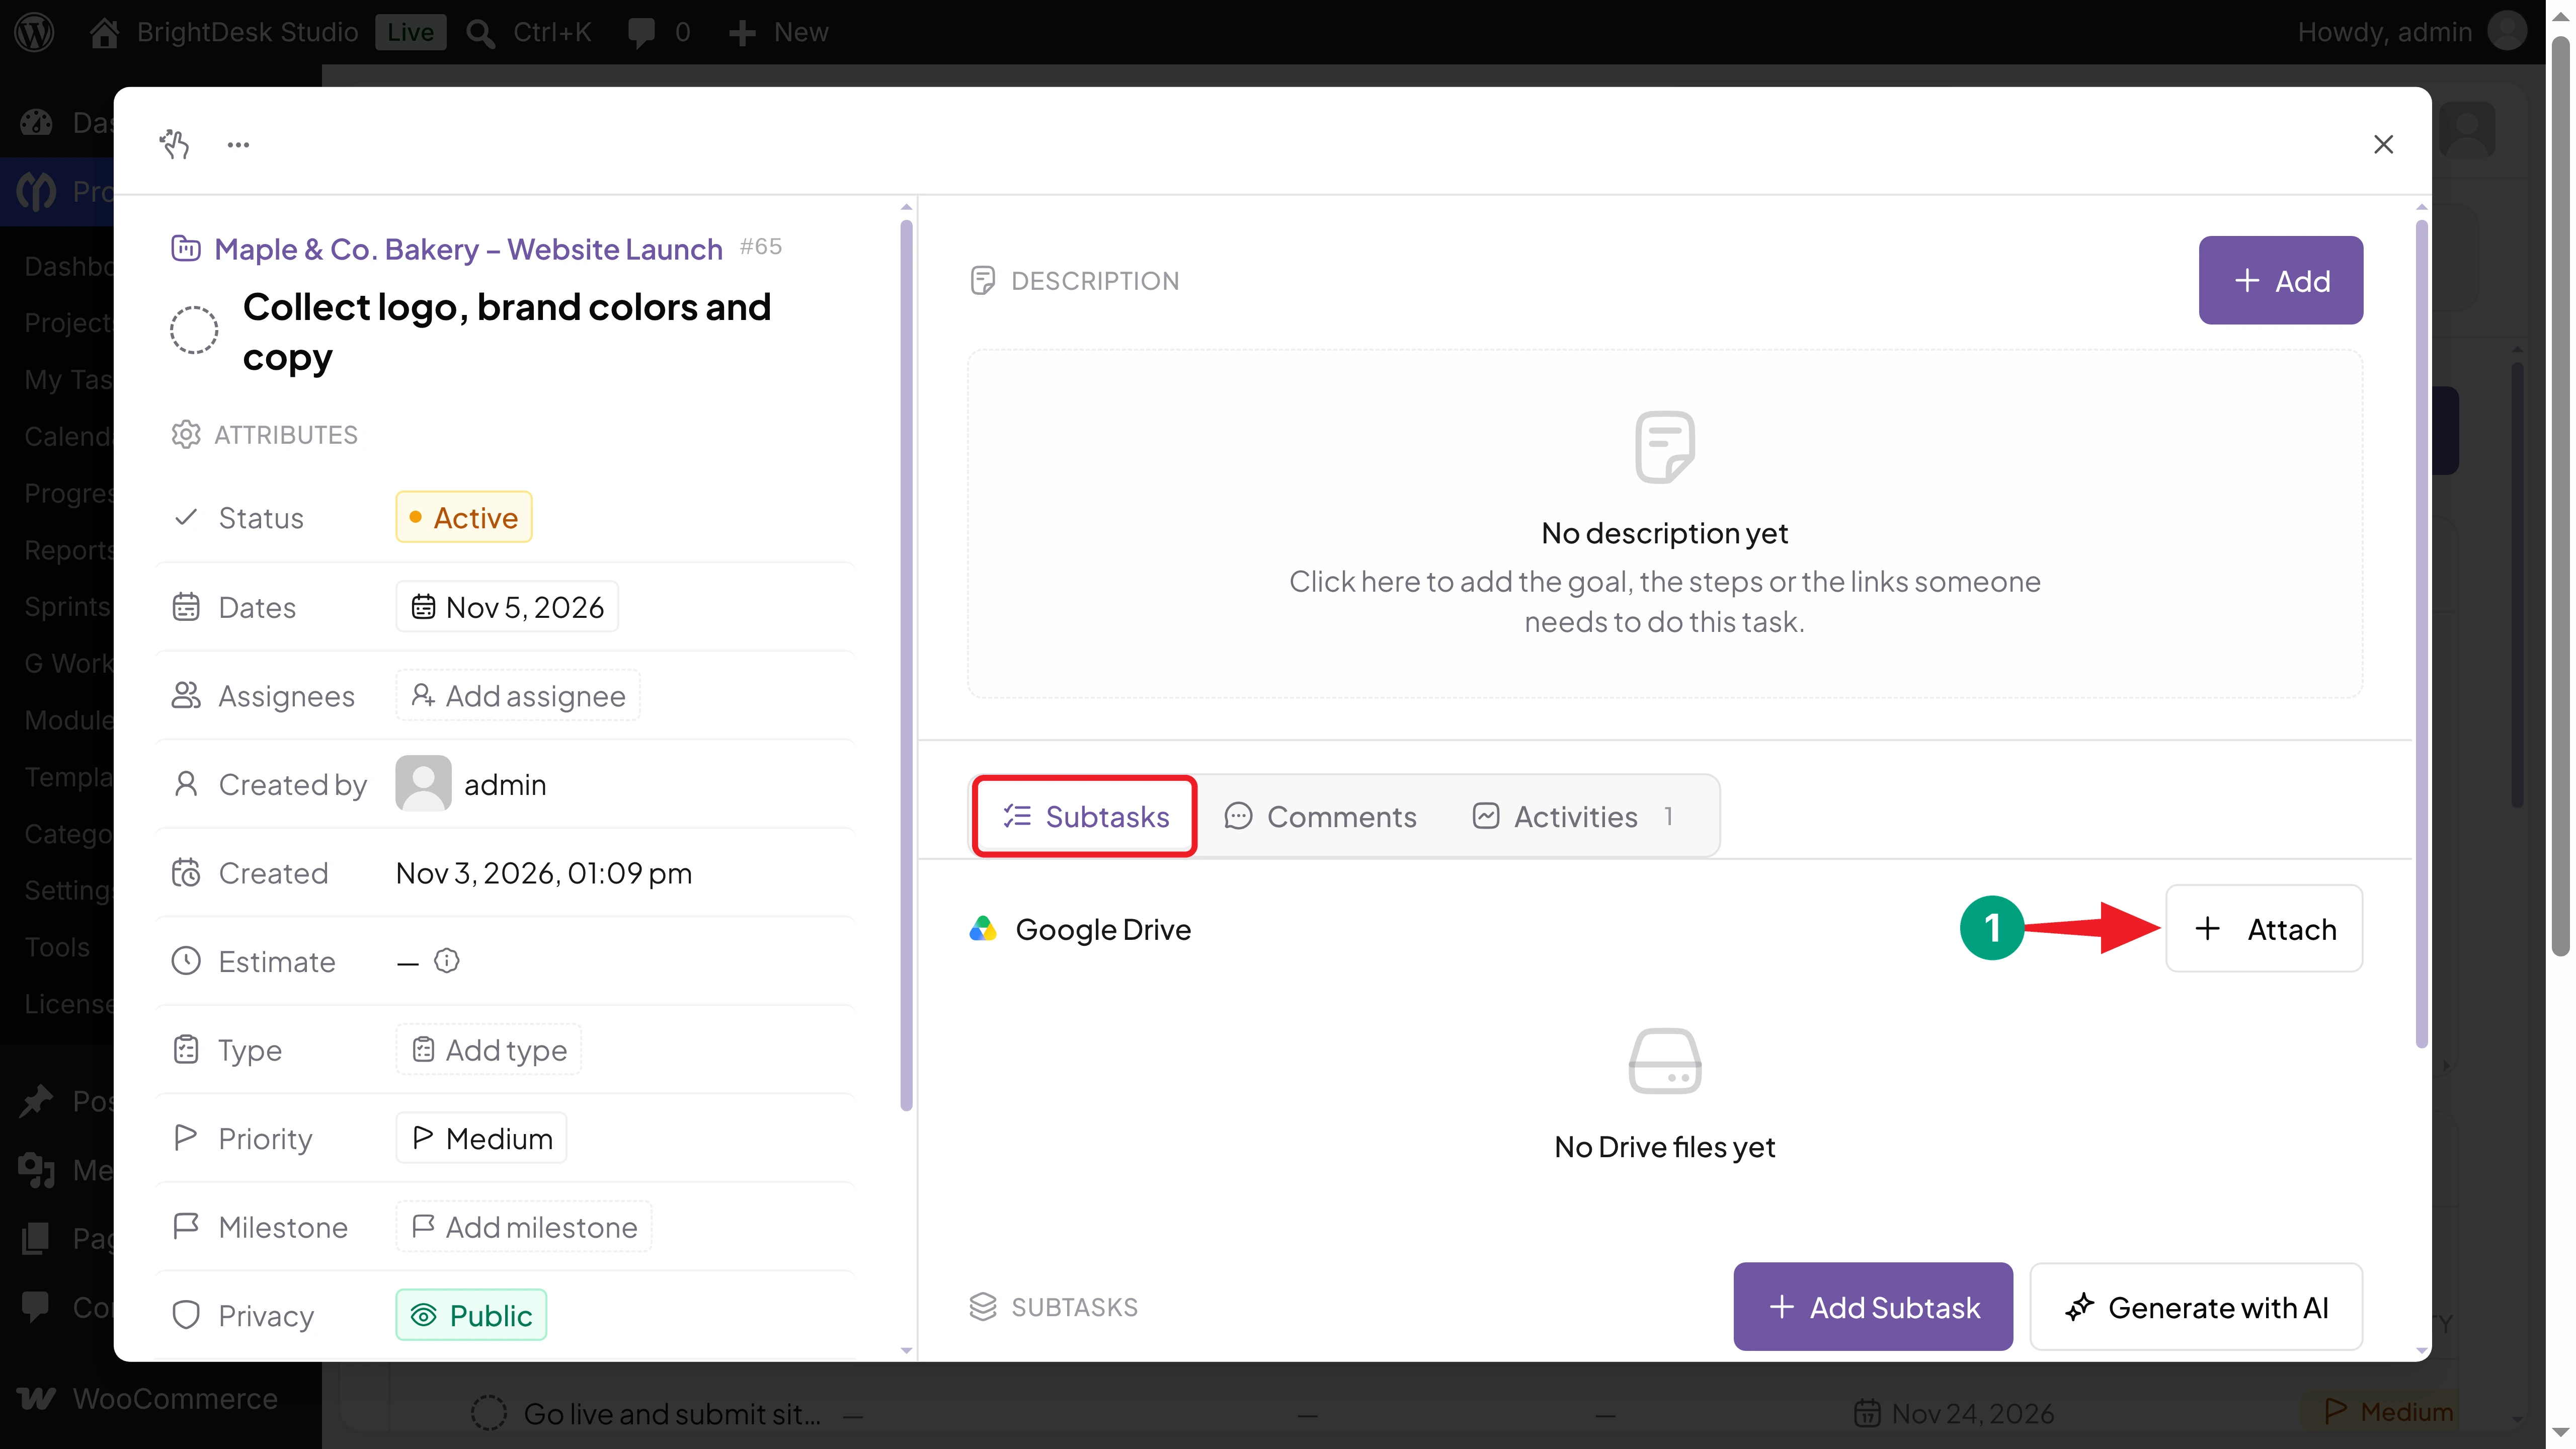
Click Attach on the right side of the section.
Step 07: Pick Your Files from Google Drive
The Google Picker opens. Browse or search your Drive, select the files you need, and confirm your choice. You can pick more than one file at a time, but not whole folders.
Step 08: Open or Remove Attached Files
The Google Drive section now shows the number of files and the first two. Click Show all to see the full list.
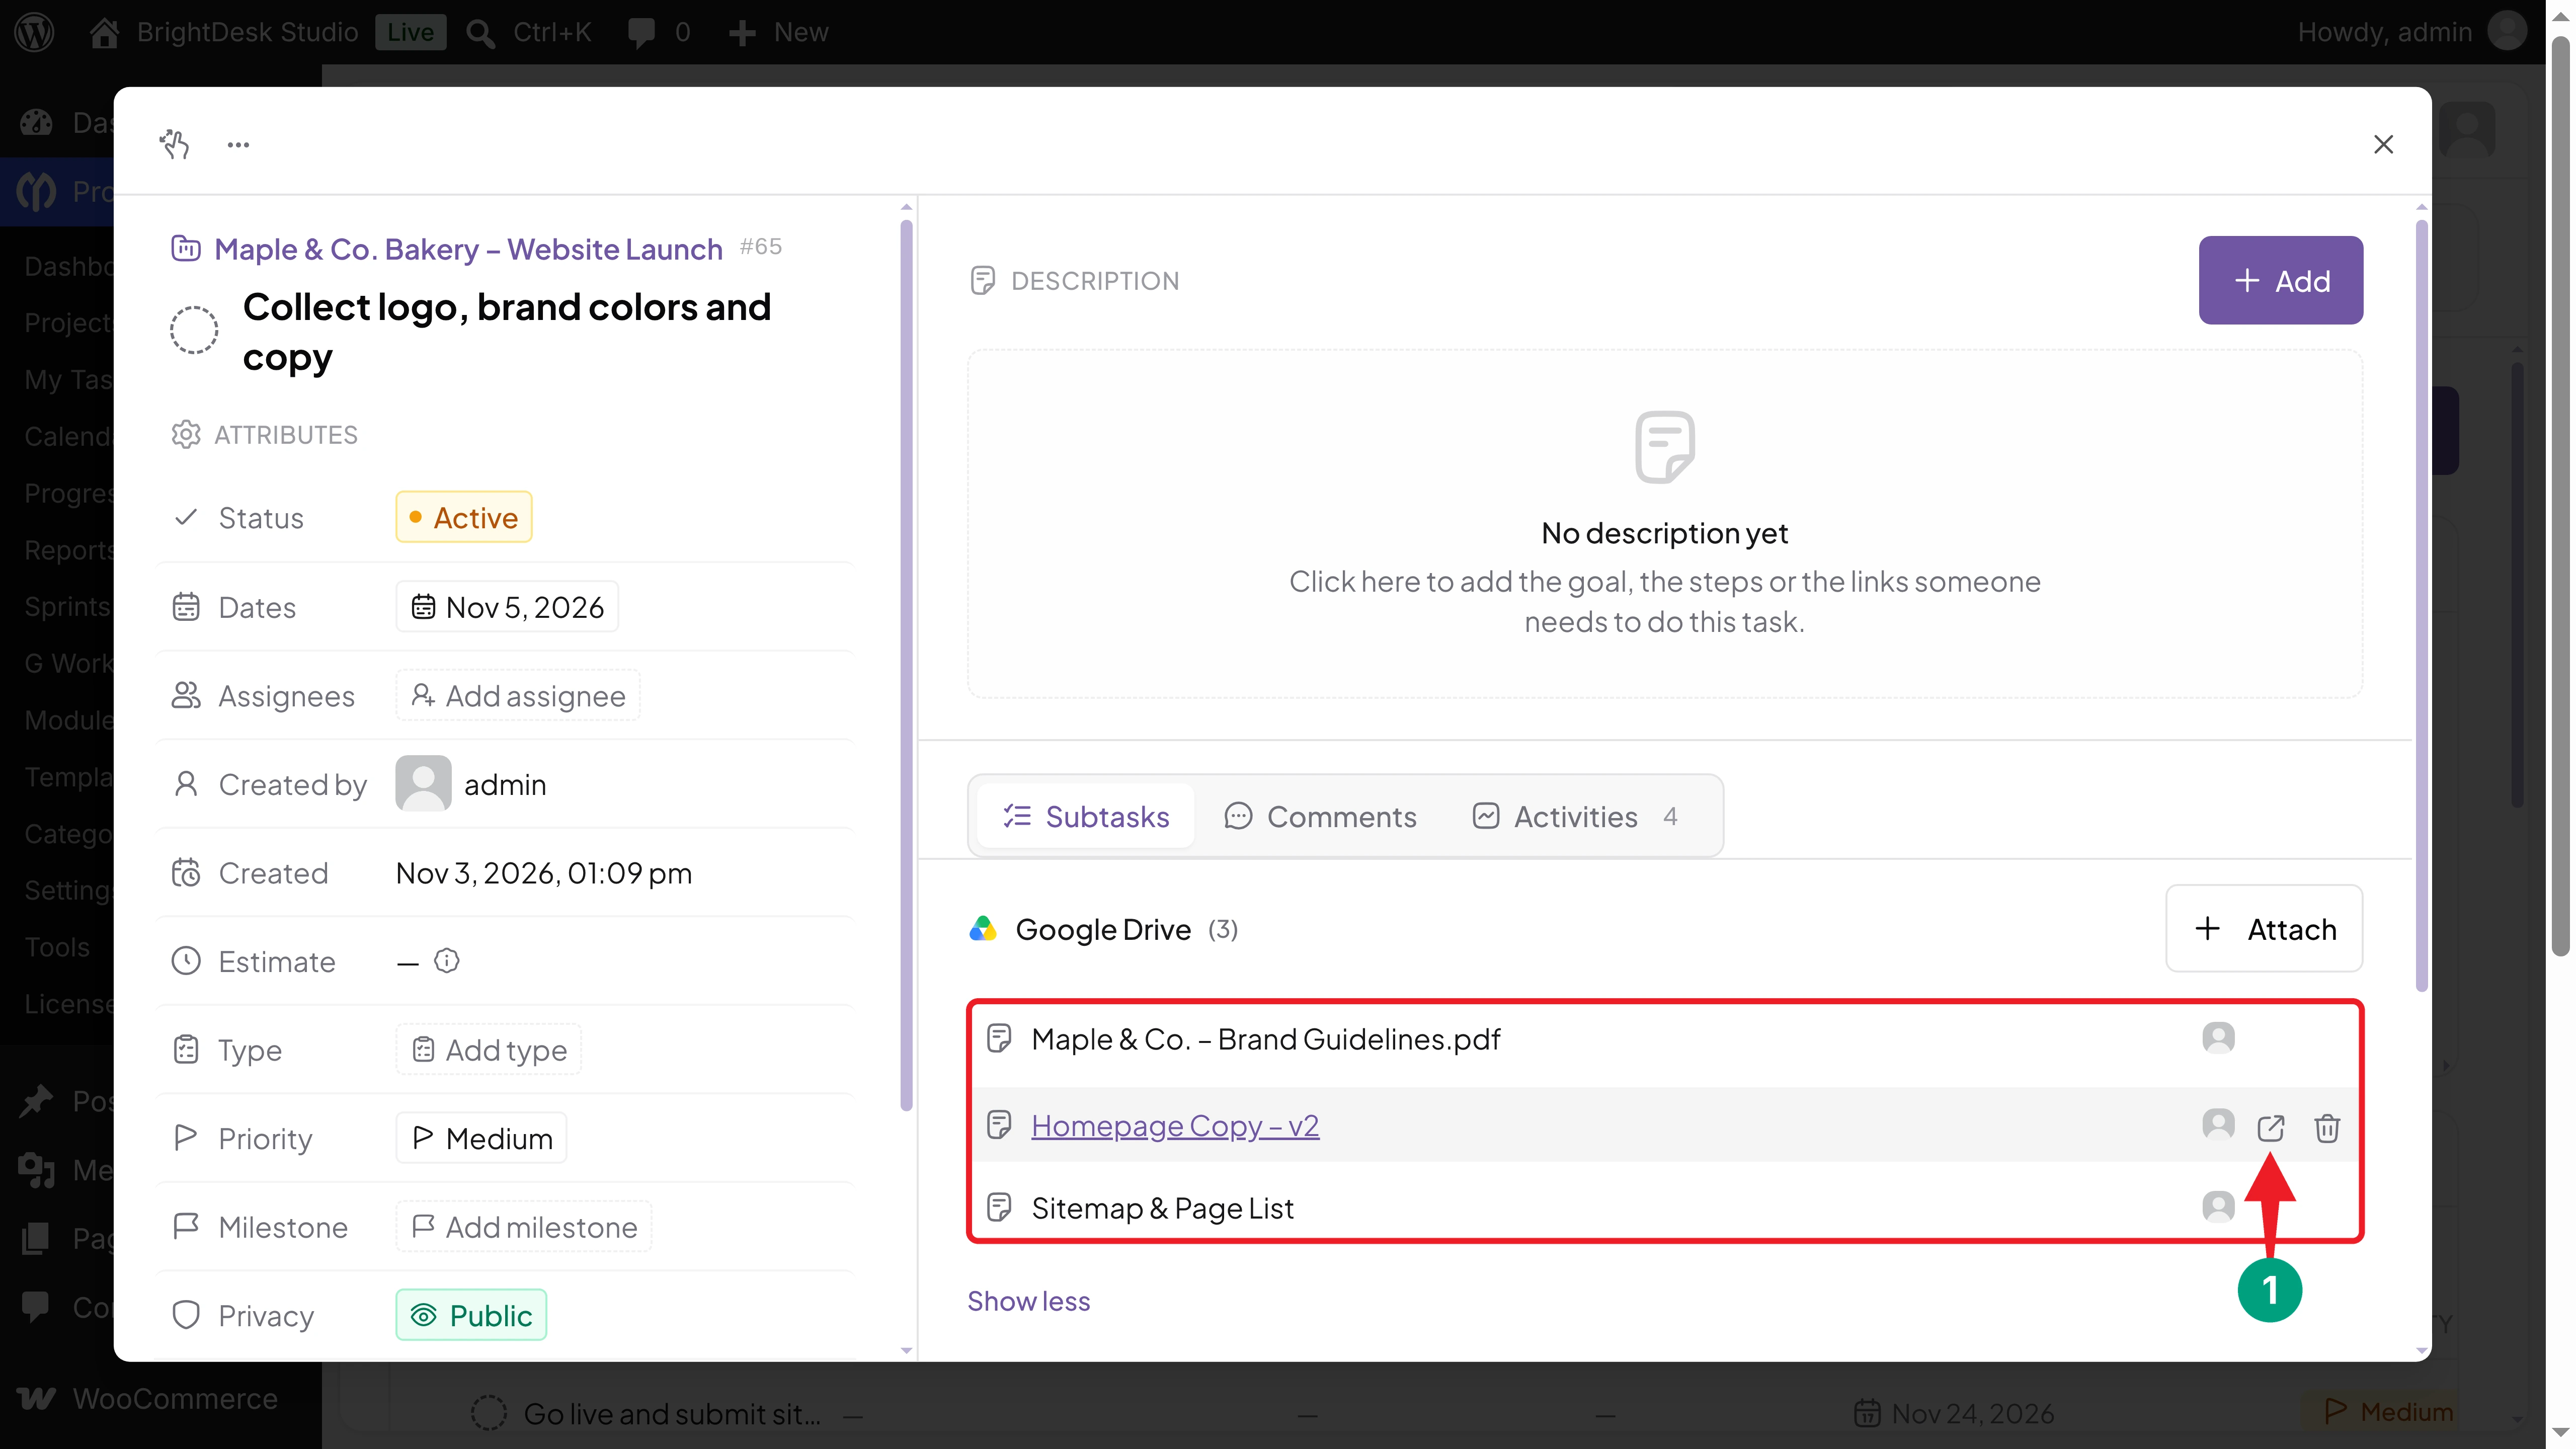
Hover over a file to see two icons:
- Open in Google Drive: Opens the file in a new tab.
- Remove: Removes the file from the task. The file itself stays in Google Drive.
Each file also shows the avatar of the person who attached it.
Very Important: Attaching a file doesn't share it. Your teammates can open it only if they have access in Google Drive. Share the file or its folder with your team in Drive first.
Step 09: Attach a Drive File to a Comment
Click the Comments tab and type your update. Next to Add Comment, you'll see a small Google Drive icon. Click it to pick a file from Drive and add it to your comment.
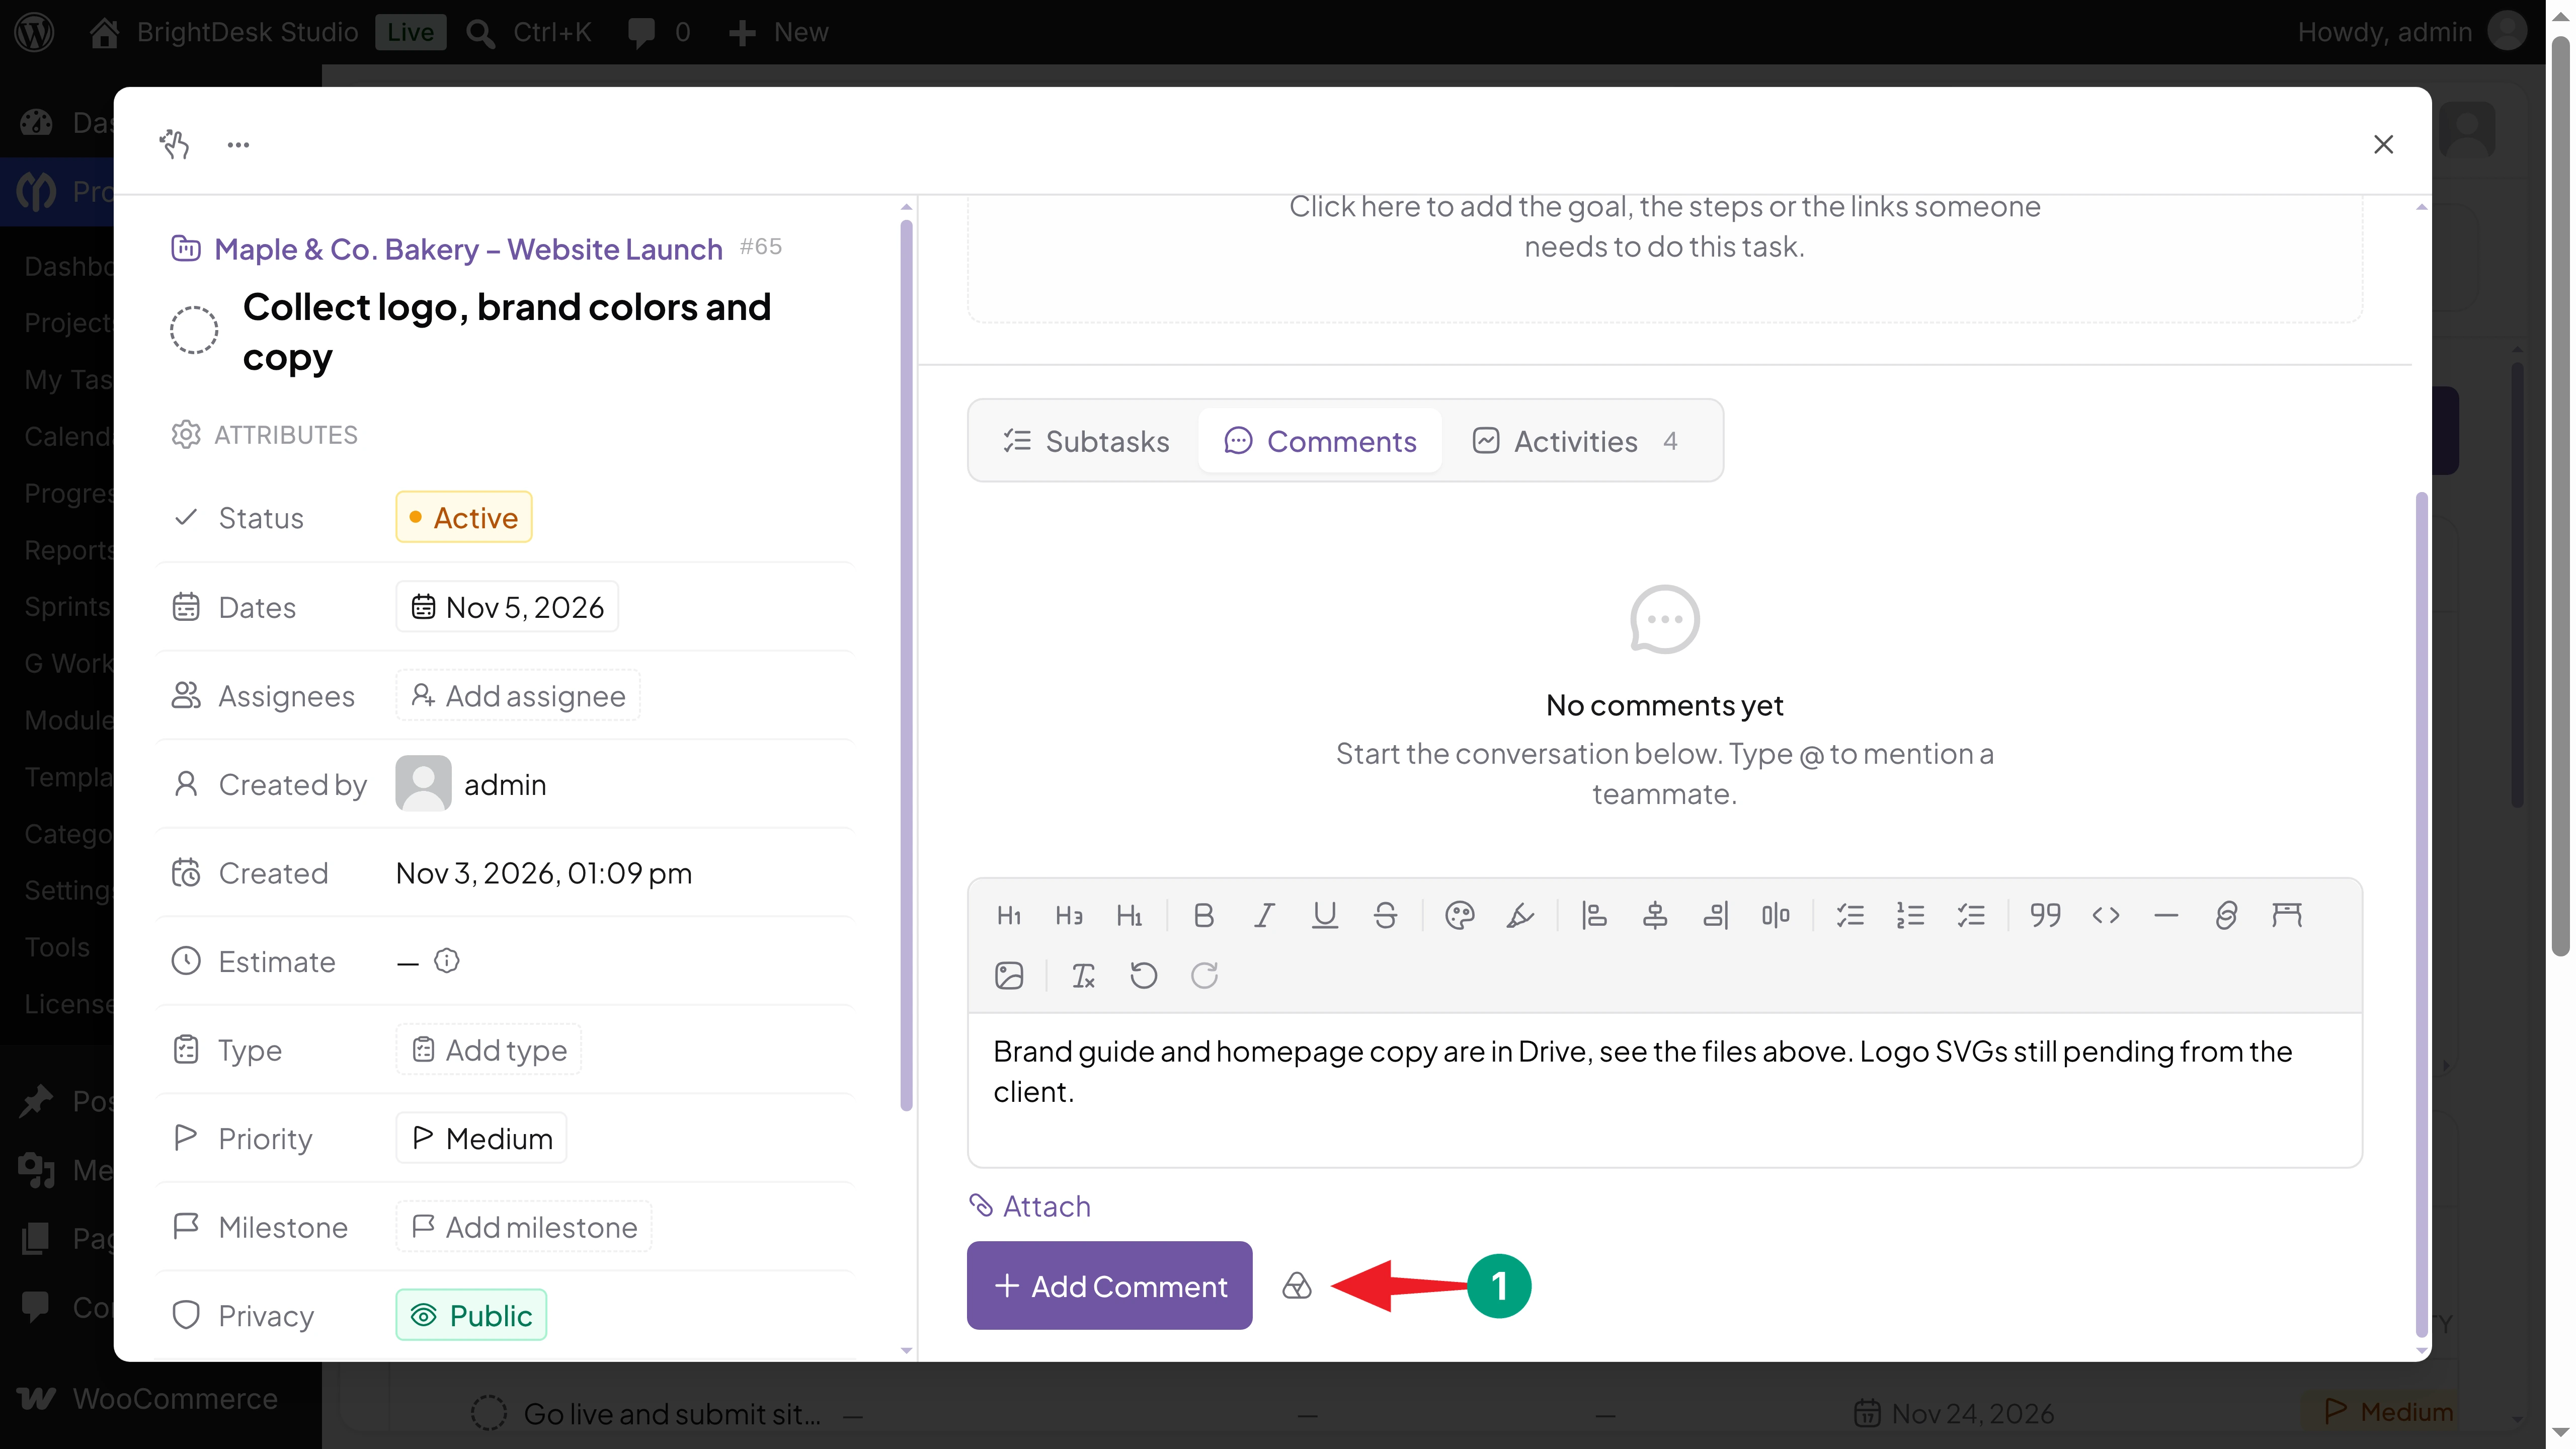
Then click Add Comment. If you don't see the Drive icon, check that Allow Drive in comments is on in Step 02.
Step 10: Track Drive Files in the Activity Log
Click the Activities tab. Each attachment is listed as Attached a Google Drive file to the task, with who did it and when.
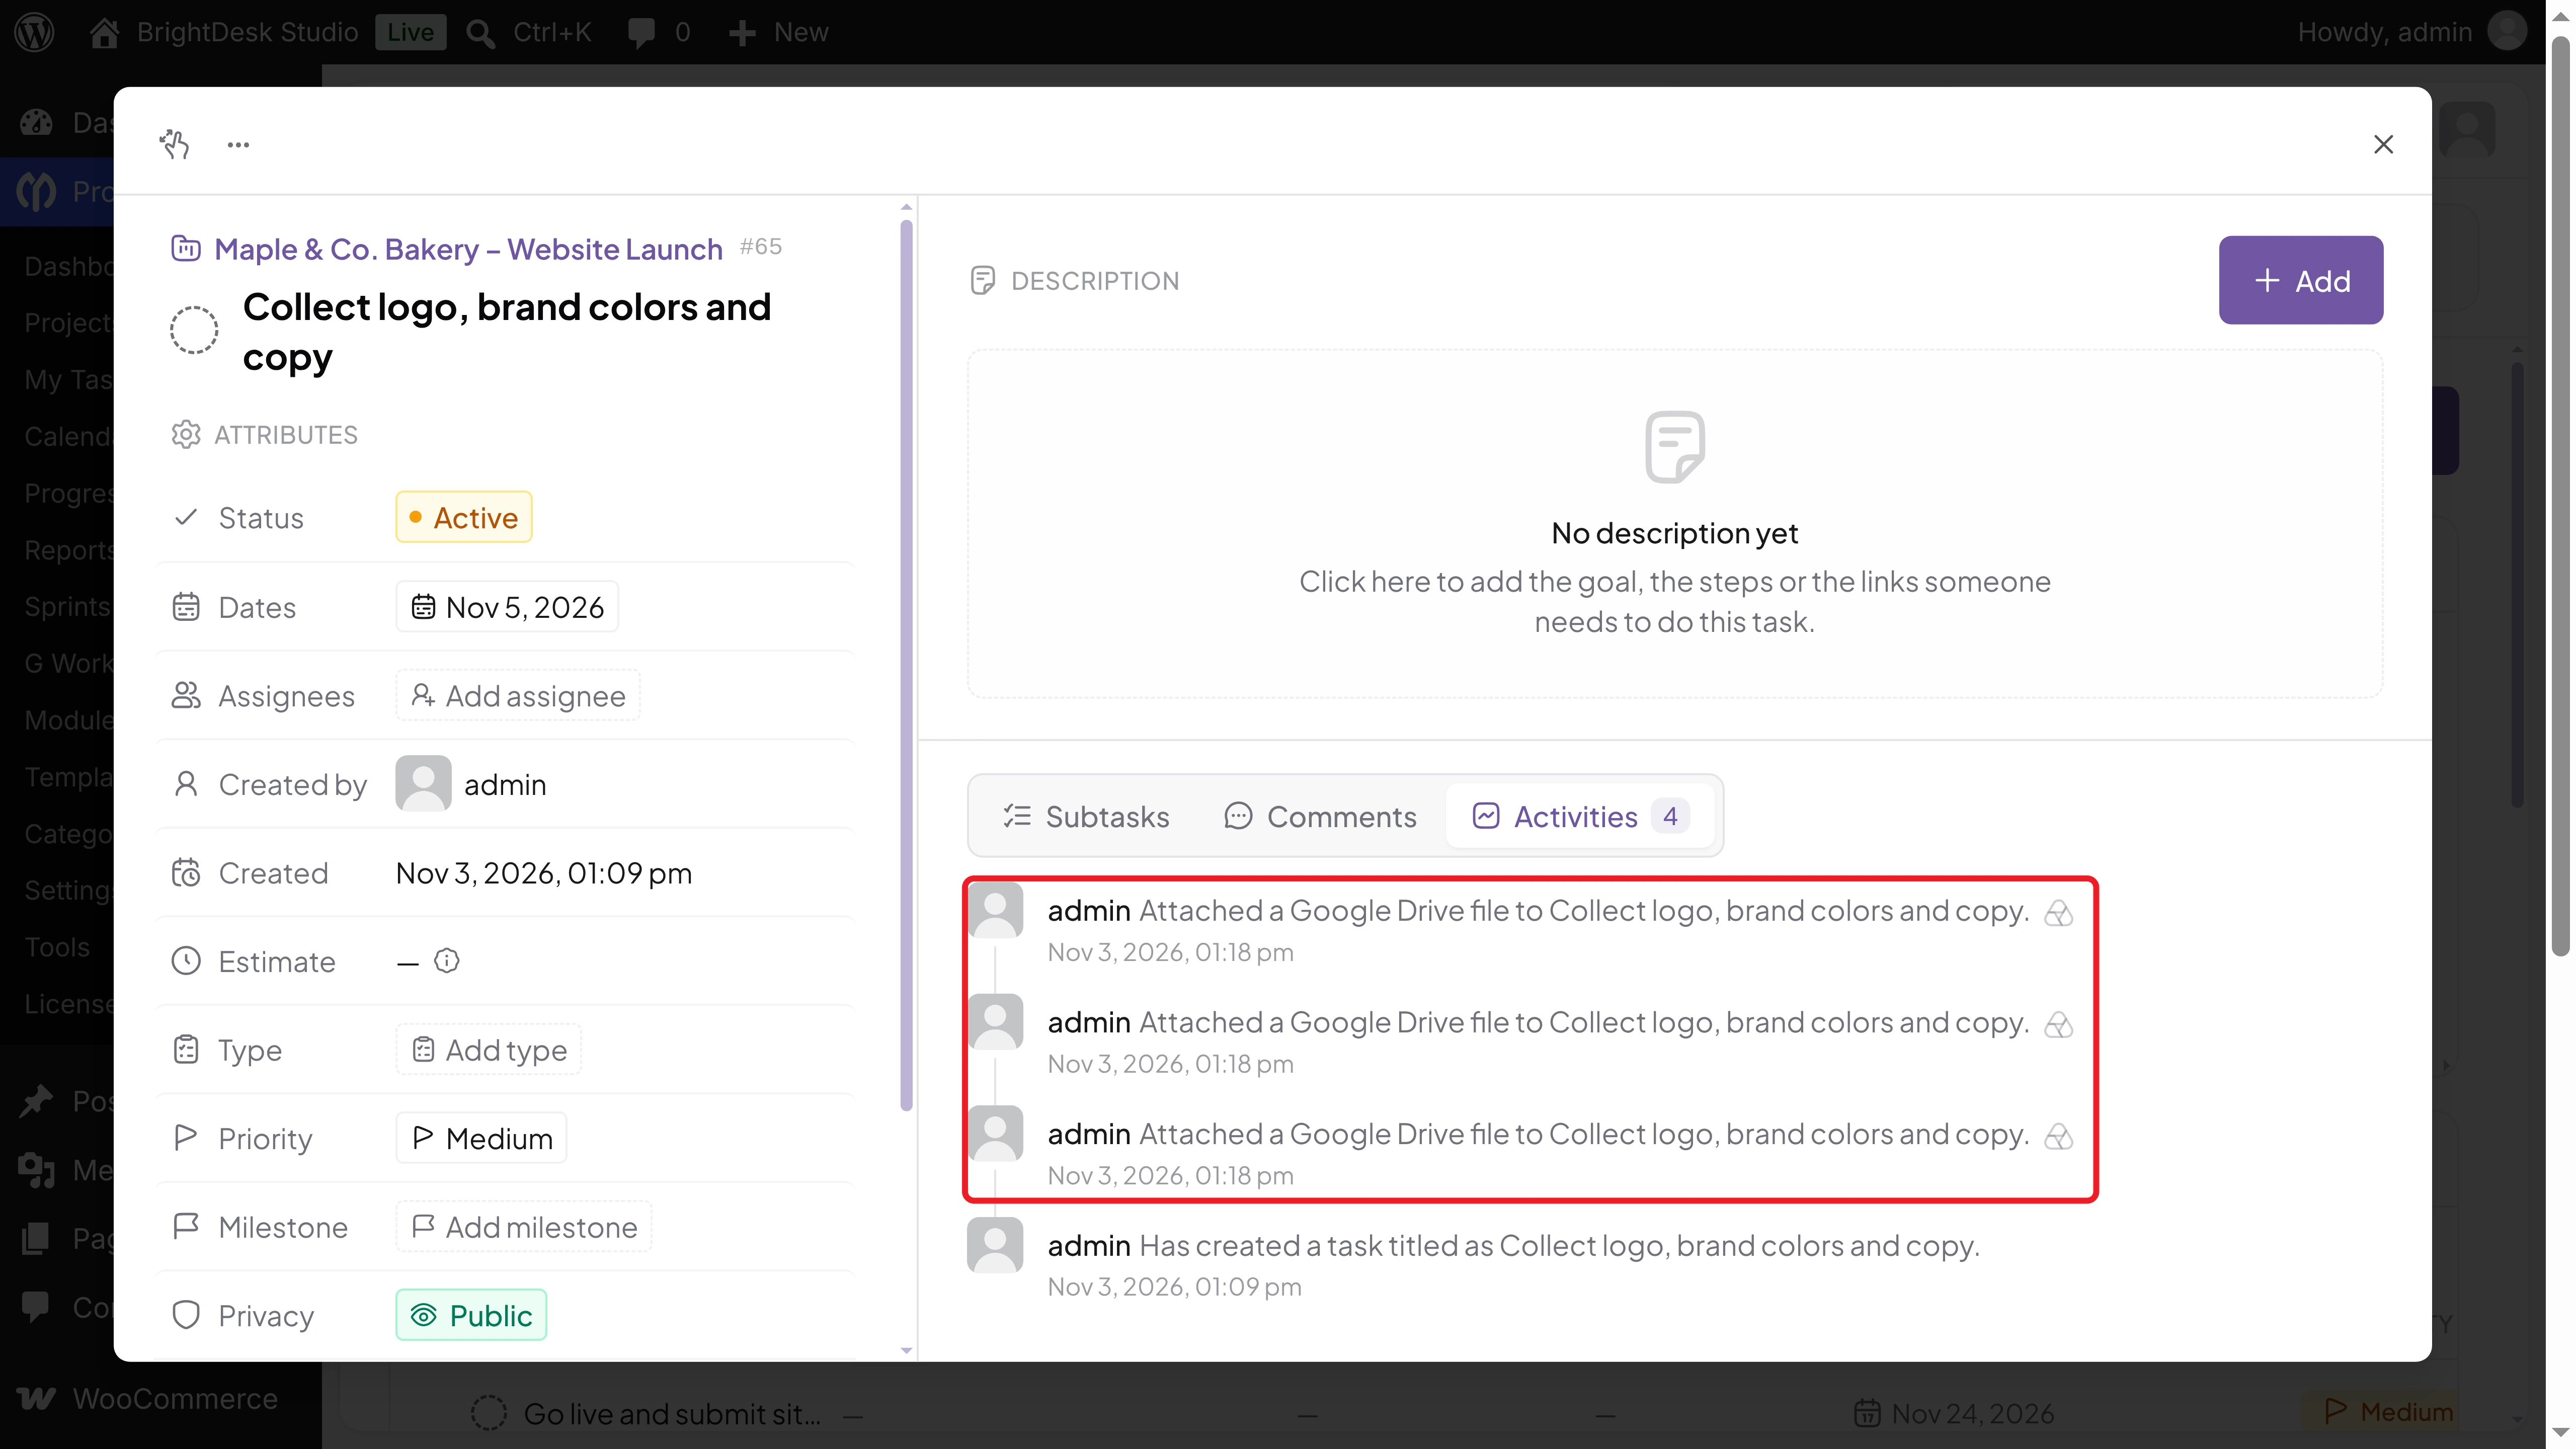
Thus, you can attach Google Drive files to WP Project Manager tasks and keep every file your team needs one click away.
We've also covered a detail video tutorial on this topic. Check it from YouTube below.
Who Can Attach Google Drive Files?
Access depends on the project role. Here's how it works by default:
| Role | See attached files | Attach and remove files |
|---|---|---|
| Admin and Project Manager | Yes | Yes |
| Co-Worker | Yes | Yes |
| Client | Yes | No (shows View only) |
A client sees a View only label in the Google Drive section instead of Attach. Hovering over it shows Your project role can view Drive files but not attach them. In comments, Google Drive links are hidden from users who don't have Drive access in the project.
Every user also needs a connected Google account to attach files. Without one, the task shows Connect Google instead of Attach.
Google Drive Attachments vs Uploading Files
WP Project Manager also lets you upload files with the Attach link in comments and the project's Files tab. Here's how the two compare.
| Google Drive Attachment | File Upload | |
|---|---|---|
| Where the file lives | In Google Drive | In your WordPress media library |
| Version | Always the latest version in Drive | A fixed copy from the upload |
| Storage on your site | None | Uses your server space |
| Who can open it | People with access in Google Drive | Project members |
| Best for | Docs, Sheets, and large files your team edits | Final files, screenshots, and small assets |
Many teams use both. Working files stay in Drive, while final files are uploaded to the project. Check how to create a project with AI in WordPress.
Best Practices for Using Google Drive with WP Project Manager
A few habits keep your Drive files easy to find and safe:
- Create one Drive folder per project: Share the folder with your team once, and every file inside is ready to attach.
- Name files clearly: Add the client and version, such as Homepage Copy – v2, so the right file is easy to spot on the task.
- Attach files to the task that needs them: Put the brand guide on the design task, not on every task.
- Use an internal consent screen: If your team uses Google Workspace, an Internal app lets only your organization connect.
- Keep the Client Secret private: Store it in a password manager, and create a new one in Google Cloud if it's ever shared.
- Remove old links: Remove files from the task when they're no longer needed, so your team doesn't open outdated versions.
Troubleshooting Common Google Drive Problems
| Problem | Possible Cause | What to Check |
|---|---|---|
| G Workspace is missing from the Project Manager menu | Google Drive is turned off | Turn on Enable Google Drive under Settings > G Workspace |
| The Google Drive section doesn't appear in the task | Drive is off, or you're on a different tab | Enable Drive, then open the Subtasks tab |
| Connect Google shows instead of Attach | Your Google account isn't connected | Connect it under Project Manager > G Workspace |
| The Attach button is grayed out | The API Key or App ID is missing | Add both under Settings > G Workspace and save |
| Google shows a redirect_uri_mismatch error | The redirect URI in Google Cloud is different | Paste the exact Authorized redirect URI from the settings page |
| The Picker doesn't open | The Picker API isn't enabled, or the API key is wrong | Enable the Google Picker API and check the API key |
| A teammate can't open an attached file | The file isn't shared with them in Drive | Share the file or folder in Google Drive |
| The Drive icon is missing in comments | Allow Drive in comments is off | Turn it on under Settings > G Workspace |
| A client can't attach files | Clients can only view Drive files | This is the default. Add files as a manager or co-worker |
FAQ on Attaching Google Drive Files to WP Project Manager Tasks
In this section, we have answered some frequently asked questions about using Google Drive with WP Project Manager.
Is the Google Drive integration free?
Yes. Google Drive comes with the free WP Project Manager plugin. Google Calendar sync and Google Meet on the same page need WP Project Manager Pro.
Does WP Project Manager copy my files to WordPress?
No. It saves a link to the file and its name. The file stays in Google Drive.
Can WP Project Manager see all the files in my Google Drive?
No. It asks for access only to the files you pick in the Google Picker.
Does every team member need their own Google account?
Yes, to attach files. Each user connects their own account under Project Manager > G Workspace. Viewing the list of attached files doesn't need a connection, but opening a file needs access in Google Drive.
What happens to the attachments if I delete a task?
The links are removed with the task. Your files in Google Drive aren't touched.
Can I attach Drive files outside of tasks?
Yes. You can also attach them to comments. The Drive section shows up on discussions as well.
Final Thoughts!
Congratulations! You now know how to attach Google Drive files to WP Project Manager tasks. Instead of hunting for links in chats and emails, your team finds every file right on the task it belongs to, always in its latest version.
Start with one active project. Set up the Google Cloud keys, connect your account, and attach the files for one task. Once your team is used to it, ask everyone to connect their accounts and make it part of how you run every project.