Build a Free eCommerce Marketplace Using WordPress in 5 Steps
Are you eager to launch your online marketplace without breaking the bank? Look no further! In this step-by-step tutorial, we will walk you through the whole journey of creating an eCommerce marketplace for free.
According to a recent statistic shared by Statista,
In 2023, global retail eCommerce sales reached an estimated 5.8 trillion U.S. dollars. Projections indicate it will surpass eight trillion dollars by 2027.
If you're looking to get a piece of the eCommerce pie, building your online marketplace is a great way to do it. And the best part is, you can do it with a minimal cost using WordPress.
WordPress is a powerful content management system that's easy to use and customize. There are a number of plugins available that can help you turn your WordPress site into a fully functioning marketplace.
If you are wondering where and how to start it, let's not get panicked. In this blog, we'll cover everything from choosing the right plugins to promoting your marketplace to get your first-ever sale.
So, without any further ado, let's get this show on the road!
Why You Should Choose WordPress As Your eCommerce Platform
When it comes to choosing an eCommerce platform, WordPress stands out as a top contender for numerous reasons. Let's explore why you should consider WordPress as your go-to platform for building your eCommerce marketplace.
- Popularity and Market Share: WordPress powers over 40% of all websites on the internet, making it the most widely used content management system (CMS) available. Its dominance in the market is a testament to its reliability and trustworthiness.
- Extensive Plugin and Theme Ecosystem: WordPress boasts a vast library of plugins and themes specifically designed for eCommerce. With popular plugins like WooCommerce, which powers over 5 million online stores, you have access to robust features for managing inventory, processing payments, and enhancing customer experience.
- Flexibility and Customization: WordPress offers unparalleled flexibility, allowing you to customize every aspect of your eCommerce platform. From designing unique layouts to implementing personalized branding, you can create a visually stunning and highly functional store tailored to your business needs.
- SEO-Friendly Architecture: WordPress is renowned for its search engine optimization (SEO) capabilities. With built-in features like clean URLs, mobile responsiveness, and easy content management, your eCommerce store has a better chance of ranking higher in search engine results, driving organic traffic, and increasing visibility.
- Cost-Effectiveness: Unlike many proprietary eCommerce platforms, WordPress is open-source and free to use. You can save significant costs on licensing fees and development, redirecting your budget towards marketing efforts and business growth.
So, it's safe to say that WordPress provides a solid foundation for building successful eCommerce platforms.
How to Create a Free eCommerce Marketplace Using WordPress- 5 DIY Steps for You

Creating an eCommerce marketplace has become easier than ever before after arrival of the WordPress. Now you can create your own eCommerce marketplace without having in-depth coding knowledge.
In this segment, we will show you the process of building an eCommerce marketplace. But before that let us discuss about prerequisites:
Prerequisites to Building an eCommerce Marketplace
To build a multivendor marketplace, the only prerequisite you’ll need to make sure is a live WordPress website.
If your WordPress website isn’t ready yet, nothing to be worried about. You can create a WordPress website by following these steps:
- Buy a domain name and a hosting plan
- Install WordPress on your control panel (cPanel)
That’s all!
We have a series of blog posts to get these things done. So, follow these blogs if you need any help:
- How to Choose The Best Domain Name for eCommerce Website
- Best Reliable Hosting for eCommerce
- How to Install WordPress on cPanel
After ensuring a live WordPress website, now follow these 5 steps to get your eCommerce marketplace ready:
- Install and Activate the Dokan Multivendor Plugin
- Install a Dokan Compatible Marketplace Theme
- Configure Dokan Basic Settings
- Upload Products and Setup Admin Shop
- Allow Vendors to Register on Your Marketplace
Now let’s get started with the tutorial:
Step 01: Install and Activate the Dokan Multivendor Plugin
Installing the Dokan plugin is as simple as installing other WordPress plugins.
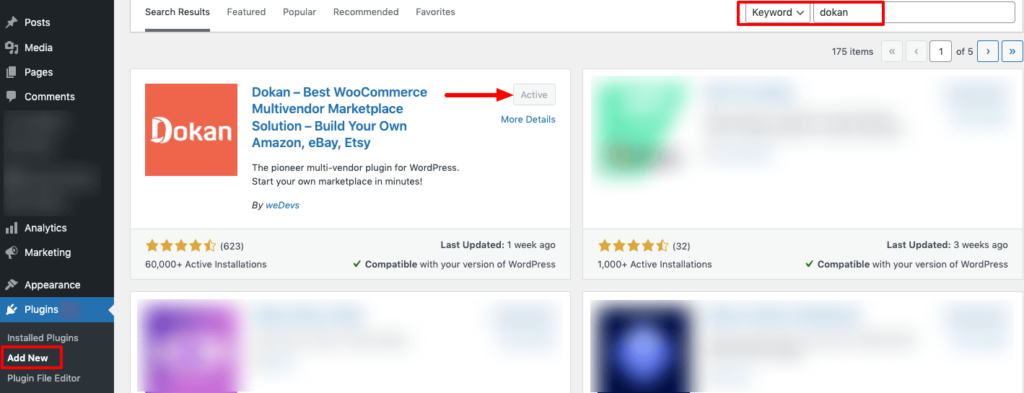
To install Dokan right from your dashboard, navigate to your WordPress dashboard -> Plugins -> Add new.
Then type the plugin name- “Dokan” in the search box and install the plugin from the search result.
After installing the plugin, click on the Activate button to activate the plugin.
After activating the plugin, follow Dokan Wizard to complete the configuration. It’s a very easy process. Then again you can follow this video on Dokan installation if you face any kind of hassle.
Note: If WooCommerce has already not been installed on your site, you don’t have to install WooCommerce separately. Because when you install Dokan, it will automatically install WooCommerce.
If you find it difficult to configure the Dokan plugin, you can watch our video on the Dokan installation guide.
Step 02: Install a Dokan Compatible Marketplace Theme
After installing Dokan, you will need to install a Dokan-compatible marketplace theme. You can install any theme that is compatible with Dokan. The good news is any theme that is compatible with WooCommerce is also compatible with Dokan.
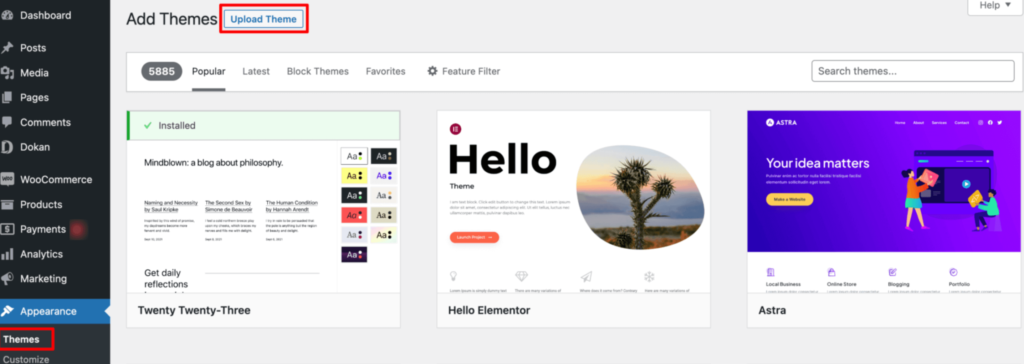
If you are not sure which theme you should consider for designing your eCommerce marketplace, we are recommending the “Dokani” theme for you. This theme is created by the same company behind the Dokan plugin. On top of that, this theme is absolutely free to use.
To install this theme on your marketplace, go to your WordPress dashboard -> Appearance -> Themes -> Add New -> Upload Theme. Don’t forget to activate the theme after uploading it.
That being said, if you want to use any third-party premium theme, we have a backup for that as well. We have compiled a list of the best third-party premium Dokan-compatible marketplace themes for you on our website. Click this button to get the list!
Step 03: Configure the Basic Settings of the Dokan Plugin
After installing and activating the Dokan plugin, now you need to configure all the basic settings. You will find all the settings options at WP-Admin –> Dokan –> Settings.
You’ll find:
- General Settings
- Selling Options
- Withdraw Options
- Payment Gateways
- Reverse Withdrawal
- Page Settings
- Appearance
- Privacy Policy
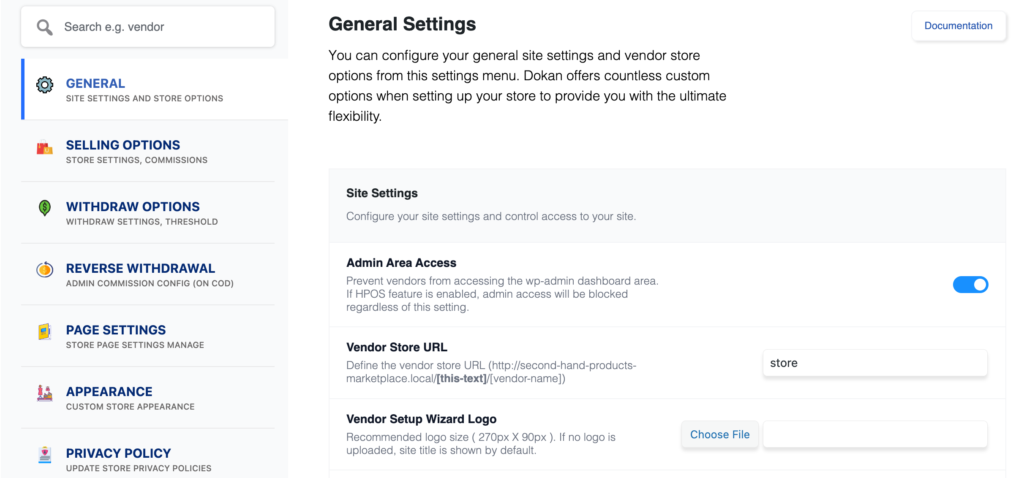
You can select the pages for the vendor dashboard, order page, store listing, and terms and conditions page from here.
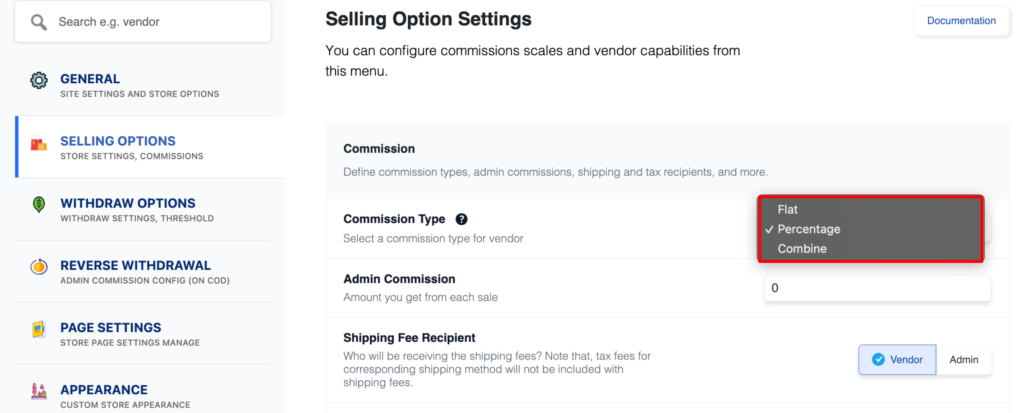
Now you need to set the commission type and rate. Go to WP Admin Dashboard -> Dokan -> Settings -> Selling Options. There you’ll find the Commission Type and Admin Commission options.
Set the commission type and rate according to your convenience.
Don’t forget to click the Save Changes button after configuring all the settings. Otherwise, you will lose all the changes that you’ve made now.
Now if you want to set the permalink settings of your product page, you can do that from WP Admin -> Settings -> Permalinks -> Product Permalinks.
For example, using “product” would make your product links like http://yourdomainname.com/store/sample-product/.
This setting affects product URLs only, not things such as product categories.
Select the check box “Custom Base” for product permalinks and write “/product” (or, whatever you want) on the box. Then hit the Save Changes button to save the settings.

Now let’s discuss two basic yet crucial settings of the Dokan multivendor plugin:
a) Configure Payment Gateways
You can’t control your customers which payment gateway they should choose, right? So, it’s always a better decision to ensure several payment gateways on your marketplace.
Dokan supports all WooCommerce-compatible payment gateways. You will get a wide range of choices to make the transaction process easier on your marketplace.
With Dokan Lite you can use non-adaptive payment gateways like PayPal, bank account transfer, cash on delivery, etc. The Pro version supports adaptive payment solutions like Stripe Connect and MOIP.
Go to your WordPress dashboard -> WooCommerce -> Settings, then click on the Payment tab to get the available payment methods.
Note: In case the PayPal option isn’t there, you should install the “WooCommerce PayPal Payments” plugin and you will find the PayPal option here.

b) Enable Withdraw Methods
Another important part of running an interactive online marketplace is to ensure a smooth withdrawal system. Dokan helps you take care of this section as well.
Go to WP Admin -> Dokan -> Settings -> Withdraw Options. Here you’ll find options to customize the withdrawal method and set the minimum balance a vendor needs to make a withdrawal limit.

You can also customize other Dokan settings following the same process that we have shown here.
If you need more help configuring the Dokan general settings, you are in luck! We have step-by-step documentation for every Dokan setting. Just check our Dokan settings documentation and set up your multivendor with ease!
Step 04: Upload Products and Set up Your Admin Shop
Since you are an admin, you have two options to earn from your marketplace. You can earn through commissions which means when any of your vendors make a sale, you will get a commission. There is another way to earn that is selling products from your admin shop.
Now we are going to show you how to create your admin shop and sell from your own marketplace. If you don’t want to set up your admin shop, you can simply skip this step and proceed to step 5.
First, you need to enable yourself as a seller. To do that go to Dokan –> Vendors and enable selling by turning on the Status button.

As an admin, you’ll get two ways to upload products. You can upload products from frontend or backend.
Let’s check how to upload products from the backend:
Go to your WordPress Backend -> Products -> Add New. There you’ll find options to add the product’s name, description, image, category, tags, and so on.

If you haven’t created Categories and Tags before, navigate to your WordPress dashboard -> Products -> Categories to add new categories.

In the same way, go to your WordPress dashboard -> Products -> Tags to add new tags.
Then configure the rest of the options for adding a new product.

After completing all the customizations, click on the “Publish” button to publish the newly added product.
That’s how you can add products from the backend.
Now let us show you how to add products from the frontend. Your registered vendors will also add products following this same process.
Go to your WordPress Dashboard -> Visit Vendor Dashboard -> Products. Then click on the Add new product.
There you’ll find options to add the product title, image, price, description, and more.

After adding all the information for the product, hit the “Save Product” to complete the process.
But this product won’t be publicly available unless the admin which is you approves it. That means you’ll find the product with pending review unless you approve it.

To approve this product, go to your backend and click on the Products option, then click on the Quick Edit. There you will find the Status option. Choose the Published option and click the Update button to approve and publish the pending products.
That’s all!
You can customize your store design by going to Vendor Dashboard -> Settings. From here you can update your store name, address, opening & closing time, etc.
After customizing your store, visit the store to check the front-end view.

This is how you can upload products from the frontend and customize your store frontend.
Step 05: Allow Vendors to Sign Up on Your Marketplace
All the basic configurations are done. Now it's time to open your marketplace for third-party vendors.
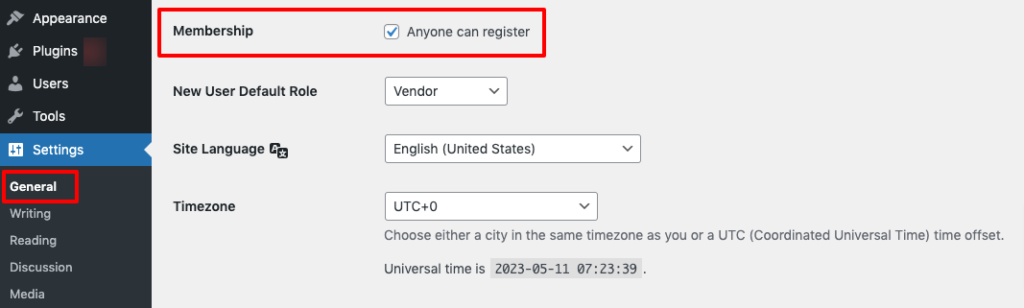
First, you need to enable the “Anyone can register” option. In order to do this, go to WordPress Dashboard -> Settings -> General -> Membership. And put the check mark on it.
Also, don't forget to save the changes that you have made now by clicking on the “Save Changes” button.
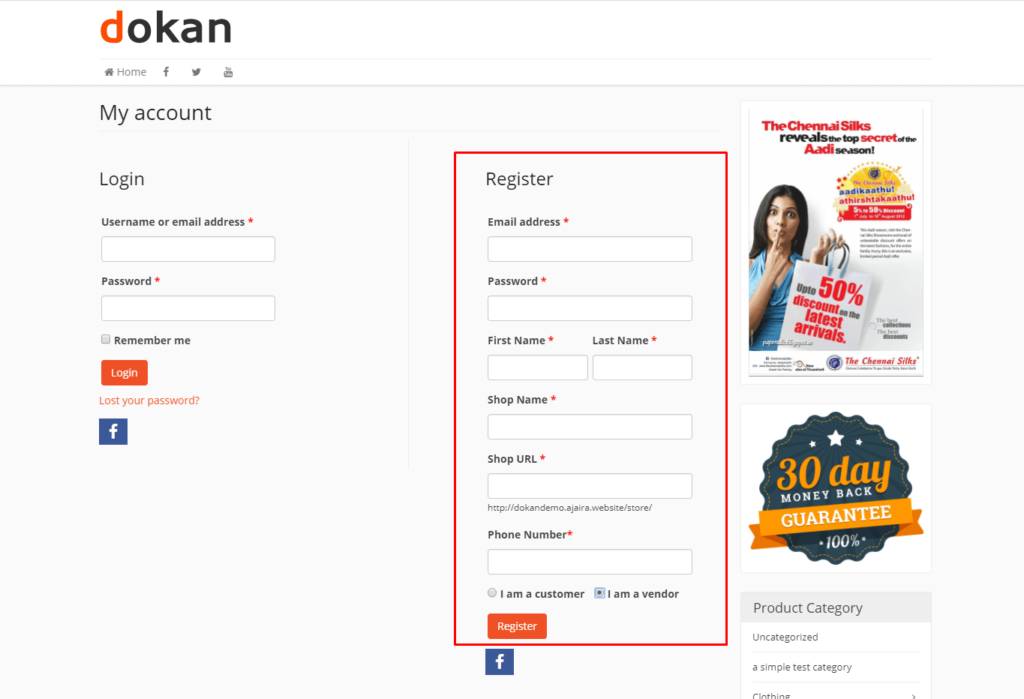
Now vendors can fill up the registration form to sign up in your marketplace-
As an admin, you have the ability to review and manage all vendor registration requests from the backend. Take a look at the profiles of potential vendors and selectively approve those who meet your criteria to sell their products on your site.
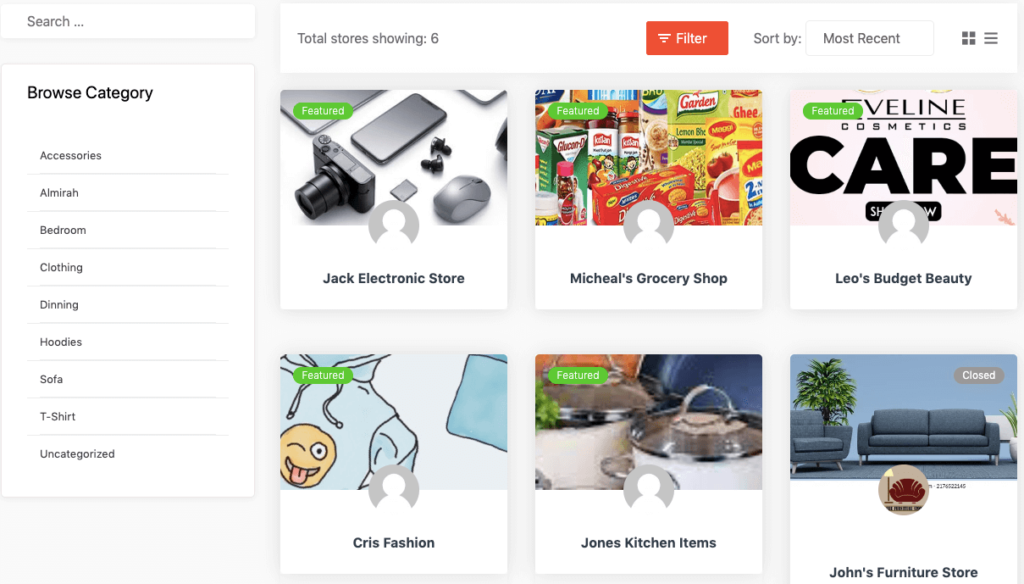
Navigate to your WordPress dashboard then click on the Visit Stores to check all the registered stores on your eCommerce marketplace.
Once approved by the admin, vendors gain the freedom to create their own stores with unique URLs. Dokan also provides each vendor with an individual vendor dashboard, empowering them to effortlessly upload, manage, and successfully sell their products.
Bonus Tip: How to Promote Your eCommerce Marketplace
Promoting an online eCommerce marketplace requires strategic planning and a multi-faceted approach. Here are some effective strategies to promote your eCommerce marketplace and attract customers:
- Social Media Marketing: Leverage popular social media platforms such as Facebook, Instagram, Twitter, and LinkedIn to create engaging content, share product updates, run targeted advertisements, and interact with your audience. Utilize social media influencers and collaborations to extend your reach.
- Search Engine Optimization (SEO): Optimize your website for search engines to improve visibility and organic traffic. Conduct keyword research, create high-quality product descriptions and blog content, and optimize meta tags and URLs. Build backlinks and ensure your site is mobile-friendly for better search engine rankings.
- Email Marketing: Build an email list and send targeted campaigns to promote new products, exclusive offers, and special discounts. Personalize your emails and provide value-added content to engage customers and drive conversions.
- Content Marketing: Create valuable and informative content through blog posts, videos, tutorials, and infographics that cater to your target audience's interests and pain points. Share this content on your website, social media platforms, and email newsletters to establish thought leadership and attract potential customers.
- Influencer Marketing: Collaborate with influential bloggers, vloggers, and social media personalities in your niche to promote your eCommerce marketplace. Their endorsement can significantly impact your brand visibility and credibility.
- Paid Advertising: Consider running targeted ads on platforms like Google Ads, Facebook Ads, and Instagram Ads. Use demographic targeting, retargeting, and lookalike audiences to reach potential customers who are likely to be interested in your products.
- Affiliate Marketing: Set up an affiliate program where influencers, bloggers, and other online marketers earn a commission for referring customers to your marketplace. This can expand your reach and drive sales through their networks.
Remember to track your marketing efforts using analytics tools to measure the effectiveness of each strategy and make adjustments as needed. A combination of these tactics tailored to your target audience and marketplace can help drive traffic, increase conversions, and grow your eCommerce business.
FAQs on How to Create a Free eCommerce Marketplace
1. What platform should I use to build my eCommerce marketplace?
One popular platform for building an eCommerce marketplace is WordPress with the WooCommerce plugin. It provides a user-friendly interface, customizable themes, and robust features for managing products, orders, and payments.
2. How do I handle payments and transactions on my eCommerce marketplace?
You can integrate payment gateways like PayPal, Stripe, or Square into your marketplace to securely process transactions. These gateways offer various payment options, ensuring a smooth and secure checkout process for your customers.
3. How can I ensure a seamless user experience on my eCommerce marketplace?
Choose a responsive and user-friendly theme for your marketplace, optimize website performance and speed, and provide intuitive navigation and search functionality. Regularly update and maintain your platform, address customer feedback, and offer secure transactions to enhance the overall user experience.
Choose WordPress and Create a Free eCommerce Marketplace with Ease
Choosing WordPress as your platform to create a free eCommerce marketplace is a smart and practical decision. With its user-friendly interface, extensive plugin options like WooCommerce, and customizable themes, WordPress empowers you to build your online store with ease.
By leveraging the power of WordPress, you can take advantage of its robust features, seamless payment integration, and efficient vendor management systems. This allows you to focus on growing your business and delivering a seamless shopping experience to your customers.
So, why wait? Harness the power of WordPress, and start building your free eCommerce marketplace today.
If you have any confusion regarding this topic, you can let us know in the comment box below. We would love to know your feedback. Thank you!