


How to Configure WooCommerce GST for Marketplaces
GST or the Goods and Services Tax is a value-added tax applied on goods and services sold for domestic consumption. A unified GST system can now be seen in many countries.
While France was the first country to implement GST, as many as 160 countries followed their path in one form or another. India was one of the last countries that announced GST in 2017.
Ways of selling goods and services have drastically changed over the years, as online is now the preferred option over the physical way.
So, naturally setting up GST on an eCommerce website is one of the important aspects of building one.
As more and more countries adopt the GST system, we are getting many queries on how to set up GST on Dokan and WooCommerce so that they can calculate and show GST right on the customer invoice. Because unless they can calculate and cut taxes on the sale, they'll have to incur losses.
So we decided to dig deep and show the ways to configure GST on the sales invoice. We come up with pretty interesting ideas, and this blog will show you the easiest one from those.
What is GST All About?

You might already have a basic understanding of GST from the paragraph above. But let us clear your ideas a little bit more.
GST, also known as Goods and Services Tax is included in the final price, and the end customers have to bear this. The seller then passes the tax amount to the government.
Usually, GST works as a common tax across the nation. So it reduces the complication. That's why many countries around the world are opting for this taxation method.
However, as an online business also have to abide by the government rules and regulations, you need to implement the GST taxation system on your eCommerce site as well.
How to Configure GST for Sales Invoices in WooCommerce – Step by Step
Configuring GST for the sales invoice is actually very simple and straightforward. You can implement this just like any other taxation in WooCommerce, with a slight modification. Until a dedicated option or plugin is developed for GST, this way will work just fine for your eCommerce site!
Read: Things You Need to Know About Your Marketplace Tax
Pre Requisites to Add GST in WooCommerce
In order to configure GST on your eCommerce site using our method, you will have to ensure the following things –
- Working WordPress site.
- WooCommerce for enabling eCommerce options.
- Dokan (To create a multi-vendor marketplace)
After ensuring all of the above, it's time to configure GST on your sales invoice. Don't worry, it's easy as a pie!
Setting up GST on WooCommerce
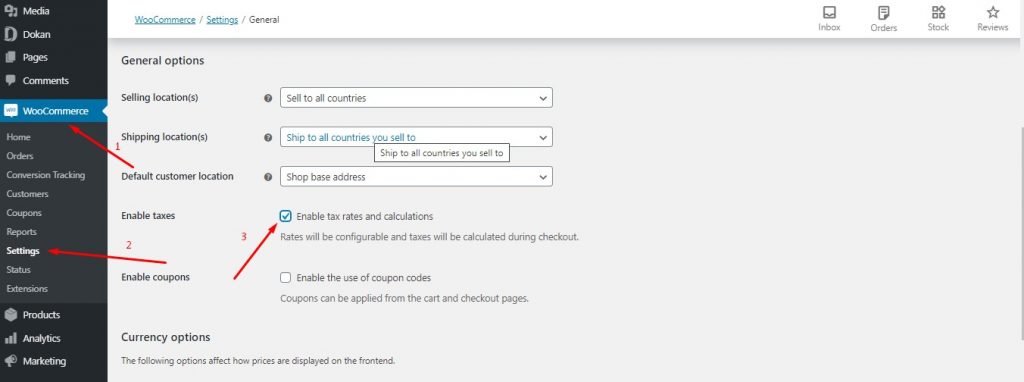
Now we are going to configure WooCommerce GST settings. First login to your WordPress-powered website. From the WP Admin Dashboard, go to WooCommerce > Settings > General. Now scroll down and check on Enable tax rates and calculations.
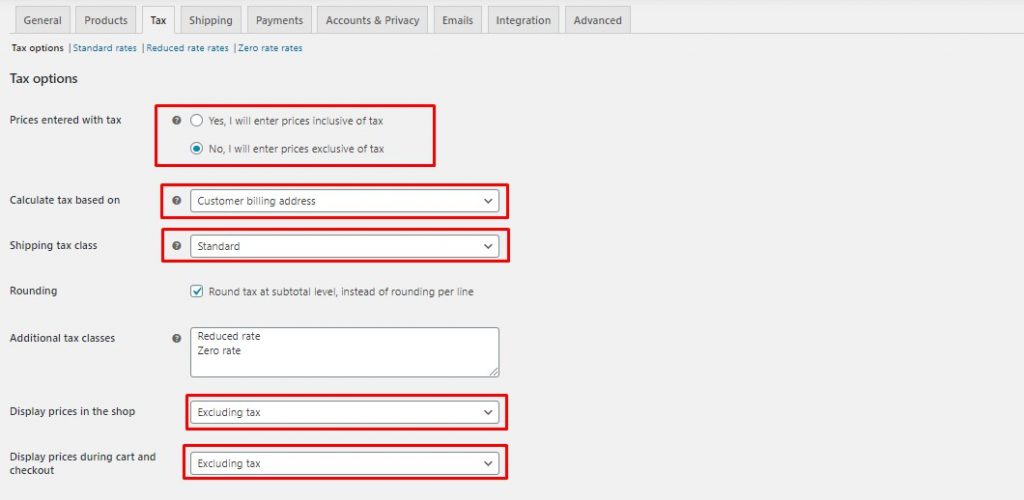
Once you do that, you'll find a tab called Tax alongside others inside the WooCommerce settings. Now altered the settings just like the image below.
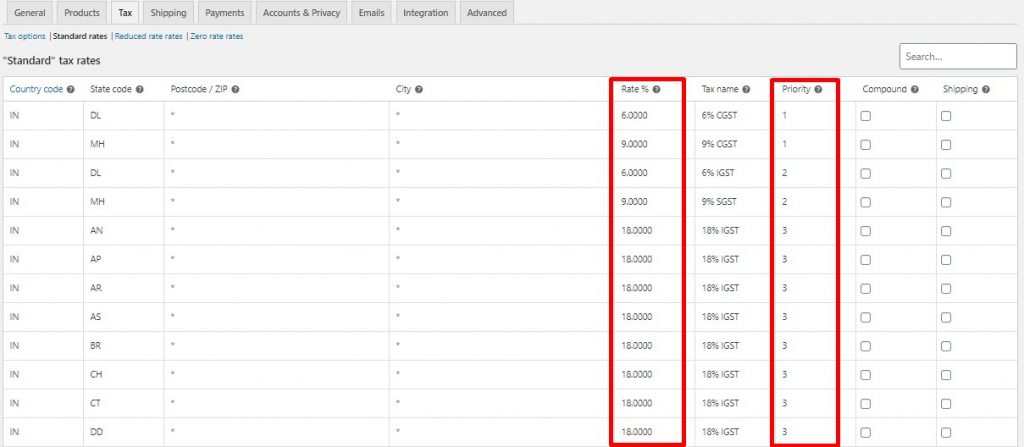
Now click on the Standard rates which you can find on the same page. Here you can find an Import CSV option. Click on that and upload the following file.
Please note that this CSV file contains all the Indian state codes and the tax rates while considering Maharashtra as the shop location while considering apparel as the product. It contains CGST, SGST, and IGST columns as per state. We categorized the tax percentage by setting a priority.
If you are selling any other product in any other state or country, make sure to modify the Tax Rate and Priority as per your requirement.
Yes, you have successfully implemented GST on your website.
The Final Result
We tried ordering a product from our website after setting the tax rates. And it worked like a charm. Want to see our tax rate in action? Here you go!
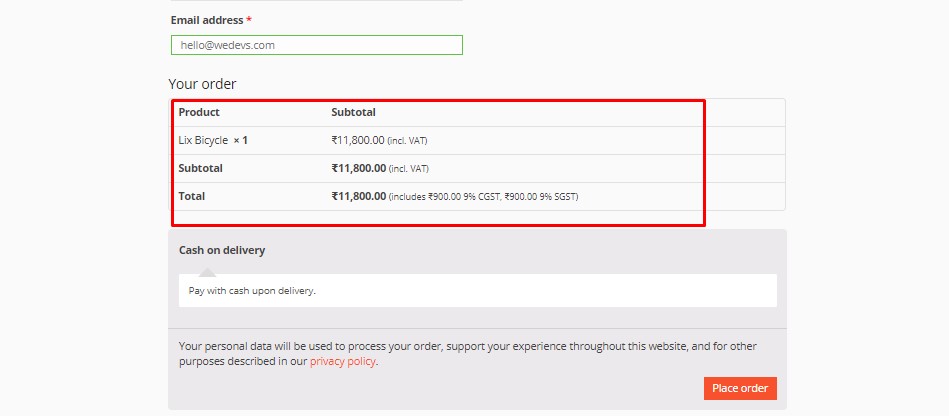
As you can see the price is showing inclusive of VAT. The original product was ₹10,000. An additional ₹900.00 or 9% CGST, ₹and 900.00, or 9% SGST was included over that price.
Setting up GST on your Dokan Powered Multivendor Marketplace
You don't need any extra configuration to set up GST on Dokan-powered multivendor marketplaces!
See how easy it was to set up GST on your WooCommerce-based site? Now if you have a Dokan-powered multi-vendor marketplace, you might have a question hovering over your mind. “Can I implement GST on my multivendor marketplace as well?”
Well, WooCommerce powers the Dokan multi-vendor plugin. So any settings that you modify on WooCommerce will also have an impact on the Dokan. So you don't actually have to configure the settings for Dokan.
Our existing settings will be in action even on a multi-vendor website. Below is an example of that.

FAQ(s) on WooCommerce GST for Marketplaces
To add the HSN code of each product in the order to the order invoice email and/or PDF file, you'll need to modify the email and PDF templates in your e-commerce platform or custom code.
Here are the general steps to accomplish this:
Identify the template files: Find the email template responsible for generating the order invoice email and the PDF template used to generate the PDF version of the invoice.
Locate the product loop: Within the template files, locate the loop that iterates over each product in order to generate the product details section.
Retrieve the HSN code: Access the HSN code value for each product. Depending on your e-commerce platform, you may need to retrieve this value from the product's custom attribute.
Modify the template: Inside the product loop, add a section to display the HSN code under each product name. You can use the retrieved HSN code value and format it as needed.
Test and verify: After making the changes, test the order invoice email and generate a sample PDF to ensure that the HSN code is properly displayed under each product name.
Remember that the exact steps and code modifications required may vary depending on your e-commerce platform and the template system used.
Yes, it is possible to capture the GST number of a customer on the checkout page.
Here are the general steps to capture the GST number during checkout:
Enable GST functionality: Ensure that your e-commerce platform or plugin supports GST functionality and provides options for capturing GST numbers.
Customize the checkout page: Modify the checkout page template to include a field where customers can enter their GST number. This field can be added as a custom field or an additional input in the billing or shipping address section.
Validate the GST number: Implement a validation mechanism to ensure the entered GST number is in the correct format and valid. This can involve using a GST number validation algorithm or API provided by the respective tax authority.
Store the GST number: Once the GST number is entered and validated, store it as part of the customer's account information or associate it with the order details.
Use the GST number for invoicing: When generating invoices or order confirmations, include the captured GST number in the relevant sections to ensure it appears on the invoice and can be used for GST credit purposes.
Compliance and legal considerations: Ensure that you comply with the relevant tax laws and regulations for capturing and utilizing GST numbers. It's recommended to consult with a tax professional or legal advisor to ensure compliance.
It's important to note that the exact steps and methods may vary depending on your specific e-commerce platform or plugin.
In the case of multivendor transactions, the priorities for CGST (Central Goods and Services Tax), SGST (State Goods and Services Tax), and IGST (Integrated Goods and Services Tax) depend on the type of transaction and the location of the buyer and seller. Here's a general guideline:
Intrastate Transactions (Within the same state):
If the buyer and seller are located within the same state, both CGST and SGST will be applicable.
The CGST portion of the tax will go to the central government, and the SGST portion will go to the respective state government.
The tax rate for both CGST and SGST will be determined by the state government.
Interstate Transactions (Between different states):
If the buyer and seller are located in different states, IGST will be applicable.
IGST is a combination of both CGST and SGST, and it is levied by the central government.
The IGST collected will be distributed between the central and state governments as per the rules and regulations.

Make WooCommerce GST Effortless & Easy
Like any other technology, eCommerce is always evolving. And rules and regulations are also being imposed on online businesses, just like offline businesses. So we need to adapt to those regulations by implementing those on our websites.
GST is one of the most widely implemented tax regulations and it is important that we set it up on our website to avoid incurring losses. And if you use WooCommerce for your eCommerce site, it actually becomes super easy to implement GST, as you can see from the article.