
How to Edit a Footer in WordPress: A Guide for Every WordPress User
Every element on a website is important depending on how you utilize and design them. A website footer is often ignored and seen as a place to dump whatever doesn't fit in the top menu. But used smartly, and a website footer can significantly impact your website and your business.
A website footer is a section of any website that appears at the bottom of every page. Most sites use the footer to add important links like disclaimers, privacy policies, and other key pages of your site. For WordPress sites, it contains a copyright that reads ‘Proudly powered by WordPress' by default.
Website footer is very crucial, especially for eCommerce sites and large websites. Utilizing the website footer smartly can improve the navigation and user experience.
In this write-up, we will show you how to edit a footer on WordPress sites so that you can make the footer more lucrative and use it to your advantage.
Get your pen and paper ready as we will start with-
Why Optimizing Footer Section of Your Website is Important?
Users think that putting extra effort in the section where the audience spends the least amount of time is not worth it. But that type of thinking is wrong, especially in this era, where website designs are becoming minimalistic, and screens are getting larger.
People are getting smart and they will scroll if they have a reason to do it. They know that the information not available in the menu will be available in the footer. So, you need to make sure, after scrolling all the way through, they don't go back from your site disappointed.
As per the benefits of having a WordPress website footer, well footers will include-
- Navigation links to important pages
- Contact information for users to get in touch
- Legal information like copyright and privacy policies
- Social media integration with links to profiles
- Consistent design elements for brand identity
- SEO benefits through internal linking
- Builds user trust and credibility
- Technical information for developers
- Subscription and conversion opportunities, e.g., newsletter sign-up.
These are all very crucial information and it is hard to cram it all in the top menu. Also, it will ruin the design of your website. Now you tell me, is it worth having a smarty-designed website footer?
How to Edit Footer in WordPress – 5 Easy Ways

After reading the above sections, you may want to start customizing your footer right away. For your convenience, we have prepared all the ways you can edit your WordPress footer and customize it the right way.
Here are the ways you can edit and customize your website footer-
- Edit a Footer in WordPress using WordPress Customizer
- Edit Footer in WordPress using Block Editor
- Use Coding to Customize Your Footer
- Edit a Footer in WordPress.com
- Create a Custom Footer for Every Single Page
Now, let's see the processes in details-
1. How to Edit a Footer in WordPress using WordPress Customizer
Most of the themes nowadays will let you take control of your website customization, including the footer. You can use the theme's Customizer option to edit the footer section. There are a few ways you can manage the site's footer-
- WordPress Widgets
- Theme Settings
- WordPress Menus
However, how much control you will have on your footer customization will depend on your theme. Some themes might give one, two, or even three options to customize your footer. We will show them to you.
Edit the Footer Section with WordPress Widgets
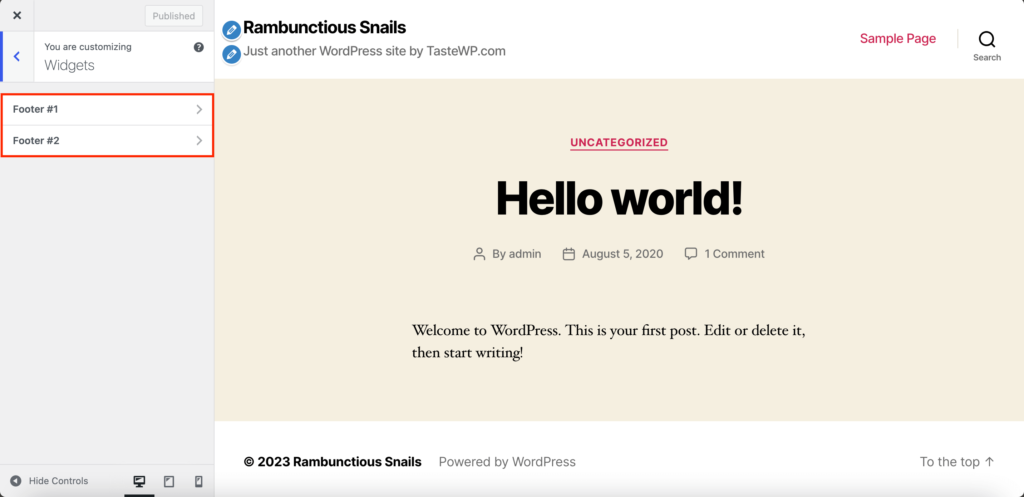
First, go to WordPress–> Appearance–> Customize. You will see the live preview of your site there. You will also find the settings options on the side on the left-hand menubar.
There you will find the Widgets option. Now, depending on the theme you will find more than one footer option. For example, you will find 2 footer options in the Twenty-Twenty theme. That means you will get two columns to add your footers.
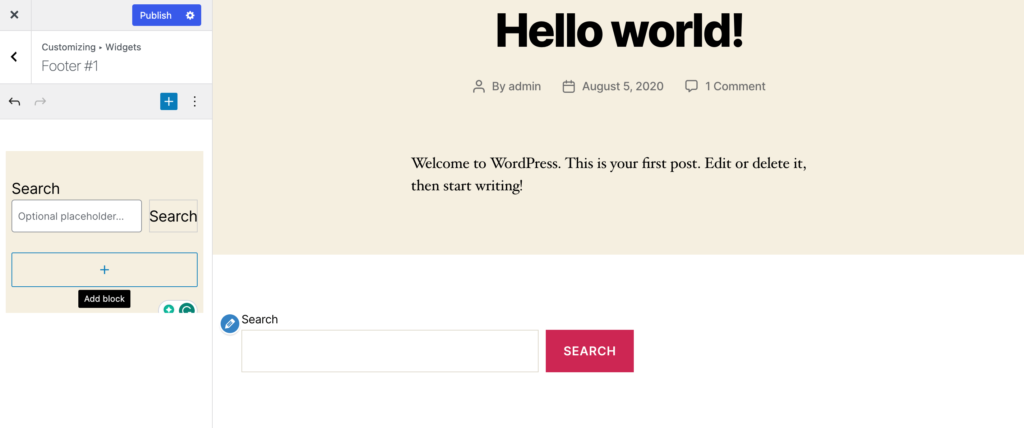
Click on one of the footer options and then you can add/edit/remove WordPress widgets. You can customize by adding widgets like “Recent posts, Search, Recent Comments, etc”.
After adding all the widgets, don't forget to hit the publish button.
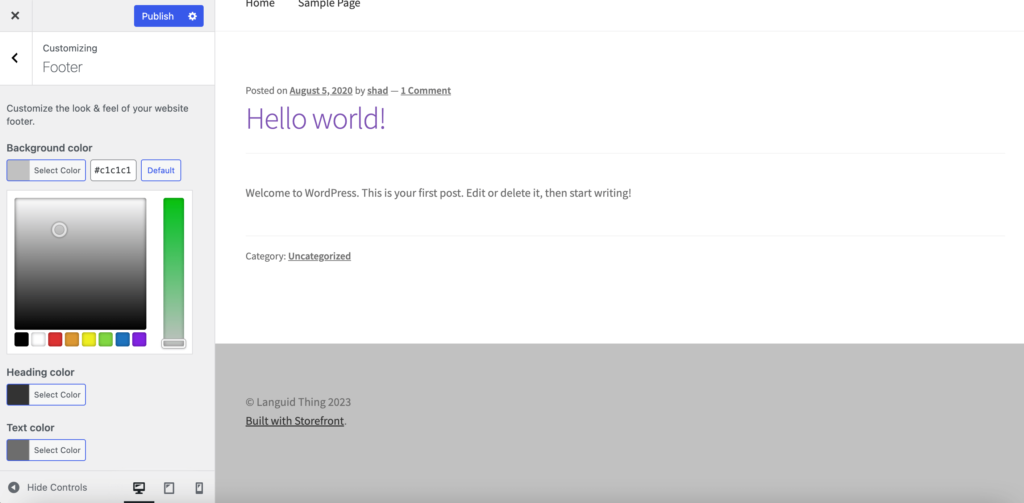
Theme Settings
Some themes provide their footer settings in the sidebar menu. If you are using the Storefront theme for your eCommerce store, then you will find a separate footer option in the menu. The footer option will help you change the background color, heading color, link color, and text color.
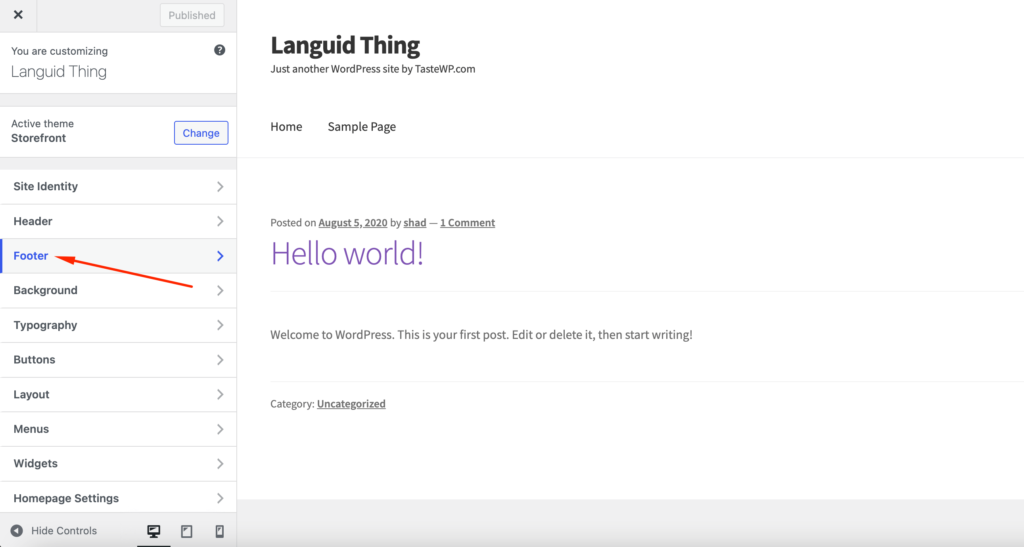
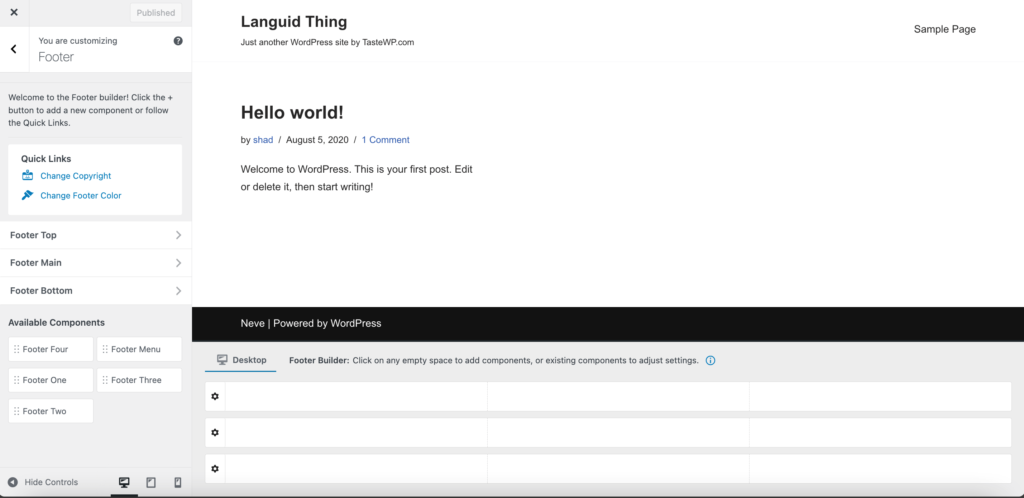
Other themes like Neve theme will provide you with an option to build your footer with its footer builder feature.
WordPress Menus
Other than their footer settings, some themes also use the WordPress menu system to create and add a footer menu. You can't add custom content using widgets, you can edit the links that appear on your site's footer.
To find out if your theme has that option or not, click on the Menu option from the sidebar and click on the View All Locations button. If your theme has a footer menu then you will see a Footer Menu option.
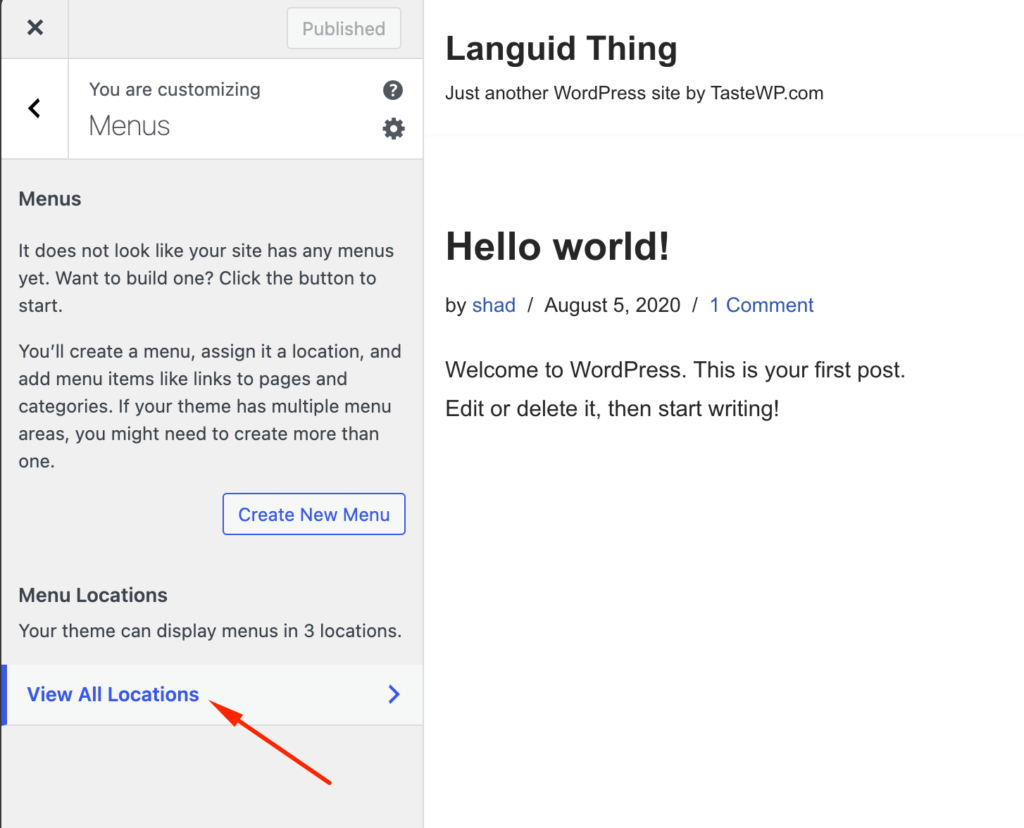
You can add menu items if you create a new menu. Or you can add an existing menu from the dropdown list.
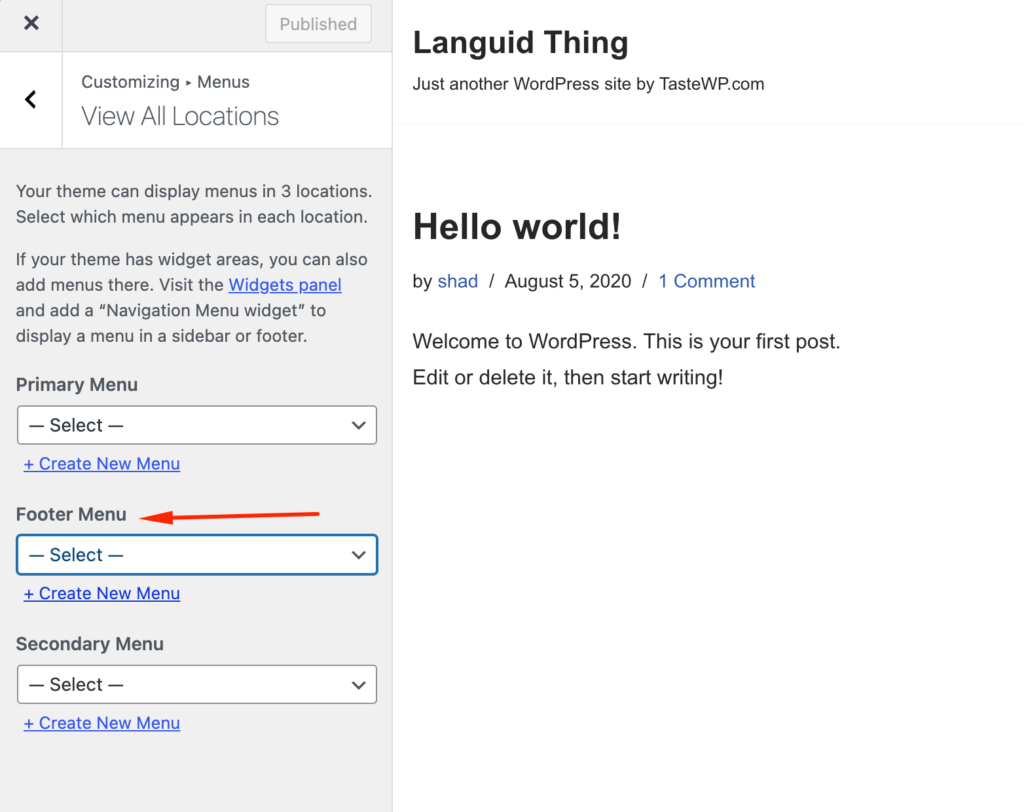
If you are finished, then click the Publish button to complete the process.
2. How to Edit a Footer in WordPress using Block Editor
WordPress 5.9 has introduced a new block editor for site customization. This makes editing easier because now the footer has its blocks and templates. Various blocks like site titles, calendars, and navigation have also replaced widgets.
However, only the block-based themes have this feature. You will get this feature if you are using a theme like the Twenty Twenty-Three.
Now let's learn how to edit a footer in WordPress using block editor.
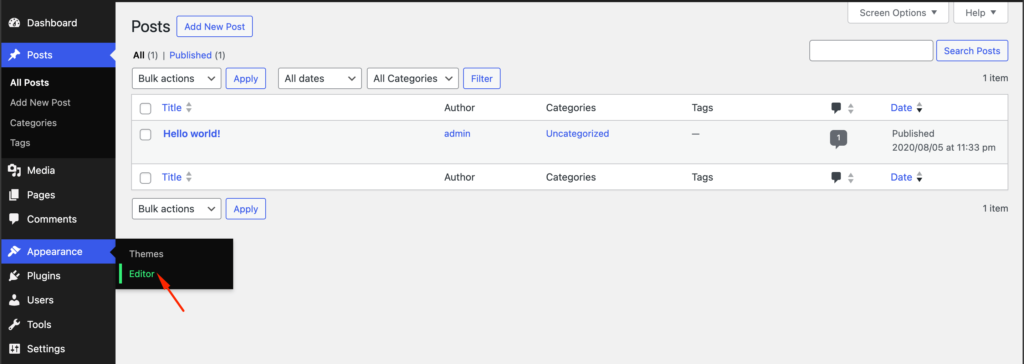
Go to the Appearance–> Editor of the Twenty Twenty-Three theme.
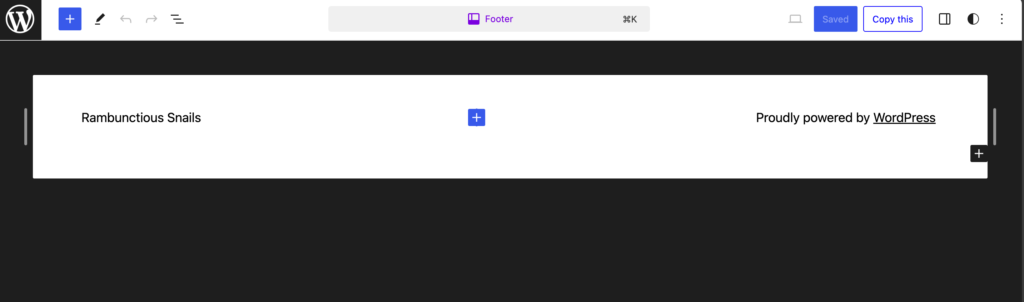
You will find the preview of the theme. Now, select the Footer section and it will let you edit the footer section. By clicking the “+” button, you will find the list of all the widgets.
Also, click the Edit option to only edit the footer section.
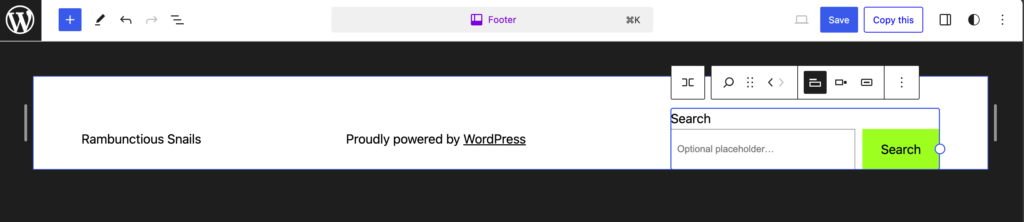
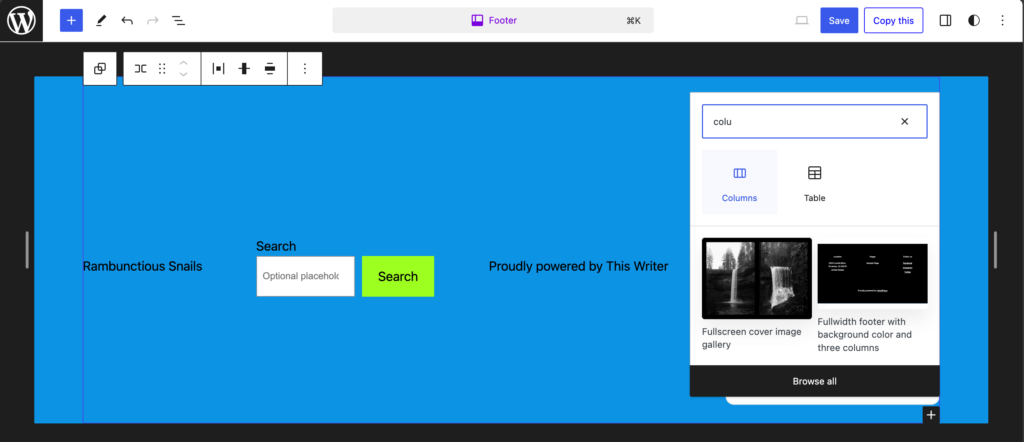
Let's add a Search widget in the footer,
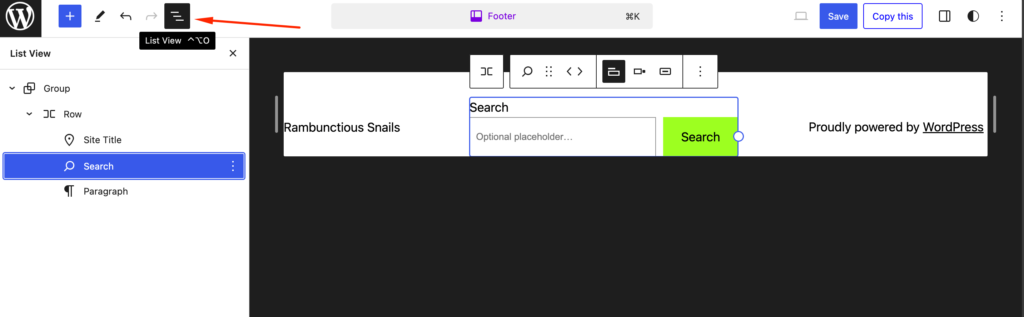
If you want to rearrange the widgets, then you can do that by using the drag-and-drop option from the list view.
After you are satisfied, click on the Save option to publish your site.
3. Use Coding to Customize Your Footer
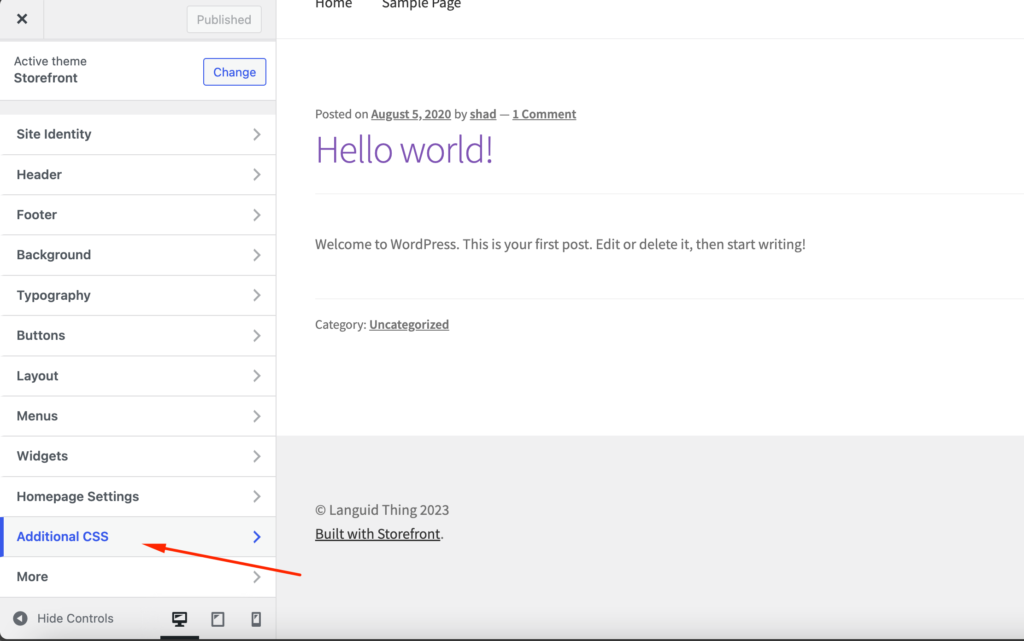
If you have technical knowledge, then you can use coding to customize your footer. For that open the Additional CSS tab from the WordPress Customizer sidebar,
To change the footer’s background and border color–
.footer-widgets-outer-wrapper, .footer-top {
    border-color: #000;
}

.footer-nav-widgets-wrapper, #site-footer {
    background-color: #D7BDE2;
}
To edit the footer’s margin and padding-
.widget .widget-title {
    margin-bottom: 1rem;
}

.footer-widgets a {
    padding-left: 5rem;
}
Don't forget to hit the Publish button after you are done.
4. How to Edit a Footer in WordPress.com
Editing or customizing a footer in WordPress.com is very much similar to WordPress.org. What we have been showing so far has all been related to WordPress.org. But if you want to edit a footer in WordPress.com, you can follow the same steps.
WordPress.com is a hosted service where you rent space on their servers, while WordPress.org is a self-hosted platform where you manage your own website.
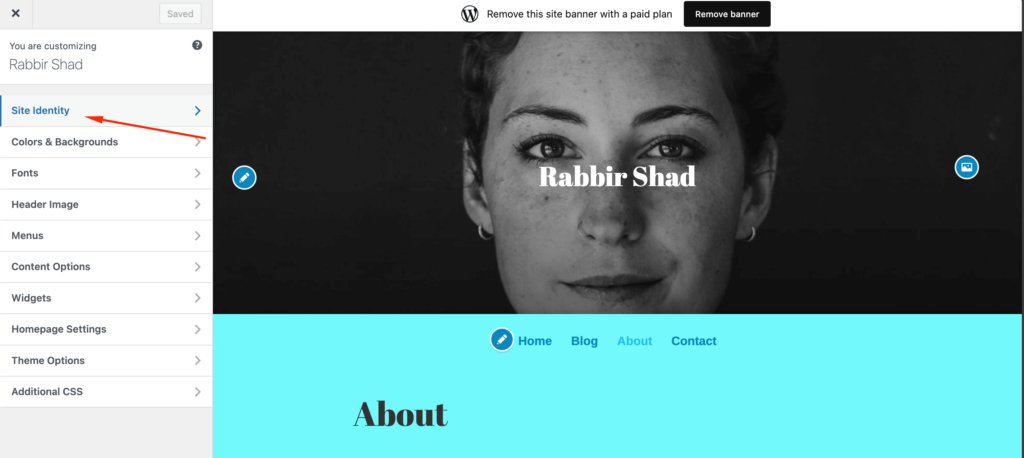
However, you will notice that WordPress.com added the site title and a WordPress credit at the very bottom of your footer. If you want to remove them, just click on the Site Identity tab,
Go to the bottom and you will find the Footer Credit option. Now if you want to remove the credit altogether you have to buy the Business plan. After you purchase the business plan, just choose the Hide option.
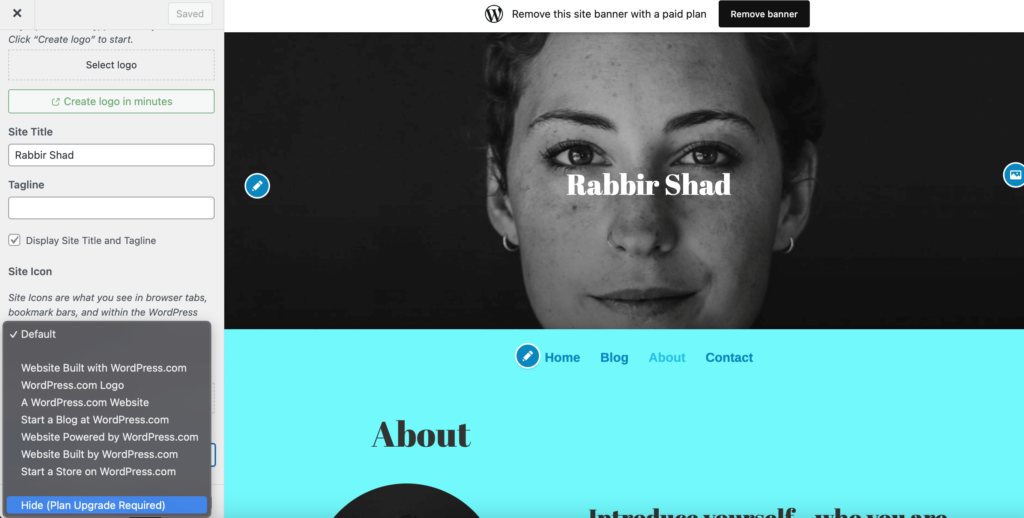
Some themes can remove the site title from the footer as well. The easiest way is to uncheck the Display Site Title and Tagline box.
5. Create a Custom Footer for Your Website
Not every time you want to use the default footer provided by WordPress and customize it. You can create a footer from scratch and customize it with your chosen content.
You can easily do that by using the page builder plugins of WordPress. We will show you how.
To achieve this, you can use two free plugins:
- Elementor – this popular page builder gives you a visual, drag-and-drop editing experience.
- Elementor – Header, Footer & Blocks Template – this free plugin lets you use Elementor to design your theme’s footer
To get started, make sure to install and activate both plugins. Then, follow these instructions for how to edit a footer in WordPress using Elementor…
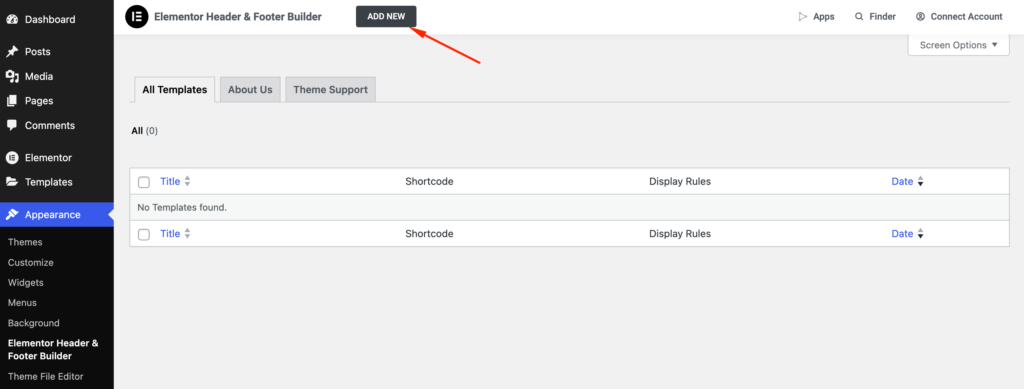
Create a Footer Template
When both plugins are activated, go to Appearance –> Header Footer & Blocks in your WordPress dashboard. Then, click Add New to create a new template:
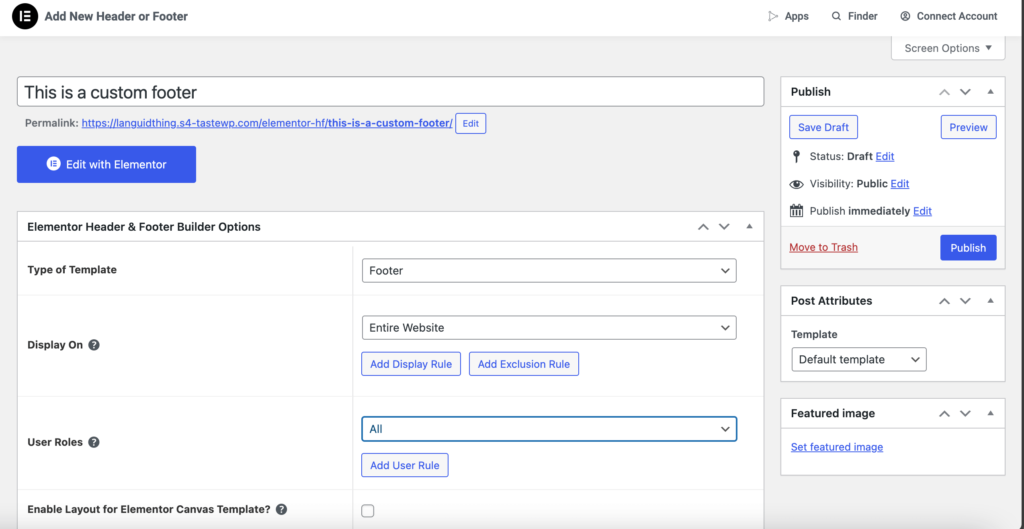
In the Type of Template, choose Footer. You can use the other settings to control where to display your footer and who should see it. If you want to use this footer for every page on your site, select the option to display on the Entire Website.
Once you’re happy with the rules, click the button to Publish it, just like a blog post:
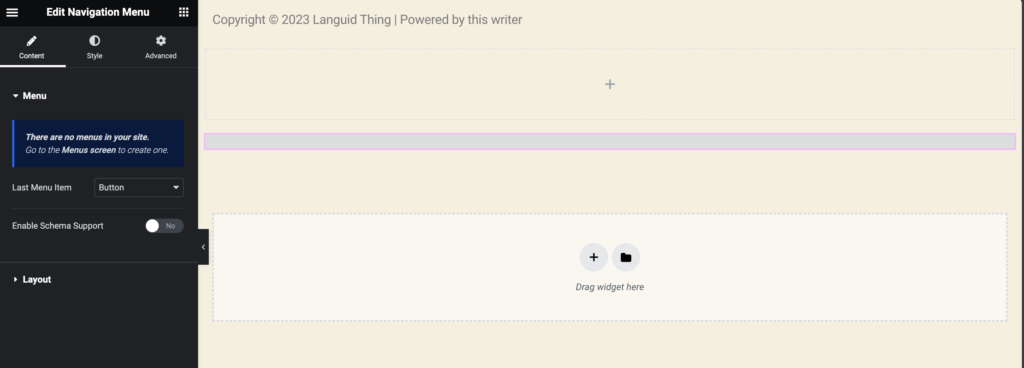
Add Content with Elementor
Click the Edit with Elementor button to launch the Elementor interface. Now, you can use the drag-and-drop editor to customize every part of your footer.
You can add a section with the number of columns you want to use:
Then, you can add different types of content using Elementor’s many widgets. The Elementor – Header, Footer & Blocks Template plugin also adds some useful widgets of its own, such as a dedicated Copyright widget,
Once you’re happy with your design, make sure to save it. Then, it will be live on your site.
Other than, here are some other ways you can customize your footer-
- Remove the “Powered by WordPress” Text in Footer
- Add Social Icons to Your WordPress Footer
- Remove Footer Entirely
- Add a Background to Your WordPress Footer
- Add Columns to Your Footer in WordPress Using Block Editor
How to Remove the “Powered by WordPress” Text in Footer
Before showing how to remove the “Powered by WordPress” text in footer, we assure you it is completely legal to remove this text. As WordPress is an open-source software, it lets you edit and customize your website as you like.
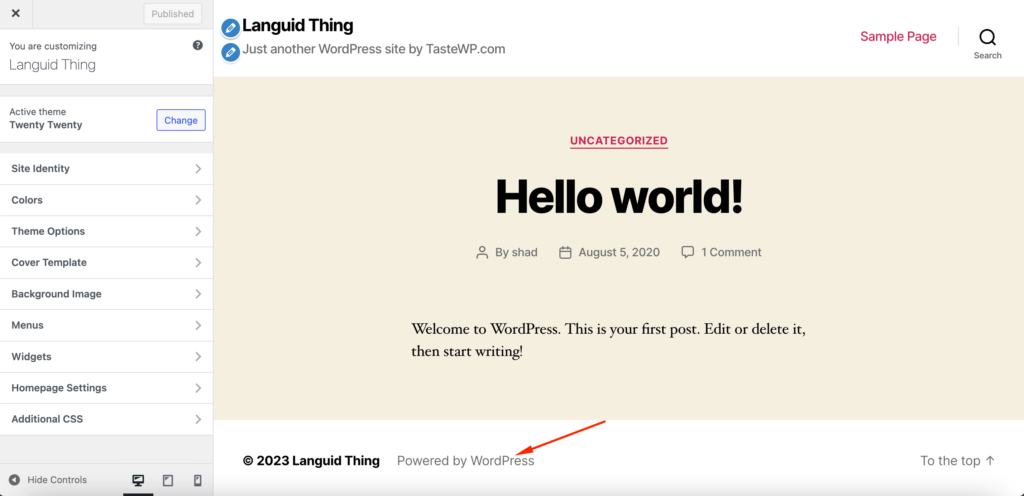
Now in order to remove the “Powered by WordPress” text, you can just remove the code from the theme file.
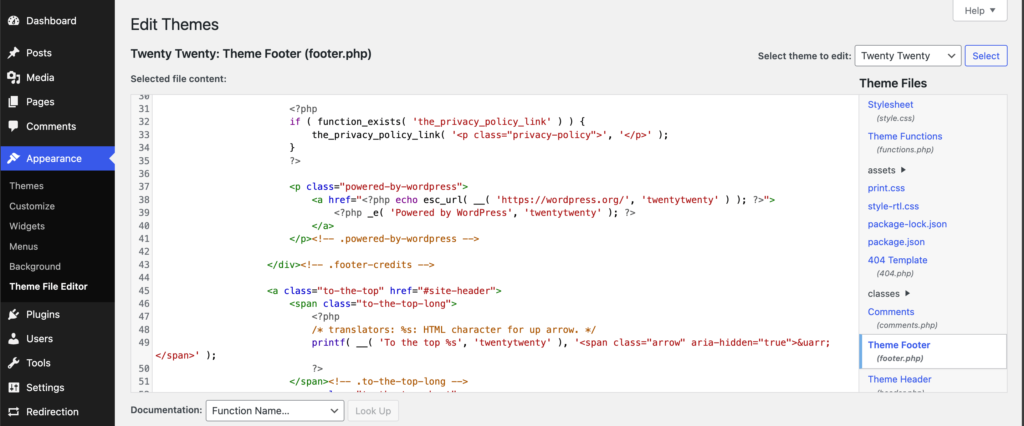
Go to Appearance –> Theme File Editor and find the footer.php file. Locate the footer credit text “Powered by” and its code. In the WordPress Twenty Twenty theme, the code looks like this:
<p class="powered-by-wordpress">
<p class="powered-by-wordpress">
<a href="<?php echo esc_url( __( 'https://wordpress.org/', 'twentytwenty' ) ); ?>">
    <a href="<?php echo esc_url( __( 'https://wordpress.org/', 'twentytwenty' ) ); ?>">
<?php _e( 'Powered by WordPress', 'twentytwenty' ); ?>
<?php _e( 'Powered by WordPress', 'twentytwenty' ); ?>
</a>
    </a>
</p><!-- .powered-by-wordpress -->
</p><!-- .powered-by-wordpress -->
Just remove the line containing ‘Powered by WordPress' or you can replace it with your brand slogan.
If you are using the block editor (refer to the previous section) then you can just remove the widget or write your brand motto.

This is how you can remove the ‘Powered by WordPress' text. You can use Additional CSS to remove the text as well.
Note: Remember, when you remove the footer of your website, it may have a bad impact on your overall site SEO. So if you decide to remove a footer make sure you have a strategy in place.

How to Add Social Icons to Your WordPress Footer
There are various social platforms and businesses are using most of them to promote their websites. It is a normal tactic to display all the social media channels on the website. But it is very hard to fit all the social media logos on top of the website. So, the footer is the perfect place to display all the social media icons.
8 links to add on footer of a marketplace website-
1. About Us
2. Contact Us
3. Help Center
4. Terms & Conditions
5. Privacy Policy
6. Blog
7. Security
8. Social Media
But if you have a product site, make sure you add Services, Affiliates, and Resources links to your footer.
To add social icons to your WordPress footer, you can use either the block editor, WordPress Customizer, or a WordPress plugin.
In the block editor, find the footer section. Click on the “+” icon to open up the list of widgets and type Social Icons.
After adding the widget, click on the “+” icon again to add your preferred social channels. Save and publish your site.
However, if you are not using a block-based theme, then you need to use the WordPress customizer to add social icons. Some themes provide social media icon widgets. To find out, go to the Widget section from the sidebar.
Select the Footer option (there may be one or two footer options, choose anyone) and click on the Add a Widget button.
You will get a slide-out menu or the normal editor and there search for Social Icons. If your theme has it, then it will show up on the list. Select and add the widget to your footer.
After adding the widget, you will need to customize the settings for these buttons. You need to settle on the size of those buttons, the coloring, and which links you want them to lead to.
If you don't find the social icon widget on the widget list then you can use a plugin like Social Icons Widget & Block by WPZoom which has over 400 social icons.
This is how to add social icons to your WordPress footer.
How to Remove Footer Entirely
This is not something we would recommend. However, if the footer of your website feels cluttered then you should probably remove it entirely.
That doesn't mean removing the footer.php file. This is a WordPress core file and that is why you should leave it. Instead, we will use CSS to hide the footer section.
Just go to the Additional CSS option from the side menu bar,
Add this CSS code,
footer{

display:none;

}
Our goal is to hide everything from the footer section. The file remains inside your file directory, just in case you’d like to re-add content in the future. If the above code doesn't work, then you can use this code instead-
.site-info { display:none; }If you using the block editor, then just remove the widgets from the footer section.
How to Add a Background to Your WordPress Footer
If you want to make your footer stand out, you can add a background color or an image. Your theme will let you do it or you can use the block editor as well.
If you are using the Storefront theme, you can set a separate background color from the footer option. Make sure the color doesn't overshadow your whole website.
Also, you can set an image as your footer background. Just open the Additional CSS option from the sidebar and add this code to your CSS,
footer { background: url(YOURIMAGEURL) repeat; }You can find the URL for any image in its details view after it’s been uploaded to your Media Library.
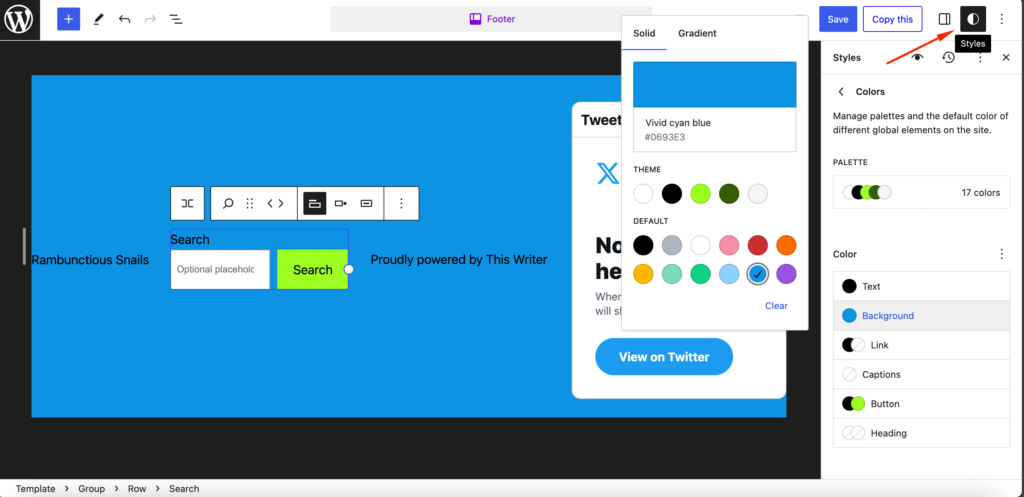
When you are using block-based themes, then you can add different colors from the styles option.
How to Add Columns to Your Footer in WordPress Using Block Editor
For the footer to look more organized, columns are very important. You can distribute the links evenly when you are using columns.
Most of the themes you are using are already divided into columns. That is why you will find options like Footer #1, Footer #2, Footer #3, etc.
But if you are using a block editor, then you can easily customize columns of your footer area. Just click on the “+” icon and search for columns,
Now, choose the type of columns you want to add to your footer. We prefer the Three Columns, Equal Split option.
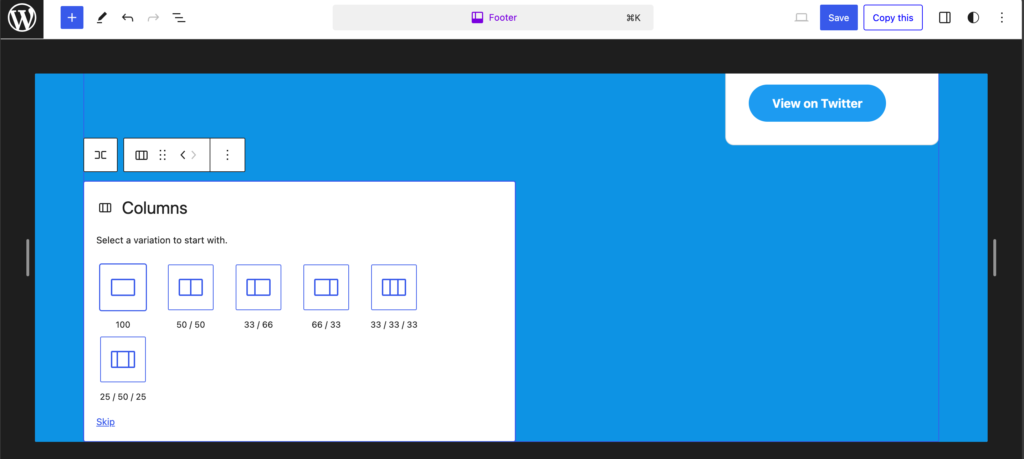
This is how you can add columns to your WordPress footer area.
Bonus: Mistakes to Avoid When Editing a Website Footer
After reading our blog, you have learned several ways to edit a footer on your WordPress site. You are probably itching to get started. But hold your horses.
While editing or customizing a footer, users often make some mistakes. We have listed them all so that you don't end up making those mistakes.
Here are the mistakes to avoid while editing or customizing a footer on your WordPress site-
- Overcrowding with Excessive Links: While a footer can serve as a navigation tool, overloading it with too many links can overwhelm visitors and make it difficult to find the desired information. Prioritize essential links and consider organizing them into categories or submenus for better clarity.
- Using Unreadable Fonts or Inconsistent Branding: The footer should maintain consistency with the overall branding of the website. Choose fonts that are easy to read and align with the website's typography style.
- Ignoring Link Functionality: Ensure that all links included in the footer are functional and lead to the intended destinations. Broken links can frustrate users and damage the website's credibility.
- Neglecting Essential Legal Information: Many websites are legally required to include certain information in the footer, such as copyright notices, privacy policies, and terms of service. Failing to provide this information can expose the website to legal risks.
- Omitting Contact Information: The footer should prominently display contact information, such as phone numbers, email addresses, and physical addresses (if applicable).
- Forgetting Social Media Links: Social media links provide a valuable way for visitors to connect with the brand and stay updated. Include icons or links to relevant social media profiles in the footer to encourage engagement and community building.
- Overlooking Accessibility: Ensure that the footer follows accessibility guidelines, such as using proper color contrast and alt text for images. This allows all users, including those with visual impairments, to access and understand the information in the footer.
- Neglecting Mobile Responsiveness: With a significant portion of website traffic coming from mobile devices, ensuring the footer is responsive and adapts seamlessly to different screen sizes is crucial.
- Using Unnecessary CSS Tricks: While CSS can be used to enhance the footer's design, avoid using techniques that could hinder search engine optimization (SEO).
- Ignoring Copyright Updates: Regularly update the copyright information in the footer to reflect the current year. Manually updating the copyright date can be time-consuming, so consider using dynamic HTML code to update the year automatically.
Remember to read them and avoid these mistakes.
Customize the Footer and Give Your WordPress Website an Exclusive Look!
We are at the end of our tutorial on how to edit a footer in WordPress and hopefully, you have become an expert in customizing the footer of your site.
As we said earlier, the footer is the most ignored element of any website. But use it wisely, and you can reap benefits from it. That is why we have shown so many ways to edit and customize the footer on your WordPress site.
For your convenience, here is what we have covered in this blog-
- How to Edit a Footer in WordPress using WordPress Customizer
- How to Edit a Footer in WordPress using Block Editor
- How to Remove the “Powered by WordPress” Text in Footer
- How to Add Social Icons to Your WordPress Footer
- How to Remove Footer Entirely
- How to Add a Background to Your WordPress Footer
- How to Use Coding to Customize Your Footer
- How to Add Columns to Your Footer in WordPress
- How to Edit a Footer in WordPress.com
- How to Create a Custom Footer for Your Website.
We have added detailed steps in every process. However, if you find anything difficult or see the code not working don't hesitate to reach out.