
How to Build an Online Education Platform Using WordPress in 2026
Let's start with a very popular quote from the Joker,
If you are good at something, never do it for free.
Now let's tweak this quote – if you are good at any skill, monetize that by creating or joining an online education platform. People around the world are looking for resources from experts like you to acquire a new skill.
Here is an eye-opening statistic for you. A study conducted by Devlin Peck revealed that,
The number of online learning users is expected to increase to 57 million by 2027.
Plus, Coursera alone teaches over 100 million registered learners in 60+ countries by providing online courses.
What's driving this surge? Accessible learning, expert instructors, and the rise of mobile learning have revolutionized education. And regardless of this, the COVID-19 pandemic further accelerated the shift.
Now, it's your turn to join the movement. On top of that, creating an online education platform using WordPress is much easier than you thought.
So, without any further ado, let's learn how to build an online education platform in just 7 steps!
Different Types of Online Education Platforms You Can Build
When you plan how to build an online education platform, the first step is deciding the type of platform you want. Each type serves different needs and audiences.
I. Learning Management Systems (LMS)
These platforms are built for structured courses. Teachers can upload lessons, track student progress, and give quizzes. Think of platforms like Moodle or LearnDash. If you want a classroom-like setup online, this is the right choice.
II. Course-Based Marketplaces
These are like online malls for courses. Instructors can upload their courses, and students can buy them anytime. Udemy and Skillshare are great examples. If your goal is to host multiple instructors, this model works well.
III. Live Class Platforms
Some learners prefer live sessions over recorded lessons. Platforms like Zoom-based academies or coaching portals allow real-time teaching. They also include interactive features such as chat, Q&A, and breakout rooms.
IV. Membership-Based Platforms
Here, learners pay a subscription fee to access exclusive content. It’s perfect if you plan to offer continuous learning materials or niche-focused lessons. For example, coding clubs or fitness training sites often use this model.
V. Corporate Training Platforms
Businesses often need custom training portals for their teams. These platforms focus on skill development, compliance training, and performance tracking. If you want to target the B2B sector, this is a powerful option.
Each type has its own audience, structure, and business model. Choosing the right one will make your journey of building an online education platform smoother.
How to Build an Online Education Platform- 7 DIY Steps for Beginners
So, here we are. In this segment, we will show you 7 steps to create your very own online education website. These are the 7 steps:
- Prepare Your WordPress Site
- Install and Configure a LMS Plugin- LearnPress
- Create a New Course
- Configure The Course Settings
- Add Lessons to The Course
- Create Quizzes for The Course
- Link Quizzes with the Lessons and Publish the Course
Now let's get started with the first step- prepare your WordPress site:
Note: We have also prepared an estimated budget to create an online education platform and shared the budget at the bottom of this article. So, don't forget to check that!
The first thing that you'll need to create an online education platform is a WordPress website. If you already have your WordPress site ready, you should start from the 2nd step. And if you don't have your WordPress site ready yet, there is nothing to worry about.
Because in the first step, we are going to show you how you can create your first-ever WordPress website. But before that, you'll require a domain name and web hosting to launch your website.
We have a series of blog posts on choosing the best domain name and web hosting for your site. You should check these blogs if you don't want to regret buying a domain and hosting from any random provider.
- How to Choose The Best Domain Name for You
- 11 Things to Know Before Buying a Hosting Plan for Your Website
- Get the Best WooCommerce Hosting for Your Site
Step 01: Prepare Your WordPress Site
After buying a domain and hosting for your site, it's time to install WordPress on your hosting. Nowadays, most hosting providers install WordPress and then provide the login credentials if you ask them to install it on your behalf.
That being said, if you want to install WordPress all by yourself, we are here to help you as well. We have a dedicated blog on how to install WordPress on cPanel. You can follow this step-by-step blog to complete the WordPress installation process with ease.
Guide: How to Install WordPress on cPanel in 10 Minutes
You are almost there to complete the process of preparing your WordPress site. Actually, you have created your WordPress site. There is only one thing left, that is installing a theme for your educational platform.
Choose a perfect LMS theme as per your requirements and install it on your site.
If you need any help installing a theme on your WordPress site, here is a step-by-step tutorial for you:
Guide: The Ultimate Guide to WordPress Themes
Now you are good to go to the next step.
Note: It is not mandatory to install WooCommerce for using an LMS plugin. While some LMS plugins might offer integrations with WooCommerce to allow you to sell courses as products, it is not a requirement. LMS plugins can function independently without WooCommerce or any eCommerce functionality.
Step 02: Install and Configure an LMS Plugin- LearnPress
To create an online education platform, we are going to use an LMS plugin called LearnPress. If you are wondering why we are using the LearnPress plugin, then let us tell you that this is one of the most popular and feature-rich plugins to create an online education platform without writing a single line of code.
Some Amazing Features of LMS Plugin
- Intuitive Course Builder: LearnPress provides an easy-to-use course builder that allows you to create and manage courses efficiently. You can add multimedia content, quizzes, assignments, and more to make engaging and interactive courses.
- Flexible Payment Integration: It supports multiple payment gateways, making it easier for you to monetize your content. Integration with popular payment processors ensures secure and seamless transactions for students.
- Extensive Quiz and Assignment Options: LearnPress offers a variety of quiz and assignment options, such as multiple-choice questions, true/false, short answer, essay-type questions, and more. You can also set passing grades and enable quiz retakes.
- Powerful Reporting and Analytics: The plugin comes with detailed reporting and analytics tools, that allow you to track student progress, monitor course performance, and gain valuable insights about your learners.
- Responsive and User-Friendly Design: LearnPress is designed to be responsive, meaning it works well on various devices, including desktops, tablets, and smartphones. Its user-friendly interface ensures a smooth learning experience for both you and your students.
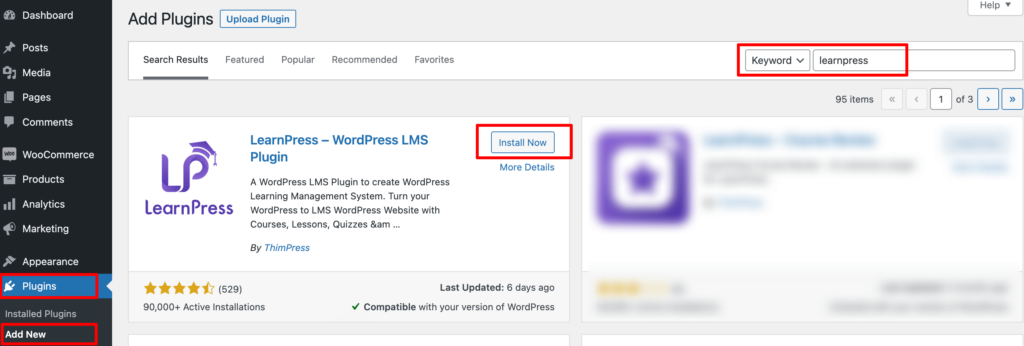
Install LMS Plugin from Your WordPress Dashboard
Now navigate to your WordPress dashboard -> Plugins -> Add New, then type LearnPress on the search box and press the install button to install the plugin from the search result. After installing the plugin, you'll get another option “Activate“, press the activate button to finish the installation process successfully.
Then you'll be redirected to the Welcome Page, or click on “Quick Setup” to go to the Welcome Page to complete the LearnPress configuration process.
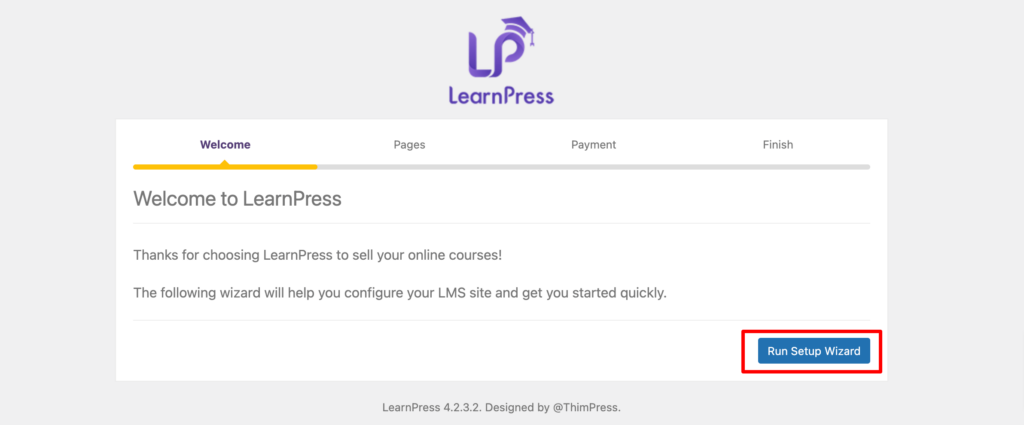
Click on the “Run Setup Wizard” to start configuring LearnPress.
There you'll have options like:
- Pages for you to choose which pages will display for your online course landing pages, such as the ‘Checkout’ page.
- Payment to configure the payment gateway you want to use to accept payments for your online course.
Once you’re done working through these tabs, the last is the Finish page. On this screen, you’ll see a number of options:
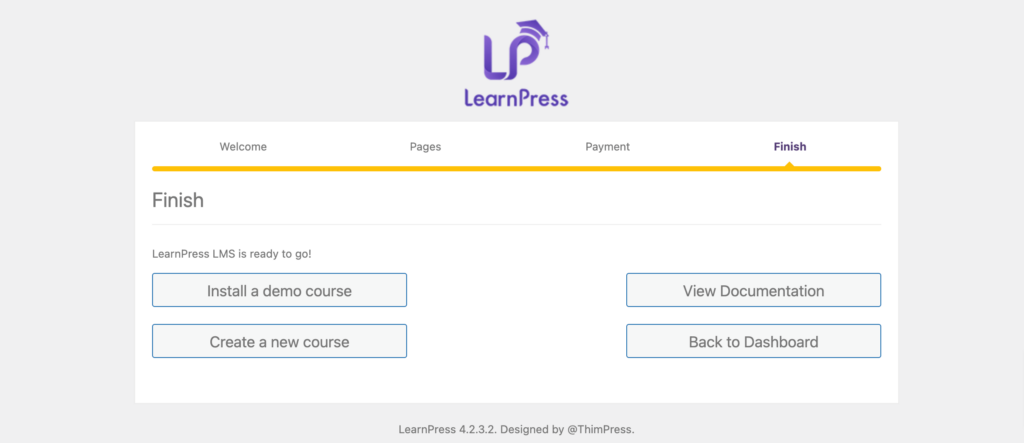
You can either return to your WordPress dashboard, jump into creating your online course, or install a sample course. We recommend installing a sample course so you can get a preview of how your online course would look on the front end.
Step 03: Create a New Course
Now it's time to create a course. To do that, navigate to your WordPress dashboard -> LearnPress -> Courses -> Add New.

There you'll need to enter a course name and a description of what the course is about.
As with typical WordPress pages, you have the option to add or apply a category to your course. We recommend doing this if you plan to create and distribute multiple courses because it can help keep you organized.
Next, under the Curriculum section, add your lessons and sections. Basically, are creating the course outline here.
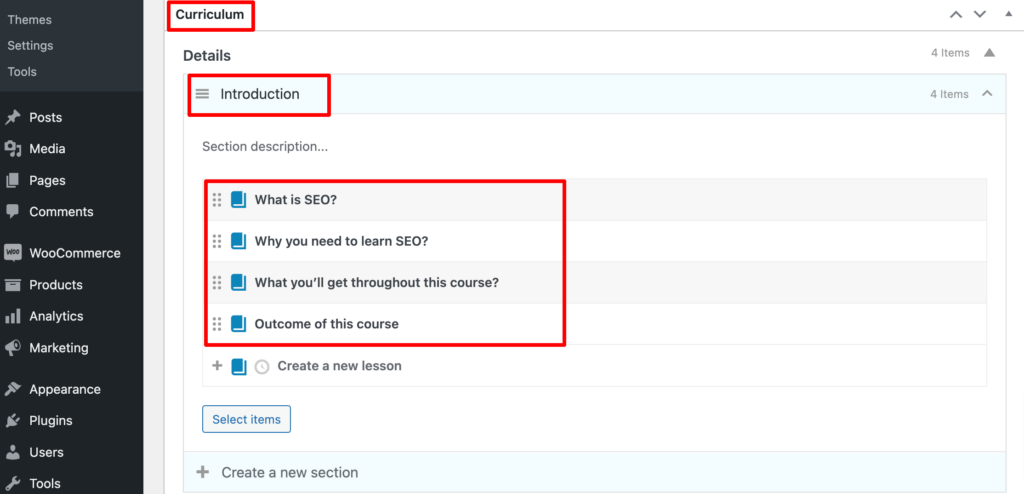
Note: Right now, just name the sections (lessons) and give a brief description of what each lesson will cover. We'll add the lesson details later. Each lesson can be a new topic or subtopic of your course.
Step 04: Configure The Course Settings
After creating the course lessons, if you scroll down a bit, there you will find a few more options to configure. Basically, there are 5 tabs to configure:
- General
- Pricing
- Extra Information
- Assessment
- Author
a) General
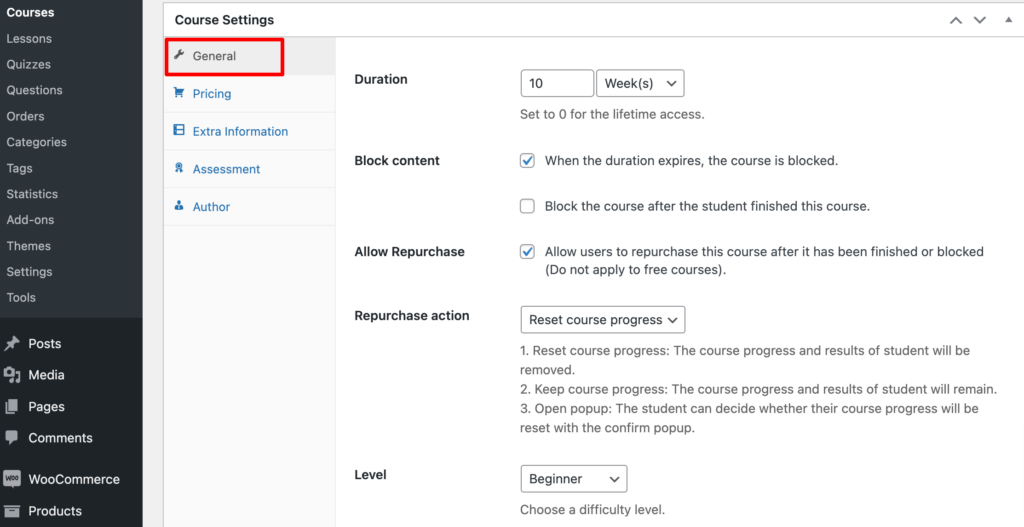
In this tab you have to configure a few crucial settings:
- Duration: For how long do you want to allow your enrolled students to access this course.
- Block Content: If you want to block the course when the duration is expired, tick this option.
- Allow Repurchase: Tick this box if you want to allow the users to purchase this course again.
- Level: Set the level of this course, e.g., Beginner, Intermediate, and Expert.
- Max Student: Set the number of maximum students that you want to allow for this course.
b) Pricing
In this tab, you need to set the price for your course.
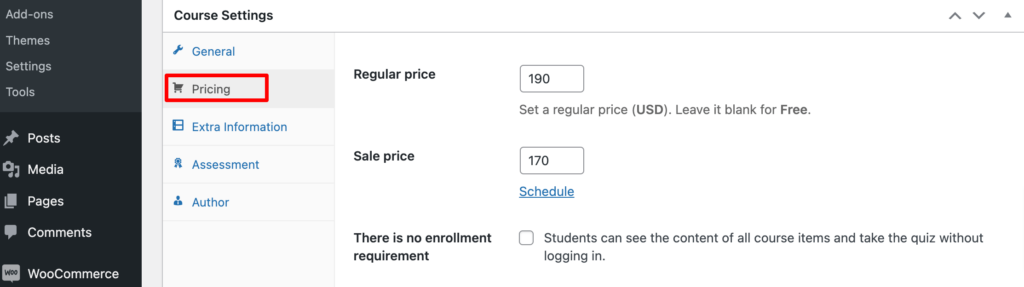
Also, if you want to publish this course for free and accessible to the public, you should tick the “There is no enrollment requirement” option.
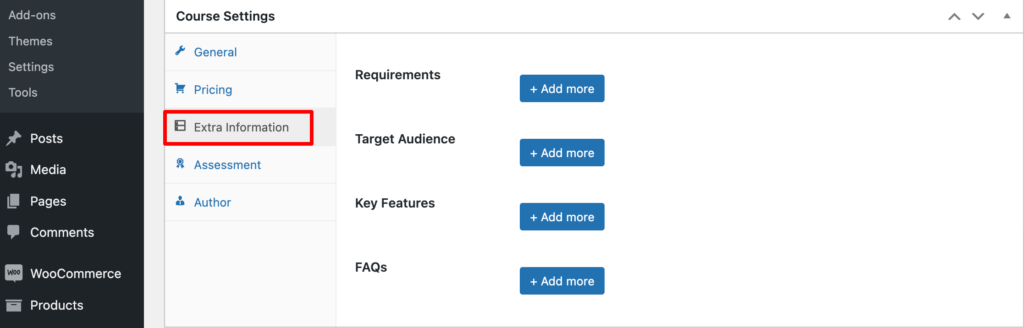
c) Extra Information
In this tab, you'll need to set up the requirements, target audience, key features, and FAQs for your course. You can configure these options, or leave these options as it is, since these are not mandatory to configure.
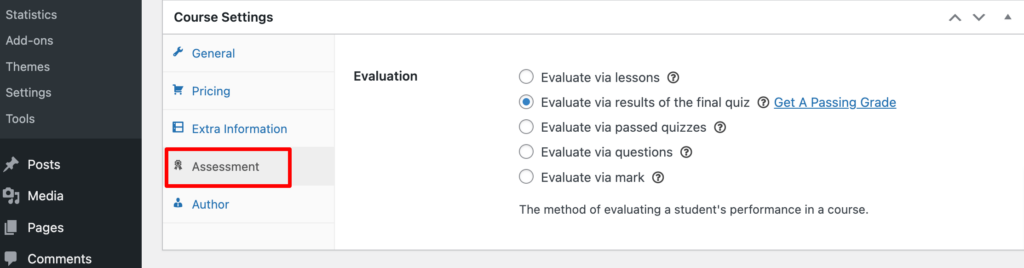
d) Assessment
Next is the Assessment tab. This is where you can choose how you’re going to evaluate students who take your online course.
You can learn more about each option by hovering your mouse over the question mark at the end of the item. However, you can keep the first one selected if you don’t plan on using quizzes to distribute grades.
e) Author
The Author section simply contains your email. Make sure to click on the Save Draft button in the top right-hand corner when you’re done.
Step 05: Add Lessons to The Course
In this step, we will create lessons for the course. To do that go to your WordPress dashboard -> LearnPress -> Lessons. There you will find the course that you have just created with the sections/lessons.
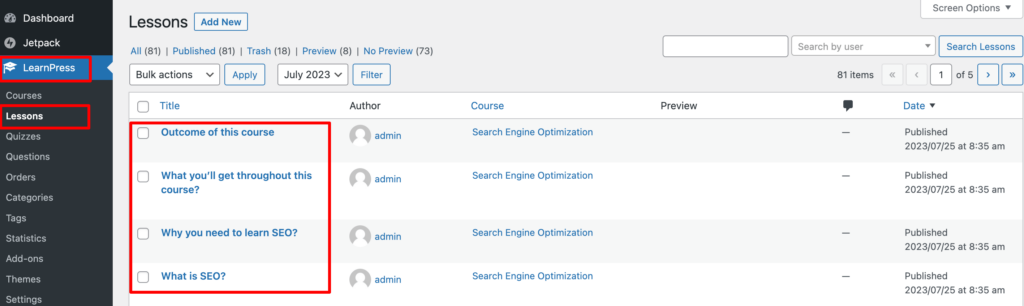
Now click on a lesson name and you will be redirected to the lesson editor interface.
Here, you can add the lesson content similar to how you would create a standard blog post. You can add and format your text. Also, if you want to add images or videos, you can click on the Add Media button at the top of the editor.
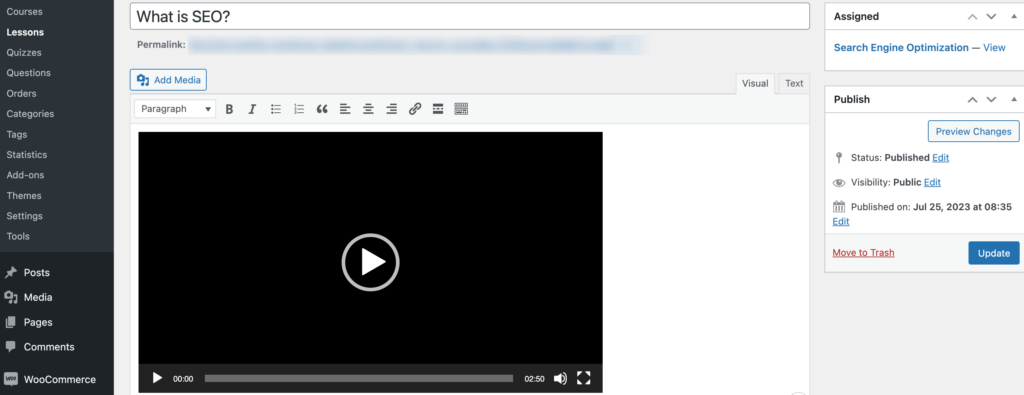
At the bottom of the page, there will be a section for Lesson Settings.
Unless you want to specify a duration for this particular lesson, you can leave the value at 0. Also, you can leave the Preview Lesson option disabled.
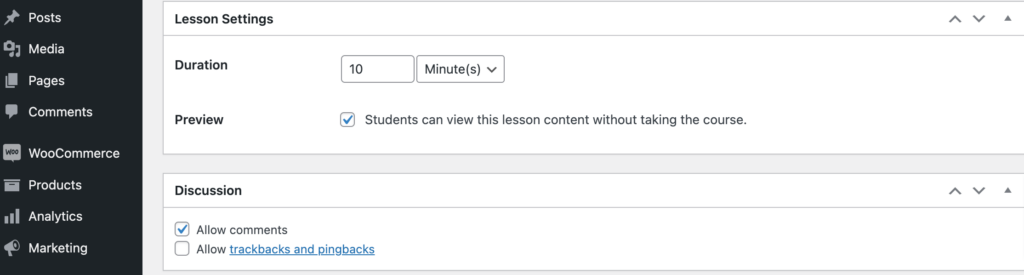
However, if you want to allow students to preview this lesson to get an idea of what your course would consist of it, you can enable it. Of course, you only would want to do this for one or two lessons, rather than your entire course.
You can also choose to enable or disable comments on the course. When you’re done, click on the Update button.
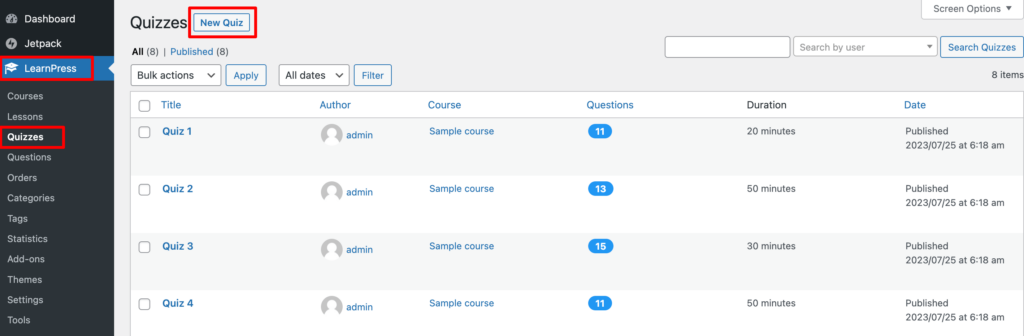
Step 06: Create Quizzes for The Course
You need to create quizzes to evaluate the learners. LearnPress allows you to create quizzes with ease. Navigate to your WordPress dashboard -> LearnPress -> Quizzes, and click on the New Quiz option.
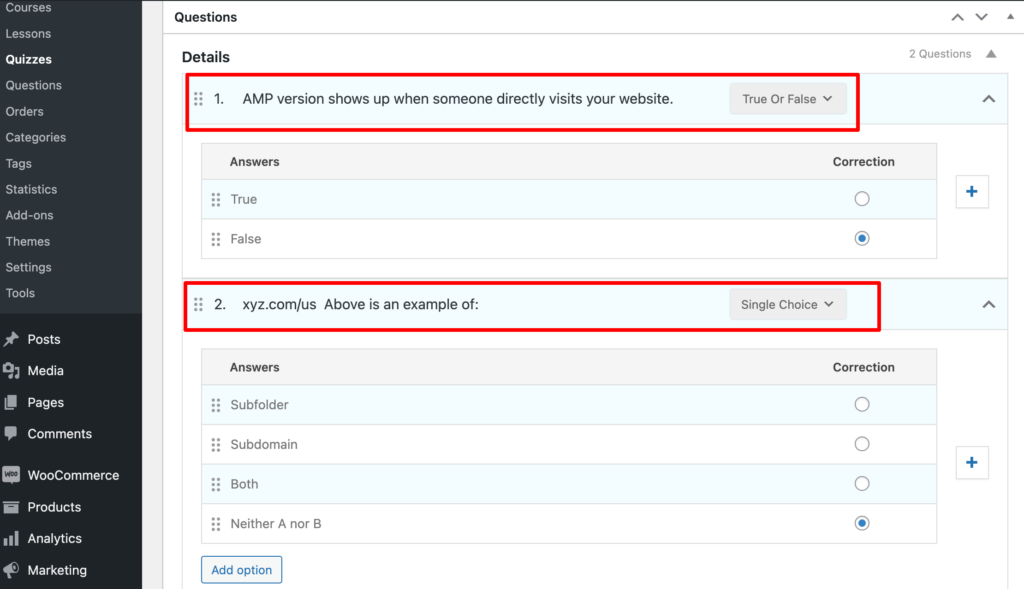
Then you'll be redirected to the quiz editor interface. Name your quiz, then use the text box to add a description or instructions for your quiz.
Now you have to set the questions with the right answers under the Questions section.
After adding the question, hover over the “Add with type” to select a question format, including-
- True Or False
- MultiChoice
- Single Choice
- Fill In Blanks
Once you select an option, you can choose content to display for the question explanation.
Under the Quiz Settings section, you can further customize the quiz. It allows you to set the quiz duration, passing grade, negative marking, and so on.
Once you’re done creating the quiz, select the Publish button in the top right-hand corner to make it accessible for your registered learners.

Step 07: Link Quizzes with the Lessons and Publish the Course
So far, you’ve created the foundation for your online course, including the description, lessons, and quizzes. However, in order to tie everything together, you need to link the lessons and quizzes. Otherwise, they’re just saved in your LearnPress LMS, but unassigned to any specific course.
For example, in the previous step, we created a course quiz, which we want to add at the end of the course. To do this, go to your WordPress dashboard -> LearnPress, and click on the Courses button. Now click on the course that you've just created.

Under the Curriculum section, select either the clock icon to create a new quiz or the Select Items button to choose one you already created.
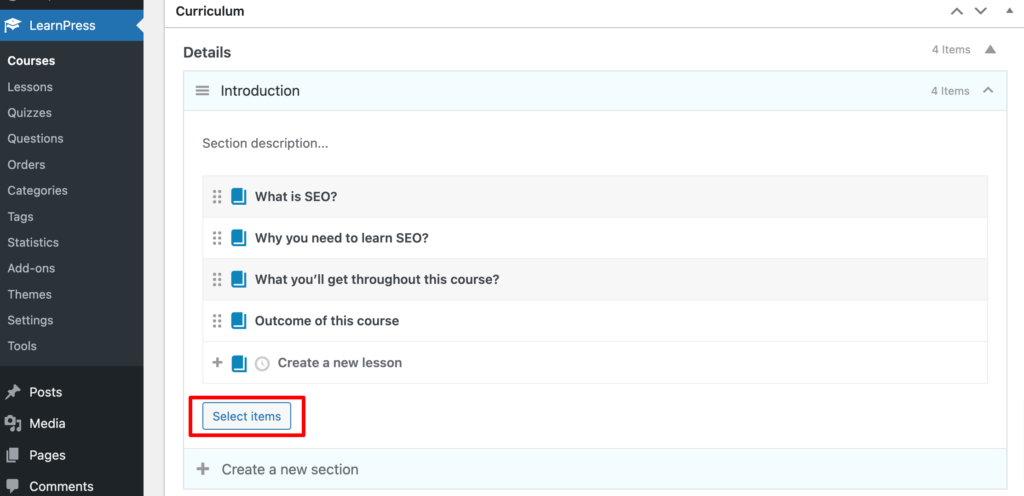
A window will open with two tabs: Lesson and Quiz. Click on Quiz, then select the quiz you have just created, followed by the Add button. Thus you can add a quizz to a lesson.
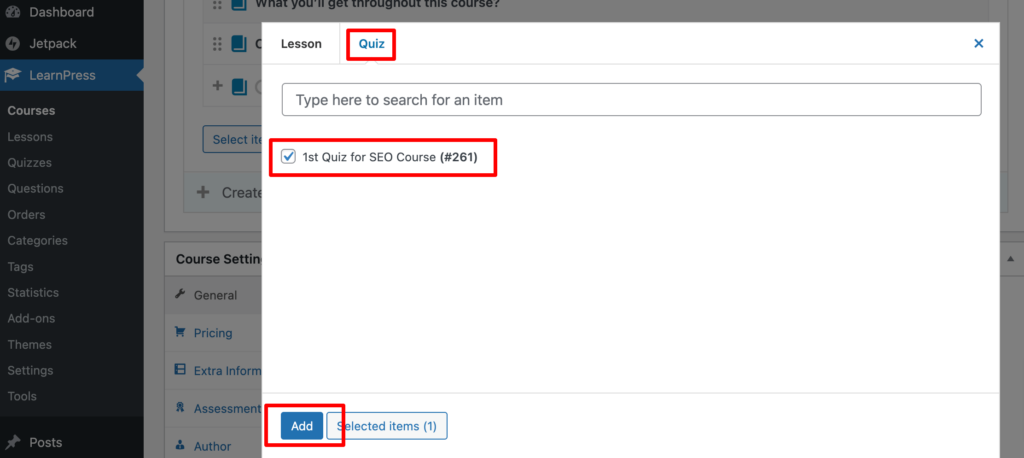
Repeat this process for any additional quizzes or lessons you want to add to your course.
Once you’re done adding lessons and quizzes to your course, you can preview it by clicking on the Save Draft button, followed by Preview in the top right-hand corner of the screen:
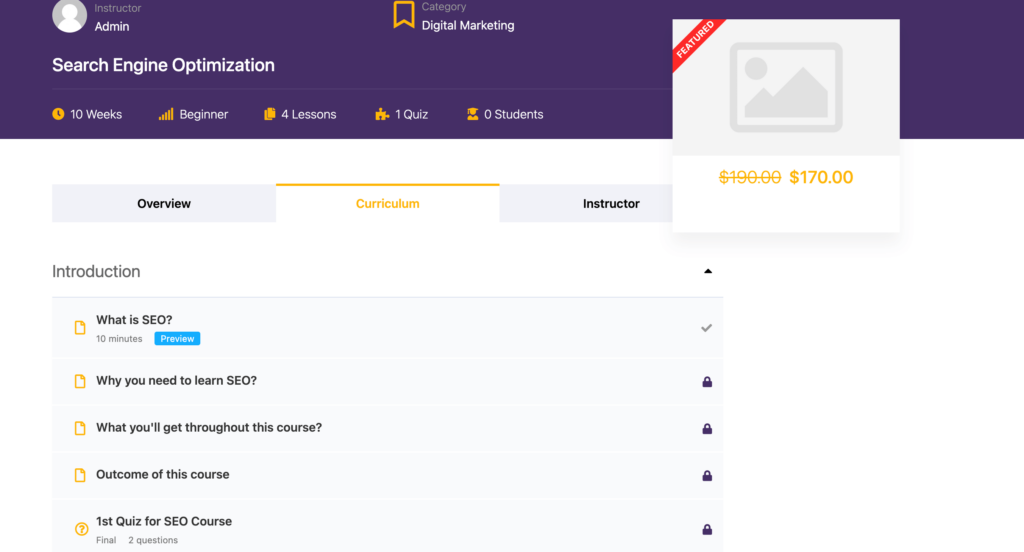
If you’re happy with how it looks, the only thing left to do is publish it. Navigate back to the course page, then select the Publish button.
Congratulations! Now you know how to build an online education platform using WordPress in only 7 steps.
Benefits of Building an Online Education Platform
You might be wondering what are the benefits of building an online education platform whereas you can do the same thing by taking physical classes. Well, let us show you the benefits you'll get if you create an online education platform:
- Wider Reach: An online education platform removes location barriers. Students from anywhere can access your courses, whether they live in your city or across the globe.
- Flexible Learning: Learners can study at their own pace. Some may prefer recorded lessons, while others may join live classes. Offering both options makes your platform more attractive.
- Low Operational Cost: Running a physical classroom is expensive. With an online education platform, you can reduce costs related to rent, utilities, and materials while still growing your student base.
- Multiple Revenue Streams: You can earn from course sales, subscriptions, memberships, certifications, or even corporate partnerships. A single platform can open several income channels.
- Better Tracking and Analytics: Unlike offline classes, you can easily track student progress online. With built-in reports and analytics, instructors know what’s working and where learners need more support.
- Long-Term Scalability: Once you learn how to build an online education platform properly, scaling becomes much easier. You can add new courses, bring in more instructors, and expand your reach without heavy investment.
Building an online education platform doesn’t just create a business. It builds a learning community that grows with you.
Also read – Subscription vs Membership: Benefits, Types, and Core Differences.
Challenges of Creating an Online Education Platform
It's apparent that creating an online education marketplace is quite easy with WordPress. But that doesn't mean you won't face any challenges.
Certainly, there are challenges that you need to overcome to be a successful entrepreneur in this field.
Here is the list of challenges that you may face:
- Content Quality: Ensuring high-quality and engaging content is crucial to keep learners interested.
- Technical Infrastructure: Building and maintaining a reliable and user-friendly platform requires technical expertise. Though WordPress has made the process simpler, still, it will still require your expertise to operate the platform smoothly.
- Competition: The eLearning space is competitive, so standing out and attracting learners may be a challenge.
- Marketing and Promotion: Effectively promoting your platform to reach the target audience demands a well-thought-out marketing strategy.
- Student Engagement and Retention: Keeping learners engaged and motivated throughout their courses is vital for platform success.
Yes, the challenges are real. But once you address them, your platform can grow into something powerful and sustainable.
Bonus: How Much Does It Cost to Create an Online Educational Platform?
The cost of creating an online education platform using WordPress can vary widely depending on several factors, including the complexity of the platform, the features you want to include, the design requirements, the extent of customization needed, and whether you choose to use free or premium plugins.
Here's a Rough Breakdown of Potential Costs for a Basic Online Educational Platform
- Domain Name and Hosting: The first expense will be acquiring a domain name (e.g., www.yourdomain.com) and a hosting plan to host your WordPress website. Domain names typically cost around $10 to $20 per year, and hosting plans can range from $5 to $50+ per month, depending on the hosting provider and the plan's features. Also, you can buy domain and hosting from the same provider to save the cost.
- WordPress Installation: WordPress is completely free to use. So, you don't have to spend any money on WordPress.
- Theme: You might want to invest in a premium WordPress theme designed specifically for eLearning or education websites. Premium themes can cost anywhere from $30 to $100 or more.
- LMS Plugin: To create courses and manage student interactions, you'll need an LMS plugin. While there are some free LMS plugins available, premium LMS plugins with more features and support can cost around $100 to $300 or more, depending on the plugin's complexity.
- Additional Plugins: You'll require a security plugin, caching plugin, email marketing plugin, social share plugin, SEO plugin, etc. These plugins will cost you around $500 to $1000+ per year.
- Custom Development: If you require custom features or extensive modifications to the theme and plugins, you may need to hire a developer, which can range from a few hundred dollars to several thousand dollars, depending on the complexity of the tasks.
- Content Creation: Creating quality educational content, such as videos, texts, and interactive elements, will require time and potentially additional costs if you outsource content creation or purchase educational materials.
- Maintenance and Upkeep: Don't forget to budget for ongoing maintenance, updates, and security for your website, which might involve additional costs, especially if you hire a website administrator or developer for regular maintenance tasks.
How to Build an Online Education Platform- Final Budget Estimation
| Items | From | To |
|---|---|---|
| Domain Name (Yearly) | $10 | $20 |
| Hosting (Yearly) | $60 | $600 |
| WordPress | $0 | $0 |
| Theme | $30 | $100 |
| LMS Plugin | $150 | $300 |
| Additional Plugins | $500 | $1000 |
| Custom Development | $500 | $1000 |
| Content Creation | $500 | $700 |
| Maintenance | $500 | $1000 |
| Total | $2250 | $4720 |
Keep in mind that these estimates are rough guidelines, and the actual cost can vary depending on your specific requirements and choices. It's essential to plan your budget carefully and consider all the necessary components to create a successful online education platform.
FAQs on How to Build an Online Education Platform
1. Which is the best platform to build an online education site?
WordPress is one of the best choices because it’s flexible, affordable, and scalable. It supports LMS plugins, memberships, subscriptions, and even multi-instructor setups.
2. How long does it take to create an online education platform?
Using WordPress and ready-made plugins, you can launch in a few days. A fully custom-coded platform can take several months.
3. Can I build an online education platform without coding?
Yes. With WordPress, LMS plugins, and drag-and-drop builders, you can create a professional site without writing a single line of code.
4. How can I make my online education platform successful?
Offer quality content, engage students with interactive features, build trust with reviews, and market your platform consistently. Free trial lessons also help attract more learners.
5. Is WordPress good for building an online education platform?
Yes. WordPress is widely used for education platforms because it’s cost-effective, customizable, and supports powerful LMS solutions like LearnDash, Tutor LMS, and LifterLMS.
6. How can AI improve my online education platform?
AI can personalize learning paths, recommend courses, automate grading, and even act as a tutor through chatbots. Adding AI features makes the platform more engaging and efficient.
7. Do I need a mobile app for my online education platform?
A mobile-friendly website is enough for many beginners. But in 2026, learners expect mobile-first access. You can start with a responsive site and later launch a dedicated app for better engagement.
8. What features should an online education platform include in 2026?
Interactive video lessons, AI-based recommendations, gamification, certificates, community forums, and mobile-first design are key features students expect today.
How to Build an Online Education Platform- Key Takeaways for You
At the beginning of this blog post, we mentioned that building an online education platform using WordPress is not much complicated. Now you have the proof, right?
All you need is to follow the right path to get your job done. Here is a quick recap of how to build an online education platform:
- Buy a domain with hosting, install WordPress, and install an LMS theme to prepare your WordPress website
- Choose and install an LMS plugin on your site to turn it into an online education platform
- Create courses using the LMS plugin
- Configure the course settings
- Add lessons to the course
- Create quizzes for the course
- Add quizzes to the course and publish the course
That's how you can build and publish a course from your online education platform.
If you still have any confusion related to the online education platform, don't hesitate to share it with us through the comment box below. We always appreciate your feedback. Good luck!