

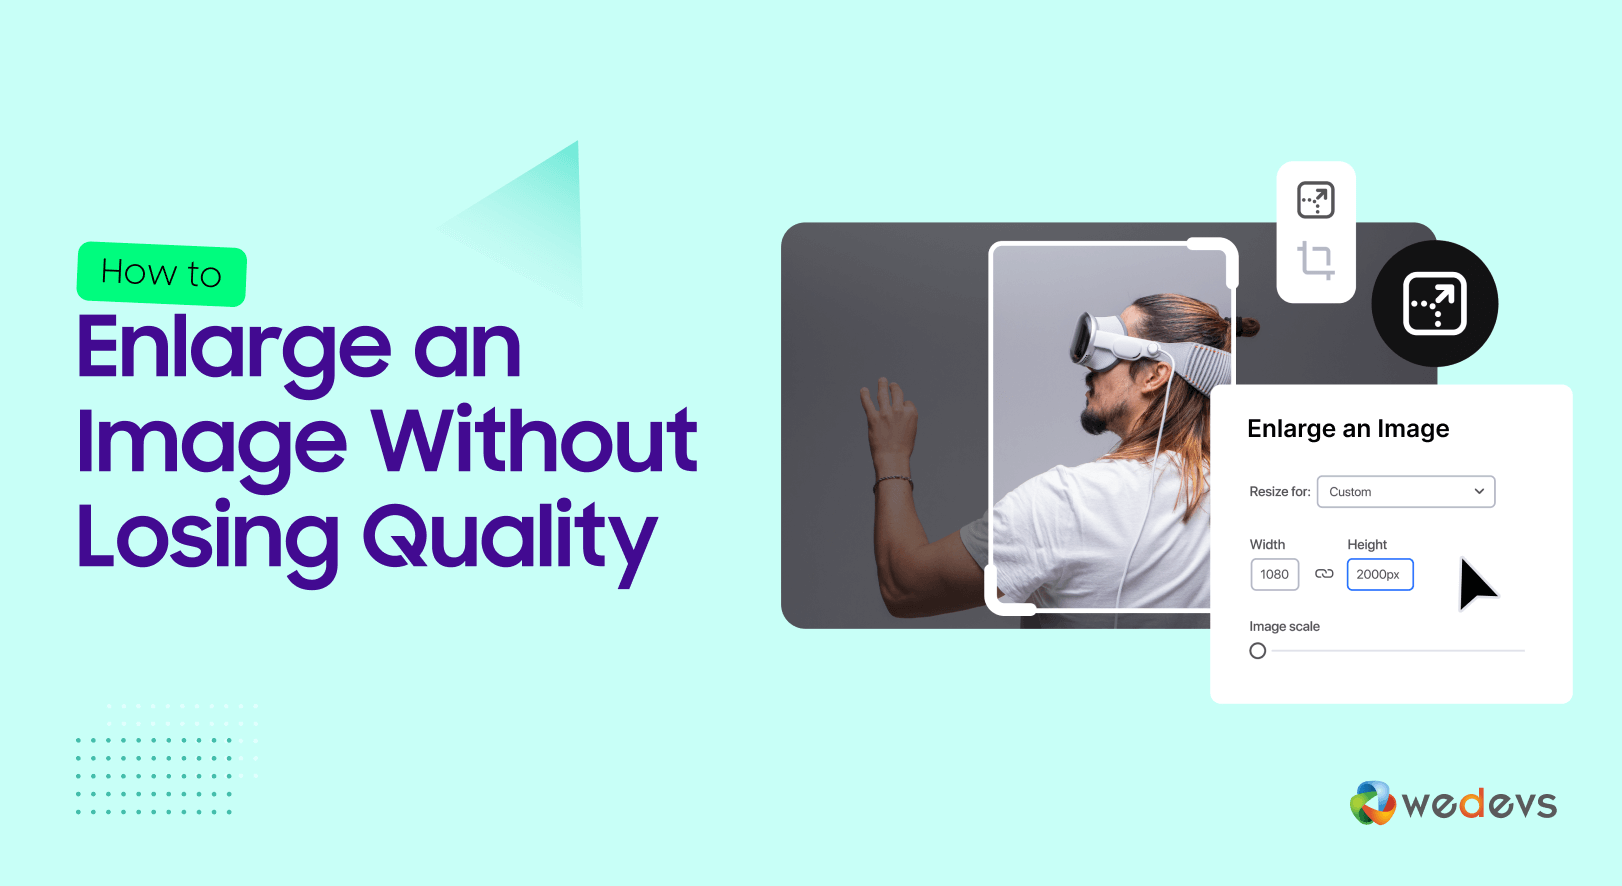
How to Enlarge an Image Without Losing Quality
Want to learn how to enlarge an image without losing quality? You have come to the right place.
Images play an important role in the eCommerce industry because customers get the first impression of your product by looking at the product images. If the images are not of good quality, then you may end up losing your customers.
Good quality images also impact the social presence of any business as visual content is 40% more likely to be shared on social media accounts.
Creating and uploading quality images can be a pain. Especially increasing the image size. The drag-and-drop technique will hamper the quality and make it blurry. You need to use the proper tools to resize the images so that it doesn't lose its original quality.
To help you out, we will go over 5 software you can use to resize images and upload them to your eCommerce website. The images will not lose their quality and customers won't have any trouble getting the detailed picture of the product.
Interested? Then let's start with-
How Quality Images Impact Your eCommerce Business
Quality images are not just nice to have—they are an important part of any eCommerce business. It is the first thing the customers see. Then they see the detailed description and pricing. If you lose them in the first step, then they might not purchase from you.
Here are some more reasons why images matter so much:
1. Creates a Great First Impression
As we said earlier, images are the first interaction the customer has with your product. According to research, 75% of online shoppers look at product pictures first.
High-resolution, professionally taken photos can instantly convey the value and appeal of a product. Poor-quality images, on the other hand, can hinder potential customers, making your products appear less desirable or even untrustworthy.
2. Increases Product Appeal
Detailed images that showcase different angles, and close-ups help customers better understand what they are buying.
This reduces uncertainty and increases confidence in the purchase. Especially for products where details matter, like clothing, jewelry, or tech gadgets.
3. Boosts Conversion Rates
Clear, appealing images can significantly boost your conversion rates. For example, including multiple images of a product from different perspectives can lead to a higher rate of purchase, as customers feel more informed.
4. Reduces Return Rates
When customers receive a product that matches the images they saw online, they are less likely to return it. Product returns happen 22% of the time because people realize it looks different in person.
Accurate, high-quality images ensure that customers know exactly what they are getting, leading to fewer disappointments and returns.
5. Improves Brand Perception
Your product images contribute to the overall perception of your brand. Consistently using high-quality images can elevate your brand's perceived value, making it stand out in a crowded marketplace.
It tells customers that you care about quality in every aspect of your business, from product design to marketing.
Not only that, great product images can also-
- Increase social media engagement. High-quality images are more likely to get shares and likes on social media platforms like Pinterest, Instagram, etc.
- Improve SEO for eCommerce sites. High-quality images with proper alt text and descriptions make your products more discoverable in image searches.
- Support storytelling. Lifestyle shots can show your products in use, helping customers imagine how the product fits into their lives.
If you have great images in support of a quality product, you will see exponential growth in your sales.
Want to turn your eCommerce store into a multivendor marketplace? Purchase and install the popular Dokan multi-vendor marketplace plugin and start your marketplace today!👇👇

Why Do Resized Images Lose Quality?
Resizing images is a common task. You need to adjust the image size to upload them on social media or create marketing materials. For example, if you want to upload an image to Facebook then the image dimensions have to be 1200×628 pixels.
However, many people encounter a frustrating issue: the loss of quality when enlarging images. You need to understand why this happens so it can help you find better solutions and avoid common problems-
- Pixelation and Blurring: Enlarging an image without adding new pixel data stretches existing pixels. It causes pixelation and blurring due to the spread of original image data over a larger area.
- Loss of Detail: Increasing image size can blur or distort fine details, particularly in high-detail images like photographs or graphics. it is due to limitations in the software's ability to preserve original information.
- Interpolation Methods: Basic interpolation methods (e.g., nearest-neighbor, bilinear) used in resizing calculate new pixel values from surrounding pixels. While suitable for minor adjustments, they often lead to a loss of clarity and precision in larger enlargements.
- Image Compression: Resized images are often compressed to reduce file size, which can degrade quality by introducing artifacts and reducing sharpness.
- Aspect Ratio Distortion: Maintaining the correct aspect ratio is essential during resizing. Failure to do so can distort the image, making it look unnatural or unprofessional.
To achieve high-quality enlargements without these issues, advanced software uses sophisticated AI algorithms. These tools analyze the existing image data and add new pixels to maintain clarity and detail. It minimizes the quality loss commonly associated with resizing.
Ok, enough chitchat. Now let's get to the exciting part of the article. Let's see how to increase an image size using different tools.
How to Enlarge an Image Without Losing Quality
You can see that there are many reasons why resized images can lose their qualities. And uploading images without quality can hamper not only your sales but also damage your reputation.
But not to worry. There are tools you can use to increase image size without losing quality.
Now let's see the tools name that you can install to learn how to enlarge an image without losing quality. The tools we have chosen are a mix of online and offline tools. They are-
- Preview (App)
- Fotor (Online)
- Photoshop (App)
- Gimp (App)
- Photopea (Online)
Now, let's see how to use them to enlarge them without losing quality.
How to Enlarge Images Without Losing Quality Using Preview
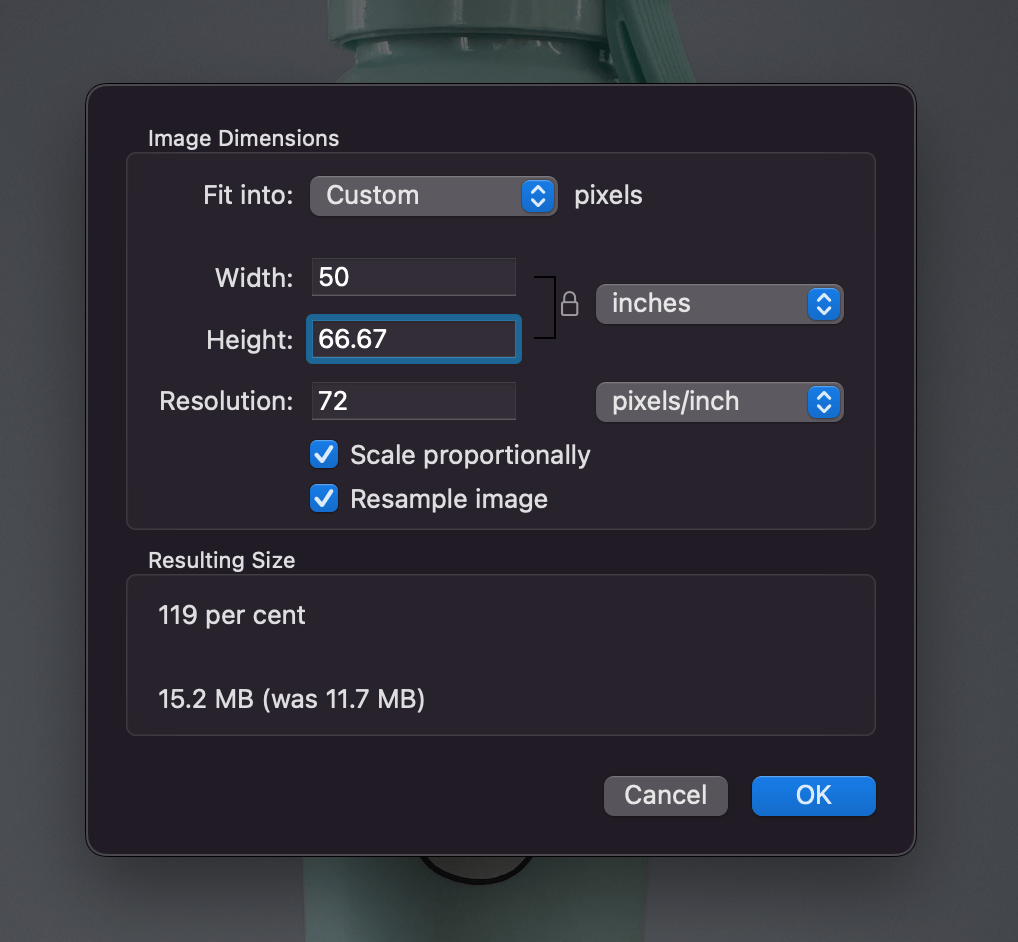
This is for all the Mac users out there. You can use the default Preview application to resize your images without losing their quality. But remember, don't enlarge more than 3x of the original image size.
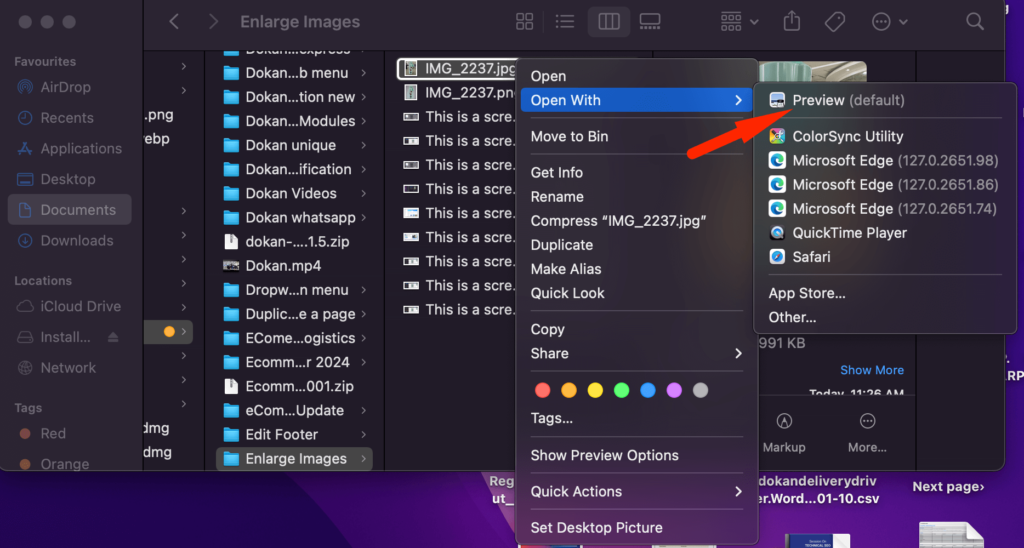
Step 1: Chose a image from your Finder and choose Preview
First, choose an image you want to enlarge from Finder. Just choose an image, double-click on the image, and click on Open With option. Then choose the Preview option-
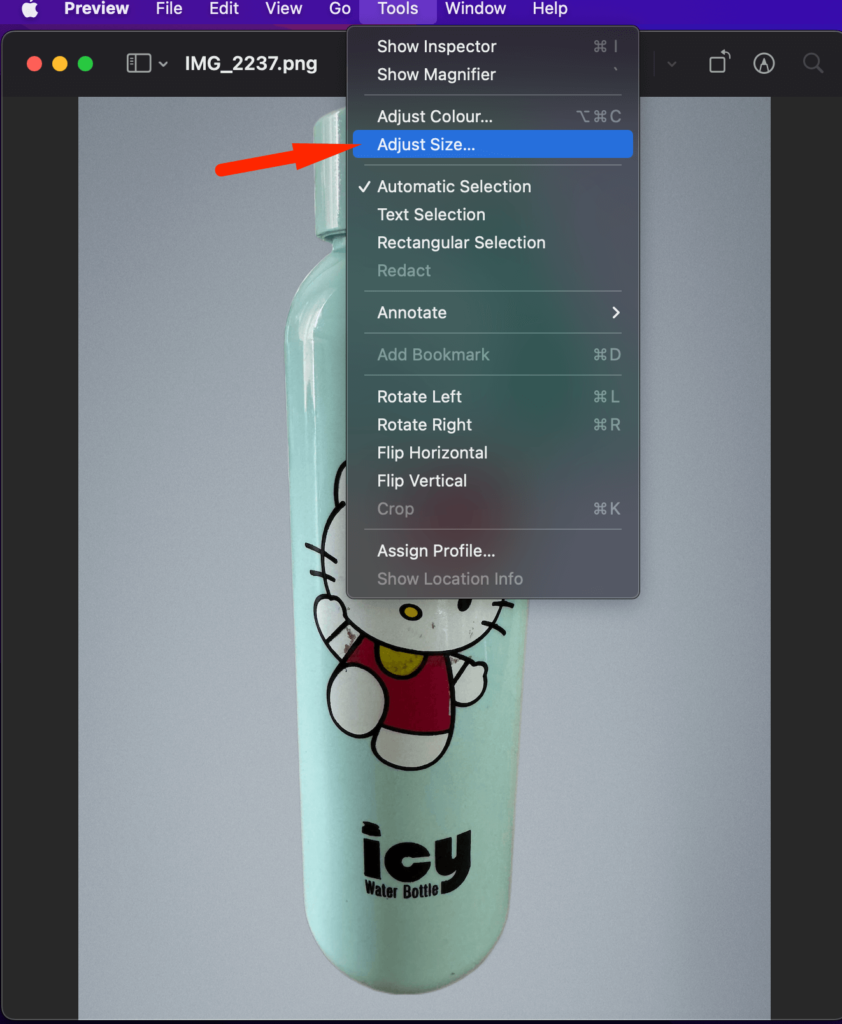
Step 2: Open the adjust option
Now, on top of the screen, you will see some options. From the Tools section, choose the Adjust Size option.
Step 3: Adjust the image size without losing quality
You will get a pop-up window where you can adjust the image size. Now you can enlarge the image without losing quality.
This is how you can enlarge images without losing quality using the Preview application.
Enlarge Images Without Losing Quality Using Fotor
If you want more options to resize your images then you can go for Fotor online image editor. This is a very popular online image editor. They give you 7 7-day free trial and have features like background remover, AI enhancement, and AI image generator as well.

Now let's see how to enlarge an image without losing quality.
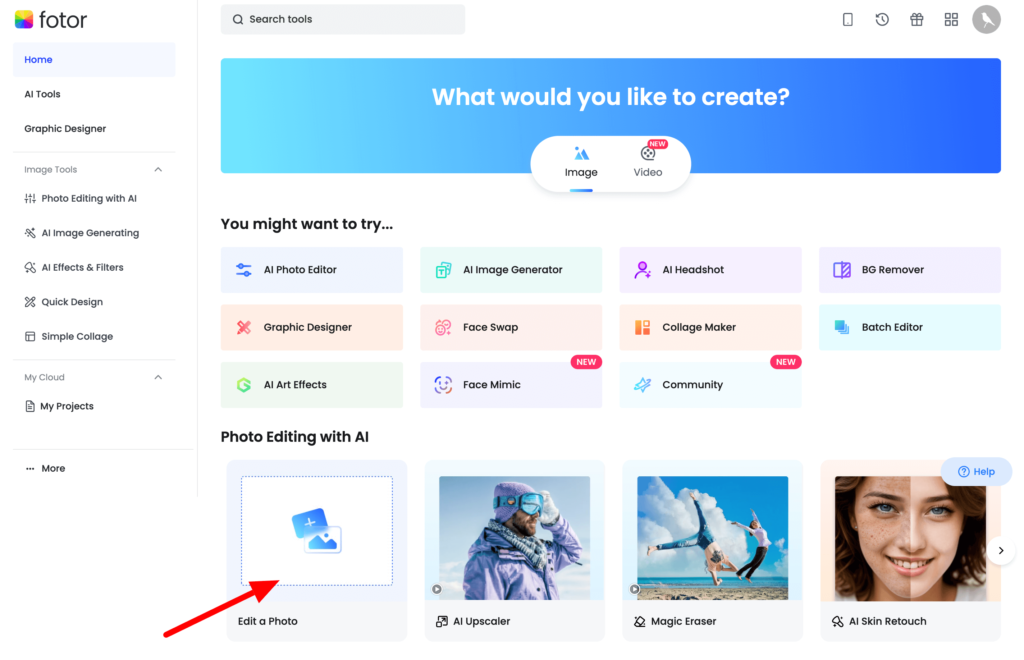
Step 1: Create an account in Fotor and choose the Edit a Photo option
First, you need to create an account in Fotor and choose the Edit A Photo option from the homepage-
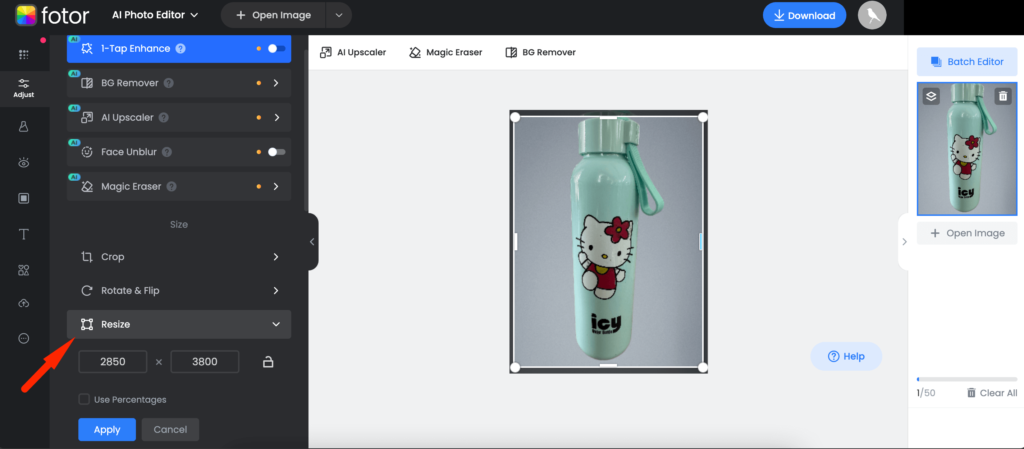
Step 2: Upload an Image and click on the Resize option
Now, you need to upload an image. Choose an image from your device and click on the Resize option from the right-hand side menu-

Step 3: Enlarge the image according to your need
Now increase the size of your image. Remember not to enlarge more than 3x of the original image size. Don't forget to click the Apply button after adjusting the image size.
Even after enlarging the image, you can see that the image quality is still intact. We have increased the image size from 2850x3800px to 2900x4000px.
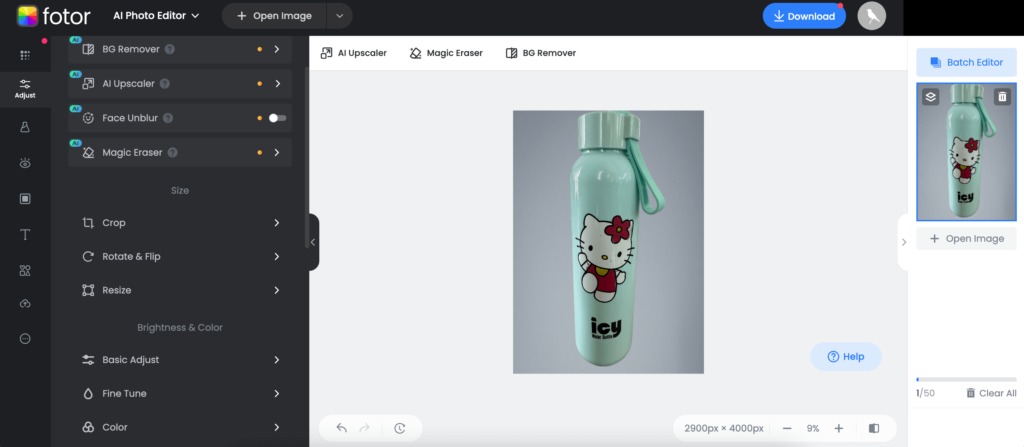
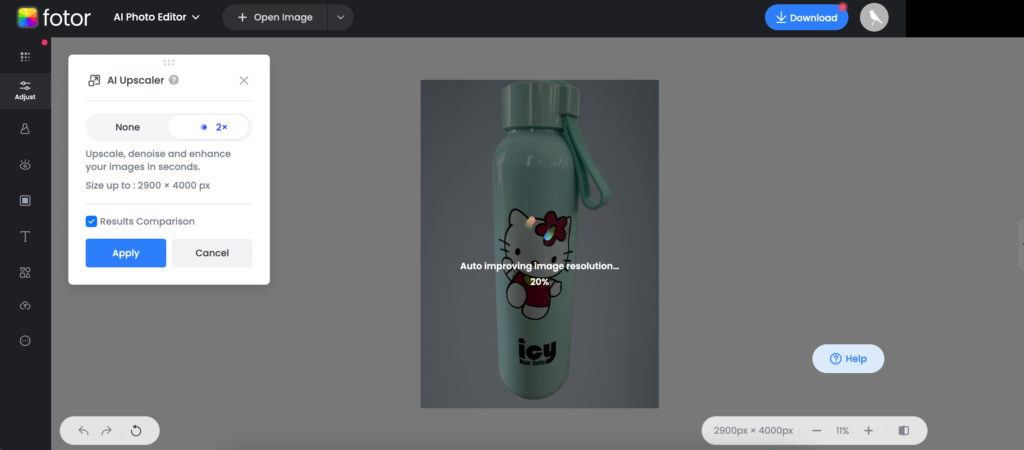
Also, you can use the AI Upscaler feature of Fotor to enlarge the image using AI-
This is how to use Fotor online image editor to enlarge images without losing quality.
Increase Image Size Without Losing Quality Using GIMP
GIMP is a free software for both Mac and Windows. It is similar to Photoshop but the application is less heavy and doesn't put much pressure on your device. You can use this to learn how to enlarge an image without losing quality.
Here is how you can use GIMP to increase image size without losing quality.
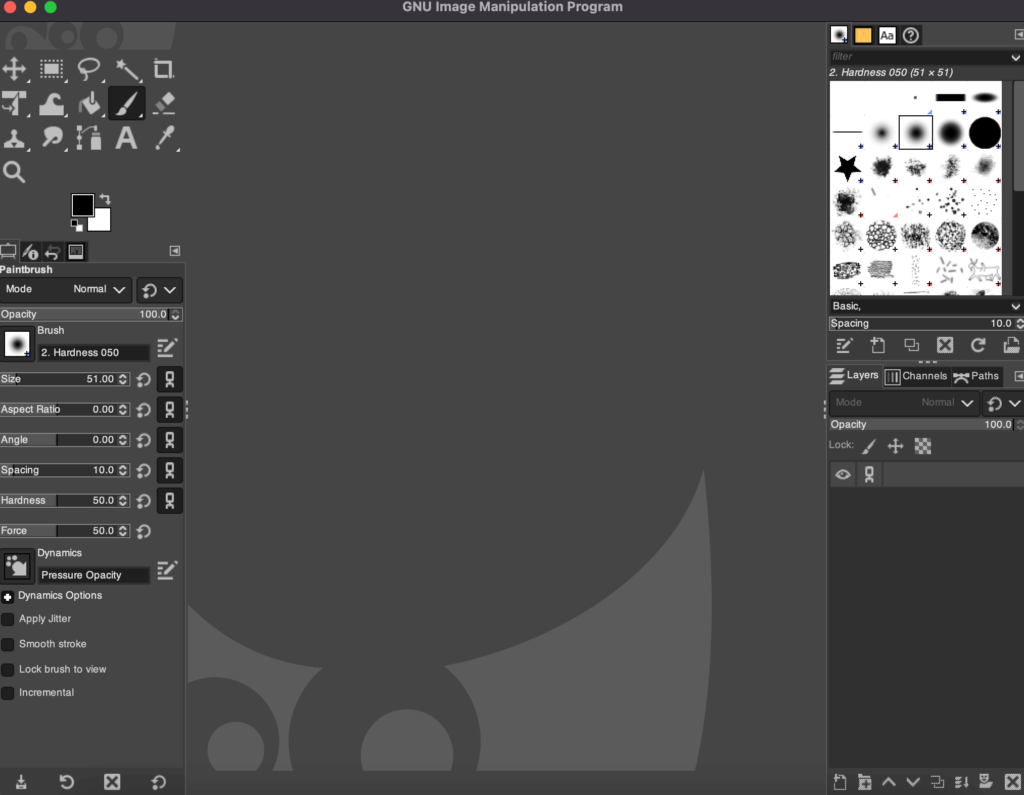
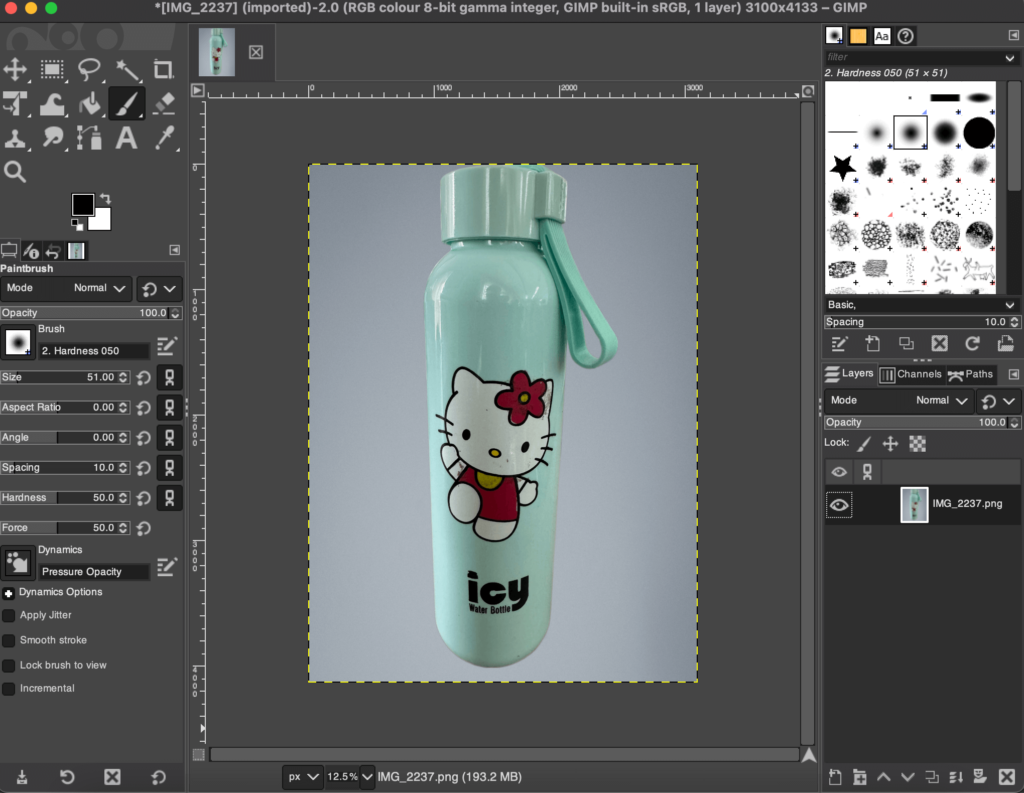
Step 1: Install and open the GIMP application on your device
First, you need to install the GIMP software on your device. You can download the software from their website. After installing the software, open it. The interface will look something like this-
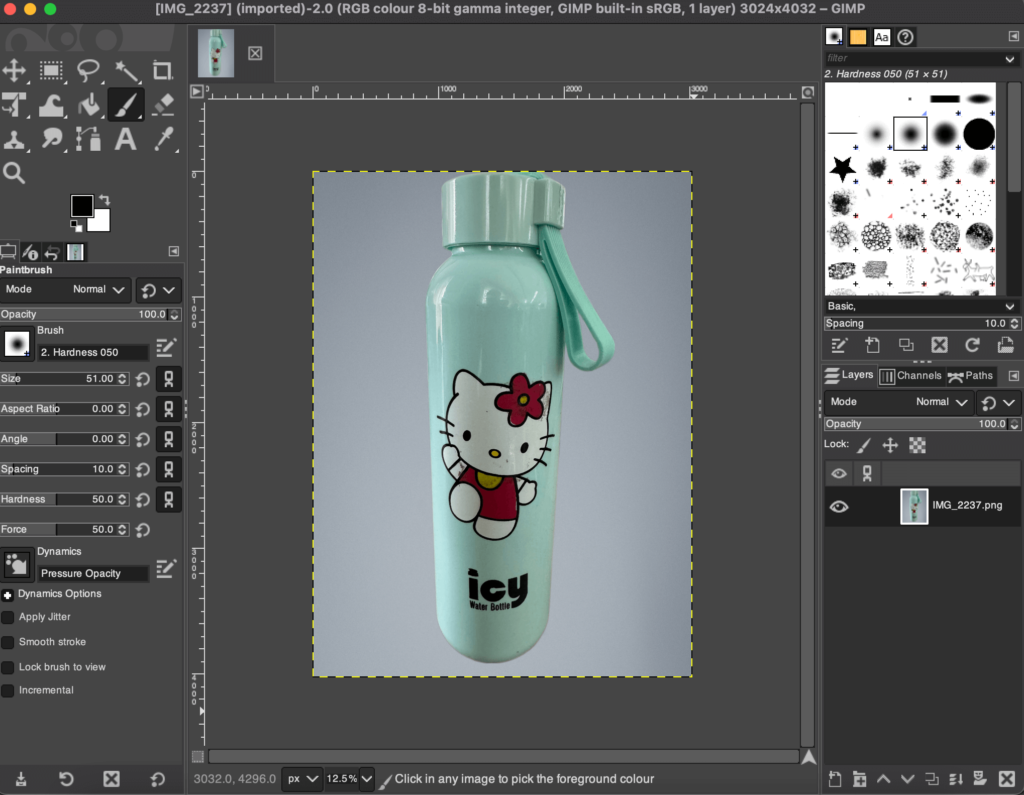
Step 2: Upload an image to GIMP
Next, you need to upload the image you want to enlarge into the GIMP software. Double-click on the editor and go to File–> Open.

After uploading your image, here is what it will look like-
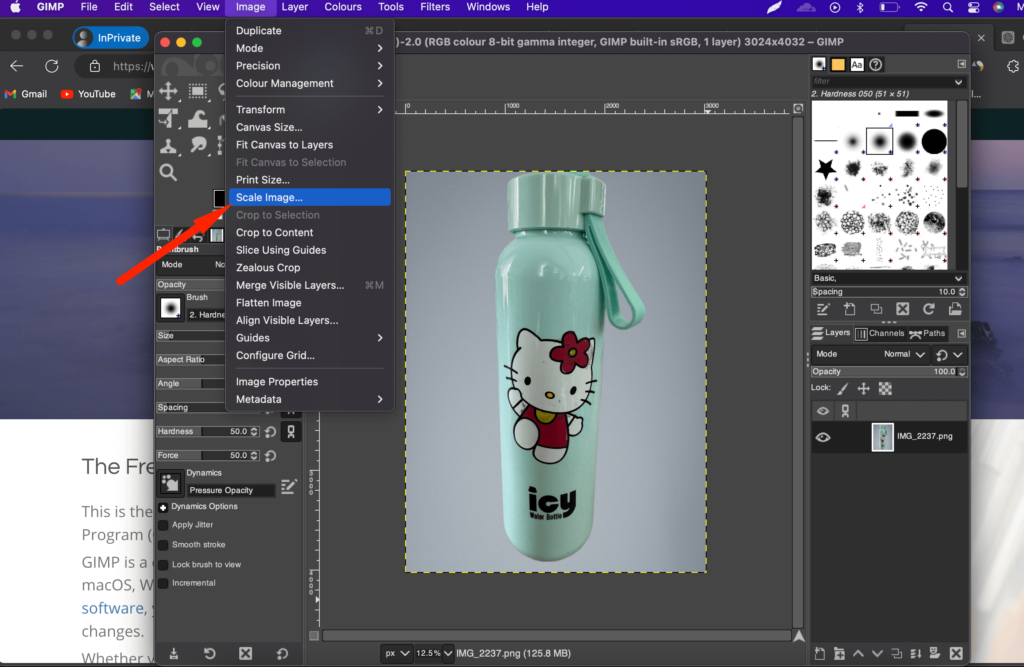
Step 3: Choose the scale image option and enlarge the image
Now go to Image–> Scale from the top of the menu if you are using a Mac device. You will find the option to enlarge the image here-
Here is the original image size-
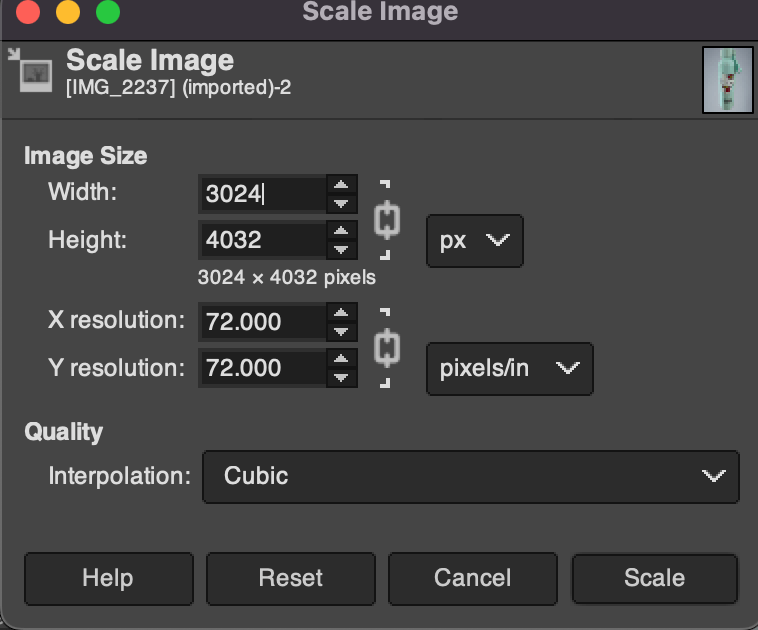
Now we will increase the image size. You can see how we have increased the image size in the below screenshot-

After scaling the image, here is what the image will look like-
Now you can download your resized image with the original quality. This is how you can enlarge an image without losing quality using the GIMP software.
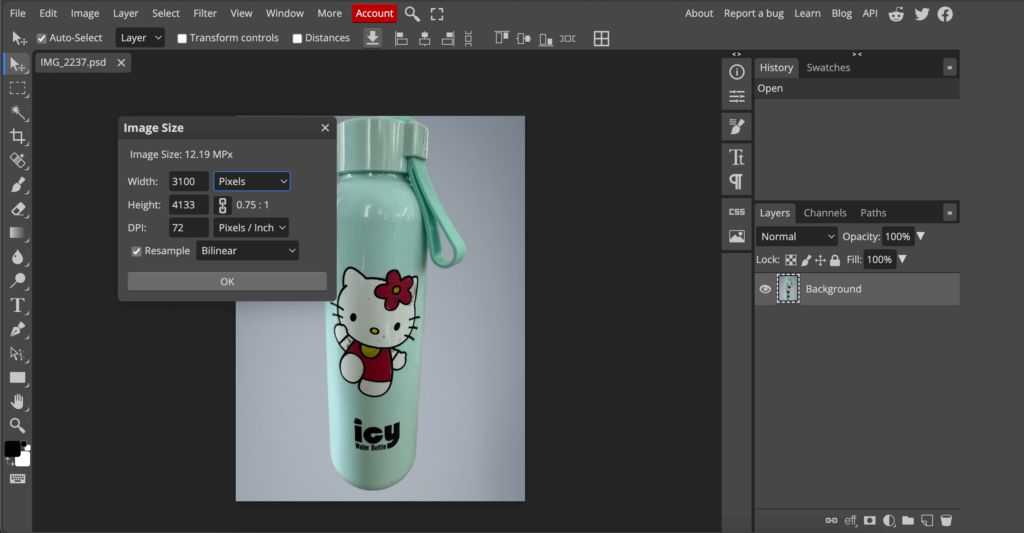
How to Adjust Image Size Without Losing Quality Using Photoshop
Adobe Photoshop is one of the most popular image editing software. It has both Mac and Windows versions, so users of both can use this software. However, this is very heavy software and you may need a device with heavy RAM and graphics to use this.
Here are the steps to enlarge an image without losing quality using Photoshop-
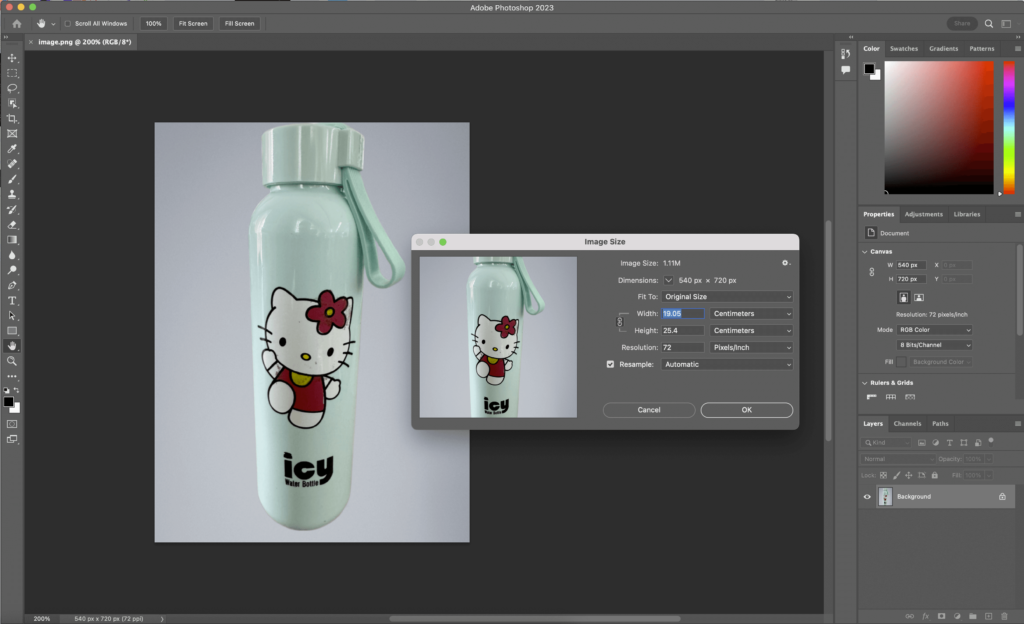
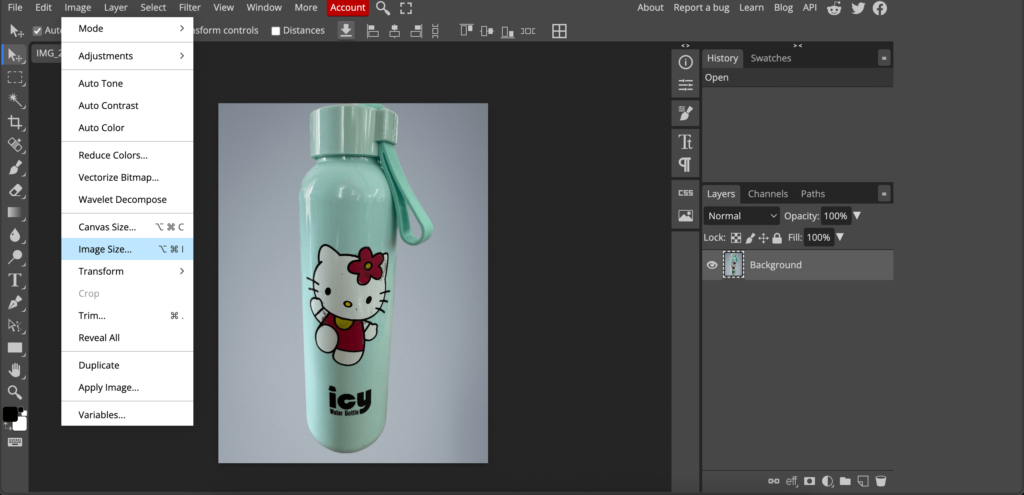
Step 1: Open Image in Photoshop and go to Image > Image Size.
Step 2: Set Resolution change the resolution to 300 pixels/inch. Ensure the width and height do not exceed 2-3 times the original size.
Step 3: Enable Resampling check the Resample box, select Preserve Details (enlargement), and click OK.
Step 4: Save the Enlarged Image.
However, you cannot make enormous changes to the original image size using Photoshop.
How to Enlarge Images Without Losing Quality Using Photopea
Photopea is also becoming a popular image editor. If you are looking for a Photoshop alternative, then this online image editor can be a great choice.
There is a great story behind the invention of Photopea. You can read about it in this article about Photopea history.
To enlarge an image using Photopea,
Step 1: Go to the online editor of Photopea and upload your image. Then from the Image option in the top menu, choose the Image Size option from the drop-down.
Step 2: Now change the image size as you prefer and download the image.
This is how you can increase the image size using the Photopea online image editor software.
Upload Great Quality Images and Improve Your eCommerce Business Metrics!!
Uploading great-quality images can do a heap of good for your brand. Blurry images can irritate the customers and they end up not buying your product.
Good-quality images have a 94% higher conversion rate compared to low-quality pictures (source: IIPVapi). That tells a lot about the importance of high-quality images.
We have shown you the usage of 5 tools to learn how to enlarge an image without losing quality. Hopefully, you can use one of them to create quality images for your eCommerce website.
But if you face any trouble while using any of the software then do tell us in the comment section. We would love to help.