

How to Run a Facebook Ad: 6 Easy Steps for Beginners
Facebook has over 3 billion monthly active users, making it the most used social media platform worldwide. So, running a Facebook ad can help your business reach more people quickly. It’s one of the easiest ways to promote your products or services online.
But if you’ve never done it before, it might feel confusing or even risky. You might wonder if it’s worth spending money on ads that don’t work
If that sounds like you, you’re not alone. Many small business owners feel the same way.
The good news is you don’t need to be a marketing expert to run a successful Facebook ad. You just need a clear plan and the right steps.
In this guide, we will take you through each step, from setting up your Facebook Page to launching your first ad and checking how it performs.
So, without any further ado, let's run your first-ever Facebook ad to reach new customers and make more sales!
Why Run a Facebook Ad? Is It Right For You?
Running a Facebook ad can bring real, measurable results, even if you’re just starting out. Many small businesses have grown their sales and audience by using Facebook ads smartly.
Let us share a few points on why you should run a Facebook ad:
- Reach More Customers Fast: Facebook lets you show your ad to exactly the people who want your product or service. You don’t waste money showing ads to the wrong audience.
- Great Return on Investment: Small businesses often see their ad spend double or triple in sales. For example, a local bakery in Texas used Facebook ads to promote a new cupcake line. They spent $200 on ads in one month and made $600 in extra sales, tripling their investment.
- Affordable for Small Budgets: You can start with as little as $5 a day. This makes Facebook ads accessible even for tiny businesses or side hustles.
- Build Brand Awareness and Trust: Ads help you get noticed by people who haven’t heard of your business before. This can lead to more followers, website visits, and repeat customers.
- Control and Flexibility: You choose who sees your ad, when it runs, and how much you spend. You can pause or change your ad anytime.
These are a few out of many reasons to run a FB ad. Now, the question is –
Should You Run It for Your Business?
The answer is – YES.
If you want to grow your business and are ready to invest a little time and money, Facebook ads are worth trying. It’s especially good if you want to attract new customers or boost sales quickly.
If you don’t have a clear goal or aren’t ready to spend on promotion, it might be better to wait. But if you want a low-cost way to reach more people, Facebook ads can deliver strong results.
When Should You Run a Facebook Ad?
If you just started your business, Facebook ads can help you get your first customers faster. Imagine you opened a small online shop selling handmade candles.
Running ads can let local people or candle lovers know you exist. But before you start, make sure you have something ready to sell or show. Ads work best when you have a clear product or offer.
Now, if you’ve already made some sales, ads can help you grow even more. Let’s say your candle shop made a few sales through friends or organic reach.
Facebook ads can help you find new customers who like similar products. You can even target people like your current buyers, which usually means better results.
You should also think about your goal. Are you trying to get more visitors to your website? Or maybe you want people to sign up for an event or buy a new product?
Facebook ads work best when you have a clear goal in mind.
Money matters too. You don’t need a big budget, but you should know how much you can spend. Even $5 a day can start bringing results, but you have to be consistent.
So, if you have a product ready, a clear goal, and a little budget, Facebook ads can really help you grow.
Prerequisites to Run a Facebook Ad (If You Are a Beginner)
Before you jump into running Facebook ads, there are a few things you need to have ready. These steps will make your ad process smoother and more successful.
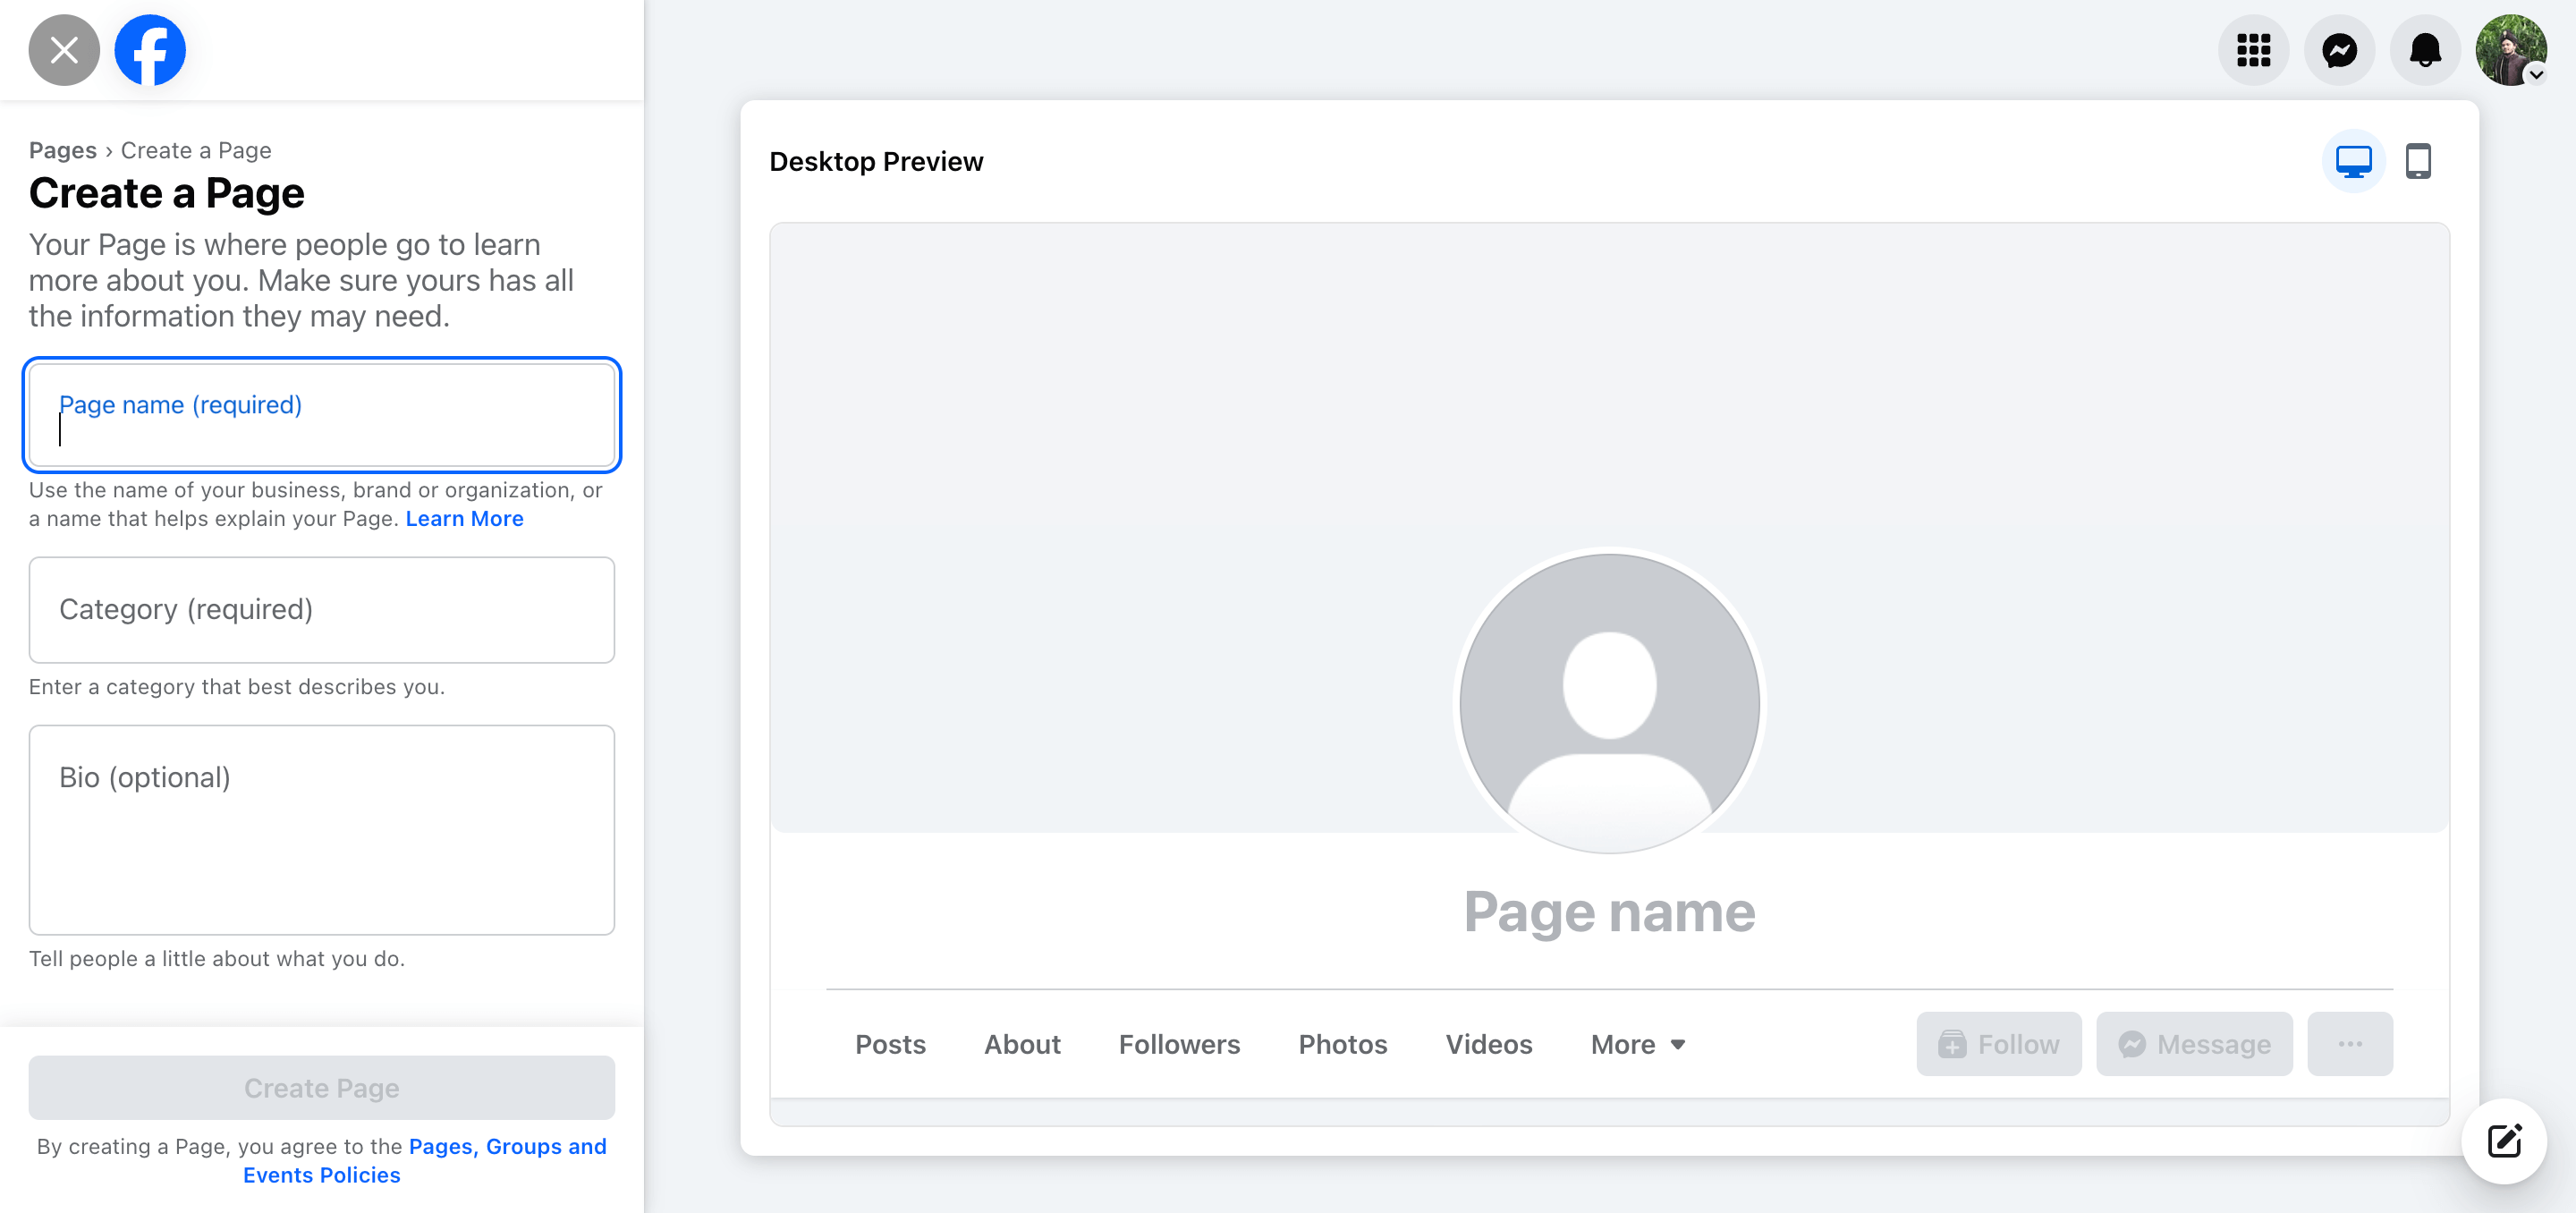
a. Create a Facebook Page
You can’t run ads from your personal profile. You need a Facebook Page for your business. It’s like your online shop window.
- To create a page, log in to your Facebook account and click on the page. Then hit the ‘+ Create New Profile or Page‘.
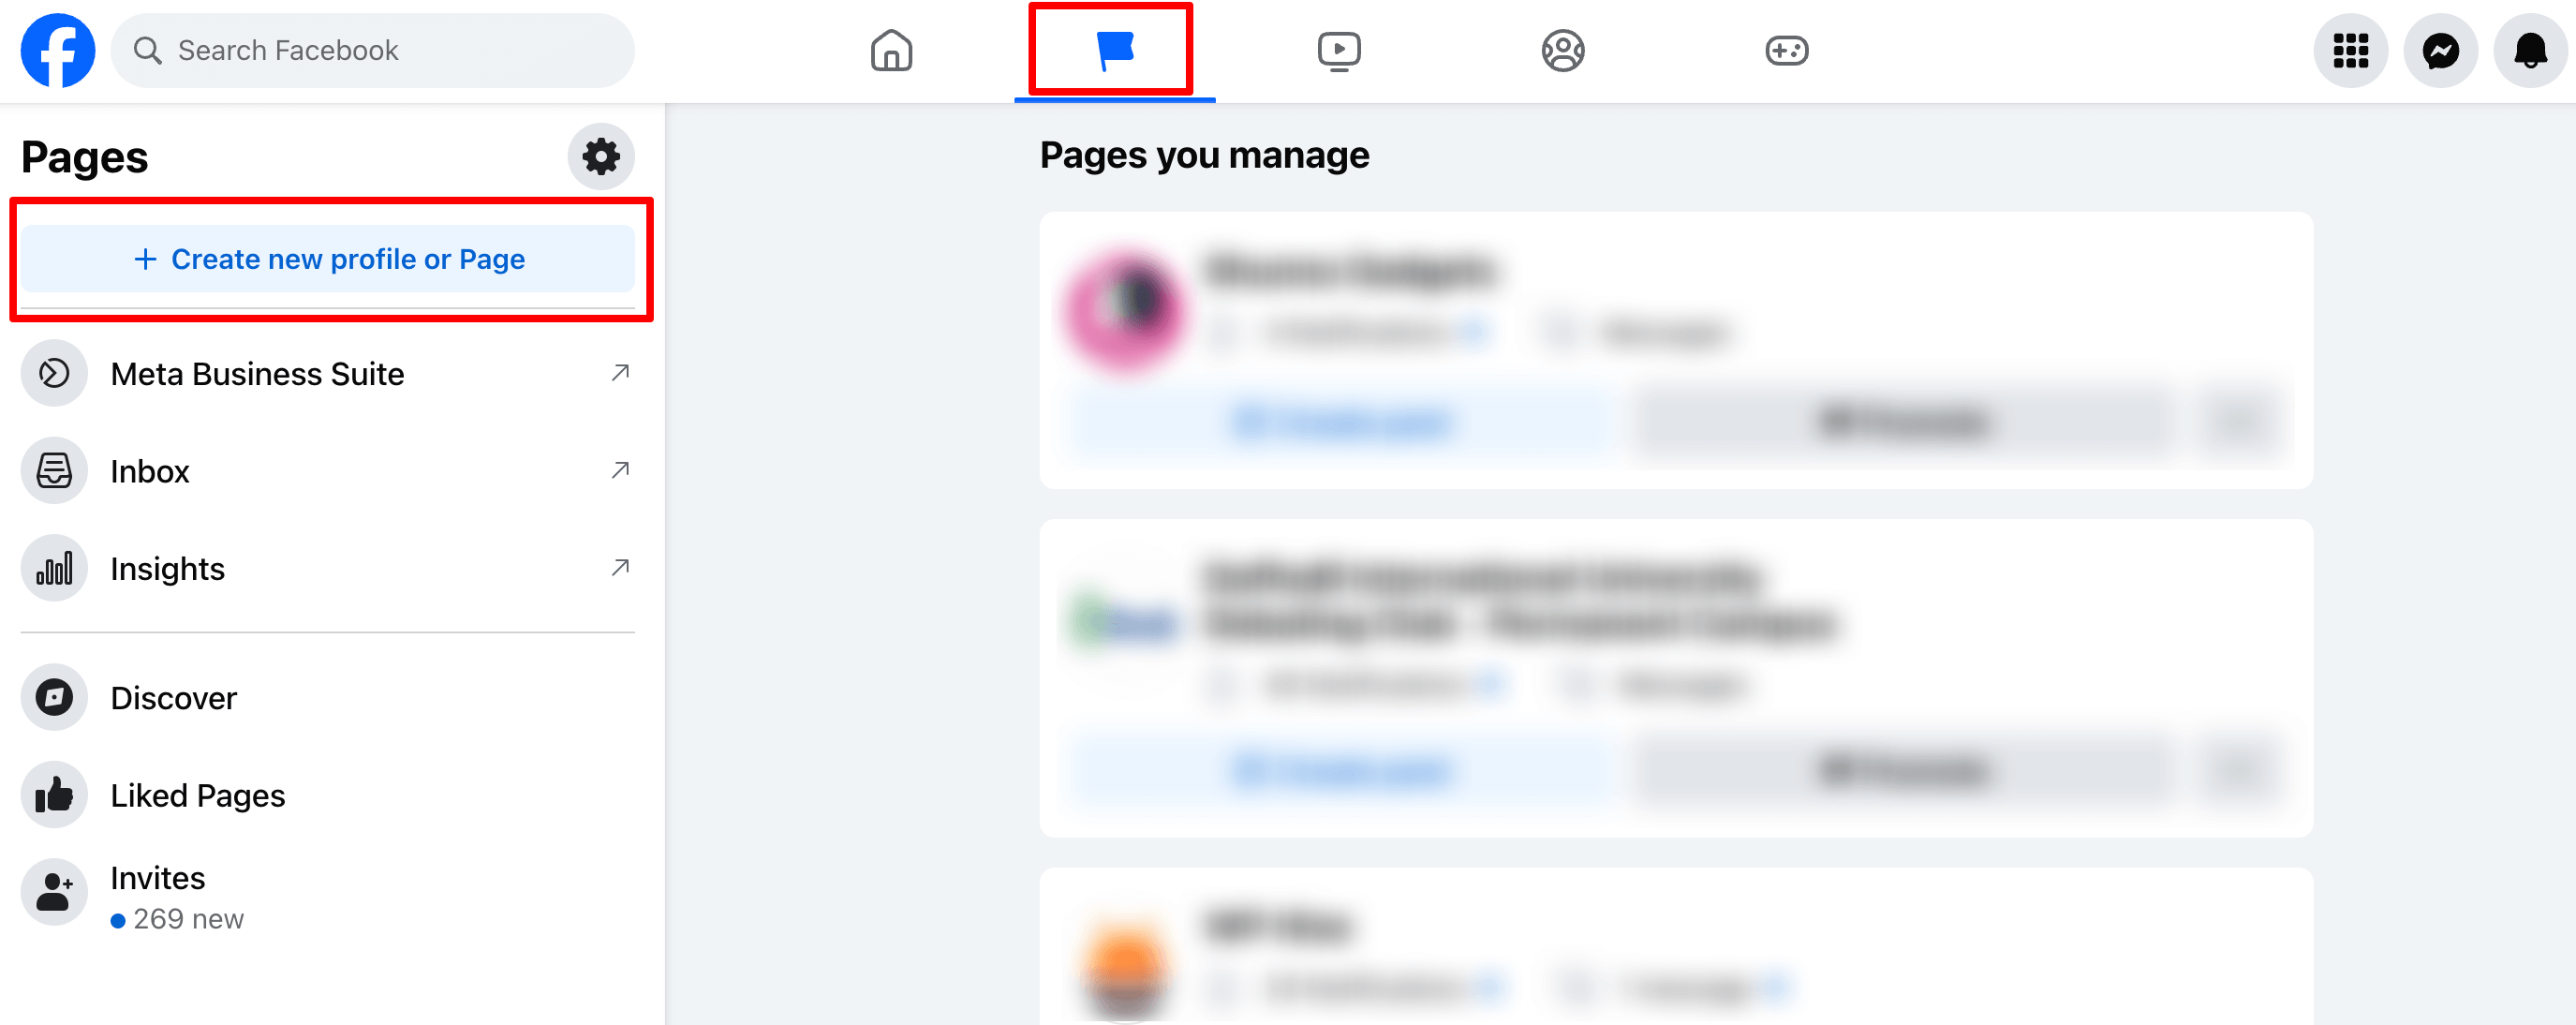
Make sure your page has your business name, contact info, and a profile picture or logo. Even adding a few posts helps people trust your page.
b. Set up Facebook Business Manager
Business Manager is a free tool from Facebook. It helps you organize your ads, payment methods, and who can manage your account. If you’re running ads yourself or with a team, this tool keeps everything in one place.
You can run Facebook ads directly from your Facebook Page using Facebook Ads Manager without setting up Business Manager. This works well for simple setups or small businesses just starting out.
However, Facebook Business Manager helps when:
- You want to manage multiple Pages or ad accounts
- You work with a team or agency and need controlled access
- You want better organization of payment methods, pixels, and assets
For absolute beginners or small businesses running one Page and one ad account, starting without Business Manager is fine.
But if you plan to grow or have more complex needs, setting up Business Manager early is a good idea.
For this tutorial, we are going to use the Facebook Ads Manager.
c. Have a Payment Method Ready
Facebook needs a way to charge you for ads. Usually, this means adding a credit card or linking your PayPal account. Don’t worry, you can set spending limits, so you won’t overspend by accident.
d. Prepare Your Content
Think about what you want to show in your ad. It could be a photo of your product, a short video, or a special offer. Having good images and clear messages makes your ads more effective.
e. Set up Facebook Pixel
A pixel is a small code you put on your website to track what visitors do after clicking your ad. It helps improve ad targeting and measure results.
But you can run ads without setting up Pixel.
For example, if you’re just starting and don’t have a website yet, or you want to promote posts on Facebook itself, Pixel isn’t needed right away.
Once you have these ready, you’re set to start creating your first Facebook ad. It might seem like extra work upfront, but it will save you time and help your ads perform better.
How to Run a Facebook Ad – 6 Simple Steps for You
Running your first Facebook ad is easier than you think. Follow these seven simple steps, and you’ll have your ad live in no time:
- Access Your Facebook Ads Manager
- Choose Your Advertising Goal
- Set Up Your Campaign Details and Budget
- Set Up Your Ad Set – Conversion, Budget, Audience & Placements
- Design Your FB Ad
- Review and Publish Your Facebook Ad
Now, let us describe each point one by one in detail!
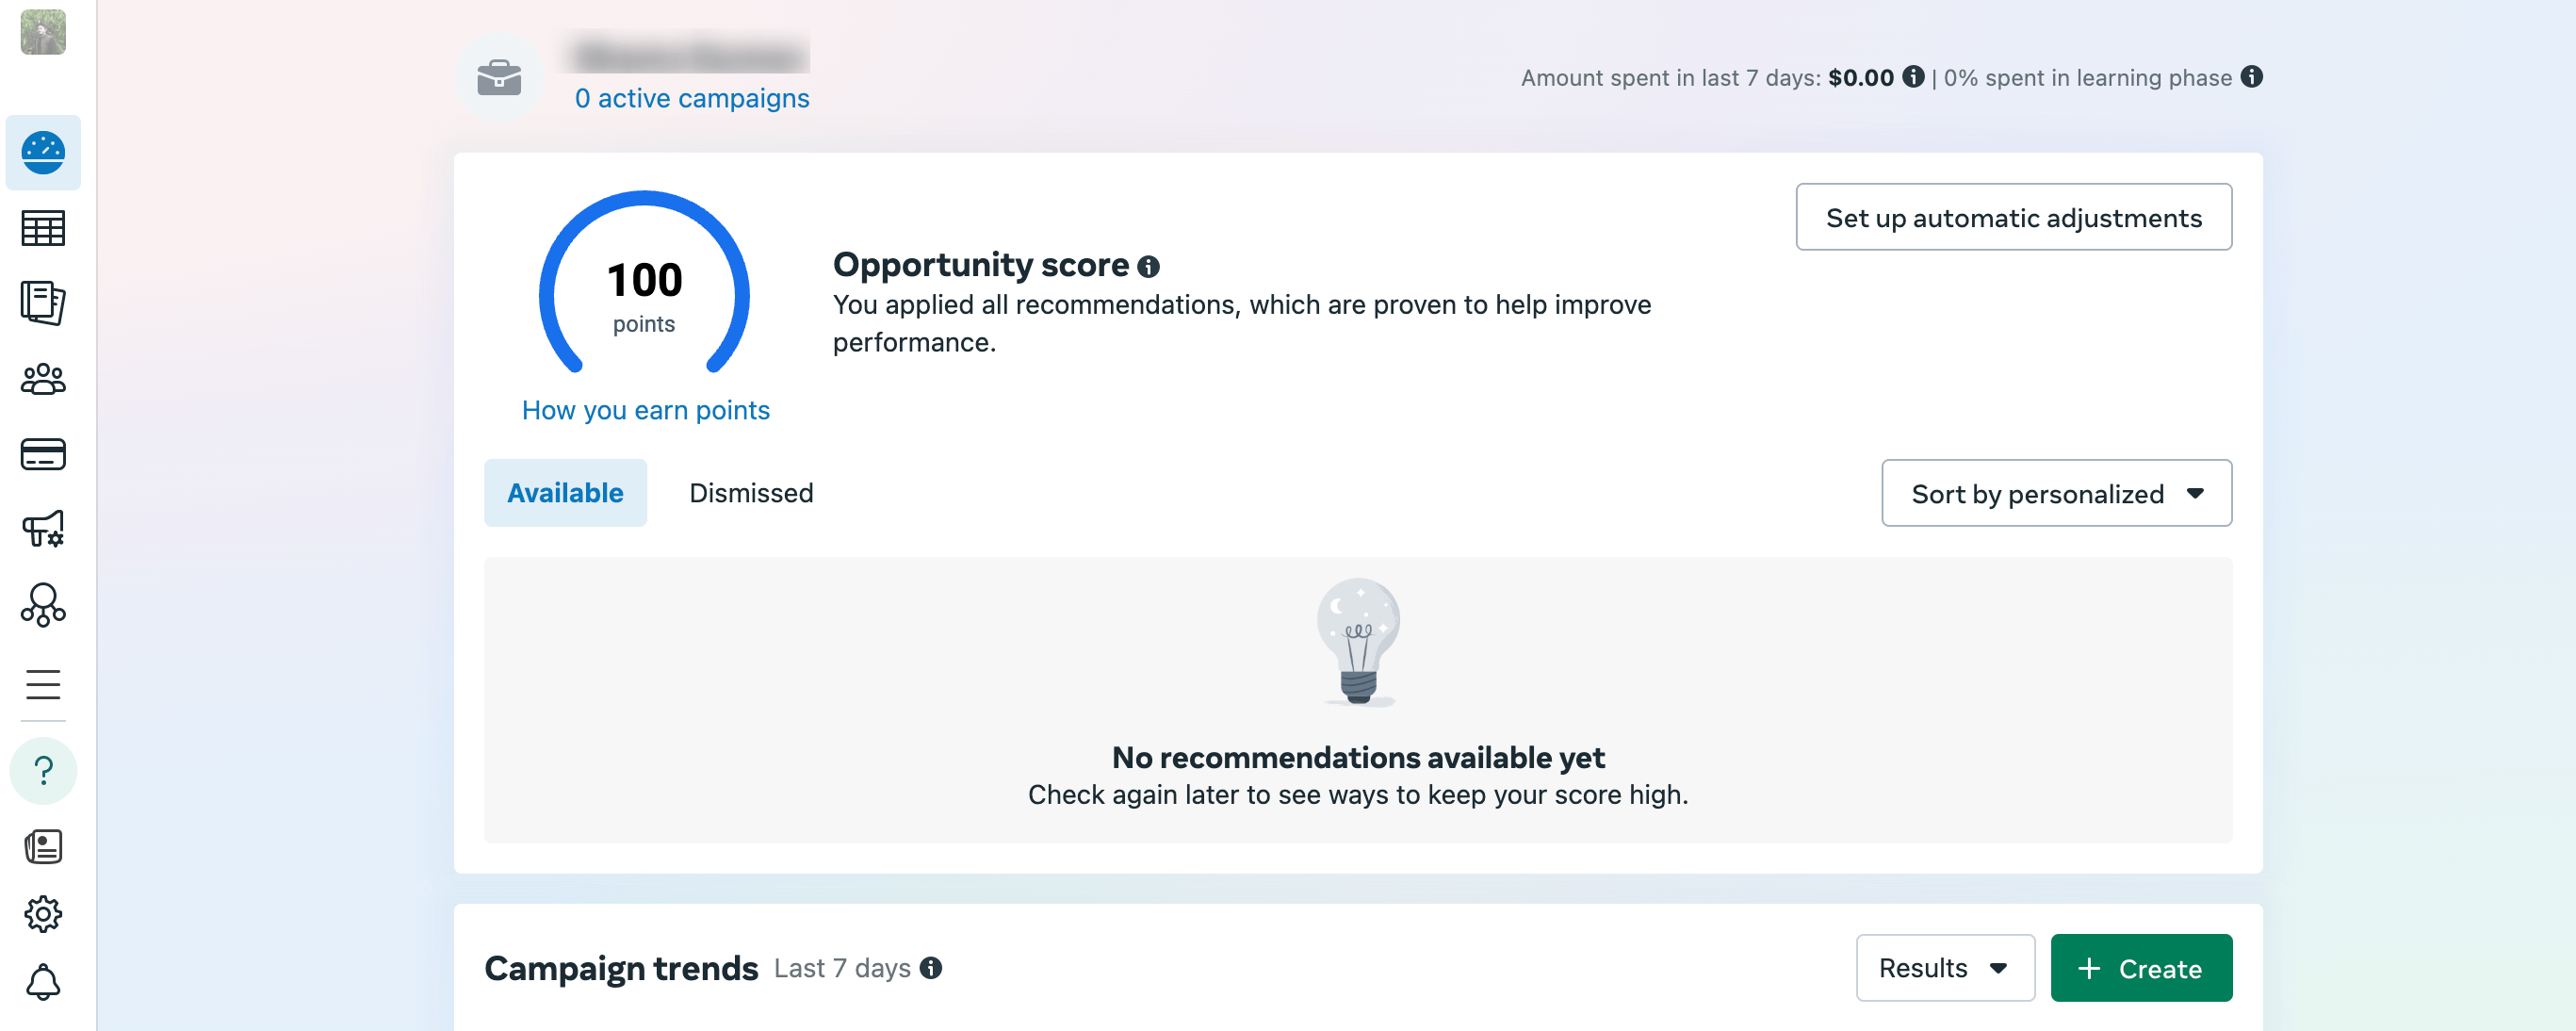
1. Access Your Facebook Ads Manager
Facebook Ads Manager is the tool where you create, manage, and track your ads. Think of it as your control center for all your Facebook advertising.
To get started, here’s how you can access Ads Manager:
- Log in to your Facebook account: Use the same account that manages your Facebook Page.
- Go to Ads Manager: You can find it by typing ‘Facebook Ads Manager' into Google or directly visiting https://www.facebook.com/adsmanager.
- Choose your ad account: If you have more than one ad account, select the right one. Usually, if you’re just starting, you’ll have only one.
- Familiarize yourself with the dashboard: Ads Manager shows you options to create a new campaign, view existing ads, and see performance stats. Don’t worry if it looks complicated at first, you’ll get used to it quickly.
That’s it! Once you’re in Ads Manager, you’re ready to start creating your first ad.
2. Choose Your Advertising Goal
Once you're inside Facebook Ads Manager and ready to create a campaign, the next step is to pick what you want your ad to achieve. This is called the campaign objective. It tells Facebook how to deliver your ad and to whom.
Here’s how to do it step-by-step:
- On the left side of the Ads Manager homepage, you’ll see a big green button that says Create. Click this to start making your campaign.
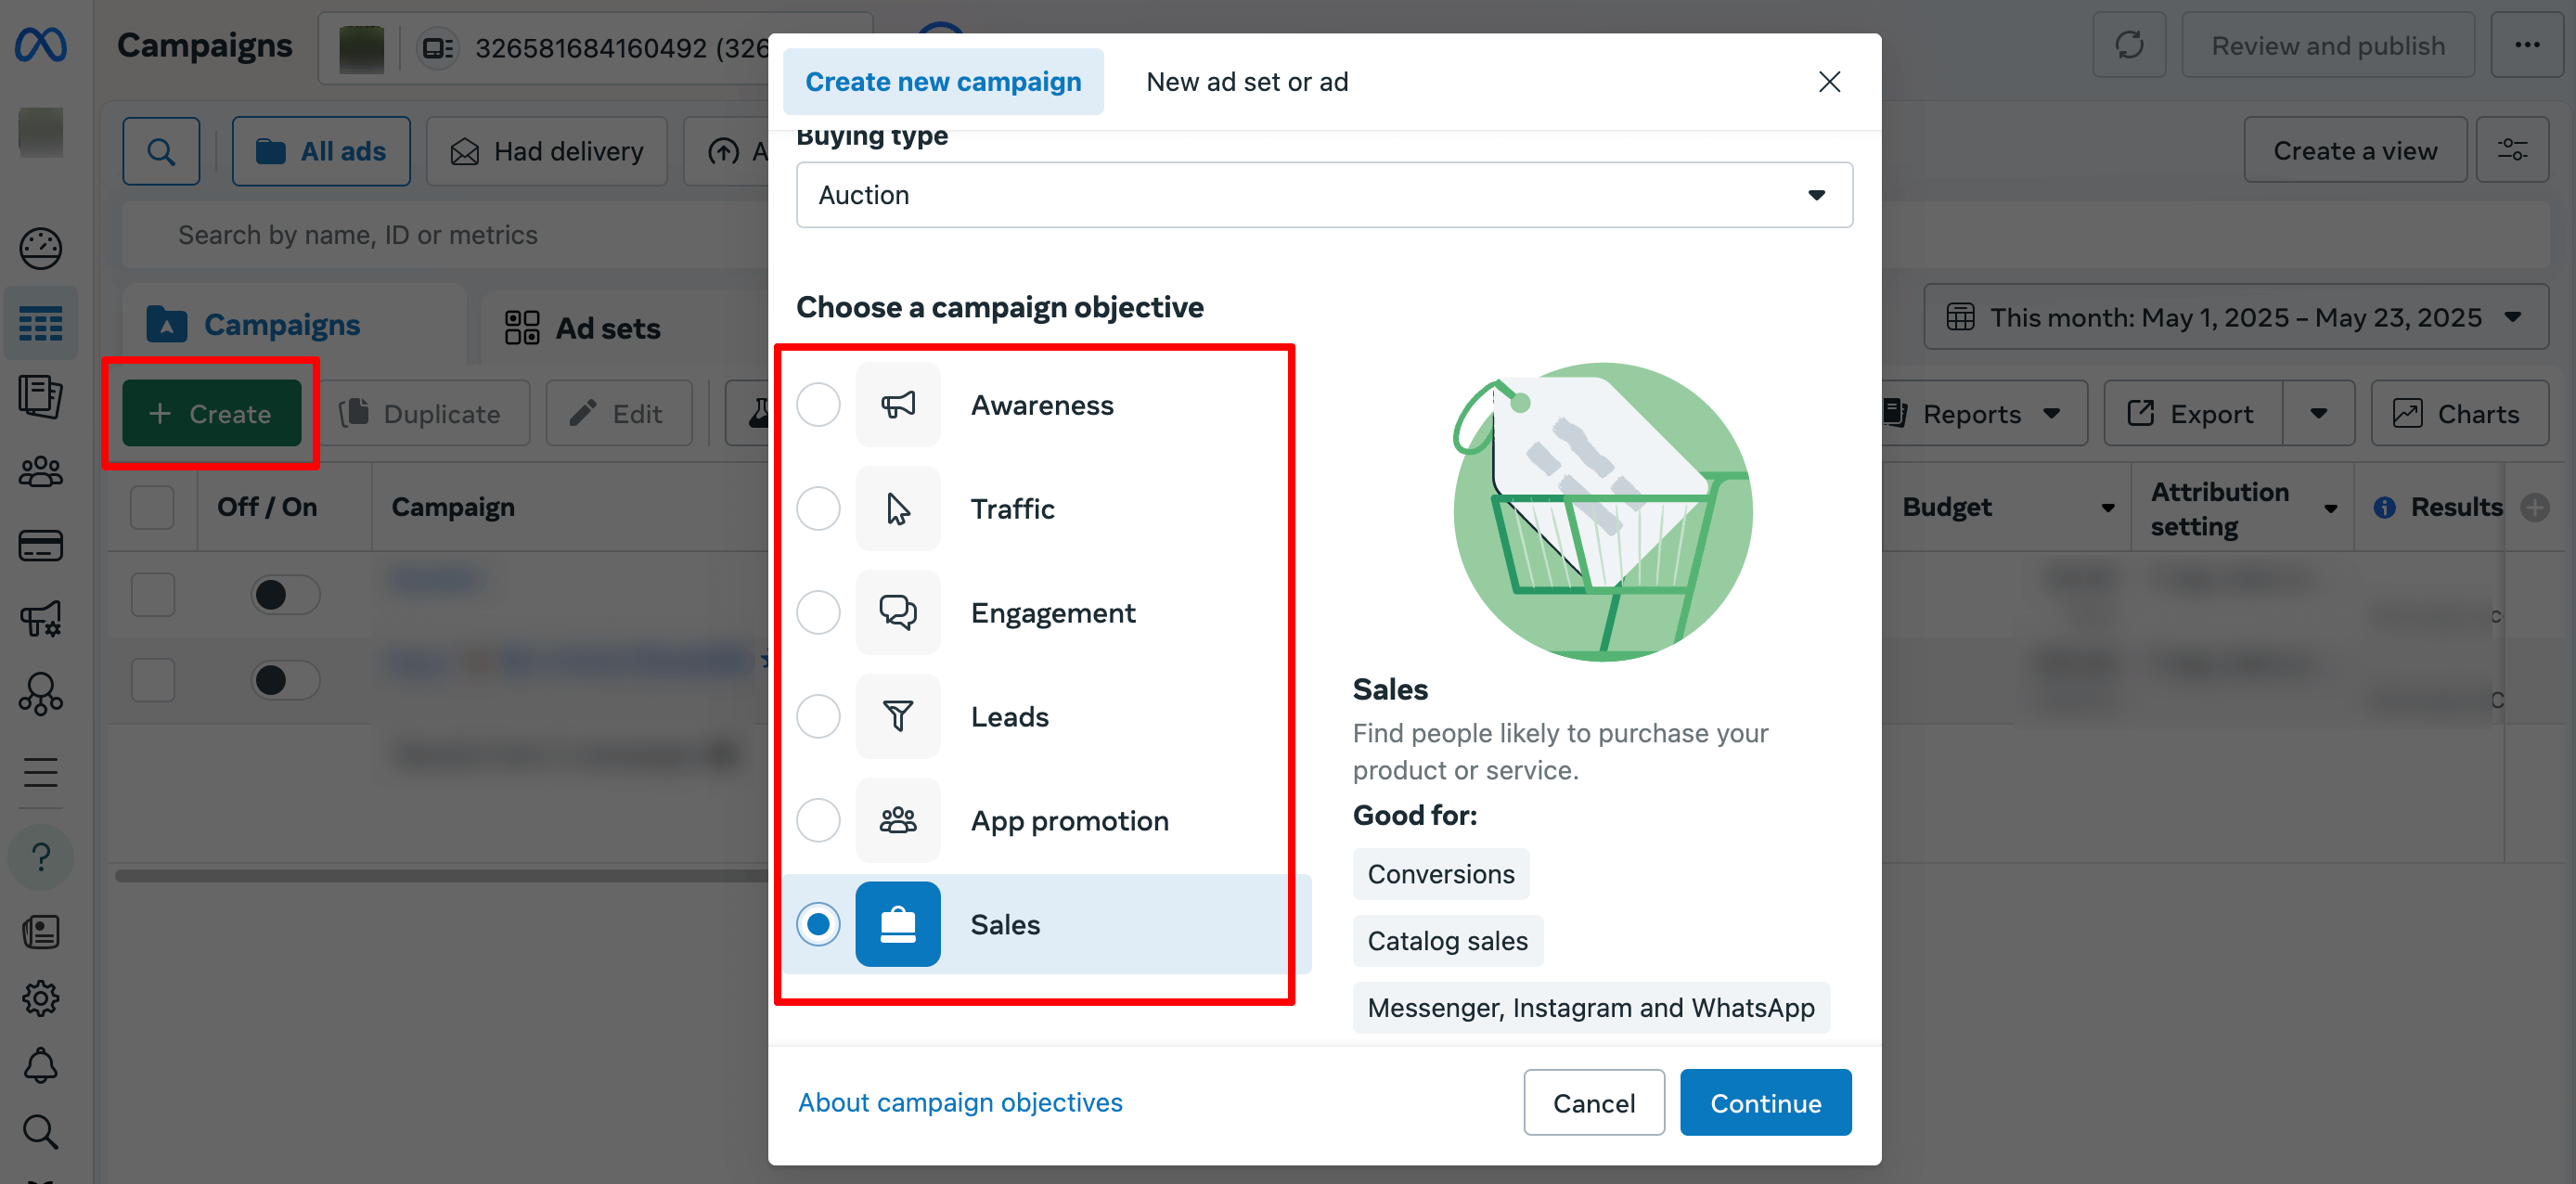
After clicking create, a new window appears with several campaign objectives. These are organized into categories based on your goal. The main options you’ll see include:
- Awareness: Use this if your goal is to introduce your business or product to as many people as possible. It’s great if you want to build brand recognition, but don’t expect immediate sales.
- Traffic: This objective sends people to your website, blog, or online store. If you want more visitors to check out your products or services, pick Traffic.
- Engagement: Choose Engagement if you want more likes, comments, shares, or responses to your Facebook posts or events. This helps grow your audience and get more attention.
- Leads: This helps you collect contact information like emails from people interested in your offer. It’s useful for building a mailing list or following up with potential customers.
- App Promotion: If you have a mobile app and want more people to install or use it, this is the right choice.
- Sales: Choose Sales when your main goal is to drive purchases, sign-ups, or other valuable actions on your website or app. This objective focuses on conversions and getting real business results.
In this tutorial, we are choosing Sales as our goal to run this ad to get more customers.
3. Set Up Your Campaign Details and Budget
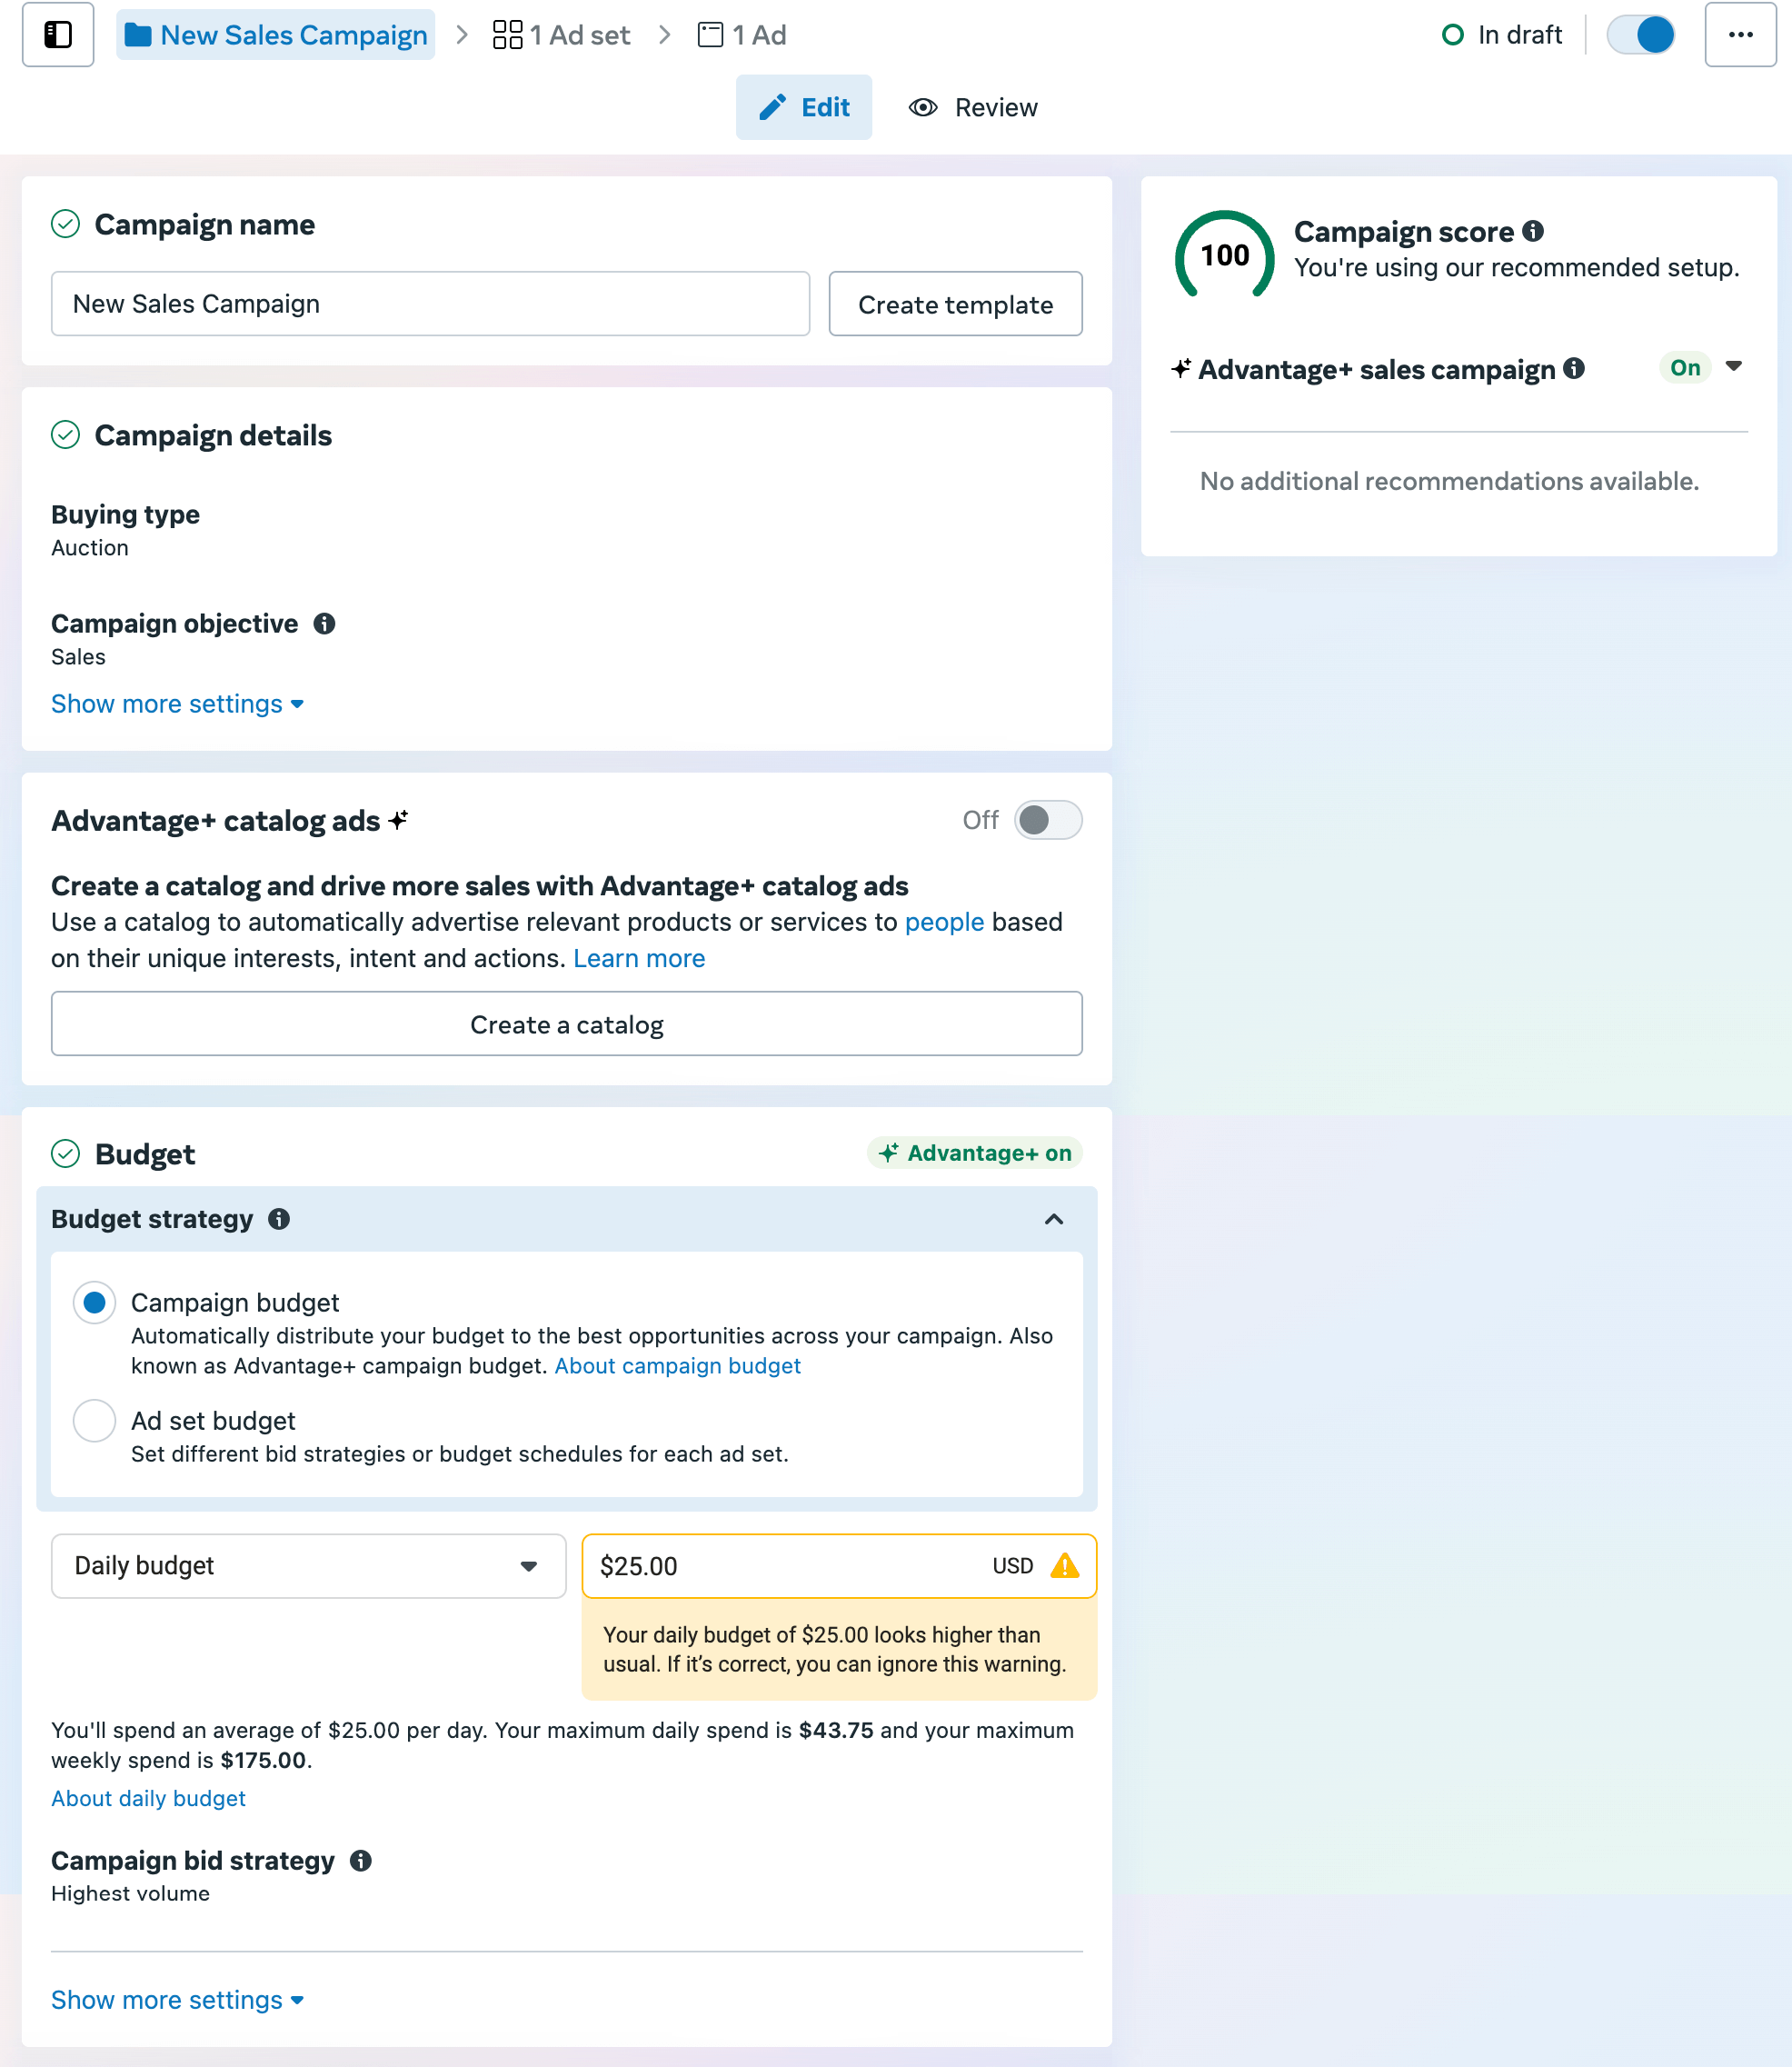
After you pick your campaign objective, you’ll see a page where you can set important details about your campaign and decide your budget.
Here’s what to do on this page:
(i) Name Your Campaign
At the top, you’ll see a box labeled Campaign name. Give your campaign a clear name so you can find it later. For example, ‘Spring Sale Campaign' or ‘New Product Launch.'
(ii) Check Your Campaign Details
Below the name, you’ll see Campaign details like the buying type and your chosen objective (e.g., Sales). Usually, you won’t need to change these. Just make sure they look right.
(iii) Advantage+ Catalog Ads (Optional)
You might see an option for Advantage+ catalog ads. This is a feature that automatically promotes products from your catalog based on customer interests. If you don’t have a product catalog set up, you can skip this for now.
(iv) Set Your Budget Strategy
This is one of the most important parts. You’ll see two options:
- Campaign budget: Facebook will automatically spread your budget across your ad sets to get the best results. This is usually the easier option for beginners.
- Ad set budget: You set different budgets for each ad set manually. This is more advanced.
For most beginners, the Campaign budget is best.
(v) Choose Your Budget Amount
Below the budget strategy, set how much money you want to spend. You can select:
- Daily budget: How much to spend each day.
- Lifetime budget: Total amount to spend over the life of your campaign.
Enter an amount that fits your budget. For example, $5, $10, or $25 per day. Facebook will show an estimate of how much you’ll spend weekly or monthly.
(vi) Campaign Bid Strategy (Optional)
This controls how Facebook bids for ad placements. If you’re new, just leave it as Highest volume, which means Facebook tries to get the most results within your budget.
(vii) Audience Segment Reporting (Optional)
This is for advanced reporting to see how different audience groups respond to your ads. Beginners can skip this.
(viii) Special Ad Categories
If your ad is about things like housing, employment, or politics, you’ll need to declare it here. For most small business ads, this won’t apply.
4. Set Up Your Ad Set – Conversion, Budget, Audience & Placements
After setting your campaign details, the next step is to configure your Ad Set. This controls where your ad runs, who sees it, how much you spend, and when.
(i) Name Your Ad Set
At the top, give your ad set a clear name to keep things organized. For example, ‘Local Customers June' or ‘Spring Promo Audience.'
(ii) Choose Your Conversion Location
This tells Facebook where you want to track sales or actions from your ad. Your options may include:
- Website: Track sales or sign-ups on your website.
- App: Track actions inside your app.
- Website and App: Track both places.
- Message destinations: Track conversations on Messenger, Instagram, or WhatsApp (this is selected in your screenshot).
- Calls: Track sales or conversions from phone calls.
- Website and in-store: Track both online and physical store visits.
- Website and calls: Track online actions and calls.
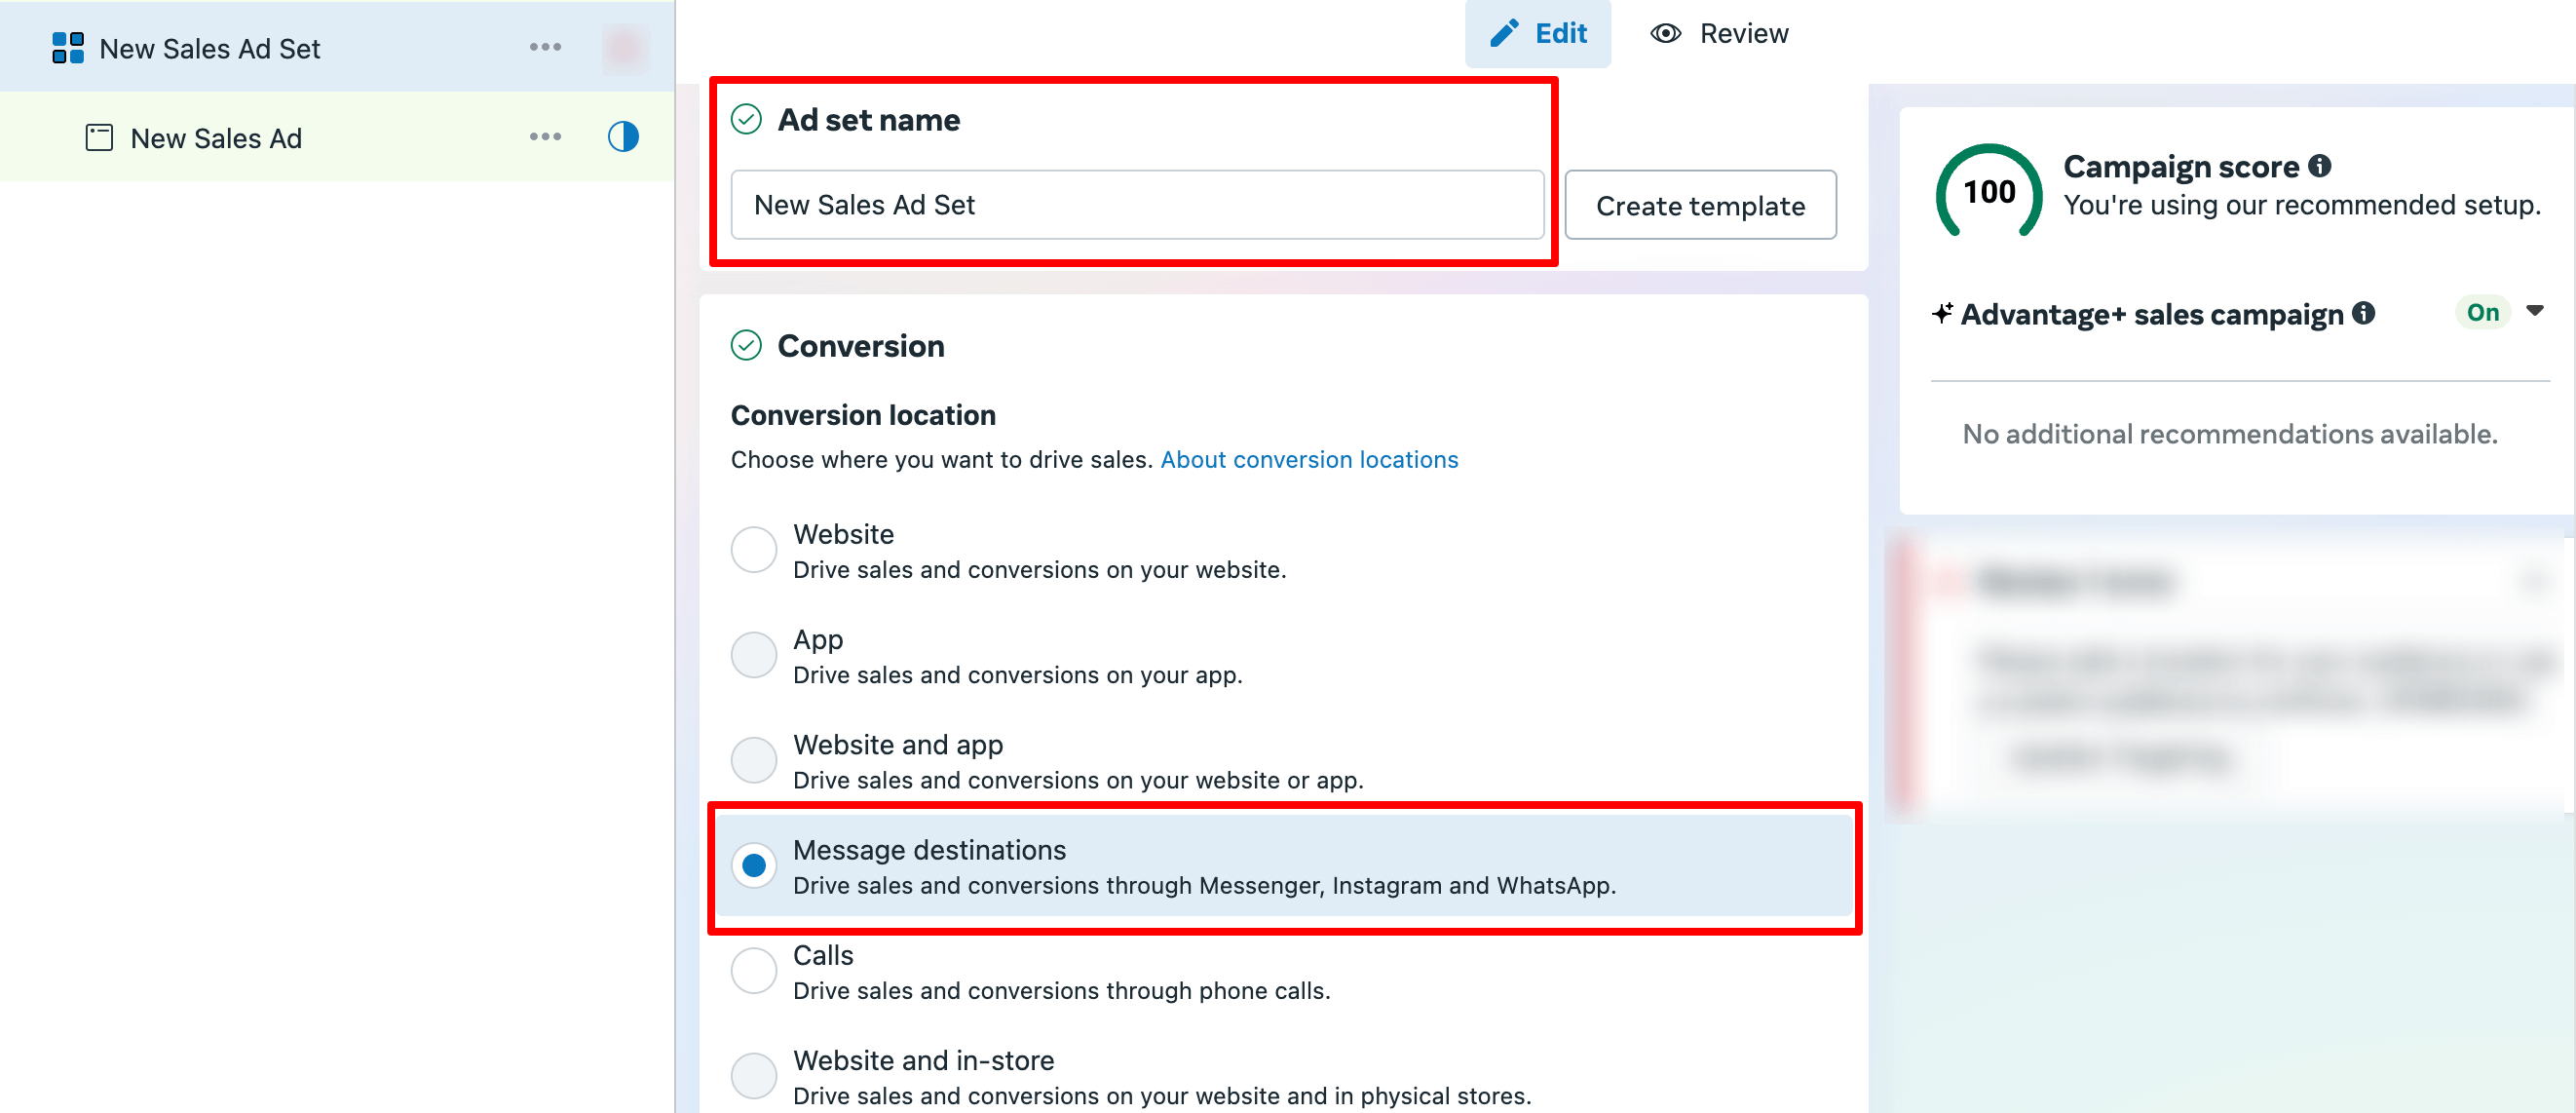
For this tutorial, we are choosing the Message destination because we want our customers to reach out to us through Messenger, WhatsApp, and Instagram.
(iii) Select Your Facebook Page
Below that, confirm the Facebook Page that will represent your business in the ad.
(iv) Choose Message Destinations (If Applicable)
If you picked message destinations, select which apps you want messages through:
- Messenger
You can select one or multiple options. For WhatsApp, you may need to connect your phone number.
(v) Set Your Performance Goal
Choose how you want Facebook to optimize your ads. For example, Maximize number of conversations helps get the most messages or contacts from your ad.
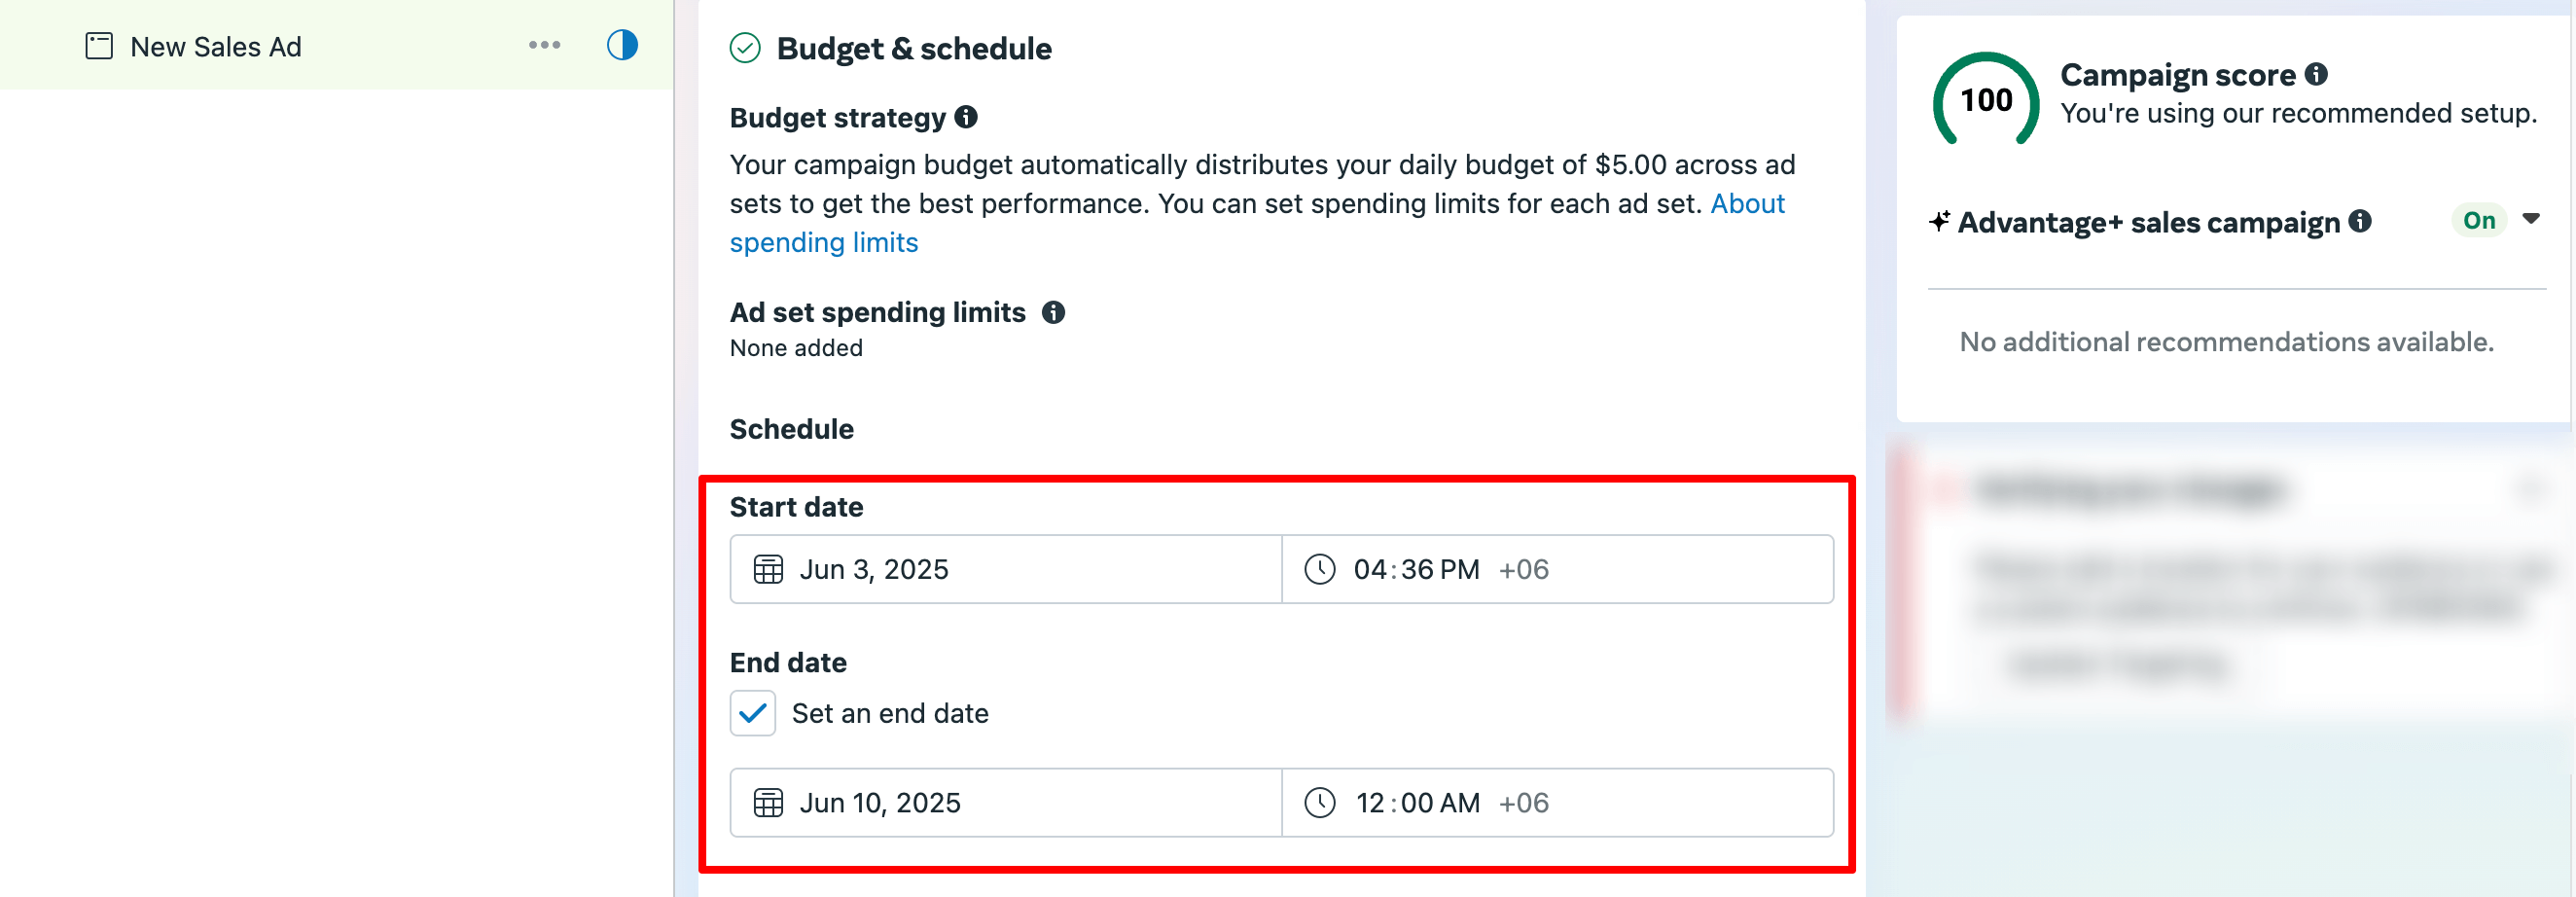
(vi) Budget and Schedule
- Budget Strategy: Facebook may automatically split your budget for the best results.
- Set your daily budget: Decide how much money to spend each day. Start small if you want.
- Schedule: Choose the start date and, optionally, an end date for your ad.
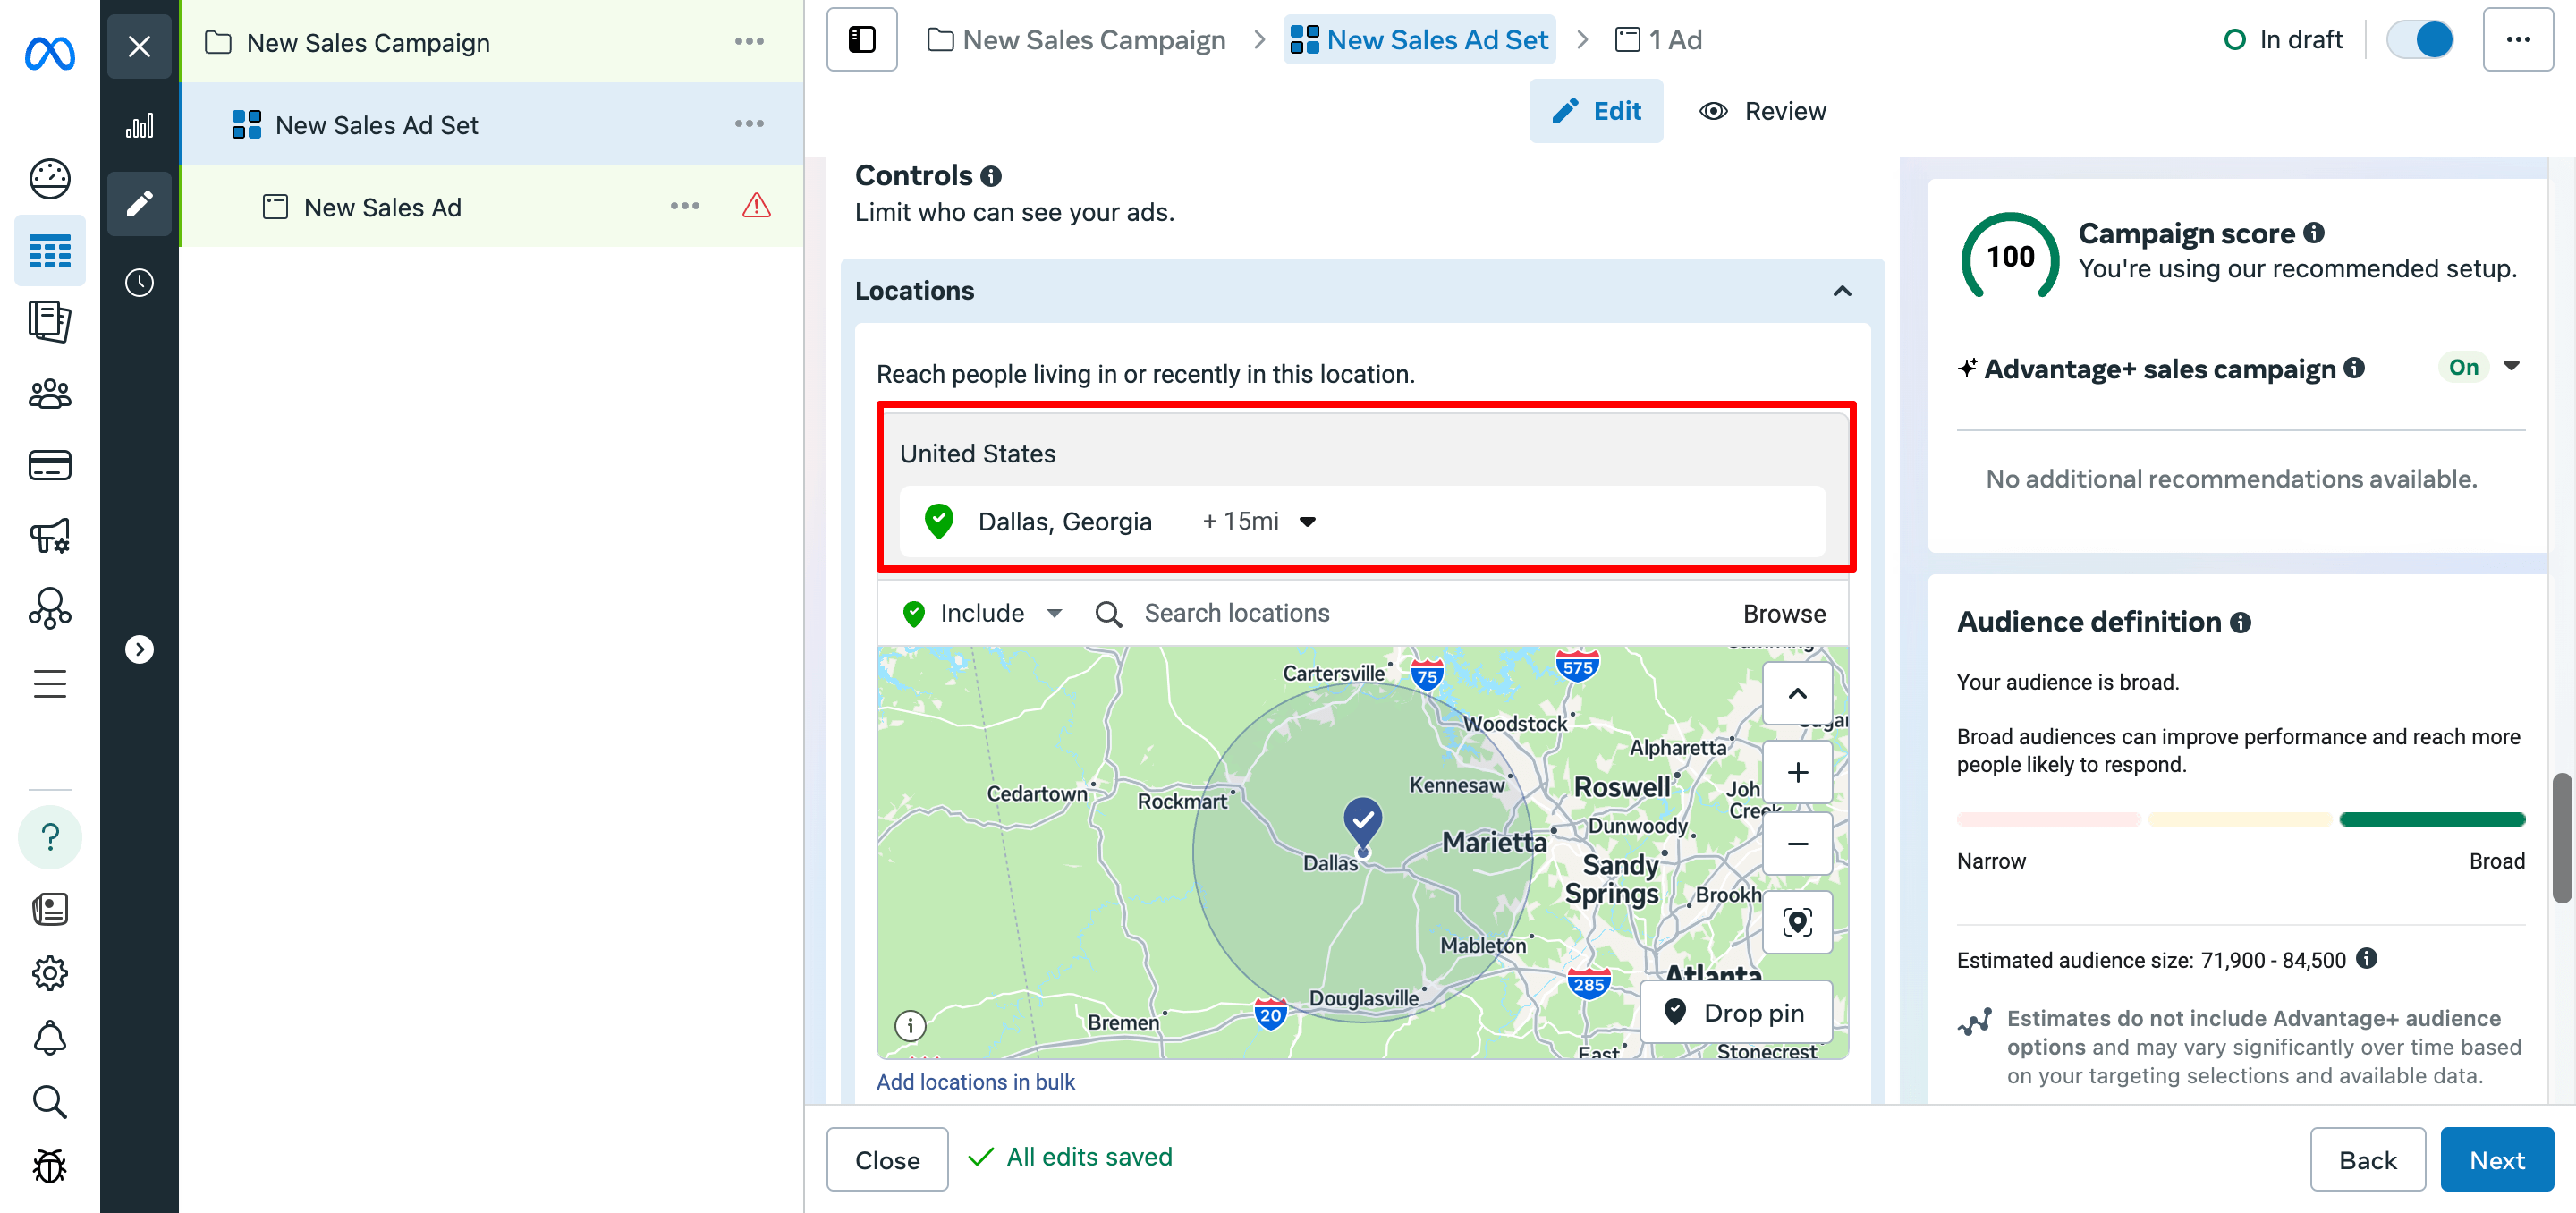
(vii) Define Your Audience
This section controls who sees your ad. If you have a saved audience, you can choose it here, or create a new one. You can limit by location, age, gender, and interests.
To set a location, enter the location name, then set the radius to narrow down the audience. Also, you can exclude any specific area from the location you chose for this campaign.
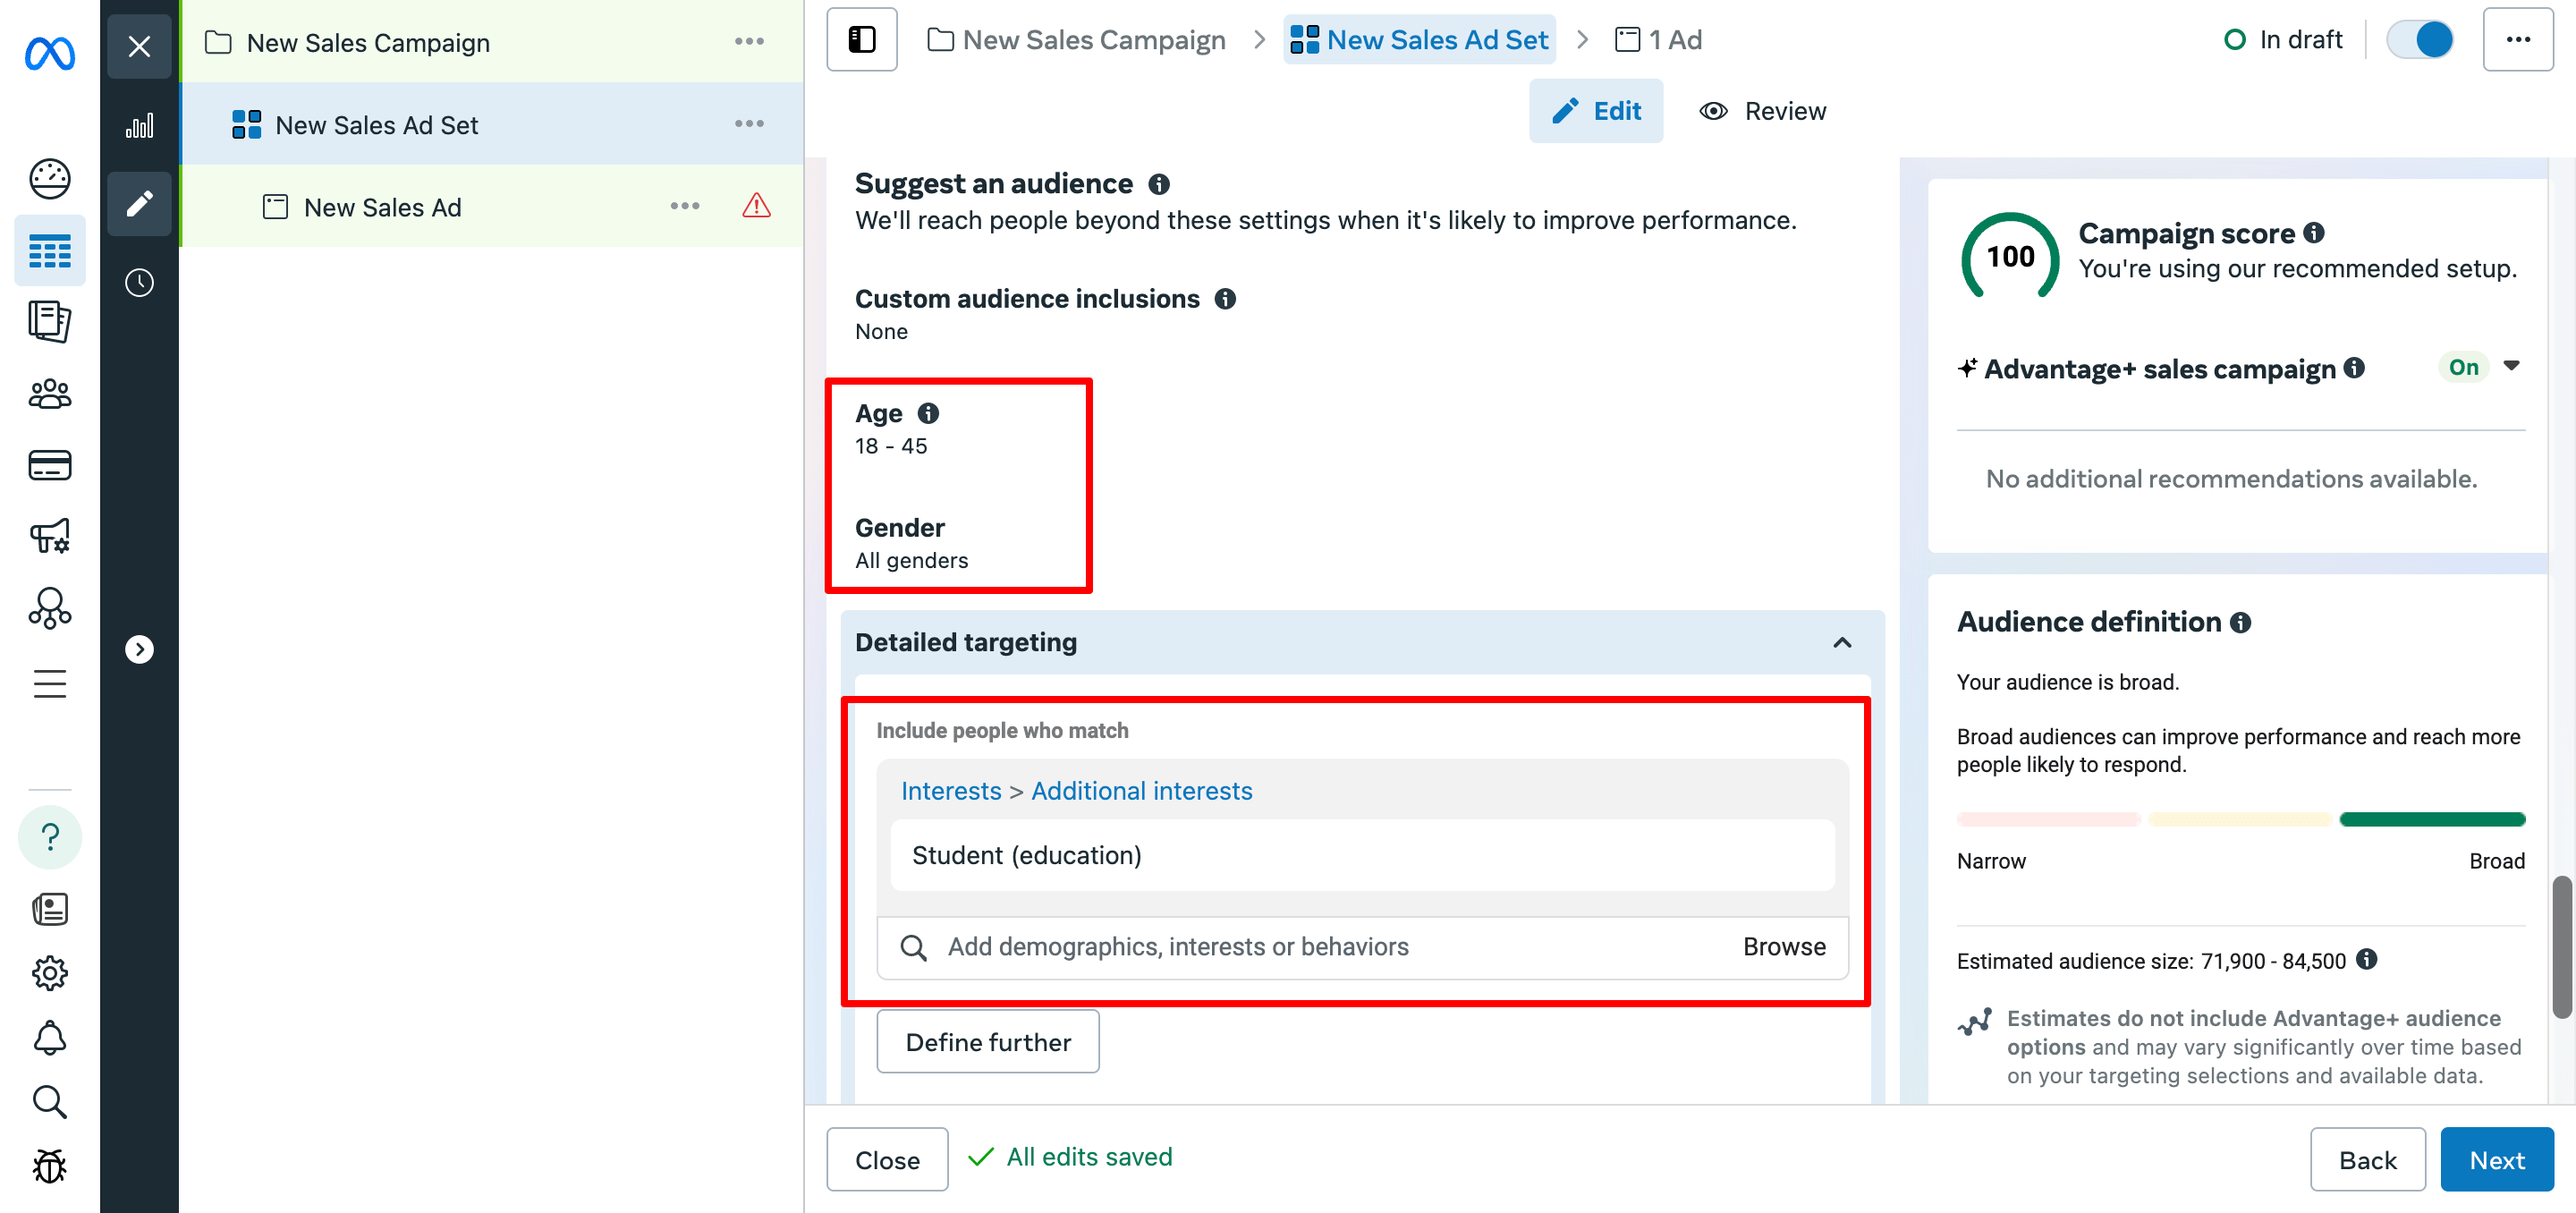
Now, set the audience. To do that, click on the Suggest an audience option and then set the Age and Gender. Also, you can target a more specific audience from the Detailed targeting based on their demographics, interests, or behaviors.
(viii) Placements
Placements are where your ads will appear – Facebook, Instagram, Messenger, Audience Network, etc. Usually, it’s best to keep Automatic Placements on, so Facebook shows your ads where they perform best.
5. Design Your FB Ad
Now that you’ve set up your campaign and ad set, it’s time to create the actual ad – the message and visuals people will see.
(i) Name Your Ad
At the top, you can give your ad a name. Choose something clear like ‘Summer Sale Ad' or ‘New Product Launch.' This helps you find and manage your ads later.
(ii) Partnership Ad (Optional)
You may see a toggle for the Partnership ad. This feature lets you collaborate with creators, brands, or other businesses to improve your ad’s performance. If you’re new, it’s okay to leave this off.
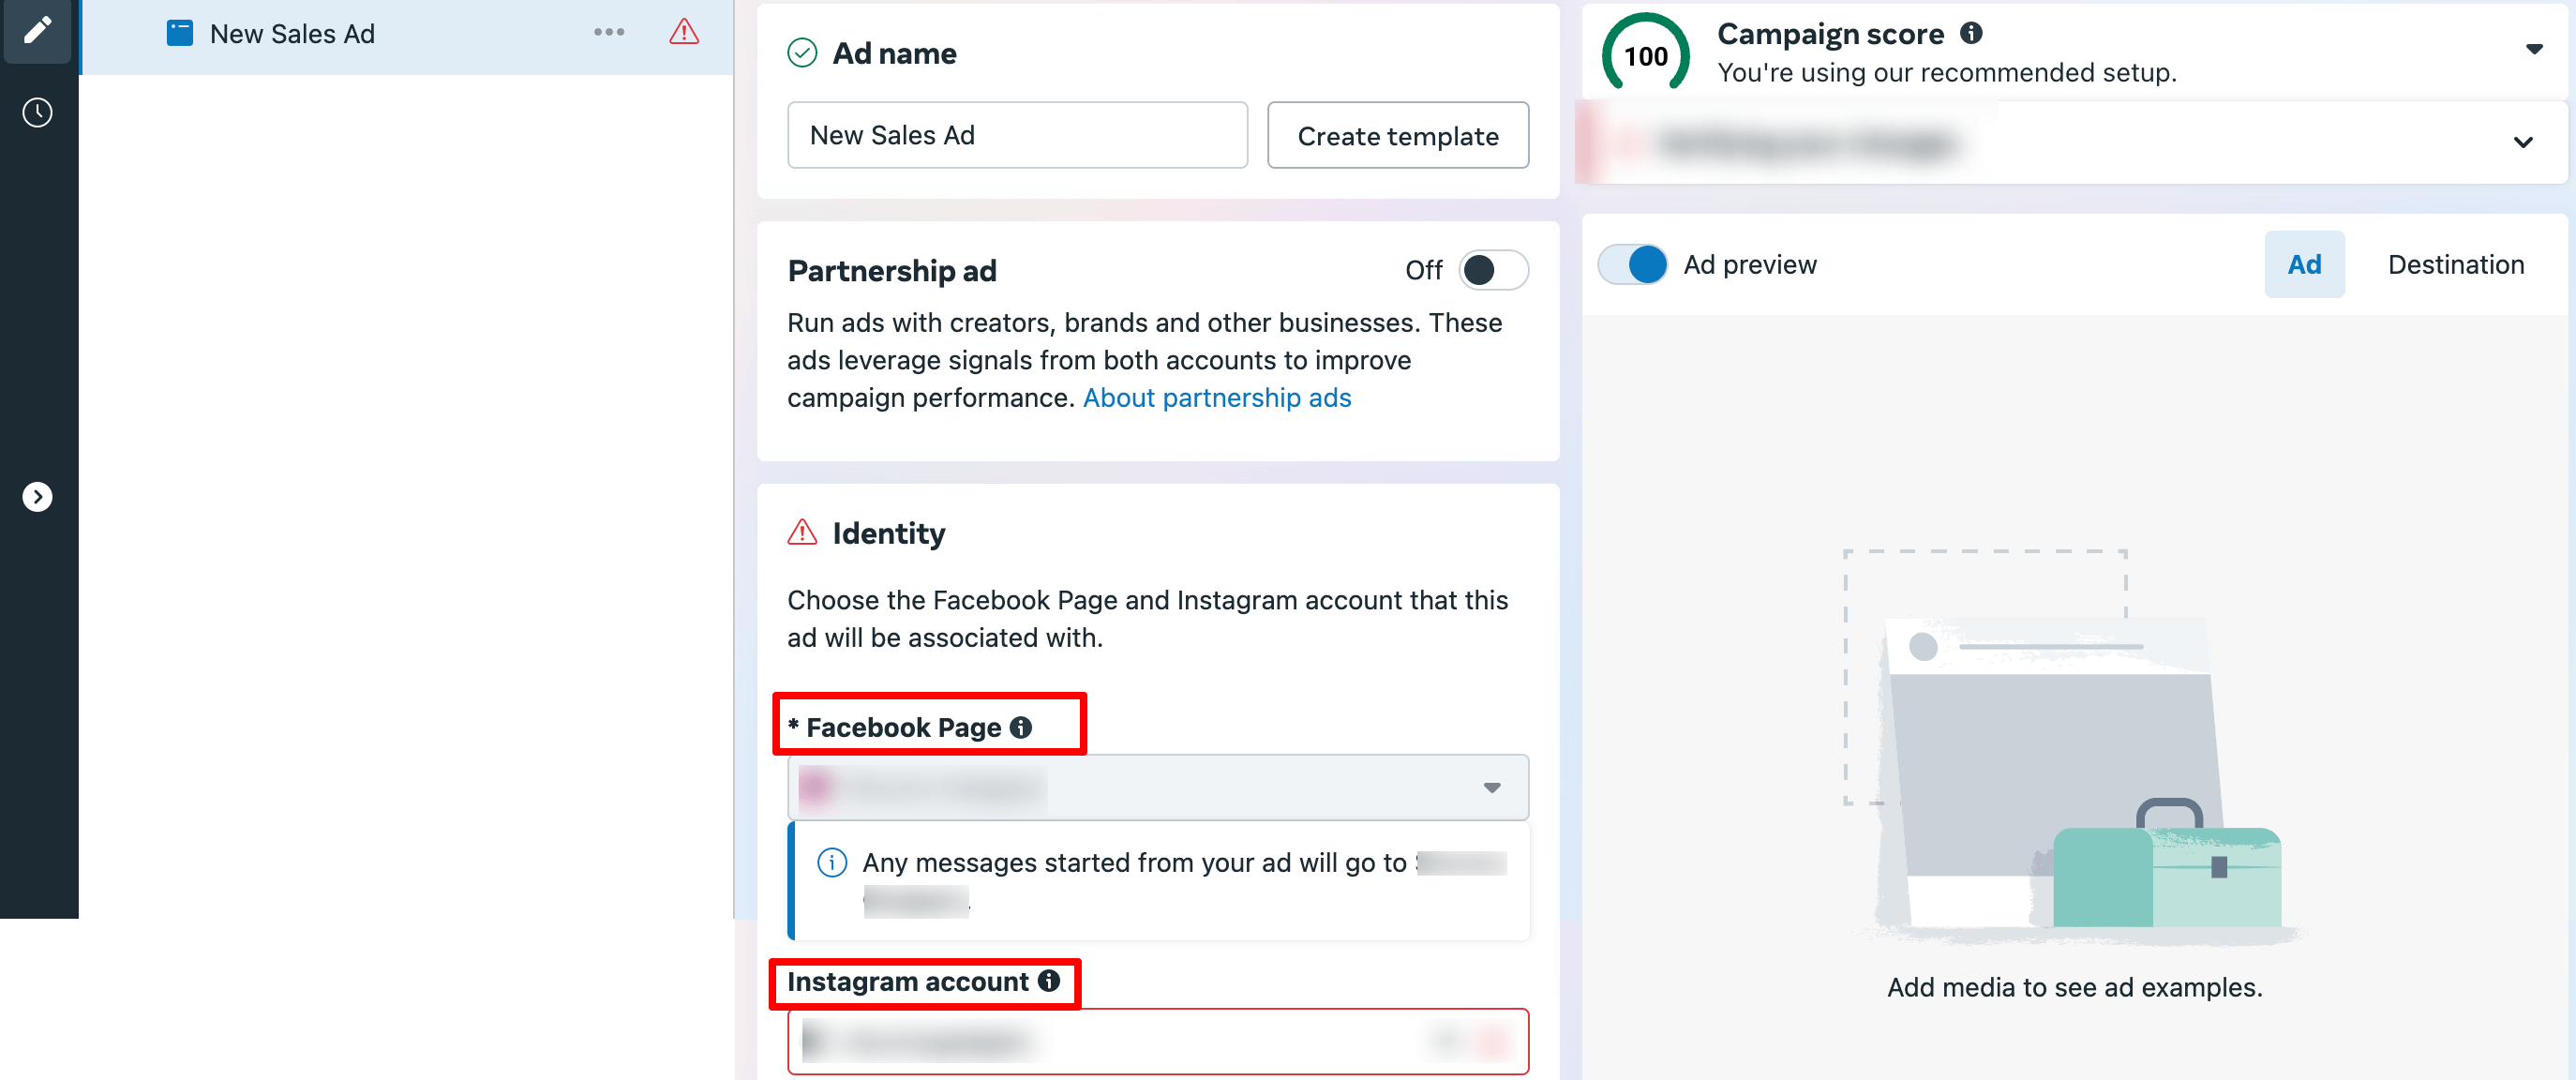
(iii) Identity – Choose Your Facebook Page and Instagram Account
Here, you pick the Facebook Page that will show your ad. This is the page your customers see and interact with.
You can also connect an Instagram account to show your ad on Instagram. This helps you reach people who use Instagram as well.
Note: The Instagram account needs a profile picture for your ads to run there. If you don’t have one, either add a photo to your Instagram profile or skip Instagram for now.
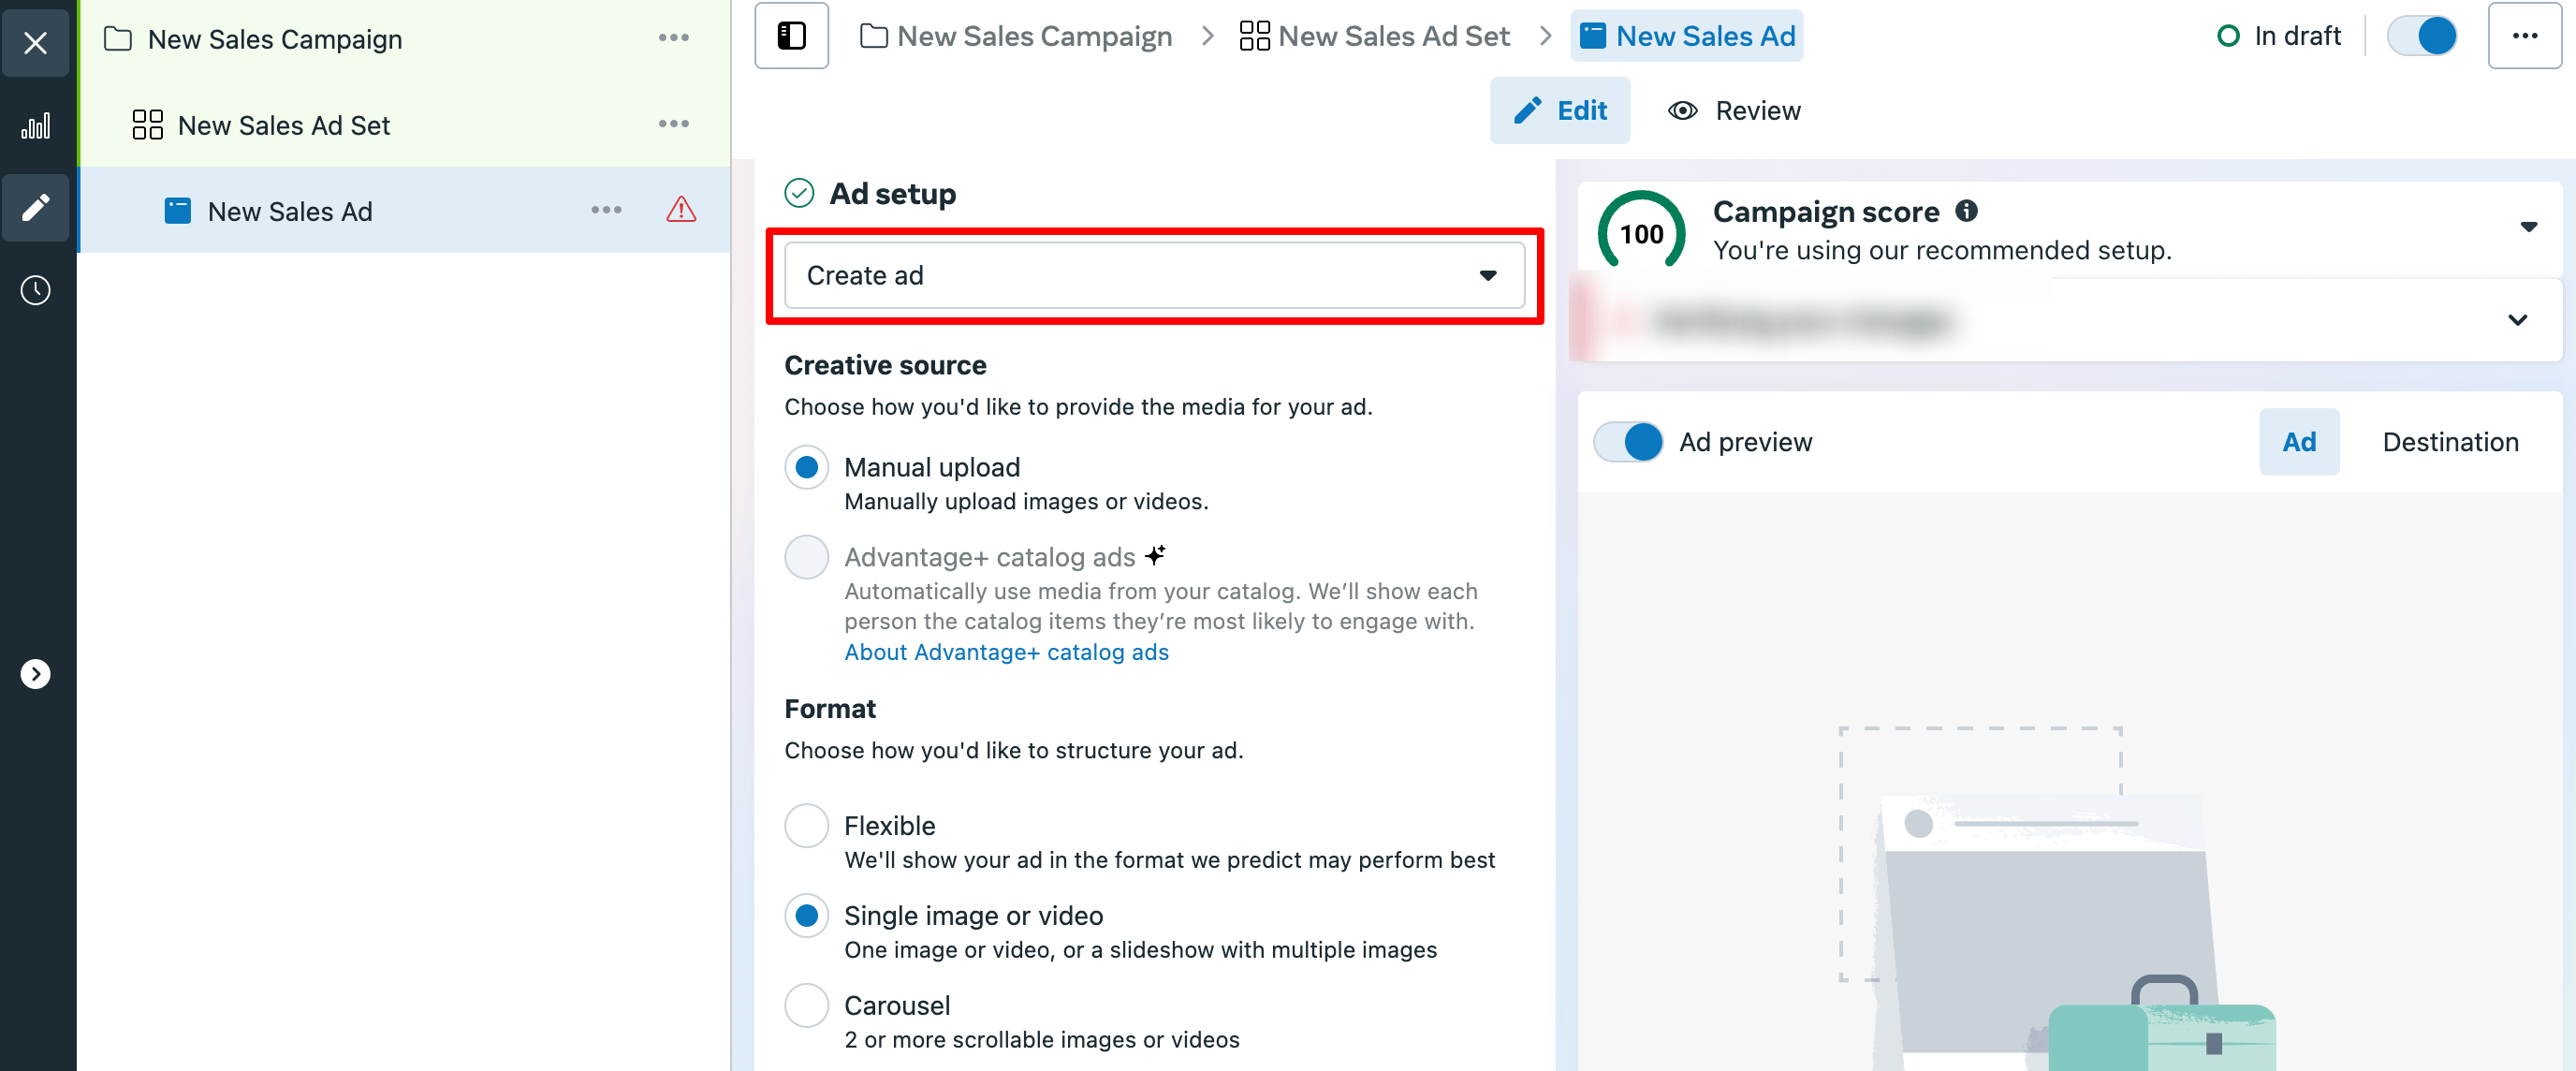
(iv) Ad Setup
Choose how to create your ad:
- Create ad: Build a new ad from scratch with your own images, videos, and text.
- Use existing post: Promote a post you already published on your Facebook Page.
For beginners, creating a new ad is usually the best option.
(v) Creative Source
Decide how you want to add media to your ad:
- Manual upload: Upload your own images or videos.
- Advantage+ catalog ads: Automatically show products from your catalog to people most likely to buy them (useful for ecommerce businesses with product catalogs).
(vi) Format
Pick how your ad looks:
- Flexible: Facebook chooses the best format to show your ad.
- Single image or video: Show one photo or video. This is simple and effective for most beginners.
- Carousel: Show 2 or more scrollable images or videos. Good if you want to showcase multiple products or features.
(vii) Multi-Advertiser Ads (Optional)
This lets your ad appear alongside other ads in the same unit, personalized for viewers. It’s an advanced option you can leave on or off.
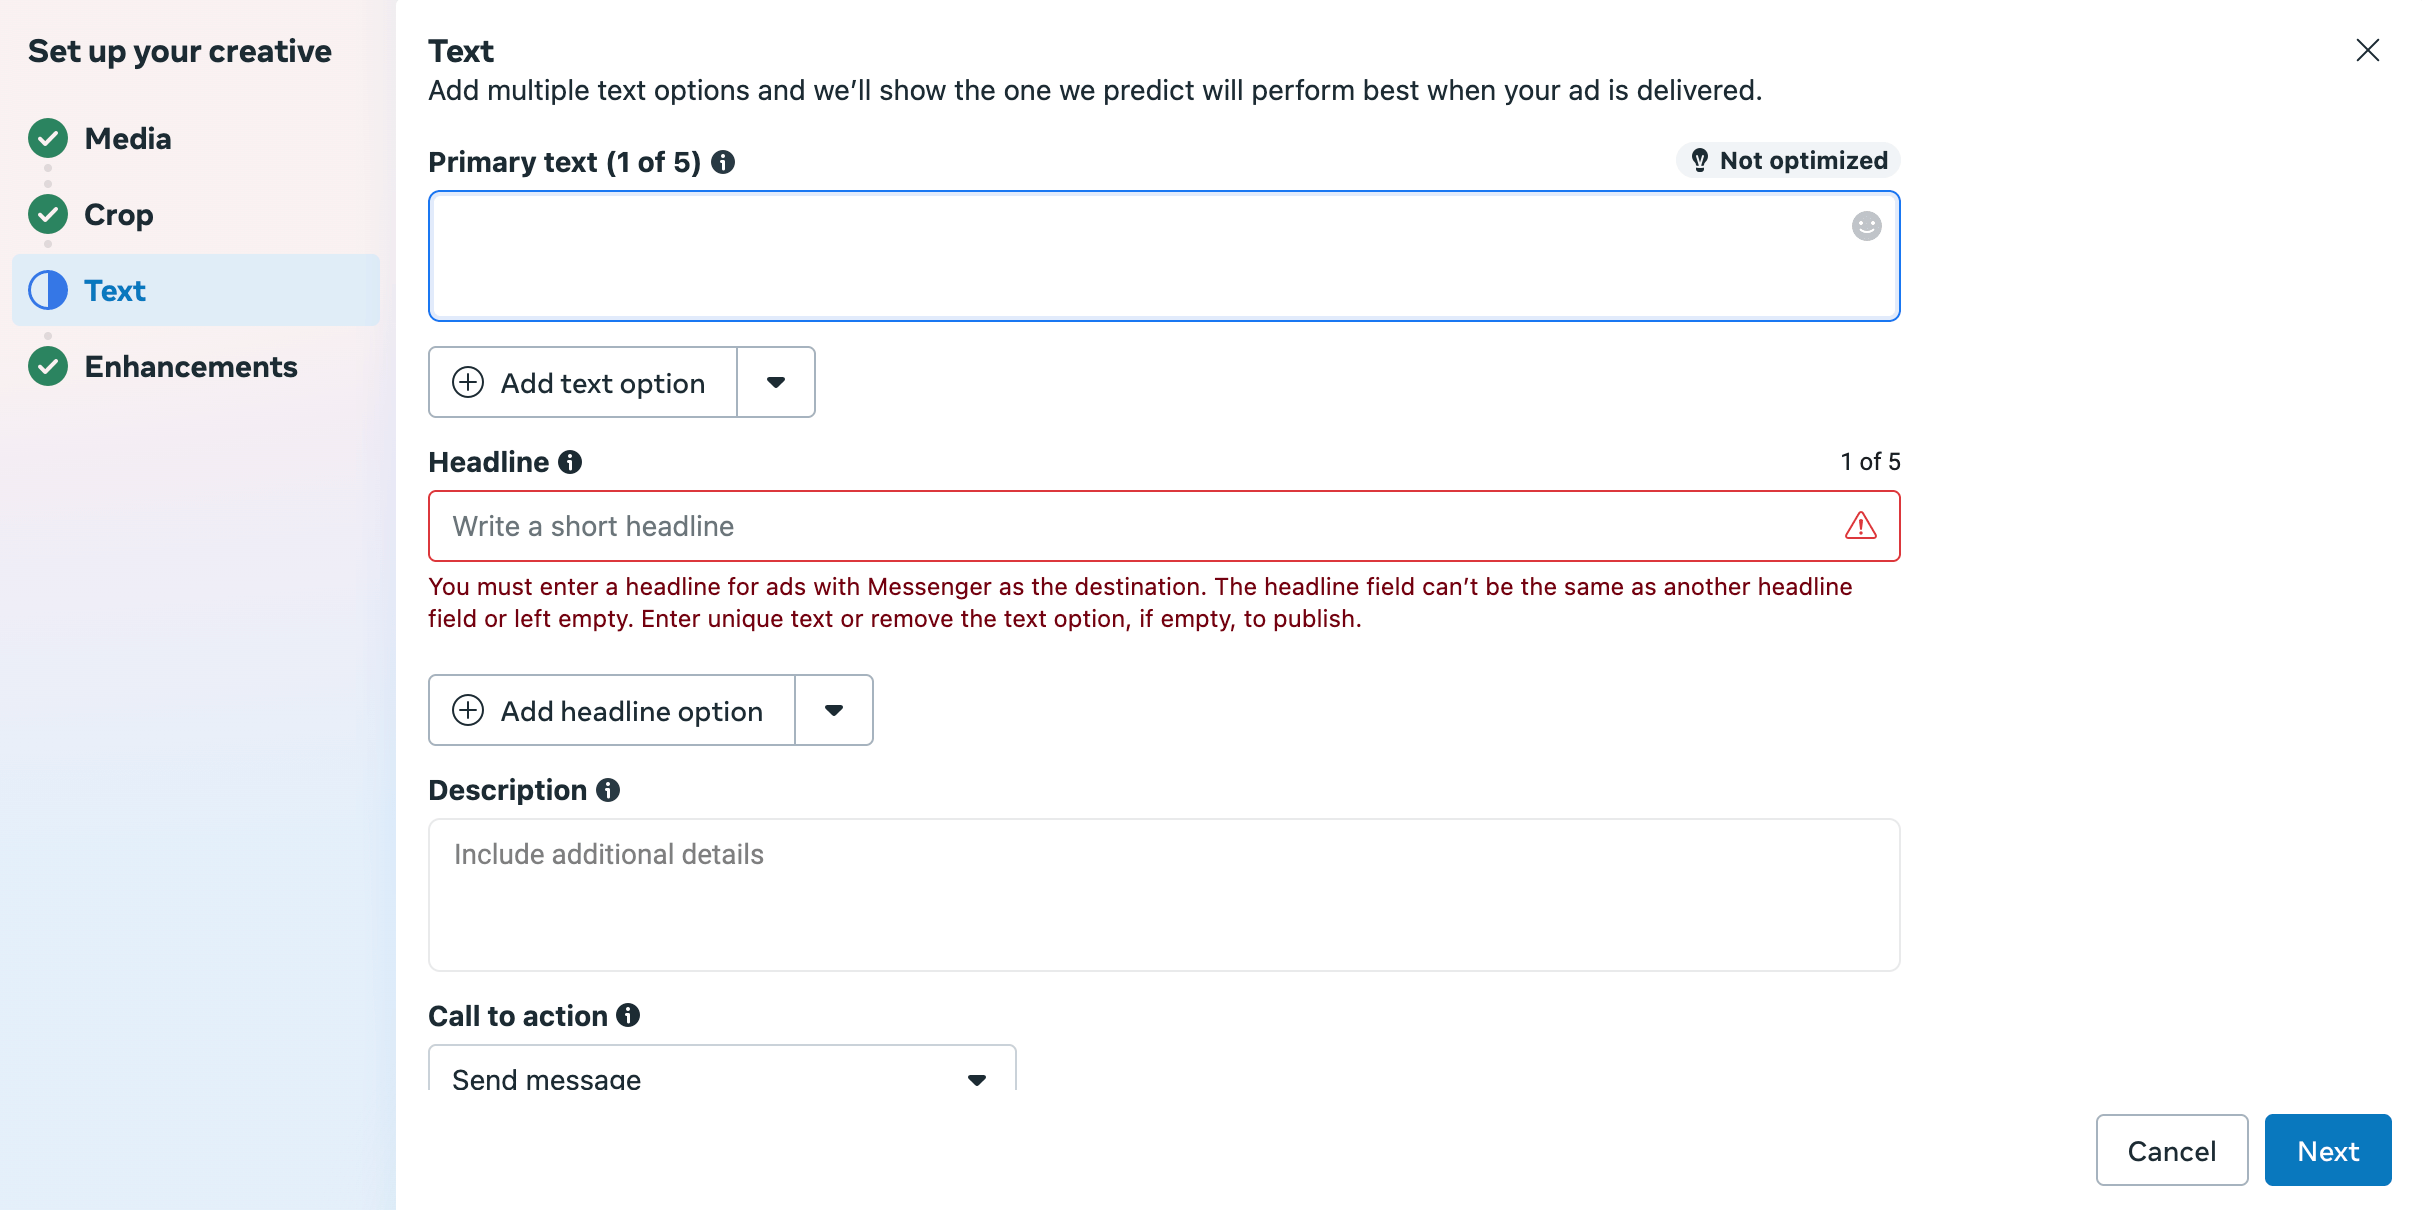
(viii) Ad Creative
Here you add your ad’s media and text:
- Click Set up creative to upload images or videos.
- Add your headline, main text, and call-to-action button (like ‘Shop Now' or ‘Learn More').
Good images and clear, simple text make your ad stand out.
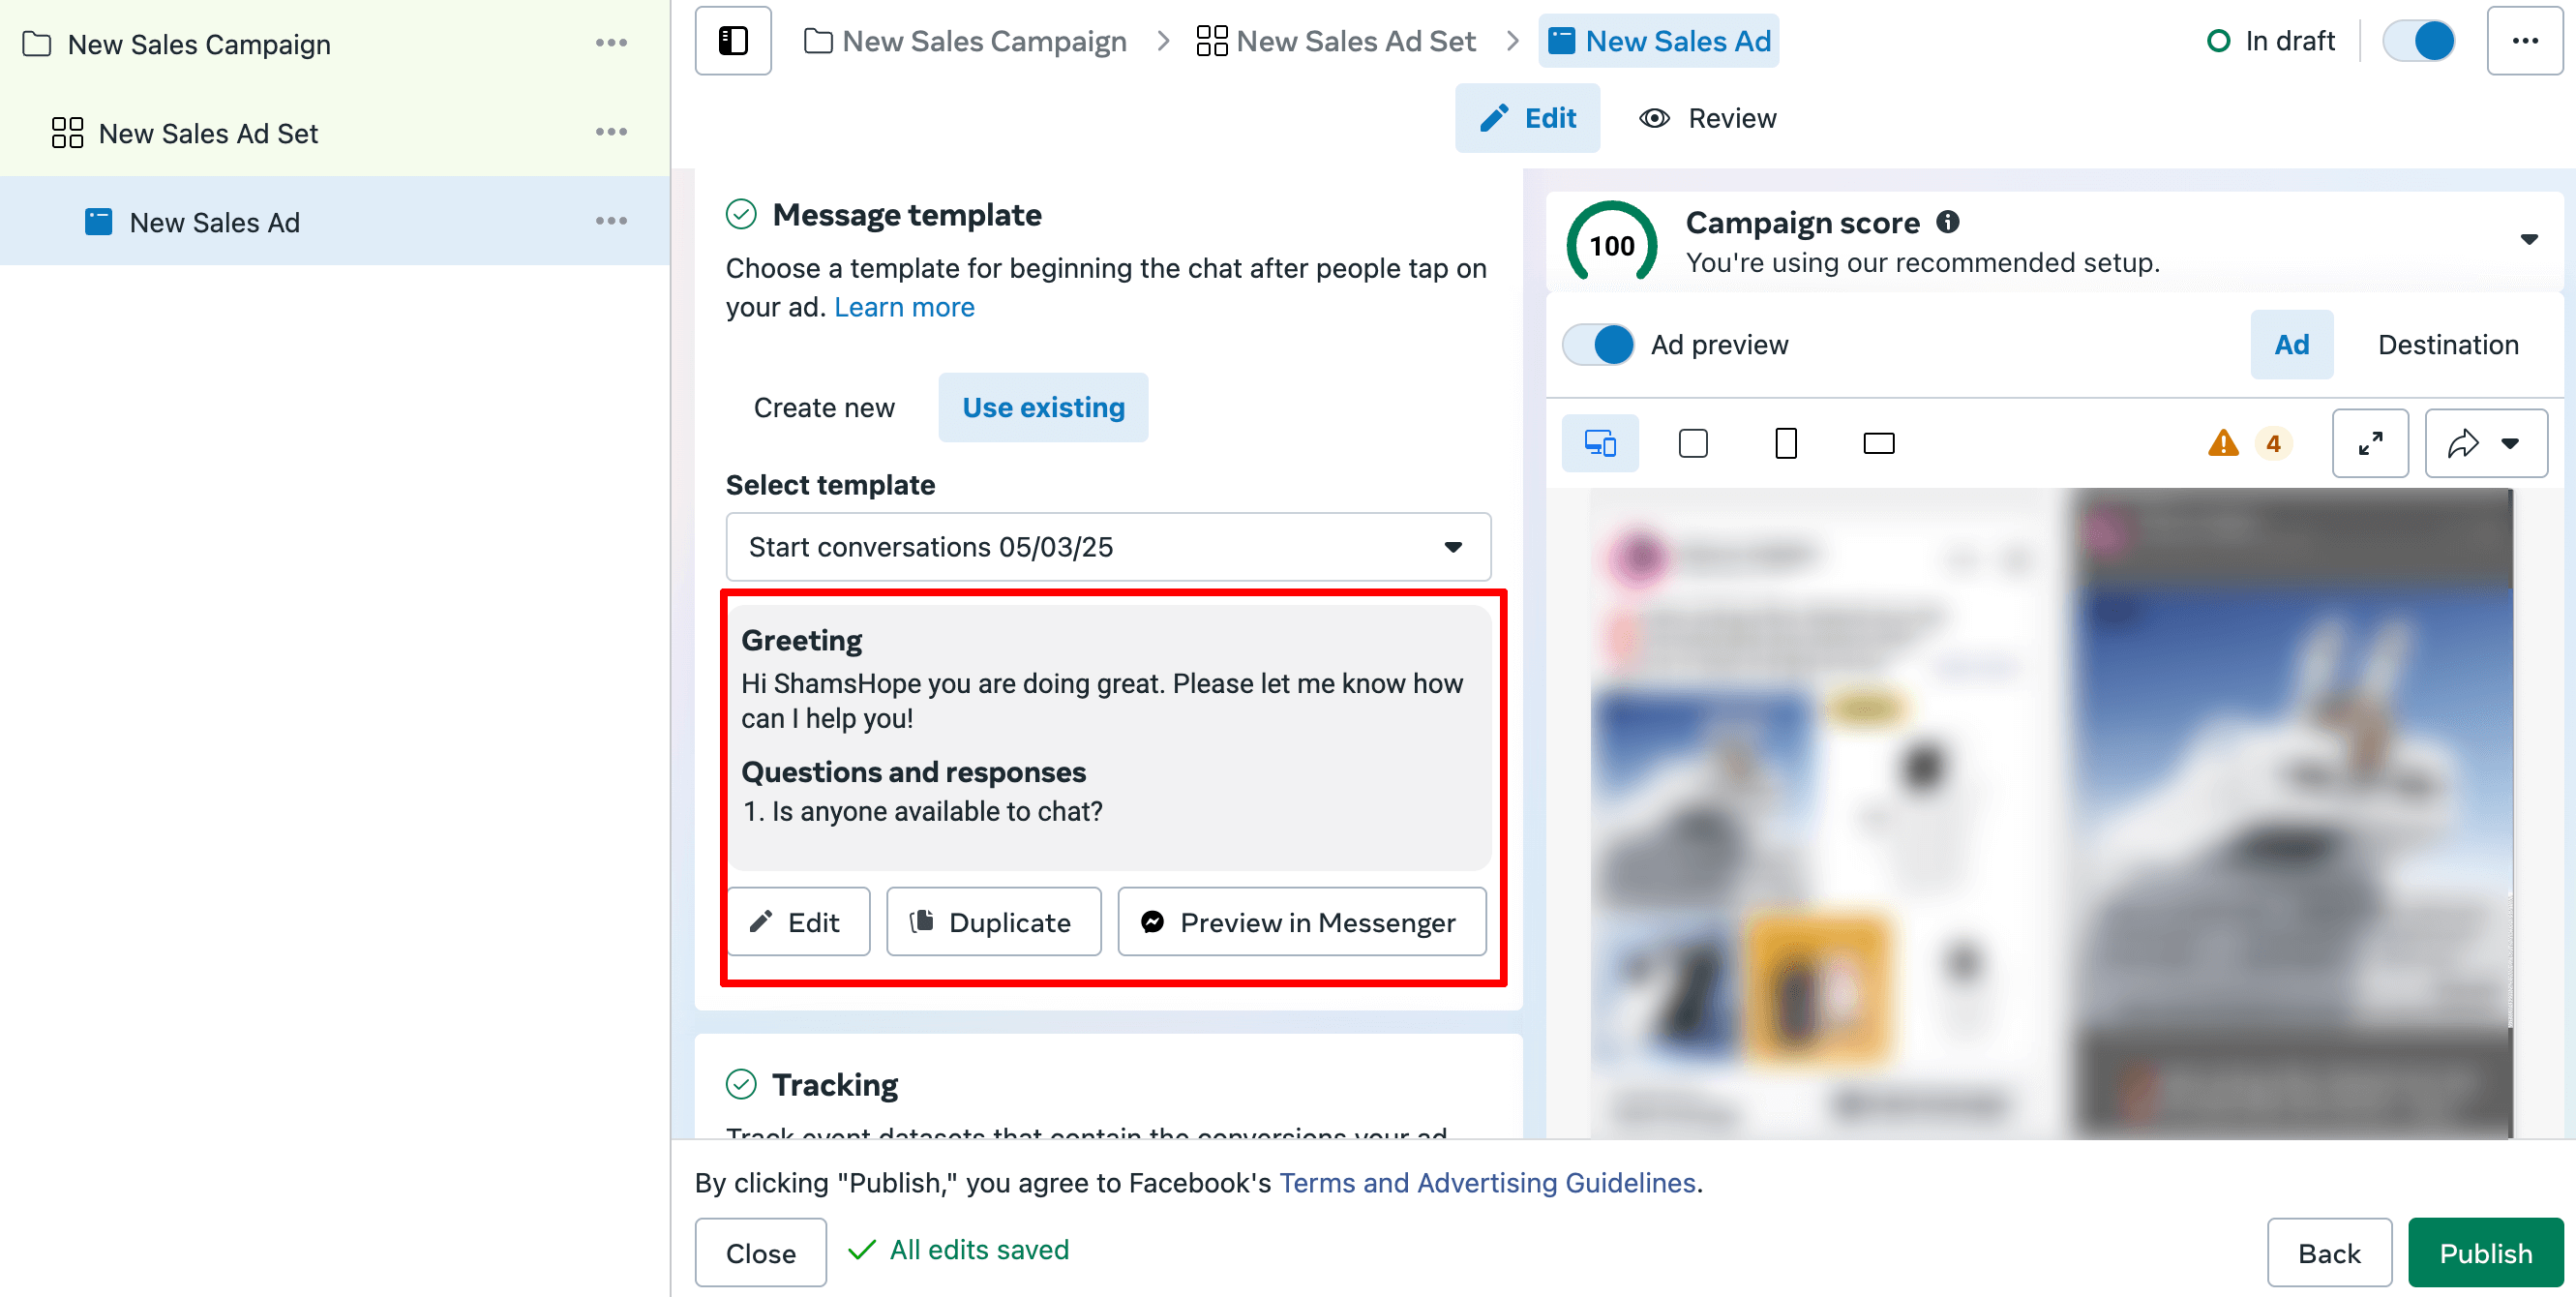
(ix) Message Template (For Message Ads)
Since your campaign focuses on message destinations (Messenger, WhatsApp), you can create a Message template. This is what people see when they click your ad to start a chat.
- You can create a new template or use an existing one.
- Templates include a greeting and suggested questions to encourage conversation.
For example, ‘Hi! How can we help you today?' with options like ‘Tell me more about your product.'
(x) Tracking (Optional)
You can set up tracking to measure actions people take after clicking your ad. This is helpful if you want detailed reports on sales, sign-ups, or other goals. Beginners can skip this for now and add it later as they grow.
(xi) URL Parameters (Optional)
This is for adding extra info to your website URL to track where visitors come from. Most beginners don’t need to worry about this right now.
6. Review and Publish Your Facebook Ad
Before you hit that ‘Publish' button, take a moment to review everything.
Double-check your ad copy. Look for typos, missing info, or anything that sounds off. Make sure your image or video looks good on both mobile and desktop.
Preview how the ad will appear in different placements like Facebook Feed, Instagram Stories, or Messenger. If something feels off, fix it now.
Also, check your audience settings. Make sure your budget and schedule look right.
Once everything looks good, click Publish. Facebook will review your ad. If it meets the guidelines, it’ll go live.
That’s it! Your ad is now out in the world.
Here is a quick checklist to check before publishing your FB ad:
- Ad objective is correctly selected
- The target audience is well-defined (location, age, interests, etc.)
- Budget and schedule are set properly
- Ad copy is clear, error-free, and engaging
- Headline grabs attention
- CTA (Call to Action) is relevant and active
- Image/video is high-quality and properly sized
- Ad preview looks good on all placements (mobile & desktop)
- URL and landing page work perfectly (if you’re sending traffic somewhere)
- Facebook Pixel is installed (if using for tracking)
- Compliance with Facebook Ad Policies checked
- Final review done – everything looks good
That's all! That's how you can run a Facebook ad, no matter if you are launching it for the first time.
How to Run a Facebook Ad – Common FAQs
Once you publish your ad, Facebook reviews it to ensure it meets policies. This usually takes a few minutes to a few hours. After approval, your ad will start running based on your schedule.
Yes! You can run ads that promote your Facebook Page, Instagram profile, or encourage people to send messages without needing a website.
The minimum daily budget depends on your campaign objective, but typically it starts around $1 to $5 per day. Small budgets are good for testing before scaling.
To stop or pause a Facebook ad, go to Ads Manager, find your active campaigns, and toggle the switch next to your ad to pause or resume it anytime.
Yes. You can target audiences globally or specific countries, cities, or regions, depending on where you want to reach customers.
Are You Ready to Run a Facebook Ad?
Starting your first Facebook ad might feel a bit scary, but now you have a clear path to follow. Facebook ads can help you reach new customers, grow your business, and get real results, even if you’re on a small budget.
You’ve learned the important steps to set up your campaign, choose your audience, design your ad, and track how it performs. The next move is simple – take action.
So, are you ready? Go ahead and launch your Facebook ad today!
If you are wondering what the difference is between a Facebook ad and a Google ad, here is our detailed guide on Google Ads vs Facebook Ads for you.
Now, if you have any confusion or face any difficulties while launching your FB ad, feel free to share that with us in the comment box. We would love to help you grow.