How to Build a Frontend User Profile in WordPress (Complete Guide)
If you've ever handed a paying subscriber a wp-admin screen to complete their profile, you already know the reaction.
Confusion. Friction. Sometimes panic.
Users expect a clean, branded profile page that feels like part of your website. But WordPress gives them a backend editor built for site administrators, not normal people trying to update a bio, upload a file, or manage their account.
It’s unfriendly on mobile. There are no custom fields, no profile photo upload worth speaking of (Gravatar dependency, really?), and zero visual connection to your brand.
For a blog with five contributors, none of this matters much. For a membership community, an online course platform, or a staff directory, it's a conversion killer and a trust problem.
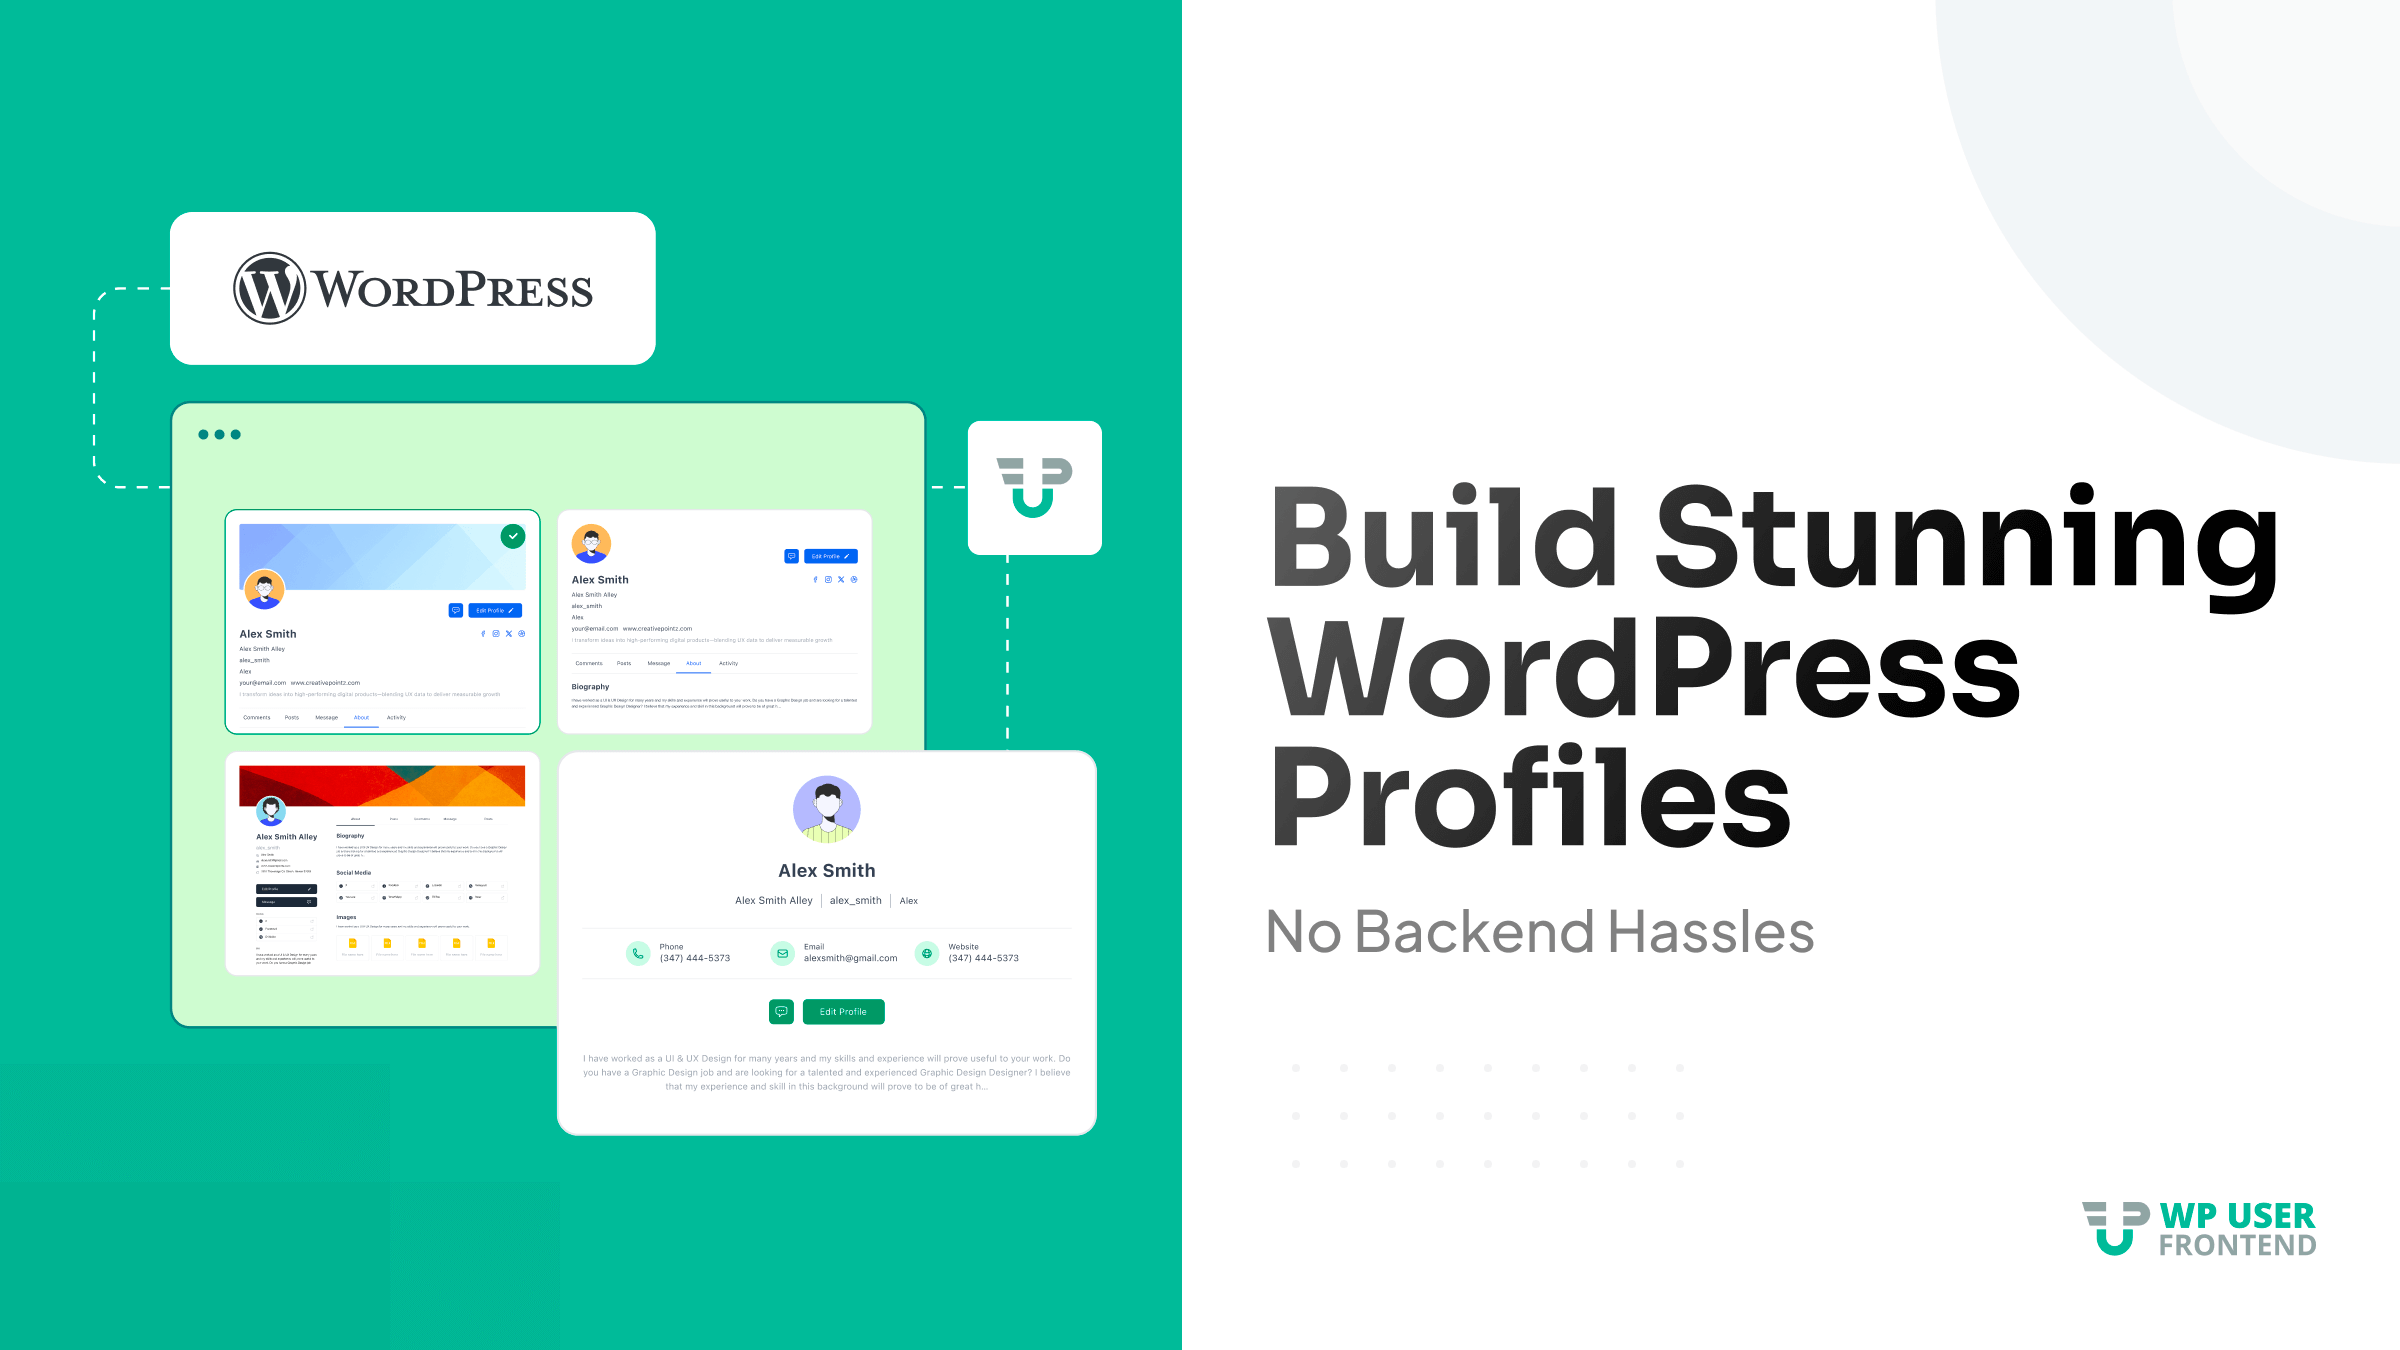
That’s where frontend user profiles come in. With WP User Frontend Pro, you can let users register, edit profiles, and manage their accounts entirely from the frontend without ever touching the backend.
What Is a Frontend User Profile in WordPress?
A frontend user profile management system lives entirely within your branded website, rather than in the WordPress admin panel (wp-admin). Users log in, view their dashboard, and update their information on pages that look and feel like the rest of your site, not like a CMS backend.
In practice, “frontend” means the user never needs to visit /wp-admin for anything. Every interaction happens on pages you design and control.
A complete frontend profile system typically includes several components working together: a registration form for new users, a profile edit form for updating personal information, user's content, account status, and role-based access control so different user types see different things.
Here's how that looks across common site types:
| Profile Type | Who Uses It | Key Fields |
| Student dashboard | LMS platforms | Enrolled courses, progress, certificates |
| Freelancer portfolio | Job boards | Skills, portfolio URL, hourly rate, reviews |
| Member profile | Communities | Bio, interests, social links, membership tier |
| Client portal | Agencies/SaaS | Projects, invoices, downloads, support tickets |
| Alumni website | Universities/Colleges | Bio, batch, major, stories |
The defining characteristic isn't any single feature; it's the experience of staying inside the product you paid for or signed up to use, rather than being redirected to infrastructure.
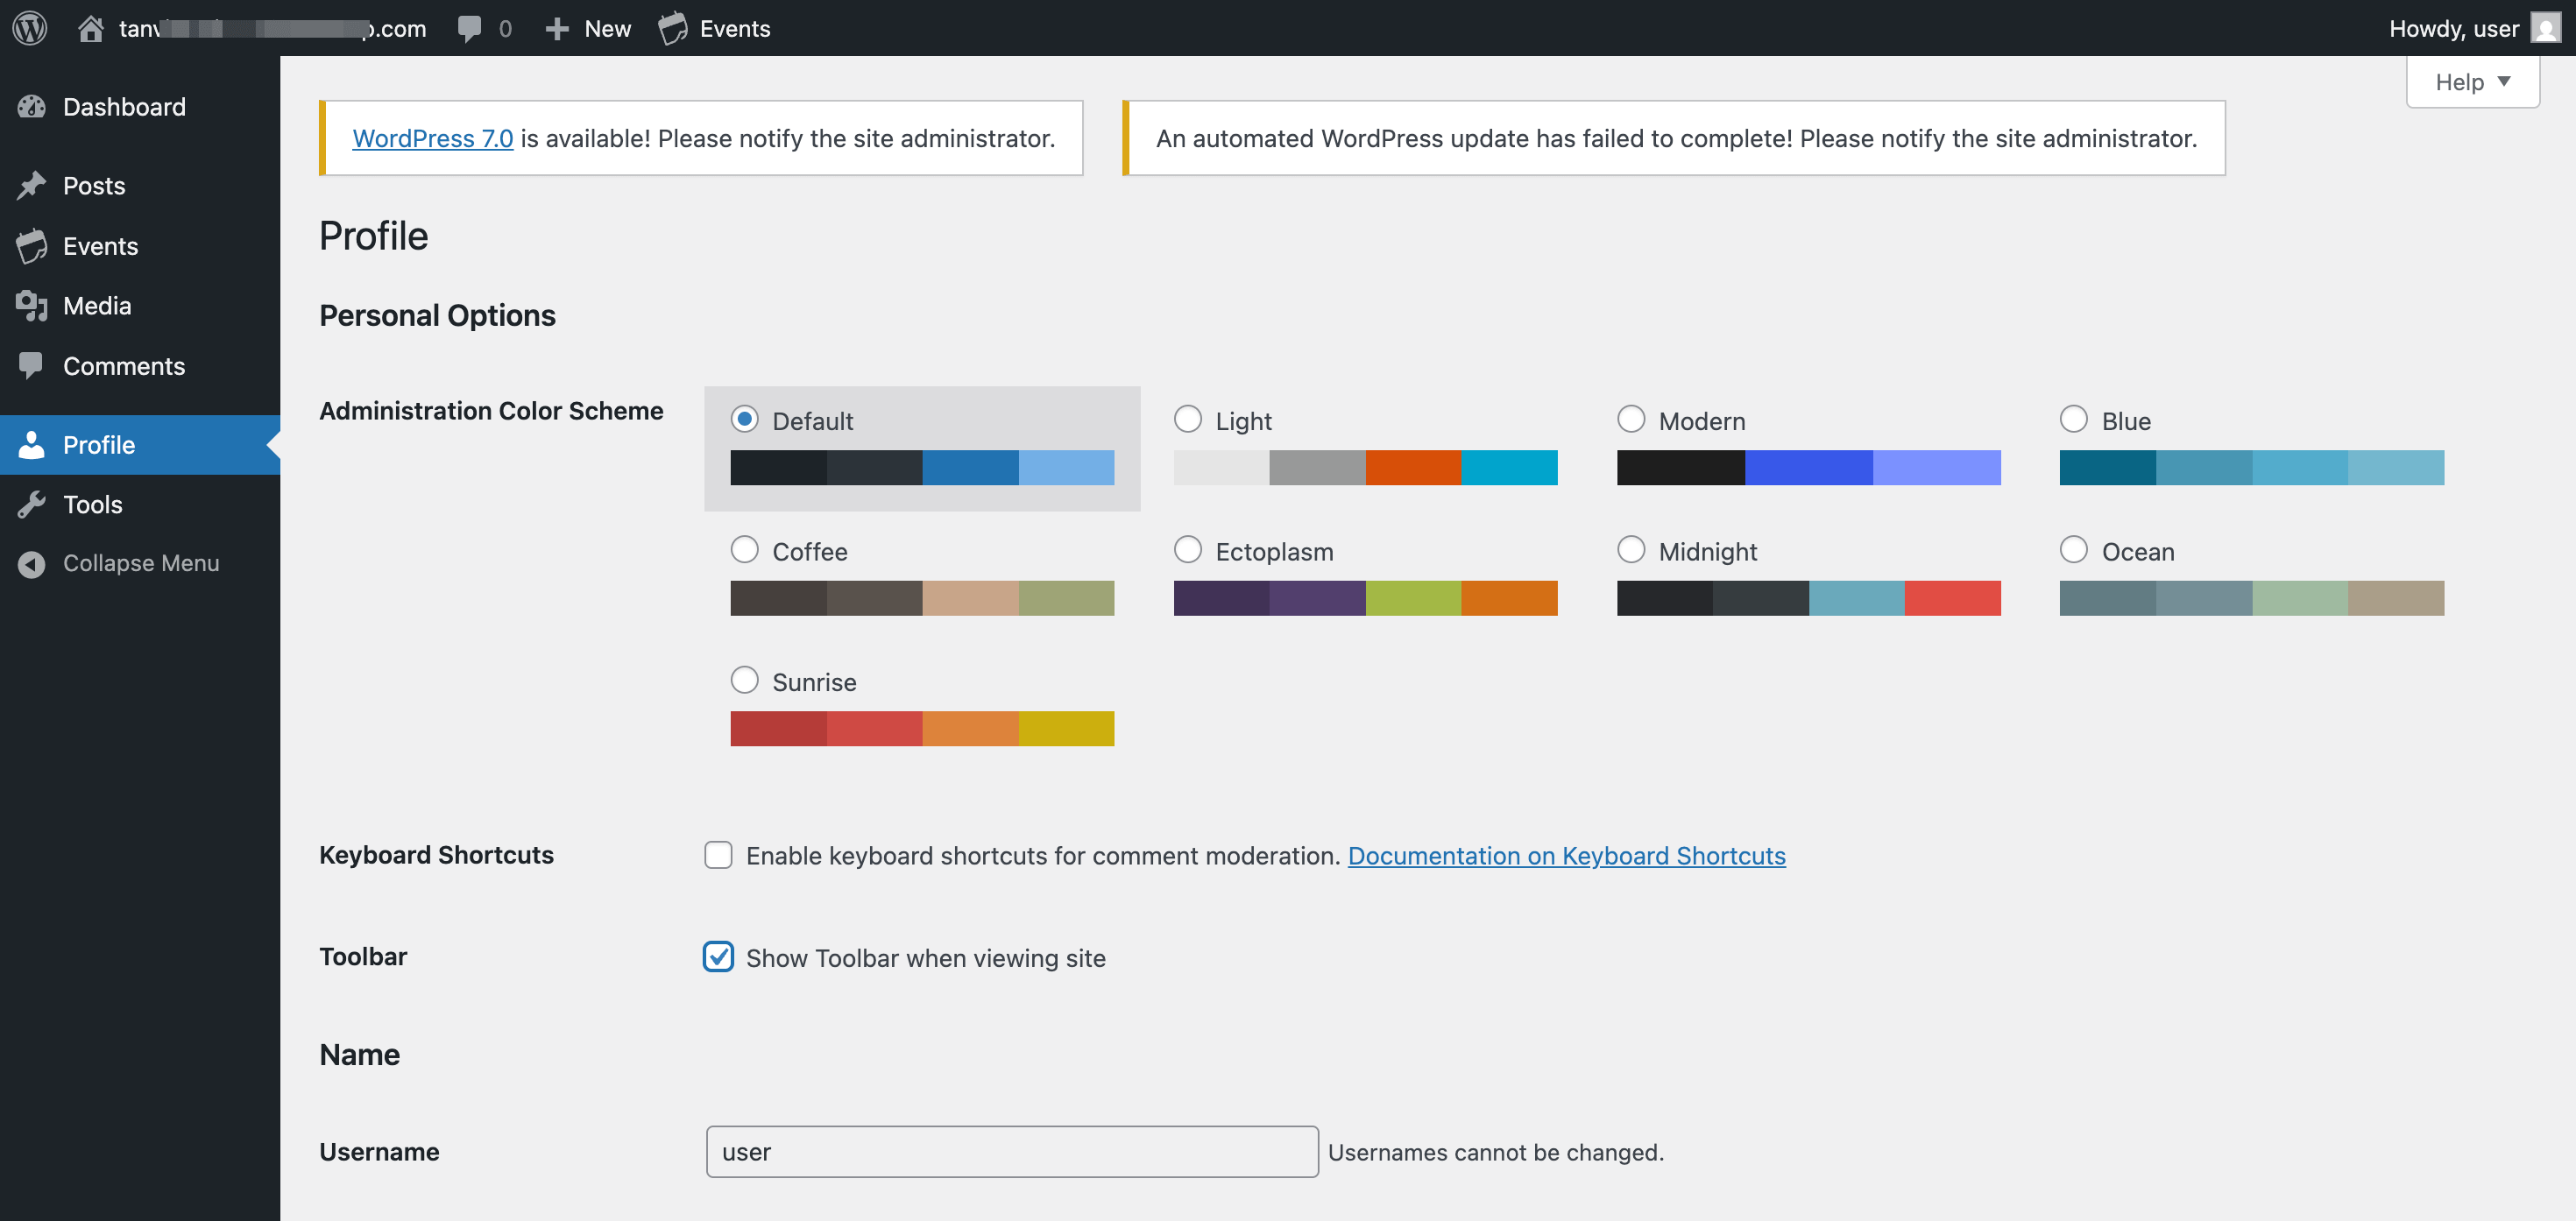
Why Default WordPress User Profiles Fall Short
When users land inside wp-admin, they immediately see plugin notices, admin menus, settings panels, and dashboard widgets they were never supposed to touch.
Even with the Subscriber role, the experience still feels cluttered and technical. And the business cost adds up fast.
Users who struggle to edit their profile usually abandon it halfway through. Users who feel like they accidentally entered the “backend” trust the platform less. Some stop engaging altogether.
Here are the biggest limitations of the default WordPress user profile system.
No Meaningful Custom Fields
The default WordPress profile editor offers: first name, last name, biographical info, and website URL. That's the full list. There's no profile photo upload beyond Gravatar dependency, no social links, no conditional fields, and no way to capture the information that actually matters to your specific community.
A marketplace vendor needs a store name, store logo, and payment details. A course student needs their enrolled programs and completion status. None of that exists in the default system.
Poor Mobile Experience
The wp-admin interface was not built for mobile users. For any community or platform where a meaningful share of users register from their phone, this is a conversion problem from the very first interaction. A mobile user who hits a cramped, unresponsive profile form often doesn't come back.
Security and Permission Risk
By default, WordPress gives you limited control over what happens after login. There's no built-in redirect away from wp-admin. Role confusion during onboarding is common, especially when you have multiple user types. Accidental access to editor-level menus happens more often than most site owners realize, and each instance creates a support ticket or, worse, a quiet exit.
Not Built for Scale
Default profiles work acceptably for a blog with a handful of authors. They start breaking down the moment you need detailed user profiles, student dashboards with assignment progress tracking, or client portals with private file libraries.
The system simply wasn't designed for those kinds of experiences, and no amount of customization will make it feel like it was.
Step-by-Step: How to Build a Frontend User Profile in WordPress
The best way to build profiles in WordPress involves using a plugin. And, WP User Frontend Pro (WPUF) is one of the few WordPress plugins built specifically for frontend user management, profile building, and content submission workflows.
That distinction matters.
WPUF combines frontend registration, profile management, post submission, paid subscriptions, and role-based user experiences inside one system.
For sites that only need a simple profile edit form, several plugins can get the job done.
But if you're building a membership platform or user directory with frontend dashboards and user submissions, WPUF is built for that environment from the start.
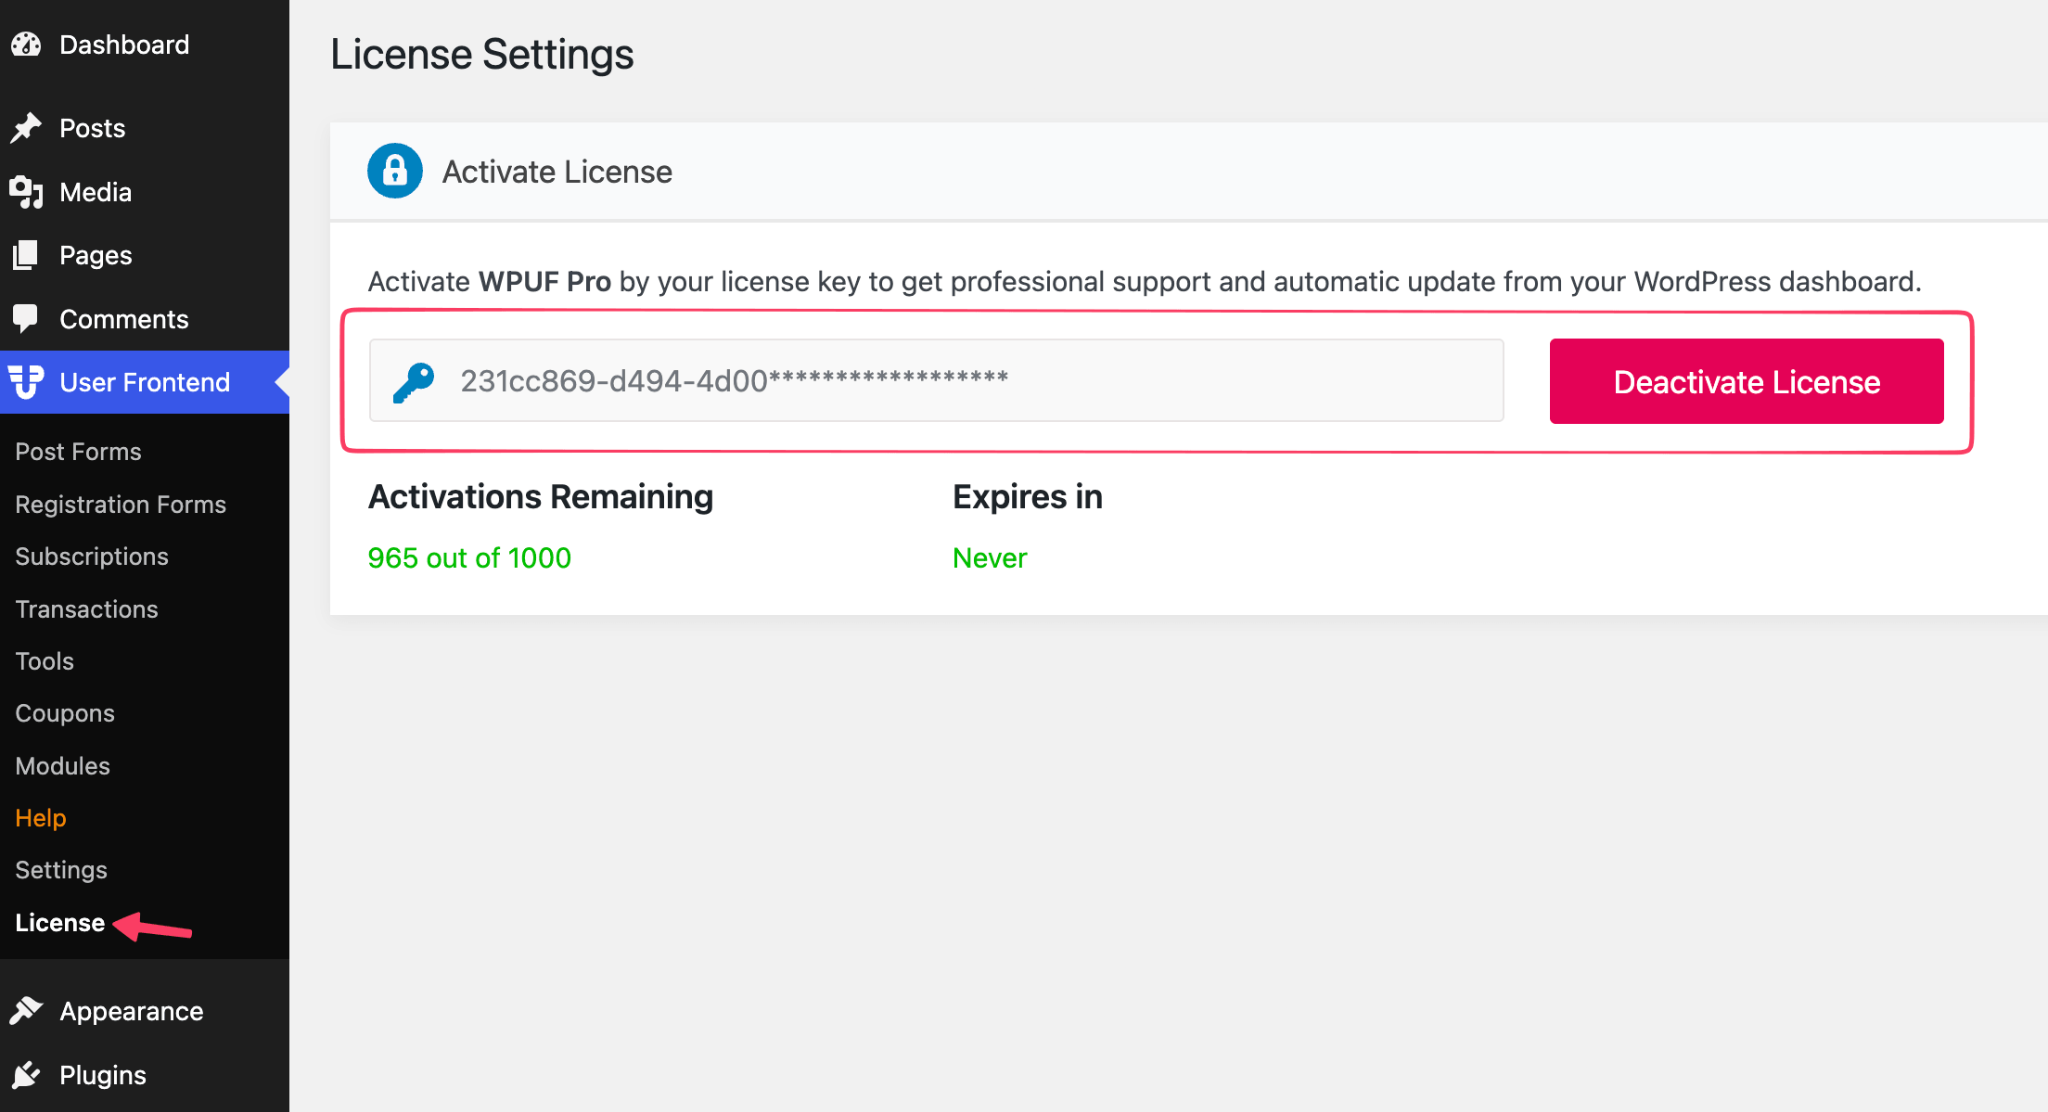
Step 1: Install and Activate WP User Frontend Pro
Since the registration forms creation for users is a Pro feature, you need to buy WP User Frontend Pro to build profiles with this plugin.
Start by downloading the plugin from your weDevs account dashboard. Navigate to Plugins → Add New in your WordPress admin, upload the .zip file, activate the plugin, and enter your license key when prompted.
Once activated, run the setup wizard. This is worth doing before anything else because it creates the core pages your system needs automatically, such as:
- /account — The central hub for all user information and account activity
- /login — The default login page for registered users
- /subscription — The page where all subscription plans are displayed
You can also create these pages by navigating to User Frontend → Tools and clicking on the Install WPUF Pages button.
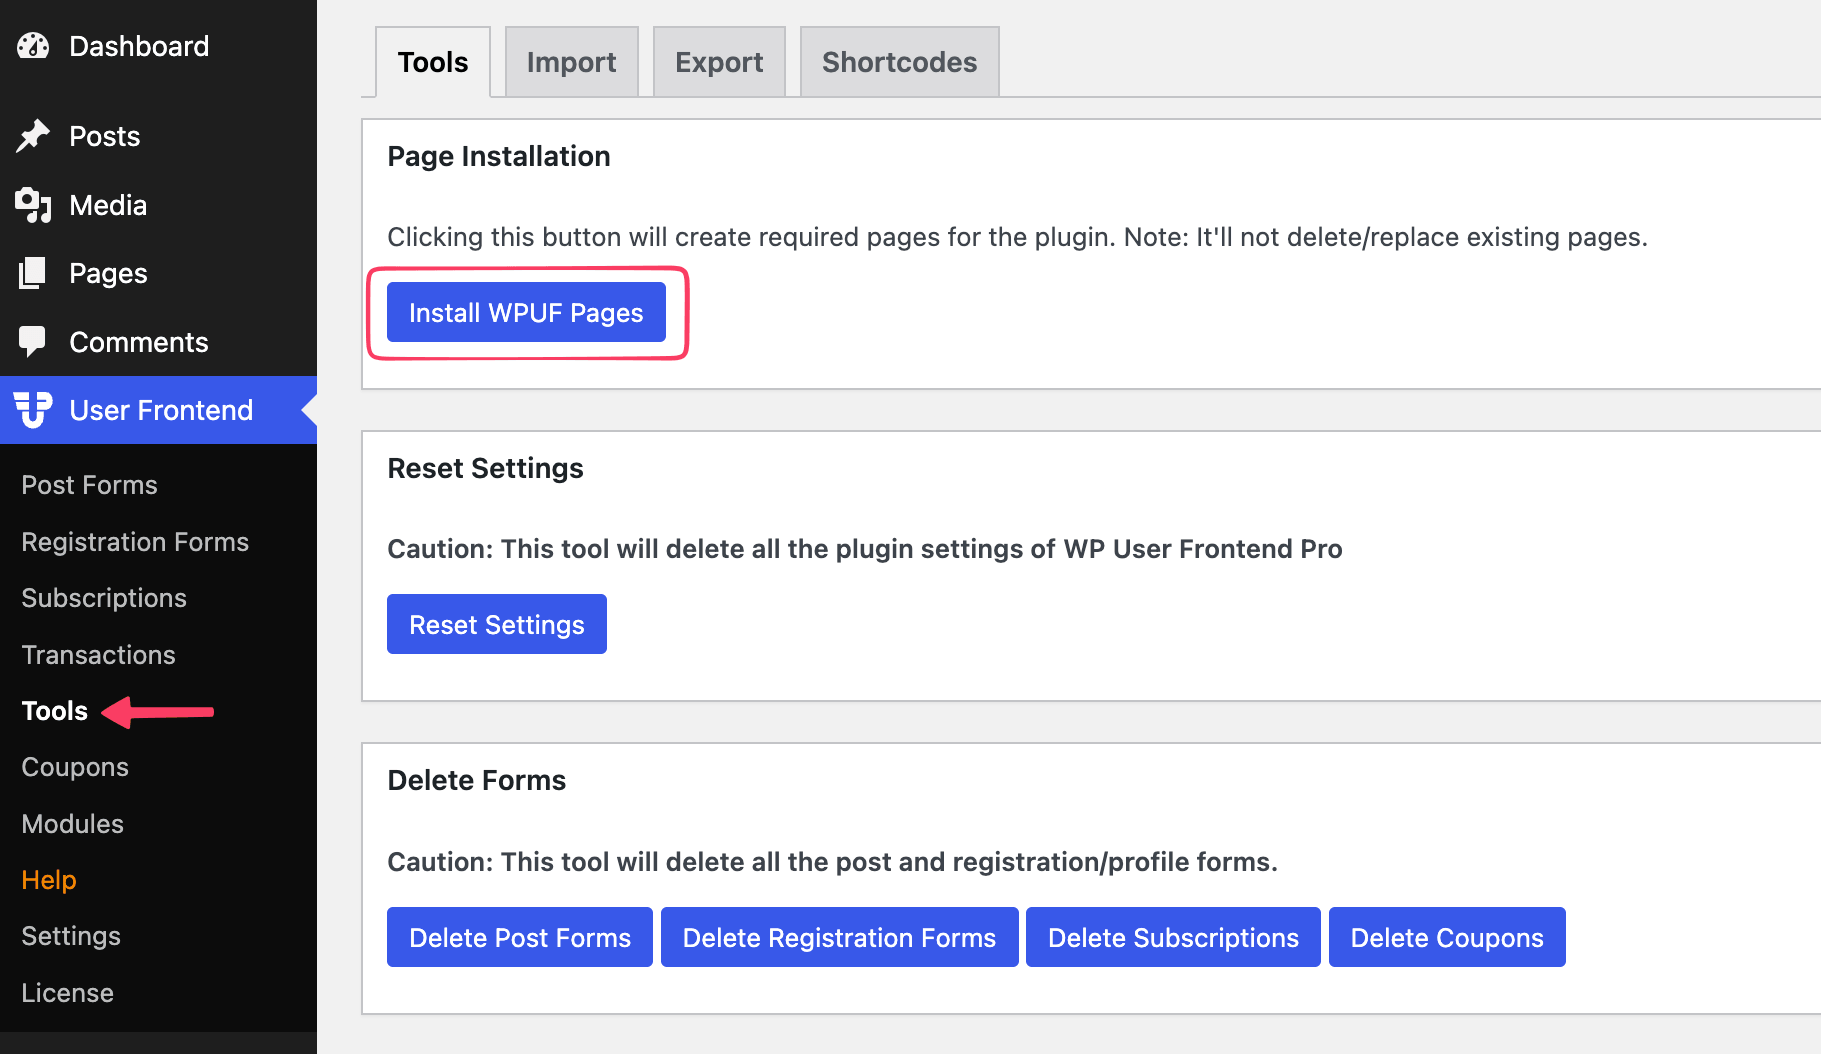
These pages are created with the correct shortcodes already embedded. You can rename them, move them in your navigation, or change their slugs at any time. The shortcodes handle the functionality regardless of where the pages live.
Step 2: Create a Frontend Registration Form
Go to User Frontend → Registration Forms. This is where you build the form that new users see when they sign up.
You’ll see a list of premade registration forms already available. Edit any of them, or you can create a new registration form using the AI generation option or by clicking on the Add New button.

Every registration form should include at a minimum: username, email address, and password with confirmation.
Profile photo upload or other advanced custom fields are optional at registration. It's often better UX to prompt for additional details during an onboarding flow after the account is created, when the user is more committed to the experience.
Advanced options worth configuring at this stage:
Fix the user role first. Since WPUF restricts access based on user roles, assigning the correct role is imperative in any profile-building workflow. Go to the Settings tab and navigate to the General menu to configure these.
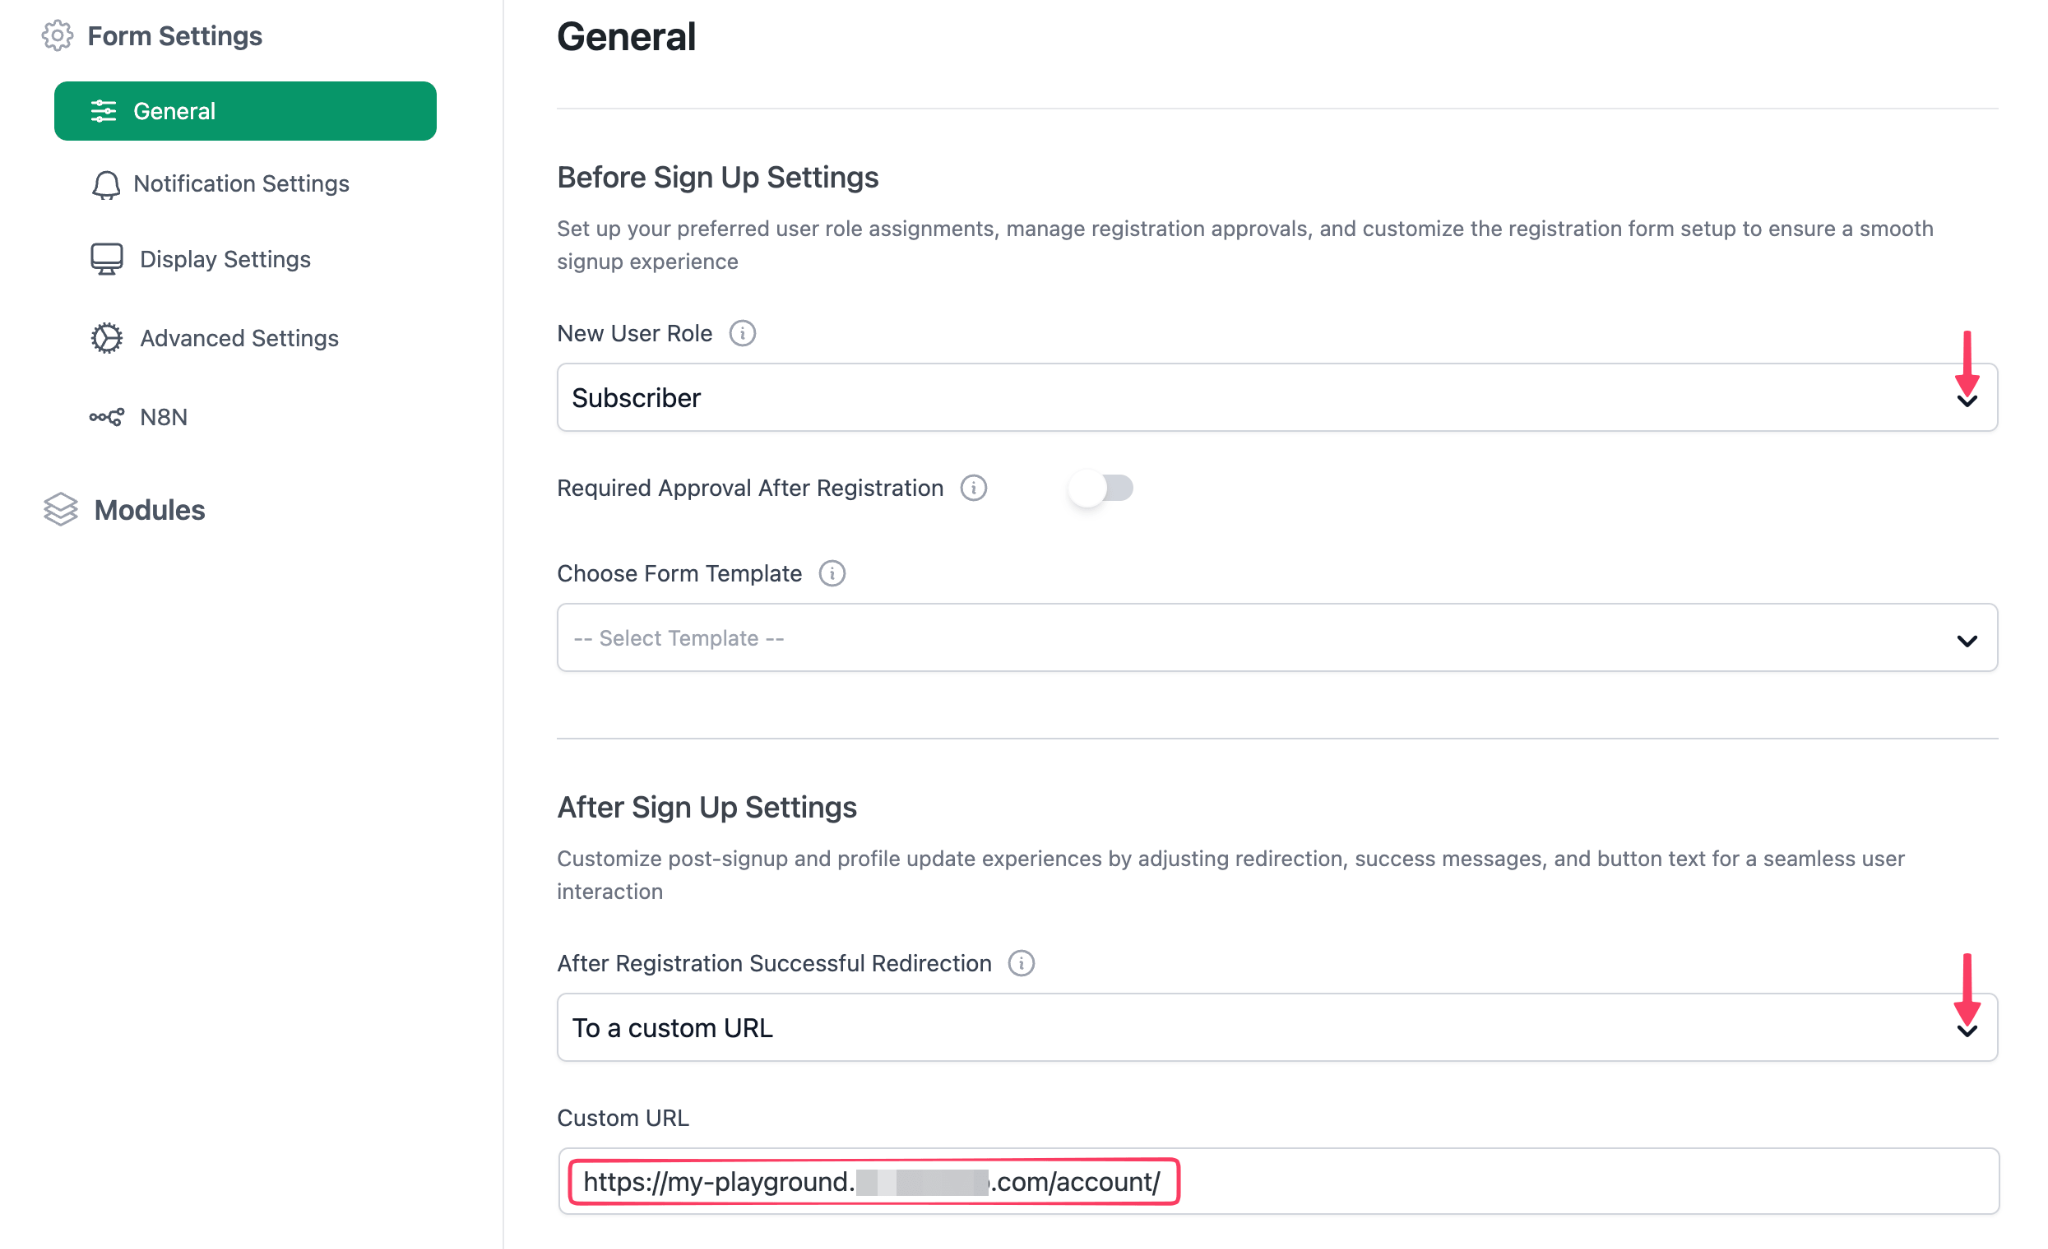
Auto-login after registration removes one step from the onboarding flow and tends to improve completion rates. Set a custom redirect URL so users land on your onboarding page or account dashboard, rather than a generic confirmation screen.
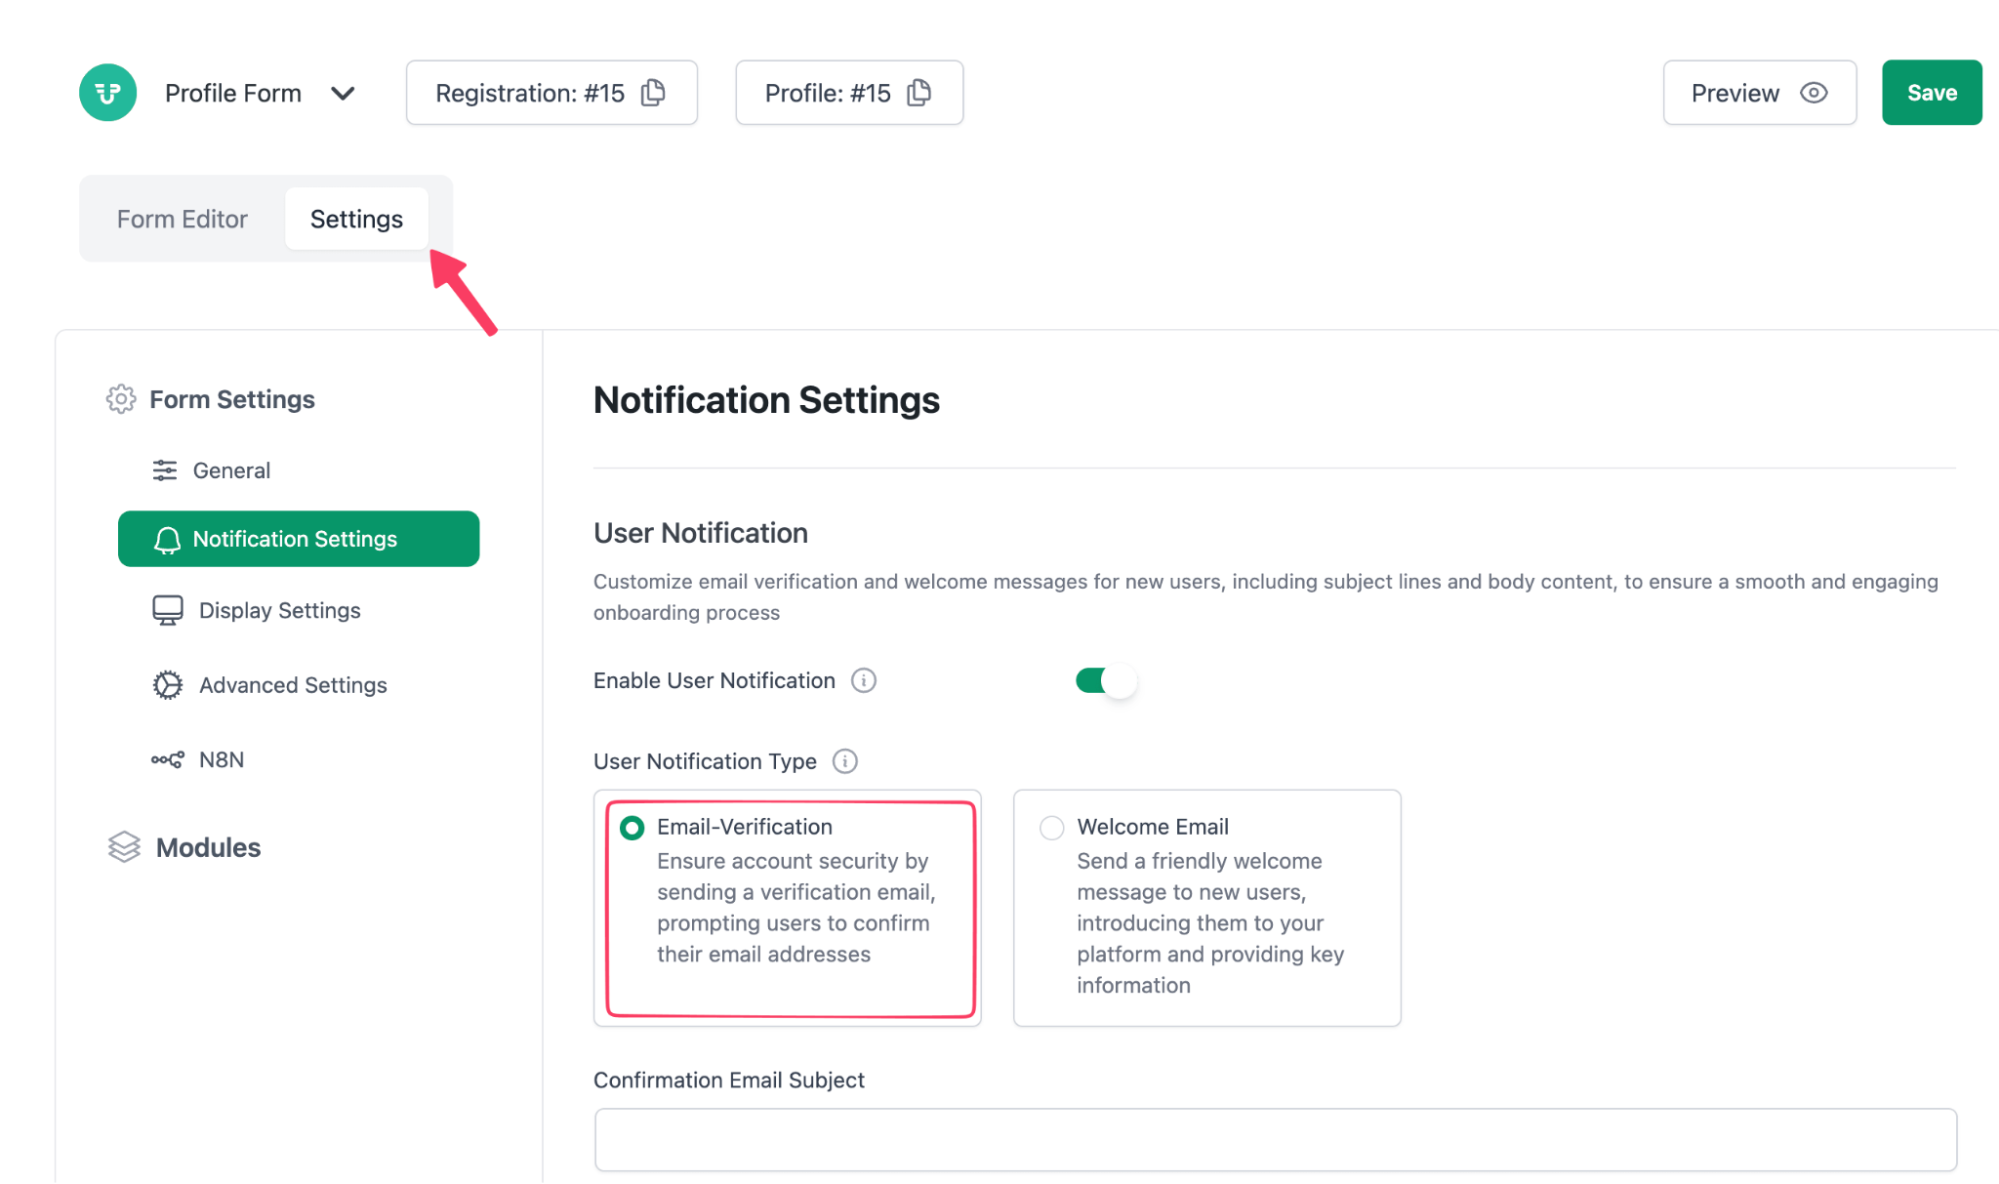
Email verification on signup keeps your user list clean and significantly reduces spam registrations. Go to the Notification menu and enable User Notification, choose Email Verification card.
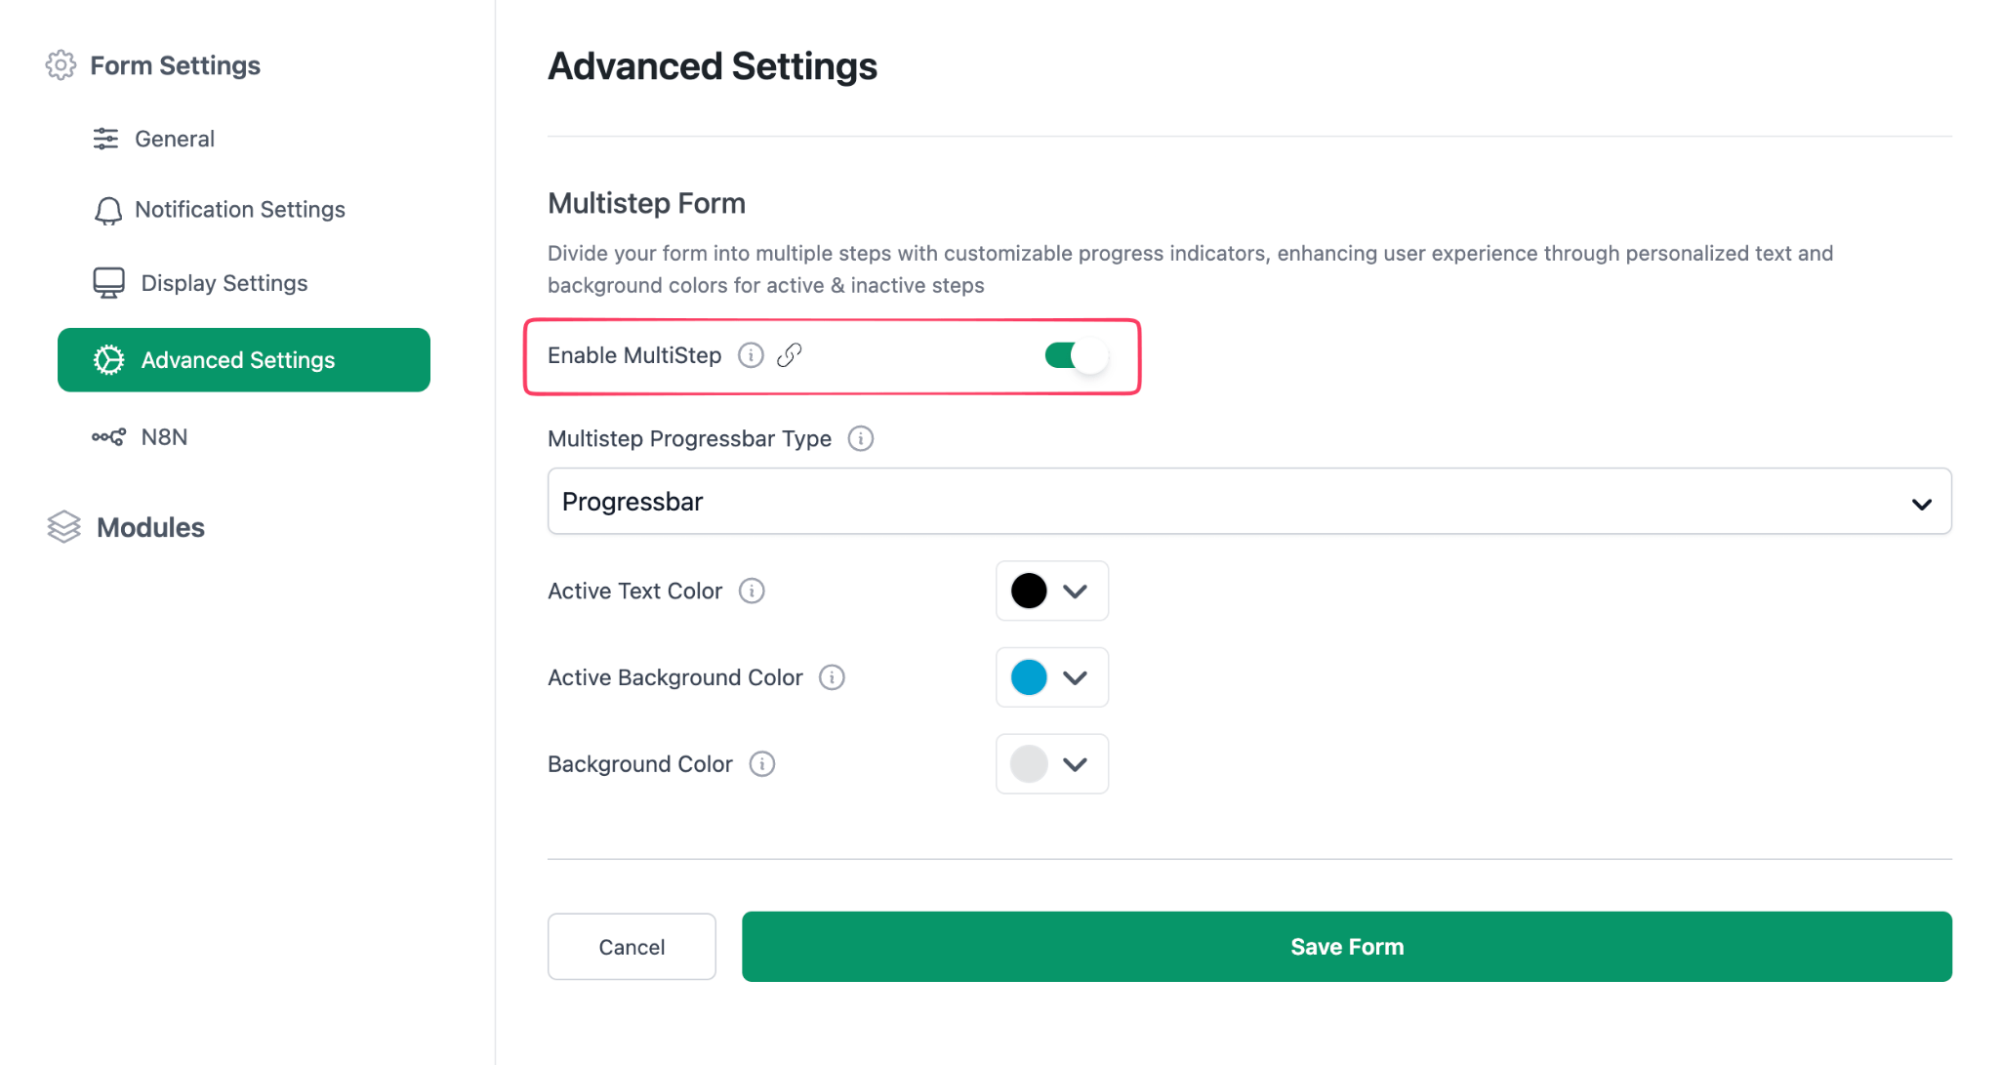
WPUF also has a multi-step form creation feature. You can create a multi-step registration form by enabling this feature by navigating to the Advanced Settings menu and toggling the Enable Multistep option.
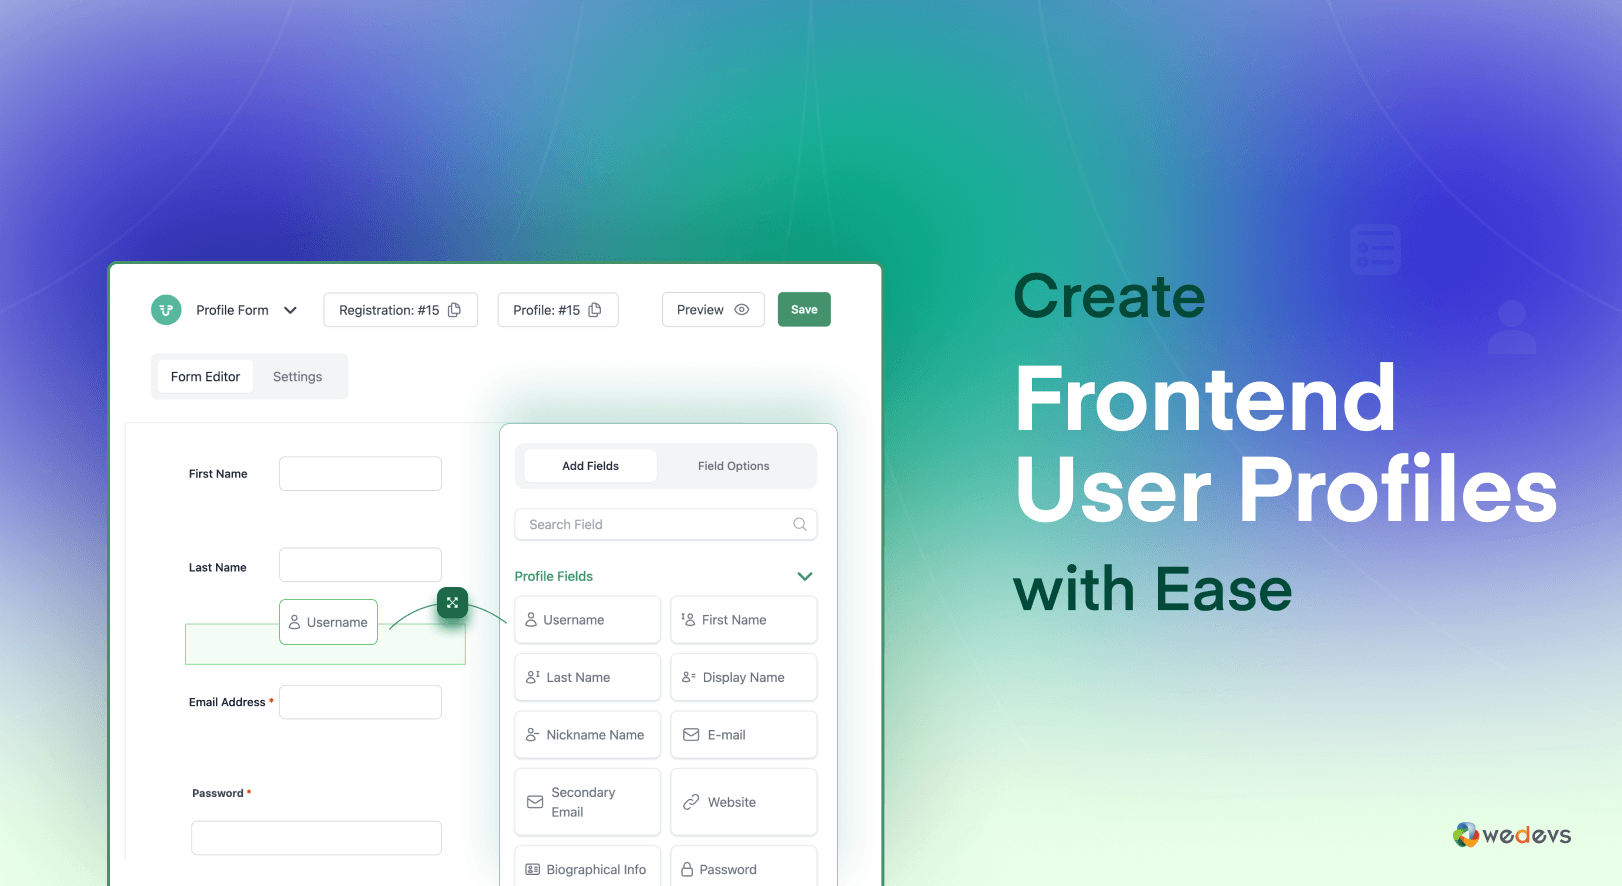
Step 3: Add Custom User Profile Fields
This is the section that turns a basic profile page into something genuinely useful for your specific community.
We’ve already shown previously how to create a registration form. Well, you can create a new form or edit an existing one. Both will lead you to the drag-and-drop builder, which lets you add and configure fields without touching any code.
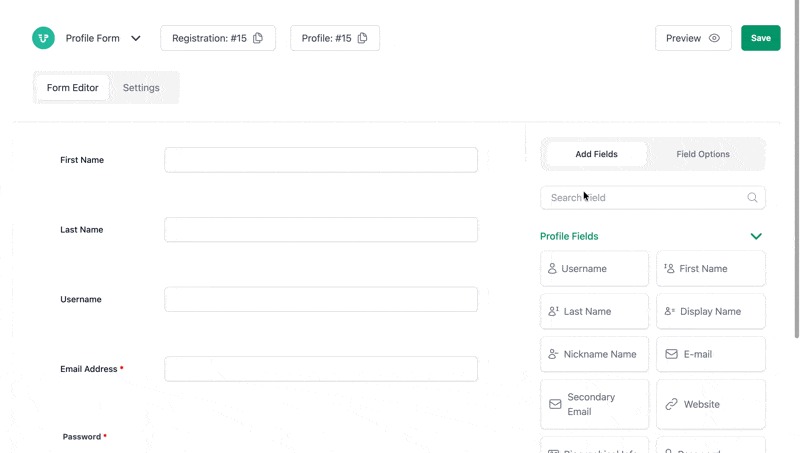
Just type in the field name in the search bar, and you’ll get the available option that can be added by simply dragging and dropping it on the editor.
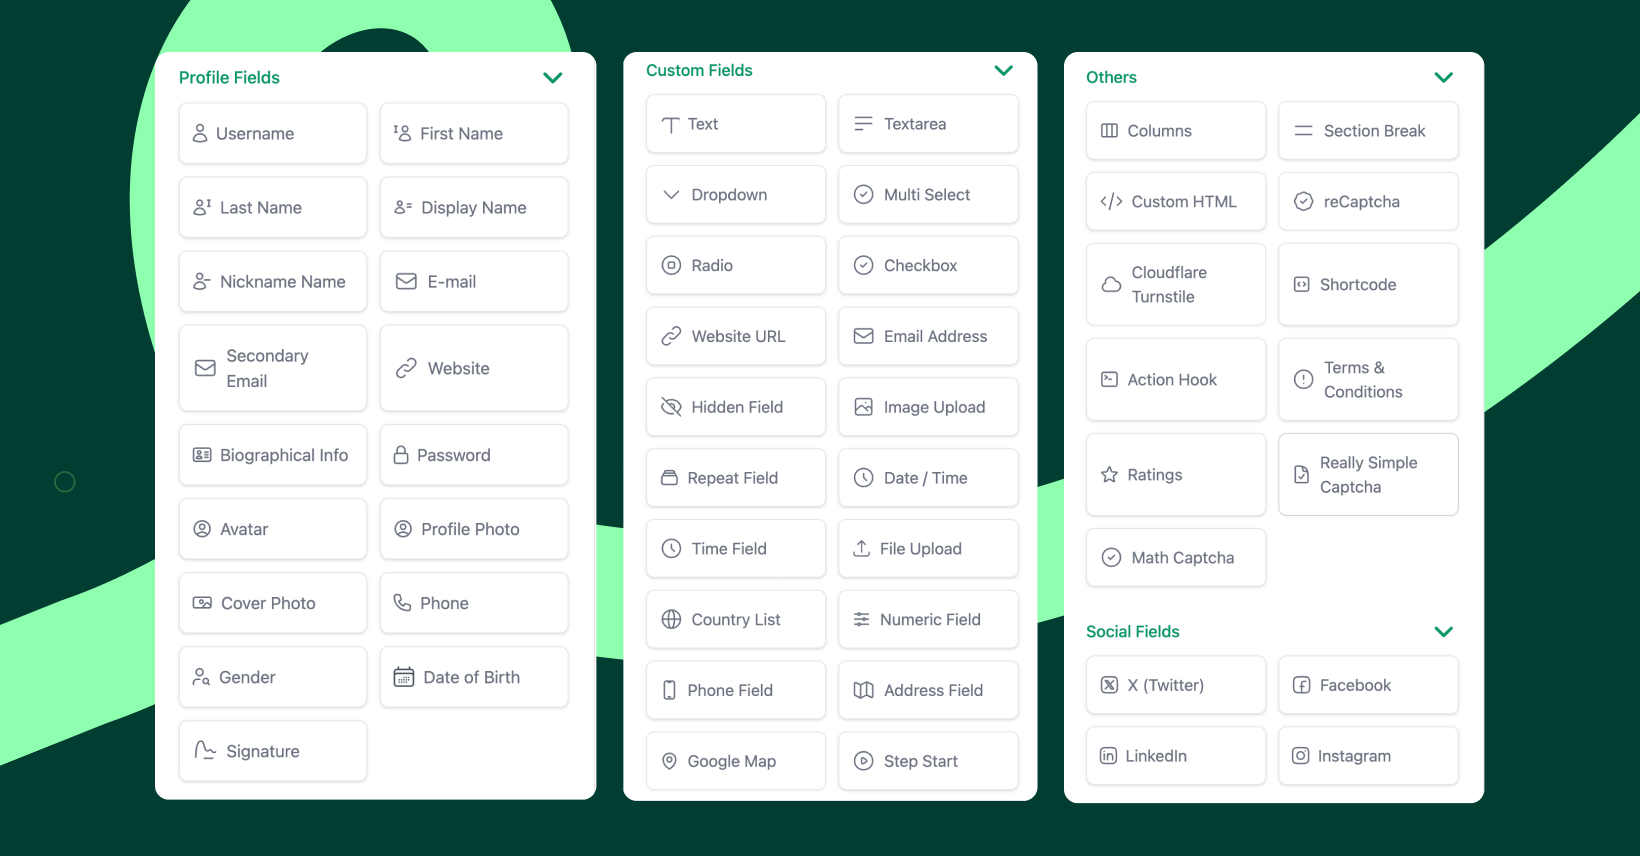
WPUF currently supports 50+ fields that you can use instantly as they are. Here are the key fields you can use:
| Category | Fields |
| Basic Information Fields | Username, First Name, Last Name, Display Name, Nickname, E-mail, Secondary Email, Website, Biographical Info, Password, Phone, Gender, Date of Birth, Signature |
| Profile Media Fields | Avatar, Profile Photo, Cover Photo |
| Text & Input Fields | Text, Textarea, Numeric Field, Website URL, Email Address, Hidden Field |
| Selection Fields | Dropdown, Multi Select, Radio, Checkbox, Country List |
| Date & Time Fields | Date / Time, Time Field |
| Upload & Media Fields | Image Upload, File Upload |
| Advanced & Repeatable Fields | Repeat Field, Address Field, Google Map, Step Start |
| Layout & Structure Fields | Columns, Section Break |
| Security & Verification | reCaptcha, Cloudflare Turnstile, Really Simple Captcha, Math Captcha, Terms & Conditions |
| Integration & Customization | Custom HTML, Shortcode, Action Hook |
| Review & Feedback | Ratings |
| Social Profile Fields | X (Twitter), Facebook, LinkedIn, Instagram |
Note: Spam protection is a common oversight. WPUF supports Google reCAPTCHA, Math CAPTCHA, and Really Simple CAPTCHA; enable them as needed.
Unprotected registration forms on WordPress sites fill with spam accounts within weeks, inflating your user count with useless data.
Using conditional logic: This is one of the more powerful features and one of the most underused. Conditional logic lets you show or hide fields based on the user's answers elsewhere in the form.
A practical example: show a “Tax ID” field only if the user selects “Business Account” as their account type.
Field validation: Set required fields, character limits, and format rules (URL validation for website fields, number ranges for age fields) directly in each field's settings panel.
One underrated feature: Most people ignore the profile completion progress bar of a multistep registration form.
Users who see a partially-filled progress bar are measurably more likely to complete their profiles than users who see a blank or static form. The psychological pull of an incomplete meter is strong. WPUF supports this natively.
Step 5: Restrict wp-admin Access and Set Login Redirects
This is the step most tutorials skip, and it's the one that ties everything else together.
Without explicitly restricting wp-admin access, users with subscriber or custom roles can still navigate to /wp-admin. They may not be able to do much once they're there, but the experience of landing there seeing the admin interface, the plugin list, the settings menu, undermines everything you've built on the frontend.
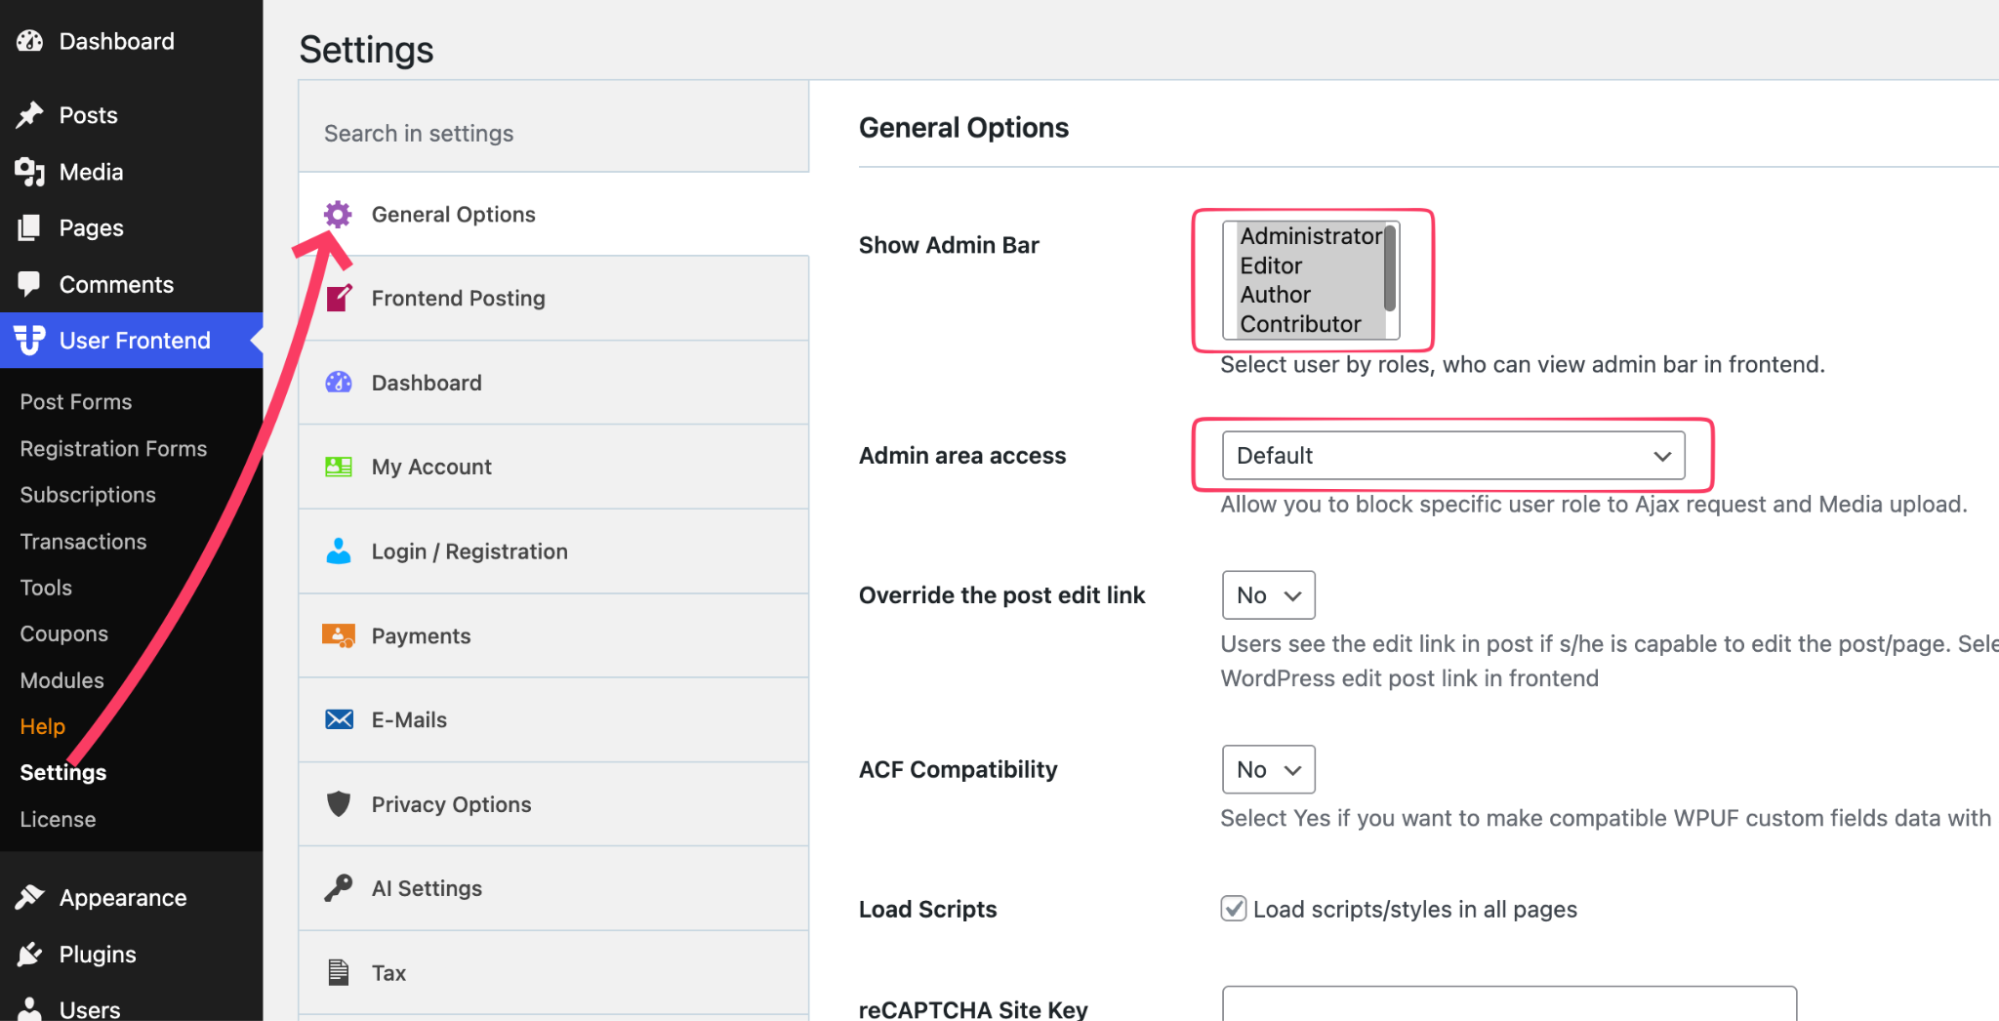
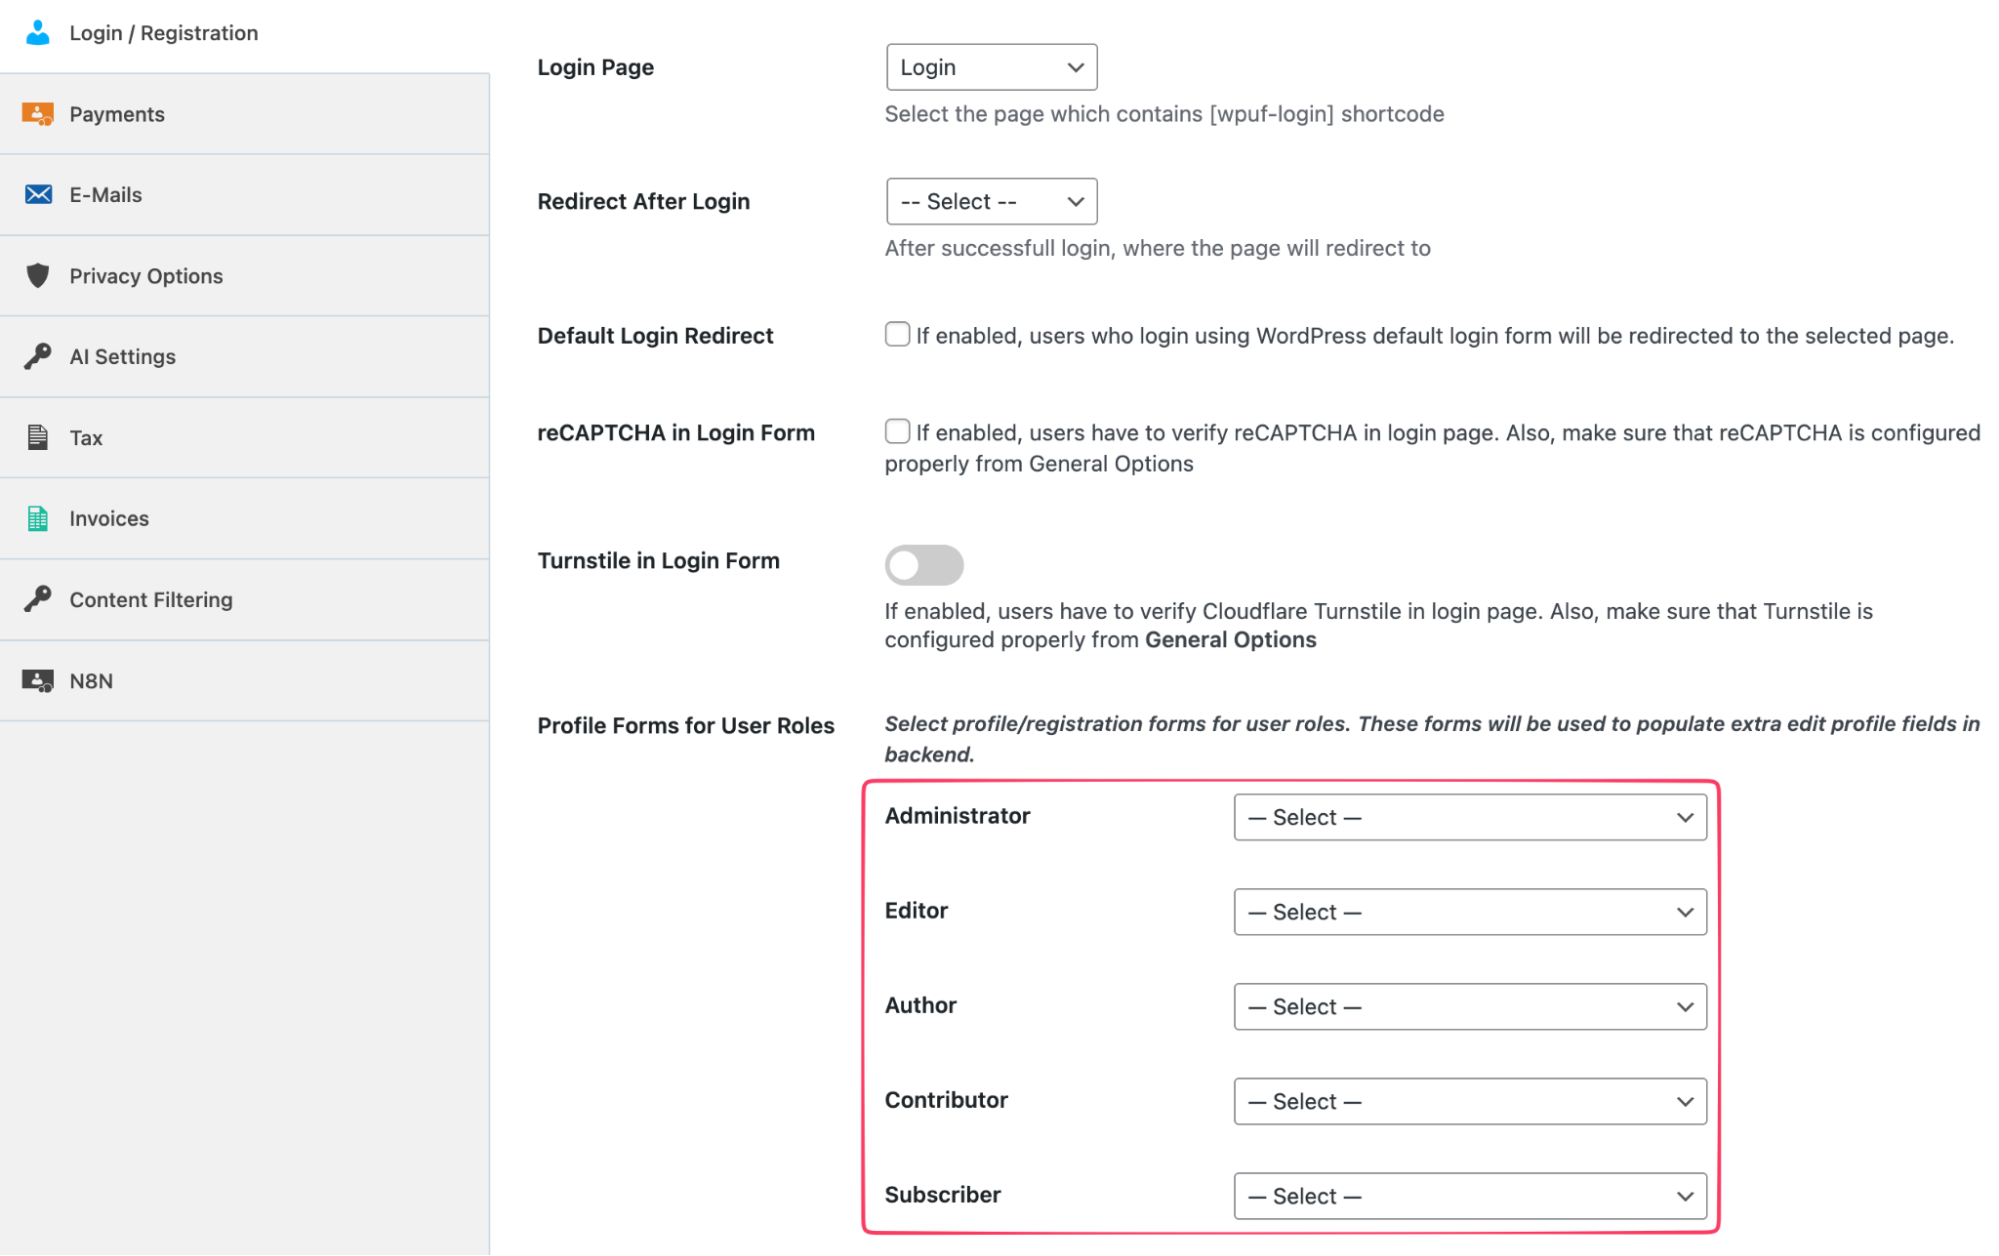
Go to User Frontend → Settings → General Options. Select the roles to which you want to show the admin bar and restrict the admin area access accordingly.
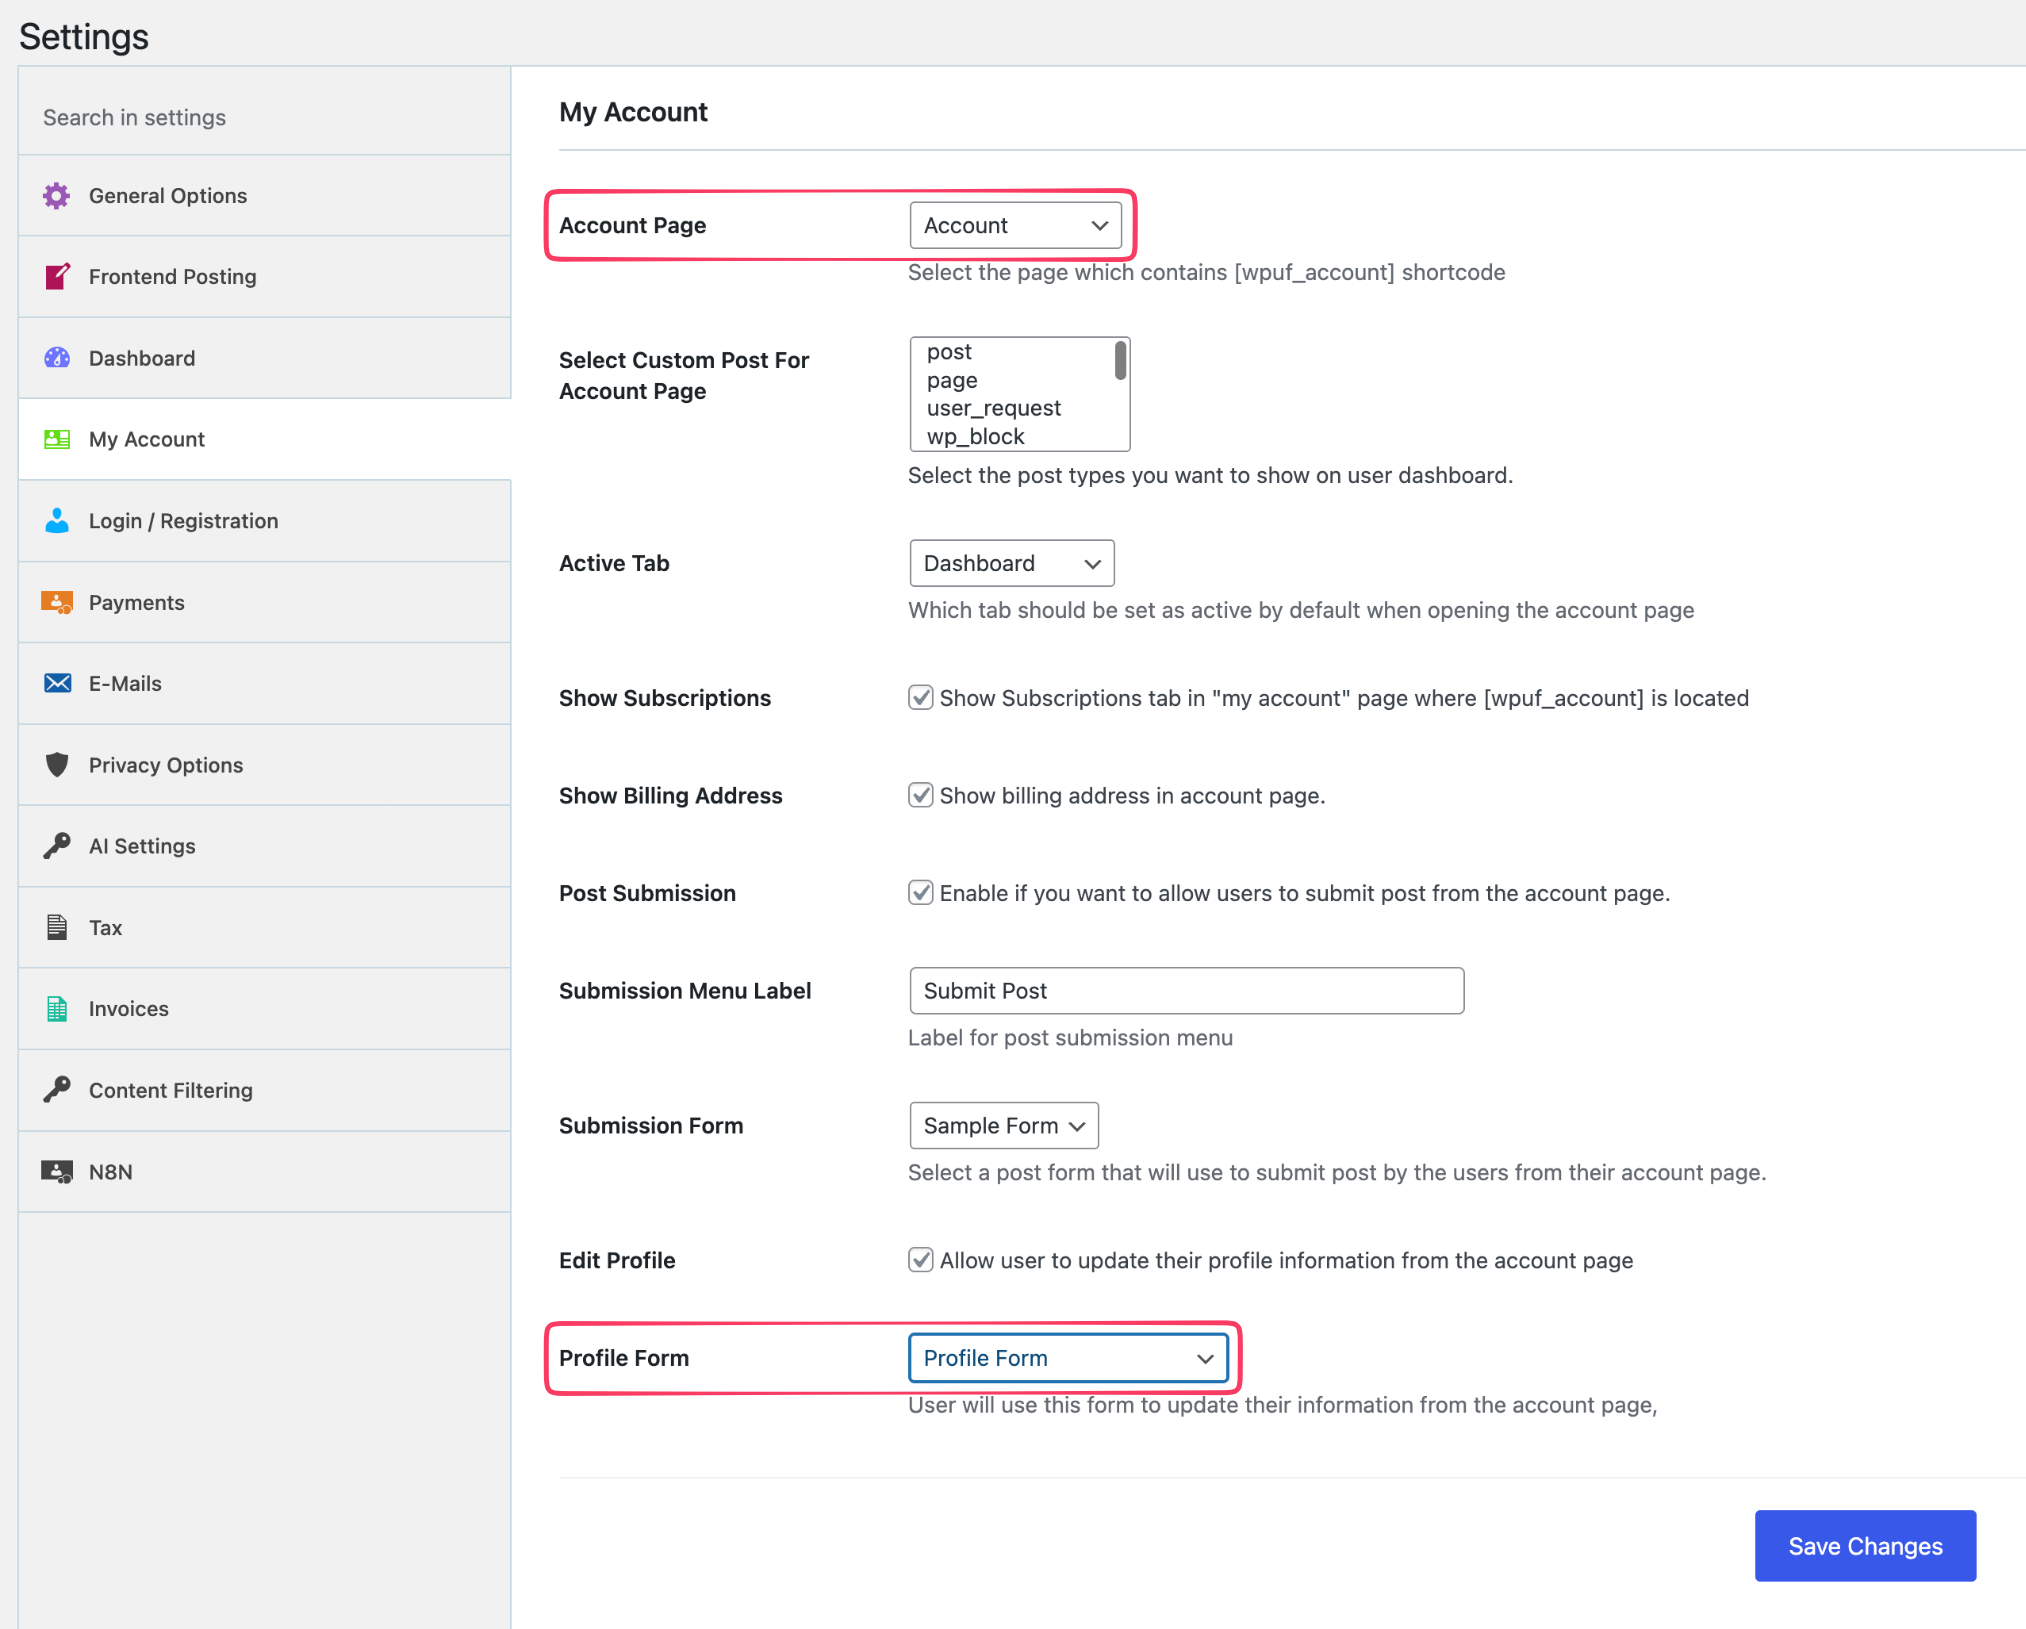
Now go to the My Account settings section and configure your settings as follows.
- Under Account Page, choose the page that contains the [wpuf_account] shortcode.
- Enable Edit Profile to allow users to update their profile information from the frontend.
- Under Profile Form, choose the form users will use to edit their profiles.
- Under Login Page, choose the page that contains the [wpuf-login] shortcode.
- Under Redirect After Login, select the page users should be redirected to after logging in.
- Enable Default Login Redirect to redirect users from the default WordPress login page to the selected page.
- Enable reCAPTCHA in Login Form to add Google reCAPTCHA verification to the login form.
- Enable Turnstile in Login Form to add Cloudflare Turnstile verification to the login form.
- Under Profile Forms for User Roles, assign specific profile or registration forms to different WordPress user roles like Administrator, Editor, Author, Contributor, and Subscriber.
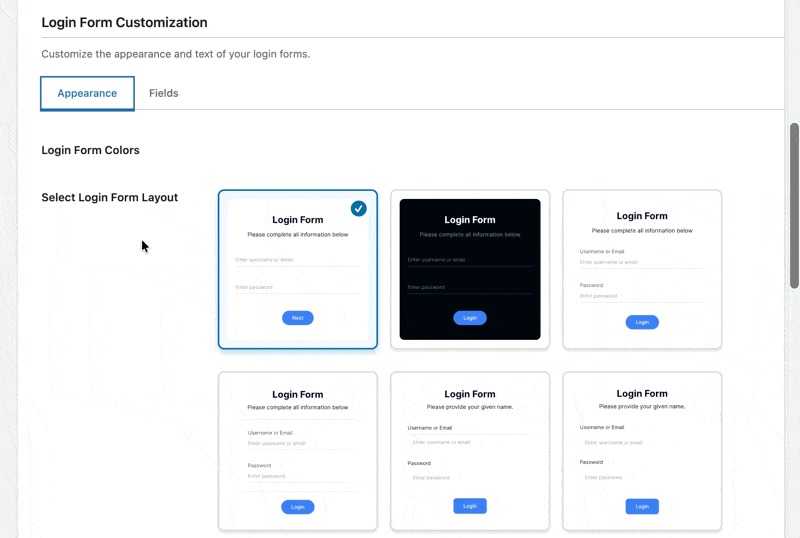
You can also customize the login page using WP User Frontend. Scroll down the Login / Registration settings page and you'll see the following customization panel.
Advanced WPUF Features Worth Implementing When
Once your core profile system is working, several additional capabilities are worth exploring each one adds meaningful value for specific site types.
Member Directories
Turn your user base into a browsable, searchable directory. WPUF provides shortcode-based member directory functionality with filter and search support. Filter members by location, skills, membership tier, or any custom taxonomy you've defined.
For communities where discovery is part of the value proposition – professional networks, alumni communities, local business directories, this takes the profile system from personal utility to platform feature.
Frontend Content Submission
Users can submit posts, listings, events, or products from the frontend without any backend access required. Submissions go through a configurable approval workflow: pending review, approved, rejected. Users can edit their submissions after publishing if you allow it, and you can set expiry dates on listings.
This is where WPUF separates decisively from profile-only plugins – it turns your site into a platform where users contribute content, not just manage their own data.
Paid Memberships and Subscription Profiles
Gate profile features, submission quotas, or dashboard widgets behind paid plans. A free member might get a basic profile and limited listing submissions. A premium member gets featured placement, additional custom fields, and access to gated dashboard widgets.
WPUF integrates with WooCommerce Subscriptions and includes its own payment module for Stripe and PayPal.
Vendor and Instructor Profiles
Purpose-built profile templates exist for marketplace vendors (with Dokan and WC Vendors integration) and course instructors (with Tutor LMS and LearnDash integration). Vendor profiles include store-level customization fields store name, logo, banner, location and connect to the backend marketplace management system. Instructor profiles surface credentials, course listings, and student counts.
Email Notifications and User Moderation
Configure automated emails triggered by registration, profile approval, submission status changes, or subscription renewals. The admin moderation workflow lets you review new profiles before they go live – useful for marketplace and directory sites where profile quality matters for the overall platform experience.
WP User Frontend Pro vs. Alternatives in Profile Building
For readers evaluating options, here's how the main plugins compare across the features that matter for a complete frontend profile system:
| Feature | WPUF Pro | ProfilePress | Ultimate Member |
| Frontend registration | Yes | Yes | Yes |
| Custom profile fields | Advanced | Basic | Basic |
| Frontend post submission | Yes | No | No |
| User dashboard builder | Yes | Limited | Limited |
| Payment/subscriptions | Native | Add-on | Add-on |
| wp-admin restriction | Built-in | Yes | Yes |
| Vendor/marketplace support | Yes (Dokan) | No | No |
| LMS integration | Multiple | No | No |
| Conditional logic | Yes | No | Limited |
For sites that need frontend content submission, paid membership tiers, role-specific dashboards, and marketplace or LMS integration, WPUF Pro is the only option in this comparison that covers the full scope without requiring additional plugins to fill gaps.
Common Mistakes to Avoid When Building a User Profile
Giving non-admin users any wp-admin access. Even “limited” backend access creates confusion and generates support burden. Set up the frontend-only experience from day one, not as an afterthought once users start asking where to edit their profiles.
Building one profile form for all user roles. Vendors need different fields than students. Students need different fields than community members. Role-specific forms are not a luxury feature they're the difference between a profile that feels relevant and one that feels generic and confusing.
Skipping email verification. Unverified registrations inflate your user count with spam accounts and make your email list unreliable. The friction it adds to legitimate signup is minimal. Enable it.
No profile completion incentive. Users abandon optional fields without a prompt. A progress bar, a completion percentage, or a feature unlock at 100% completion all move the needle. Build the incentive in from the start rather than adding it later when you notice profiles are incomplete.
Unsecured file upload fields. If you add a resume, portfolio, or document upload field, restrict allowed file types (PDF, JPG, PNG not .exe or .zip) and set a maximum file size. Unrestricted upload fields are a security liability.
Ignoring mobile from the start. Preview every form on a real mobile device before publishing, not just in a desktop browser's mobile simulation. The forms that look fine in DevTools often have layout or tap-target problems on an actual phone that only show up in real testing.
Best Practices When Building a Frontend User Profile in WordPress
Small UX decisions can make a huge difference in how many users complete registration, update their profiles, and stay active on your site. Here are some best practices to create a smoother and more effective user experience.
- Progressive profiling: Ask for only the essential details during registration. Then collect the remaining information after the user’s first login through a guided onboarding flow. Shorter signup forms usually lead to higher completion rates.
- Conditional logic: Show fields based on the user’s role and previous answers. A smart five-field form feels much easier to complete than a long static form with unnecessary inputs.
- Separate registration from onboarding: Registration should focus only on account creation. Onboarding should help users complete profiles, explore features, and take their first meaningful action after signup.
- Real user testing: Test forms with real users before launch. Issues like confusing labels, broken mobile layouts, or unclear required fields often stay hidden during developer testing.
- Role-based redirects: Send users to the most relevant page after login. Vendors should see their dashboard, students should see their courses, and community members should land on their activity feed.
- Performance optimization: Optimize profile pages early, especially for logged-in users. Slow-loading pages reduce engagement and lower profile completion rates.
Frequently Asked Questions About User Profiles in WordPress
How do I create a frontend profile page in WordPress?
Install a frontend profile plugin like WP User Frontend Pro, create a profile edit form using the drag-and-drop builder, and publish it to a page using the provided shortcode. The plugin also creates registration and dashboard pages automatically during setup. No coding is required. The entire configuration happens through the plugin's admin interface.
Can users edit their profiles without accessing wp-admin?
Yes. With a frontend profile plugin, all profile editing happens on a branded page within your site. You can also restrict backend access entirely so users with roles like Subscriber or Vendor are automatically redirected to the frontend dashboard if they attempt to visit /wp-admin.
What is the best frontend profile plugin for WordPress?
WP User Frontend Pro is the strongest option for sites that need custom profile fields, a configurable user dashboard, frontend post submission, and payment support in one plugin. For simpler profile-only use cases a community site where users just need to edit their bio and photo ProfilePress and Ultimate Member are also solid choices with polished interfaces.
How do I add custom fields to a WordPress user profile?
In WP User Frontend Pro, go to Profile Forms → Add New and use the drag-and-drop builder to add field types: text, dropdown, image upload, repeater, and more. Each field can be set as required, conditional, or read-only. Changes apply immediately to the frontend profile edit page. No code is needed at any point in the process.
Can I create different dashboards for different user roles?
Yes. WPUF Pro allows you to build role-specific dashboard layouts. Vendors can see their sales and listing status, students can see their course progress and certificates, and members can see their subscription status and renewal date all from different dashboard configurations tied to each user role.
How do I restrict wp-admin access for subscribers?
In WP User Frontend Pro, go to Settings → Frontend Settings and enable backend access restriction for the roles you want to lock out. Users with those roles will be automatically redirected to your frontend dashboard when they attempt to visit /wp-admin. Set a custom login redirect URL in the same settings panel.
Does WP User Frontend Pro work with WooCommerce and LMS plugins?
Yes. WPUF Pro integrates with WooCommerce for payment processing and subscriptions, and with LearnDash, LifterLMS, and Tutor LMS for student and instructor profile workflows. It also integrates with Dokan and WC Vendors for marketplace vendor profiles. These integrations are built-in no additional connector plugins are required.
Final Thoughts
Frontend user profiles change how people experience your WordPress site. Instead of forcing users into wp-admin, you keep everything inside a clean, branded environment that feels intuitive from the first login to daily use.
That matters more than most site owners realize.
A smoother onboarding flow leads to better engagement, more completed profiles, fewer support requests, and a platform that feels more professional overall.
WP User Frontend Pro gives you the flexibility to build that experience without custom development. From frontend registration and profile editing to role-based dashboards and content submission, it brings the entire user journey into the frontend where it belongs.
The goal is simple: make your WordPress site feel like a real product, not a backend system users accidentally discovered.