You built a neat set of fields in Advanced Custom Fields, and now you want visitors to fill them in from the front of your site. ACF can do that, but only if you write PHP into your theme. If you would rather not touch code, there is a simpler route. This guide shows you how to build an ACF frontend form with the free WP User Frontend plugin, step by step.
TL;DR
- An ACF frontend form lets visitors fill in your ACF fields from a normal page, with no dashboard access.
- The free WP User Frontend plugin builds it with drag and drop. No PHP is needed, unlike ACF's
acf_form()function. - The setup takes six steps, from building the form to testing it on a page.
- Each ACF field name must equal the meta key of a WP User Frontend field, and every choice value must match exactly.
- ACF Pro's Repeater field is the one field type that does not work with this setup.
What Is an ACF Frontend Form?
An ACF frontend form is a form on a public page that saves its answers into Advanced Custom Fields. A visitor types a price, picks a genre or ticks a few checkboxes, and those values land in the same ACF fields you see when you edit the post.
This matters because ACF fields normally live inside the dashboard. Your writers, members or customers would need a login and access to the editor just to fill them in. A frontend form removes that step. People submit from your site, and you review the result in WordPress like any other post.
Typical uses include book reviews, property listings, job posts, event submissions and member directories. Anywhere you want structured data from people who are not admins, a frontend submission form saves you from copying answers in by hand.
Two Ways to Build an ACF Frontend Form
You can build one with code or with a form plugin. Here is how the two compare.
- Write PHP with ACF's
acf_form()function. - Use a form plugin that writes into ACF fields, such as WP User Frontend.
Use acf_form() if You Are Comfortable With PHP
ACF ships a function called acf_form() that prints a form for a field group. You call acf_form_head() at the top of a page template, before the header loads, and then call acf_form() where the form should appear.
It works well for developers. Still, everything beyond the basic form becomes your job. Guest access, spam protection, email alerts, payments and an edit screen for the person who submitted all need extra code. You also have to keep that template safe when the theme updates.
Use WP User Frontend if You Want No Code
WP User Frontend builds the form with drag and drop and saves each field as post meta. Once you match its field names to your ACF fields, ACF reads those values as its own. Nothing goes into your theme files.
| acf_form() | WP User Frontend | |
|---|---|---|
| Code needed | Yes, PHP in a template | No |
| Guest submissions | Custom code | Built-in setting |
| Review before publishing | Custom code | Built-in post status option |
| Spam protection | Add your own | reCAPTCHA and Cloudflare Turnstile fields |
| Users edit their own posts | Custom code | Frontend dashboard |
| Charge for submissions | Custom code | Pay per post and subscription packs |
The rest of this guide covers the no-code route.
What You Need Before You Start
You need two free plugins and a post type to submit to.
- Advanced Custom Fields. The free version is enough.
- WP User Frontend. The ACF integration is part of the free plugin.
- A post type. Regular posts work. You can also use a custom post type such as Listings or Reviews.
How to Create an ACF Frontend Form With WP User Frontend
Here are the six steps. The example is a book review form with Genre, Rating and Available Formats fields.
- Build the post form and note each field's meta key.
- Turn on ACF compatibility.
- Create an ACF field group with matching field names.
- Copy the choice values for select, radio and checkbox fields.
- Point the field group at the form's post type.
- Add the form to a page and test it.
Prefer to watch first? This video walks through the whole setup.
1. Build the Post Form and Note Each Meta Key
Start in WP User Frontend, because its field names decide what your ACF fields must be called. Go to User Frontend, then Post Forms, and click Add New. Pick a template such as Post Form, or start from a blank form.
Drag in the custom fields you need from the Custom Fields group, for example a Dropdown for Genre, a Radio field for Rating and a Checkbox field for Available Formats. Next, click Edit on each field and look for Meta Key in the field options. Write each one down, since you will reuse them in ACF.
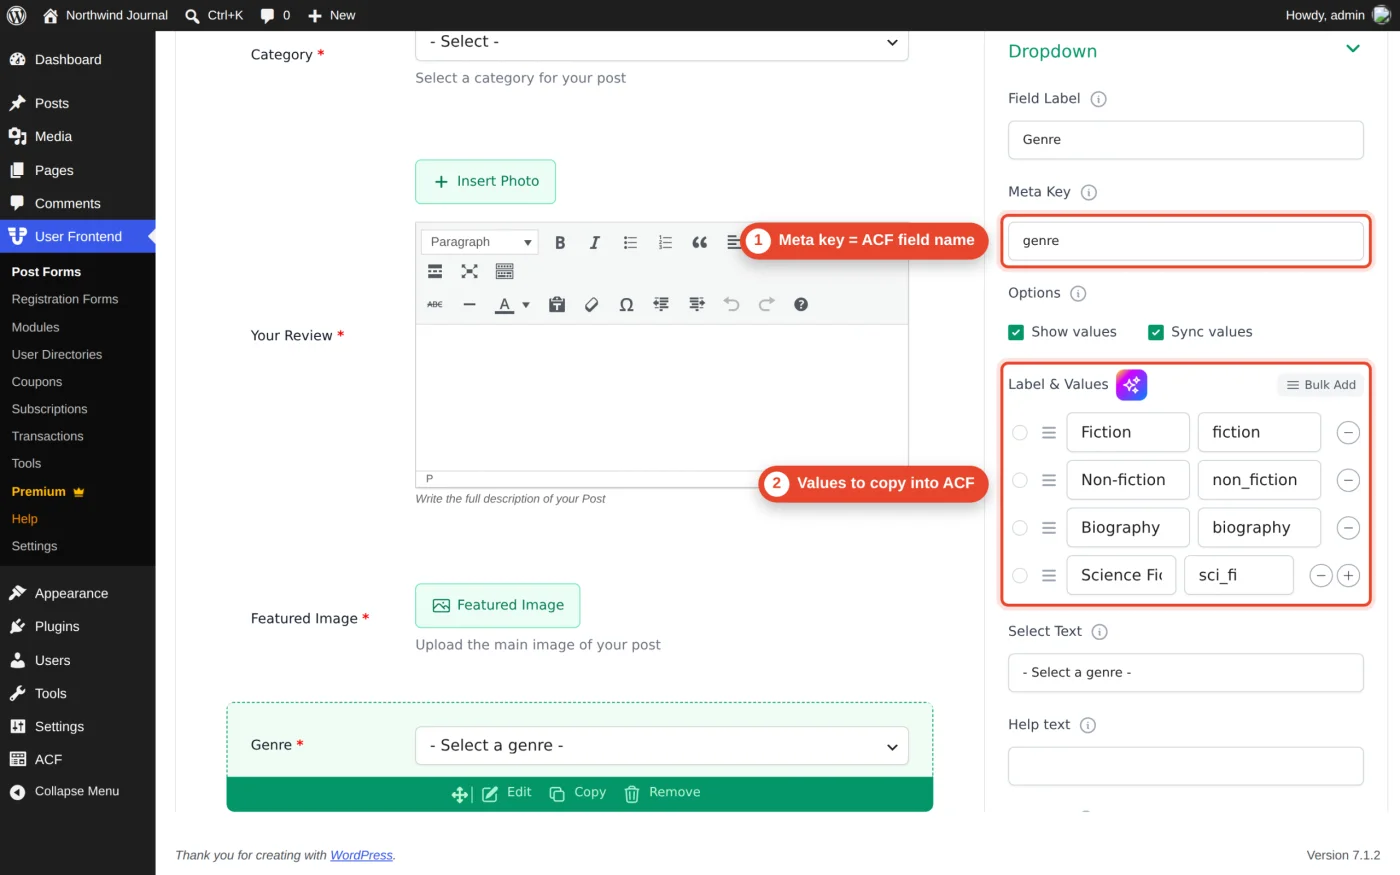 The Meta Key becomes the ACF field name. Tick Show values to see each option value.
2. Turn On ACF Compatibility
WP User Frontend asks how to work with ACF the moment you activate ACF. You will see three choices.
- Compatible saves new submissions in a format ACF can read.
- Compatible & Migrate does the same and also converts submissions made before.
- No Thanks skips it for now.
Choose Compatible for a new form. If ACF was already active, or you skipped the prompt, turn it on later under User Frontend, then Settings, then General Options. Set ACF Compatibility to Yes and save.
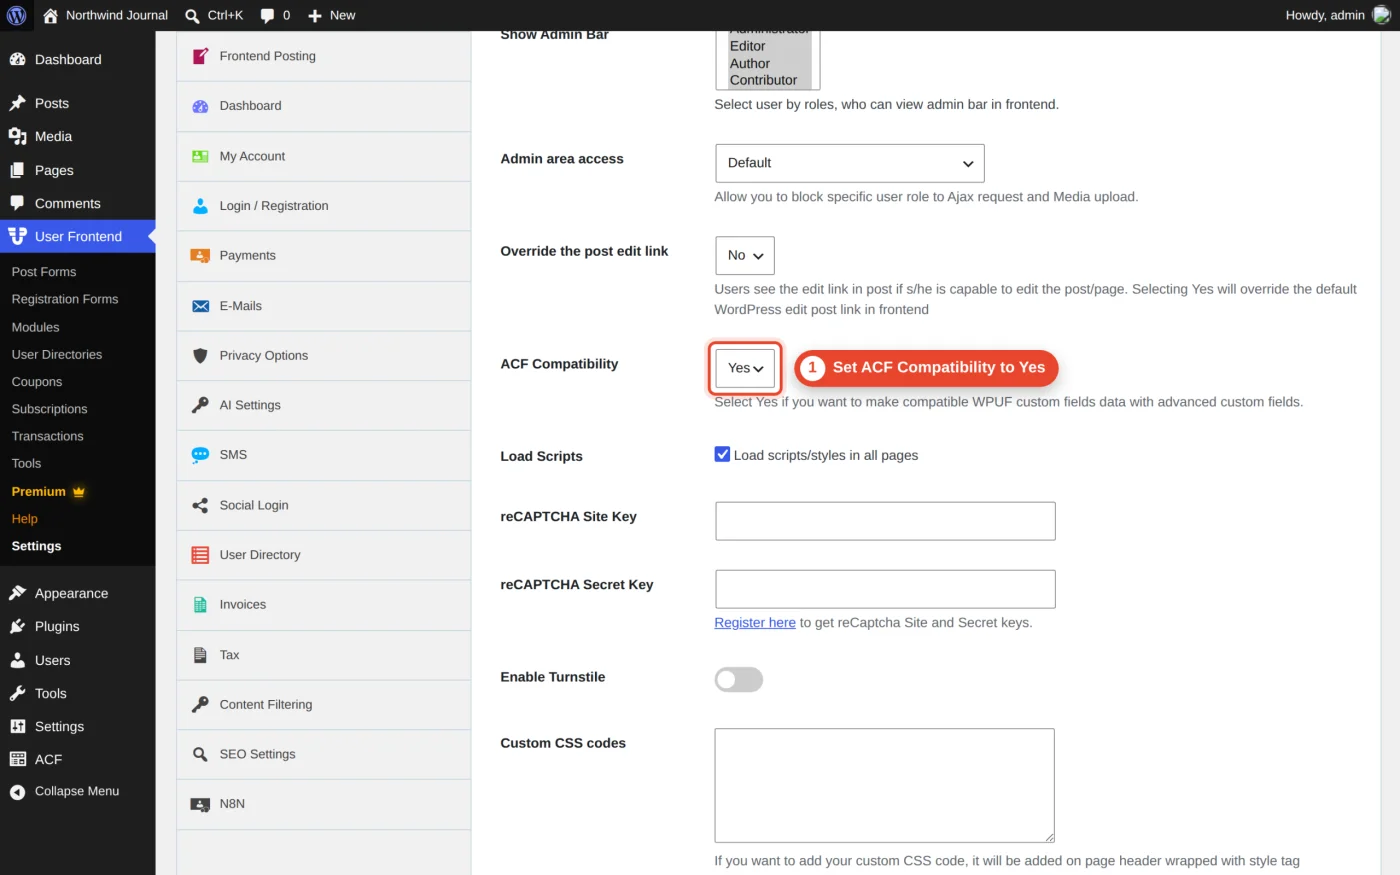 ACF Compatibility lives under User Frontend, Settings, General Options.
3. Create an ACF Field Group With Matching Field Names
Every ACF field name must be identical to a WP User Frontend meta key. That single rule is what connects the two plugins.
Go to ACF, then Field Groups, and add a new group. Add one field for each custom field in your form. Pick the matching field type, then check the Field Name. ACF fills it in from the label, so a label of Genre becomes genre. If your meta key is different, change the field name by hand until they match exactly.
4. Copy the Choice Values for Select, Radio and Checkbox Fields
Choice fields need one more match. The stored value of each option must be the same in both plugins, or ACF will show the field as empty.
In WP User Frontend, open the field and tick Show values. You will now see the value behind each label, such as non_fiction for Non-fiction. In ACF, enter each choice on its own line as value, colon, label.
fiction : Fictionnon_fiction : Non-fictionbiography : Biographysci_fi : Science FictionRepeat this for every radio, select and checkbox field.
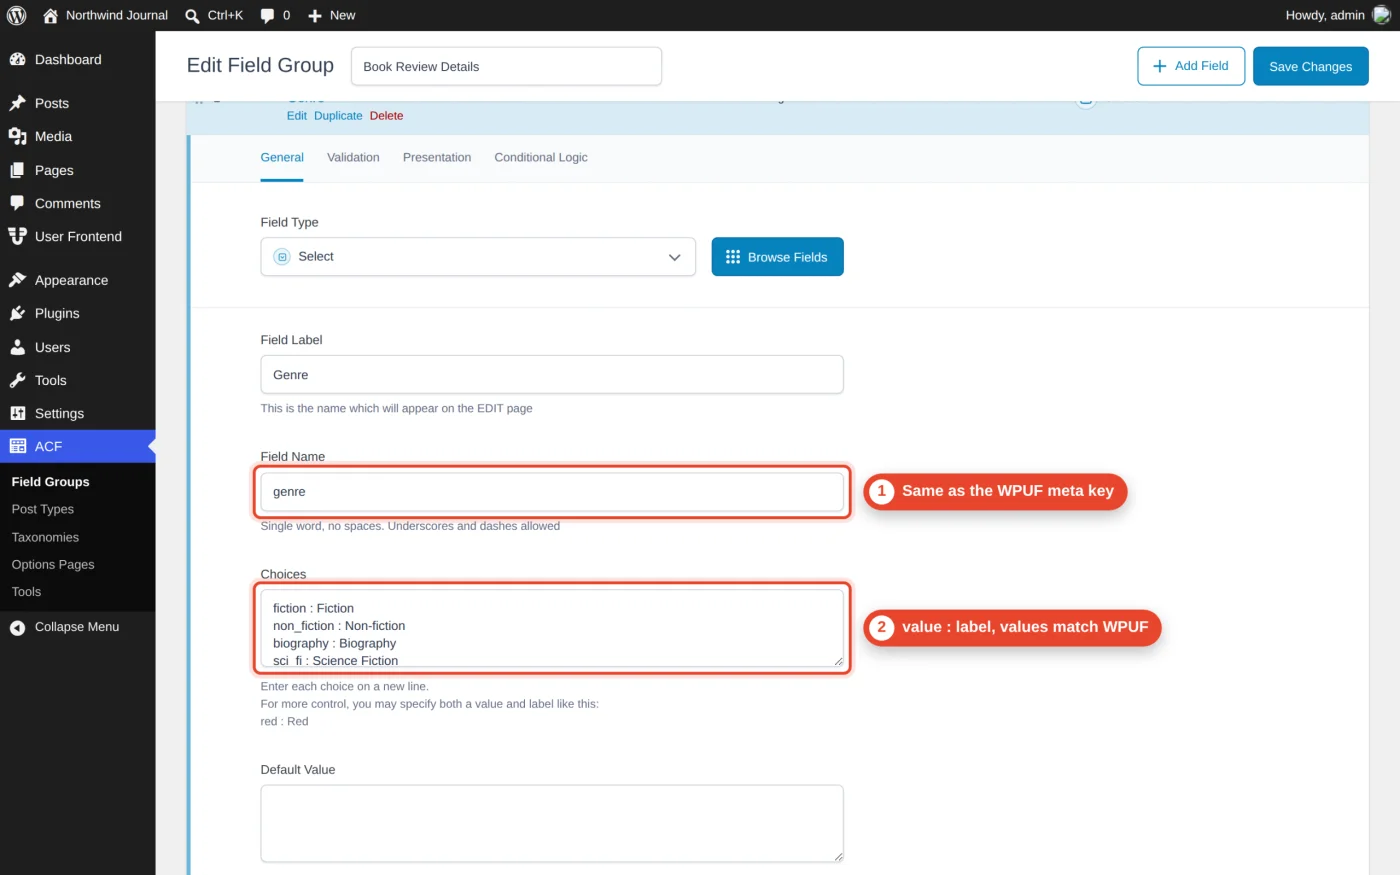 The ACF field name and choice values match the form exactly.
5. Point the Field Group at the Form's Post Type
The field group's location rule must use the same post type the form submits to. WP User Frontend looks up ACF field groups by that post type when it saves a submission.
In the field group's Settings, the default rule is Post Type is equal to Post. Keep it if your form creates posts. If the form submits to a custom post type, change the rule to that post type. You can check the form's post type under the form's Settings tab, in Post Settings, then General. Then click Save Changes.
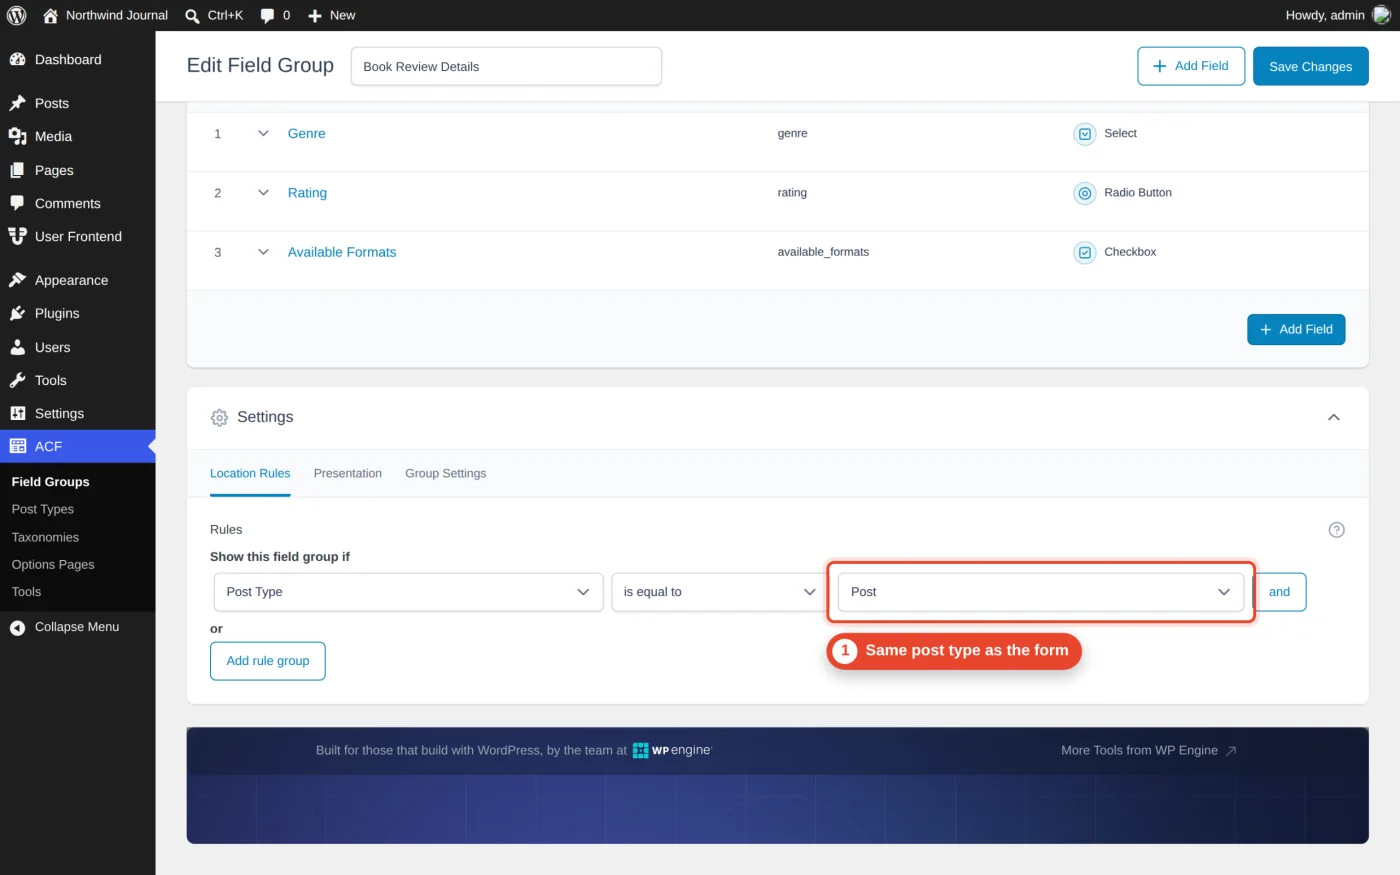 The location rule uses the same post type as the form.
6. Add the Form to a Page and Test It
Your ACF frontend form goes live the moment you place it on a page. Create a page, add the Post Form block, and select your form. You can also paste the form's shortcode, which looks like [wpuf_form id="123"].
Now submit a test entry from a private browser window. Open the new post in the dashboard and check the ACF field group. Your genre, rating and formats should appear there, just as they were chosen on the form.
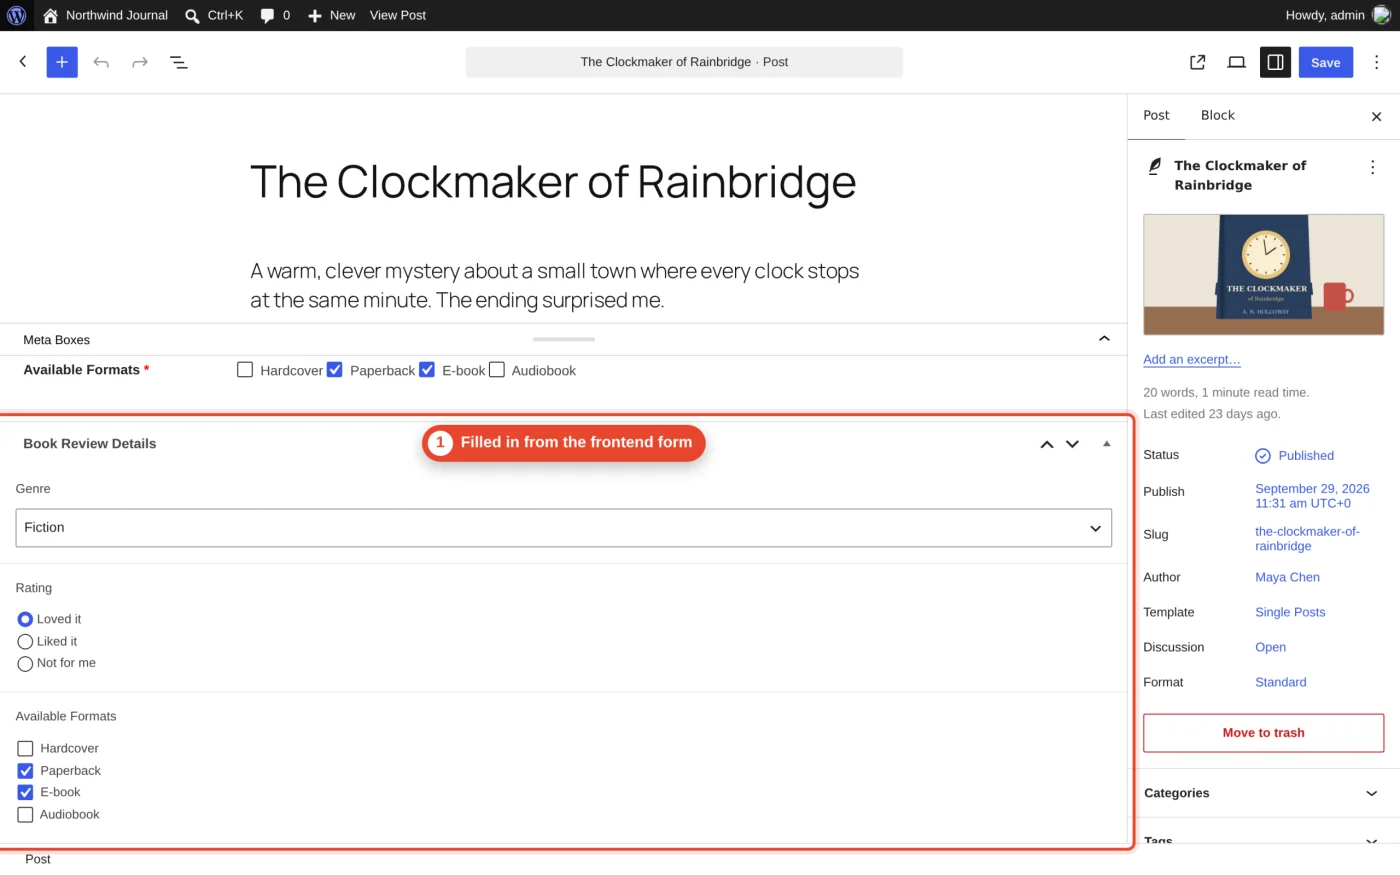 A frontend submission, with every ACF field filled in.
How WP User Frontend Fields Line Up With ACF Field Types
Pick the ACF field type that stores data the same way as the WP User Frontend field. These pairs work together.
| WP User Frontend field | ACF field type | What must match |
|---|---|---|
| Text | Text | Field name |
| Textarea | Text Area | Field name |
| Email Address | Field name | |
| Website URL | URL | Field name |
| Numeric Field | Number | Field name |
| Dropdown | Select | Field name and choice values |
| Radio | Radio Button | Field name and choice values |
| Checkbox | Checkbox | Field name and choice values |
For any other field type, run a test submission before you launch. One known limit is ACF Pro's Repeater field, which does not work with WP User Frontend.
Control Who Can Submit and What Happens Next
A frontend form is open to the public, so decide on these four settings before you share it.
- Who can submit
- Whether posts wait for your review
- How you block spam
- Whether people can edit what they sent
Allow Guests or Limit It to Certain Roles
Open the form's Settings tab and find Post Permission. Choose Guest Post to let visitors submit without an account, or Role Based Post to limit it to roles such as Author or Subscriber. Guests can be asked for a name and email, which also creates an account for them. There is a full walkthrough of taking guest posts from the frontend if you want to go further.
Hold Submissions for Review
Set Post Submission Status to Pending Review. New entries then wait in Posts until you open them and click Publish, so nothing unchecked goes live.
Add a Captcha Field
Drag a reCaptcha or Cloudflare Turnstile field into the form, then add your keys under Settings, then General Options. The free plugin also includes Math Captcha and Really Simple Captcha fields if you would rather not use an outside service.
Let People Edit Their Own Entries
WP User Frontend creates a Dashboard page during setup. Logged-in users see their posts there with an Edit link, and the edit form saves back into the same fields. Your ACF data stays in step because both plugins read the same meta keys.
Show the Submitted ACF Data on Your Site
Because the values are ordinary ACF fields, you display user-submitted posts the same way as any other ACF data.
- In a theme template. Use
the_field( 'genre' )to print a value, orget_field( 'genre' )to use it in your own markup. - In a page builder. Builders that support ACF, such as Elementor Pro with its dynamic tags, can pull the fields into a design without code.
- In WP User Frontend itself. Each custom field has a Show data on post option, which appends the value to the post content for you.
Fix the Three Most Common Mapping Problems
When a field shows up empty in ACF, one of these three is almost always the cause.
- The names do not match. Compare the ACF field name with the WP User Frontend meta key, letter by letter. Capital letters, spaces and dashes all count.
- The location rule points at a different post type. Set the field group to the post type the form submits to.
- The choice values differ. A label can be anything, but the value before the colon must match the value shown when you tick Show values.
FAQ
Do I need ACF Pro for this?
No, the free Advanced Custom Fields plugin is enough. The integration also works with ACF Pro, except for the Repeater field.
Is the ACF integration part of WP User Frontend Pro?
No, it ships with the free WP User Frontend plugin. Pro adds extra features around it, such as more templates, registration form builders and modules. Here is a full comparison of the free and Pro versions.
What happens to posts submitted before I turned on compatibility?
They stay as plain post meta until you convert them. The Compatible & Migrate option converts older submissions into the format ACF reads, so test it on a staging copy of your site first.
Will I lose the data if I deactivate ACF later?
No, the values are stored as post meta by WP User Frontend. ACF only reads them, so they are still there, and they show again when you reactivate ACF.
Start Collecting ACF Data From the Frontend
An ACF frontend form does not need a single line of PHP. Match the names, match the choice values, point the field group at the right post type, and your visitors can fill in ACF fields from any page. Install WP User Frontend for free and build your first form today.