How to Track Facebook Pixel Conversion for Your WooCommerce Store
If you are doing online business, you already know how significant tracking Facebook pixel conversion is. And if you don't know, then you are missing something very important! Because with Facebook Pixel, you can gain insights into customer behavior, target the right audience, and increase conversions.
Actually, Facebook conversion tracking is not as difficult as it sounds. You can easily track Facebook conversion using only 4 easy steps. If you're wondering about these steps, let's dive in and explore each one.
In this guide, we'll walk you through setting up and using Facebook Pixel with WooCommerce. Whether you're new to online business or experienced, you'll learn how to track Facebook pixel conversions for your WooCommerce store. So, keep reading!
What is Facebook Pixel Conversion Tracking?
Facebook Pixel Conversion Tracking is a feature offered by Facebook that allows businesses and advertisers to monitor and measure the effectiveness of their advertising campaigns on the social media platform. The Facebook Pixel is a piece of code that you place on your website, which then enables you to gather data about user interactions on your site after they have clicked on a Facebook ad.
Here's how it works:
- Placing the Pixel: You insert the Facebook Pixel code into your website's header. This code generates a tracking pixel that collects data about user behavior on your site.
- Tracking User Actions: Once the pixel is installed, it starts tracking various actions that users take on your website, such as viewing specific pages, adding items to their shopping carts, making purchases, signing up for newsletters, and more.
- Attributing Conversions: The Facebook Pixel helps attribute conversions back to the specific ads that users interacted with before taking action on your website. This data helps you understand which ads are driving the most meaningful actions on your site.
- Optimizing Campaigns: With the data collected by the Facebook Pixel, you can analyze the performance of your ads and optimize your advertising campaigns based on real-time insights. You can refine your targeting, adjust your ad creatives, and focus on the campaigns that yield the best results.
- Creating Custom Audiences: The data collected by the Facebook Pixel also enables you to create custom audiences. These audiences consist of users who have interacted with your website in specific ways. You can then use these custom audiences for retargeting purposes, showing ads to users who have already expressed interest in your products or services.
Facebook Pixel Conversion Tracking provides valuable insights into user behavior and the effectiveness of your advertising efforts. It allows you to make data-driven decisions to optimize your campaigns, increase conversions, and improve your return on investment.
Tracking Facebook Pixel Conversion: Let's Do It for Your WooCommerce Site
As a marketer and also a business owner, you must know – how your visitors, users, and customers are interacting with your website. If you can feed this data to Facebook, targeting those people over social media becomes easier.
This means you can let Facebook know which people you want to show your targeted advertisements. If you can deliver the right message to the right people, the chances are high that they will buy from you!
To do that, follow these 4 steps:
- Choose a WordPress Plugin- WooCommerce Conversion Tracking
- Configure the WooCommerce Conversion Tracking Plugin
- Create and Connect Facebook Pixel ID
- Track Facebook Pixel Conversions
Step 01: Choose a WordPress Plugin- WooCommerce Conversion Tracking
You will need a powerful tool that can track different important events in your store and send that data directly via your Facebook Pixel to the Ad platform.
Well, funny you should ask. WordPress has plugins for almost everything now. That means you will have a tool/plugin for any complex work and sometimes you will get your task completed in one click. So,
What if I told you that you can get such a tool for free?
Yes, you heard right.
WooCommerce Conversion Tracking, a free WordPress plugin, helps you the most for,
- Obtaining advanced user behavioral data
- Tracking your WooCommerce business better
- Getting detailed conversion data for analytics
- Creating better ad campaigns
- Increasing ROI from all paid media investments
- Securing better customer retargeting for future marketing efforts
However, it also allows you to track and send Conversion data of your store to Facebook. Let's find out how.
Step 02: Configure the WooCommerce Conversion Tracking Plugin
As you already know, WooCommerce Conversion Tracking is FREE, you can download and install it anytime you want from WordPress.org.
Simply, go through your Add Plugins page, search for ‘WooCommerce Conversion Tracking', and hit the install button. Finally, activate it.
WooCommerce Conversion Tracking supports 3 ad platforms in the Free version including Facebook, Twitter, and Google Ads. If you want support for retargeting platforms like Perfect Audience, you can consider the WooCommerce Conversion Tracking Pro version.
To enable Facebook Pixel Tracking, navigate to –
WordPress Admin Dashboard → WooCommerce→ WooCommerce Conversion Tracking.
Now, click on the toggle button beside Facebook under Integration Settings.
Must Read: How to Install Facebook Pixel on WordPress & WooCommerce Store
Step 03: Create and Connect Facebook Pixel ID
In this step, first, you have to create a Pixel ID for you and then you need to connect that ID to your website. So, let's get started!
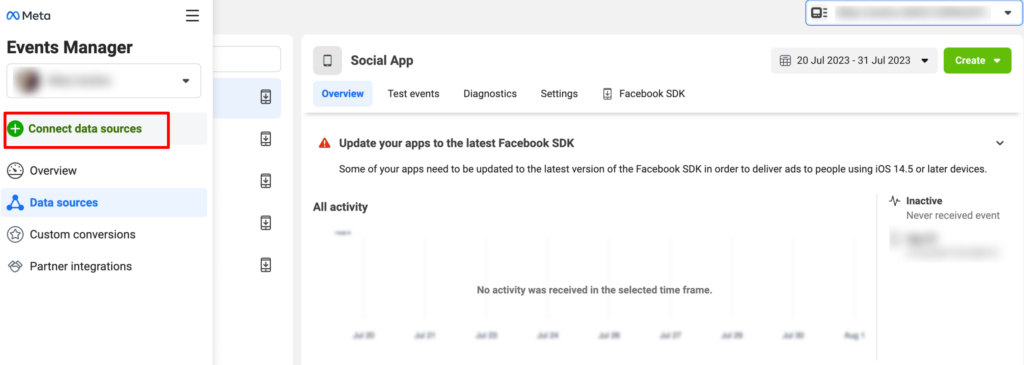
Go to your Event Manager by navigating Meta Business Suite -> All Tools.

There you'll find an option “Connect Data Source”, click on that option.
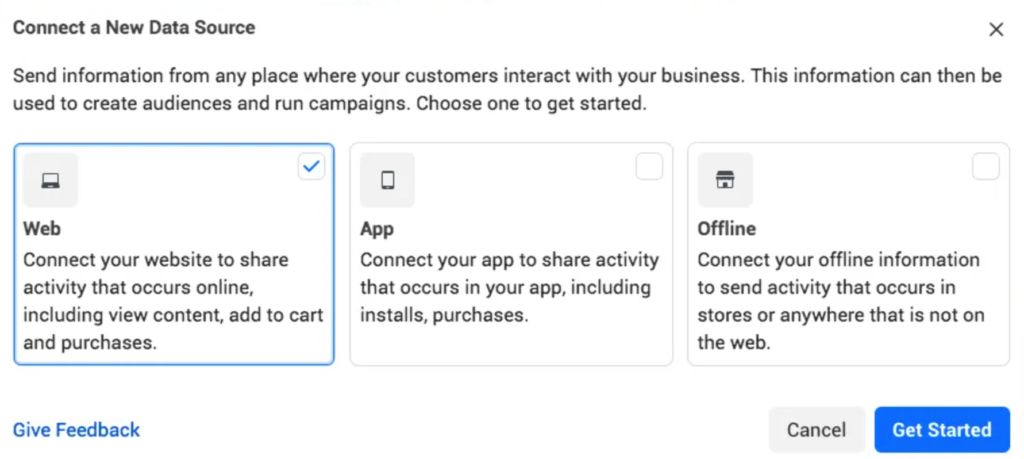
Now click on the “Web” and hit the “Get Started” button.
Note: If you don't have a business account in Business Manager, you won't be able to connect the Web option from this interface. To create a business account in Business Manager, visit this page.
Then give your pixel a name and click on the blue “Create Pixel” button.
Finally, finish by entering the URL of your website, then click on the blue “Verify” button.
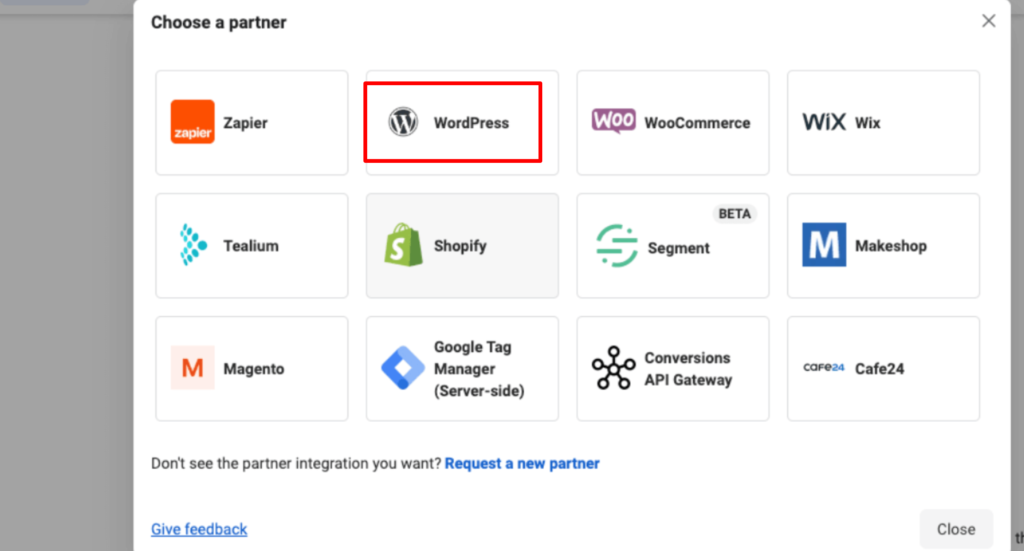
Then select the partner you want to install the Pixel for.
Now copy the Facebook Pixel ID under your Pixel name.
Then paste it into your WooCommerce Conversion Tracking Facebook integration settings page.
Step 04: Track Facebook Pixel Conversions
Please note that WooCommerce Conversion Tracking allows you to integrate with Facebook for free and also gives some basic events to track. If you need advanced and more specific events, you will need the premium version.
You will find available events on the settings page of WooCommerce Conversion Tracking, just below where you have put your Facebook Pixel ID.
Simply, check the events you want to track and it will start tracking them. When a user interacts with your site and triggers any of these conversion events, WooCommerce Conversion Tracking will send that data to Facebook Ad Platform.
How Does Facebook Pixel Conversion Tracking Work?
Now that you have successfully added the Facebook Pixel ID to your WooCommerce store using WooCommerce Conversion Tracking and started sending conversion data to Facebook.
When your users will perform any of the following activities/ events on your store –
- Completes registration
- Search for products
- View product pages
- View product categories
- Adds products to their wishlists
- Add something to their carts
- Initiate checkout
- Purchase
WooCommerce Conversion Tracking will send that specific data to your Facebook Ad account. This way you will be able to track some users on Facebook and curate targeted ads just for them.
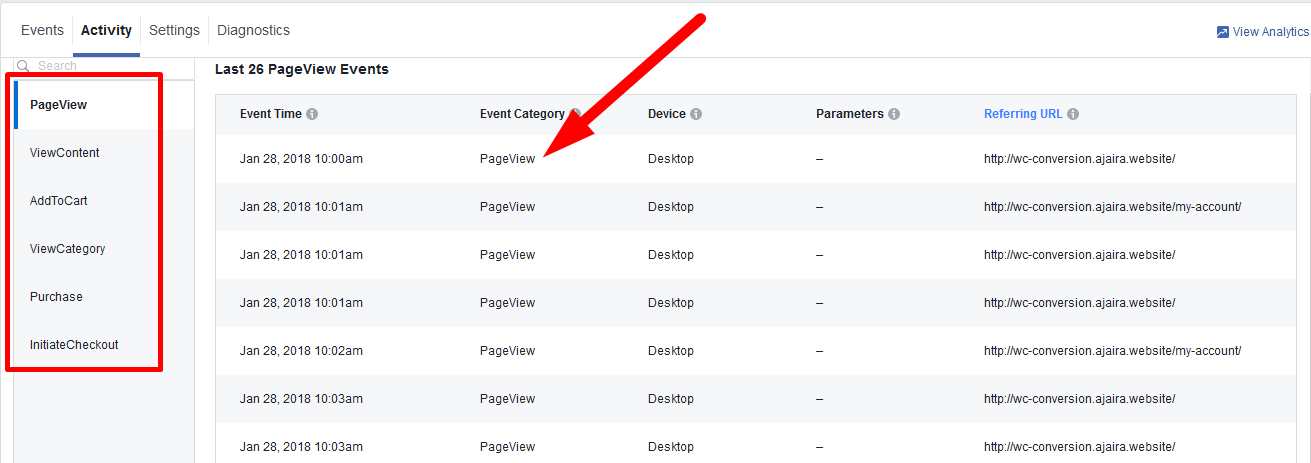
This is how you will view the conversion or events data on your Facebook Ads platform.
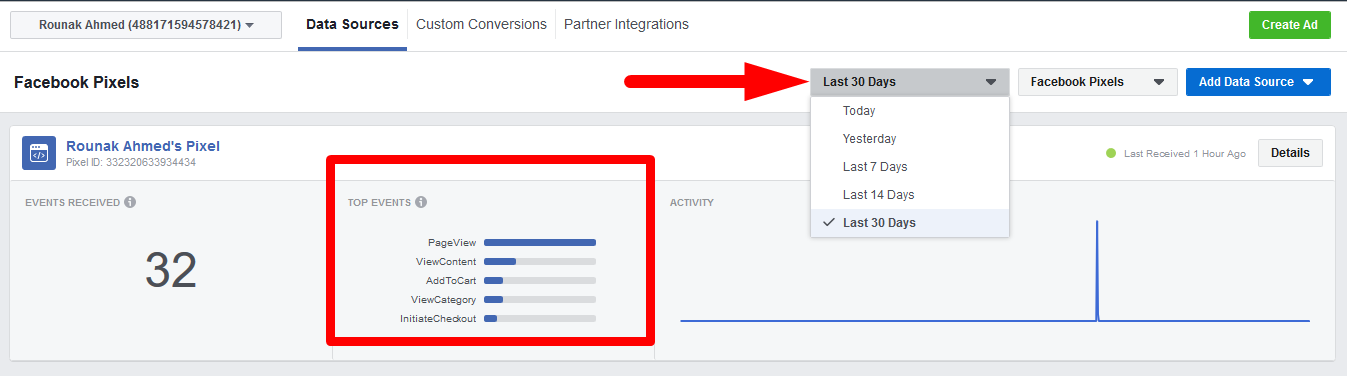
You can also view the details activity list or data that WooCommerce Conversion Tracking has passed to Facebook.
To learn more about the Conversion Events for Facebook, you can read this doc.
Tracking Facebook Pixel Conversion- Key Takeaways for You
You might still be confused about what to do with this data.
Don't worry, when you have enough conversion data, you can use them for retargeting. While creating your Facebook Ad, you will be able to select target audience using this valuable data.
So, why wait?
Simply install WooCommerce Conversion Tracking plugin and choose suitable events. Start receiving the free conversion data and create your Facebook retargeting ads curated just for your WooCommerce store!