


Everything About Remarketing – Tips, Benefits, and Examples
Remarketing happens when someone visits your site, shows interest, then leaves without buying. You reach out again with ads or messages to bring them back and finish the purchase.
Remarketing is a digital marketing strategy that involves targeting individuals who have already interacted with your website but did not complete the purchase.
99.9% of eCommerce store owners can benefit from retargeting their website visitors through running remarketing campaigns. In fact, if you’re not running these campaigns, it’s safe to say that you’re leaving money on the table.
In this step-by-step guide, we'll take you through everything you need to know about remarketing, including what is remarketing, how it works, and how to implement it for your eCommerce store.
By the end of this guide, you'll have a clear understanding of how remarketing can help you boost your eCommerce sales and take your business to the next level. So, let's dive in!
What is Remarketing?
Remarketing means when an online shopper comes to your website but does not make any purchase, then whatever steps you take to get that shopper back on your website to complete the purchase is called remarketing.
Your site stores small cookie files in the visitor’s browser. These help you follow their activity so you show ads based on what they viewed.
Remarketing uses cookies, which are small text files stored on a user's computer when they visit a website. These cookies should track a user's browsing behavior and preferences, allowing advertisers to display targeted ads to users who have already interacted with their website.
For example, if a user visits your website and adds a product to his cart but does not complete the purchase, you can use remarketing to show the user ads featuring that product or similar products.
These ads should be displayed on other websites or social media platforms, encouraging the user to return to your website and complete the purchase.
Here is a graphic that will help you understand how a remarketing campaign works:
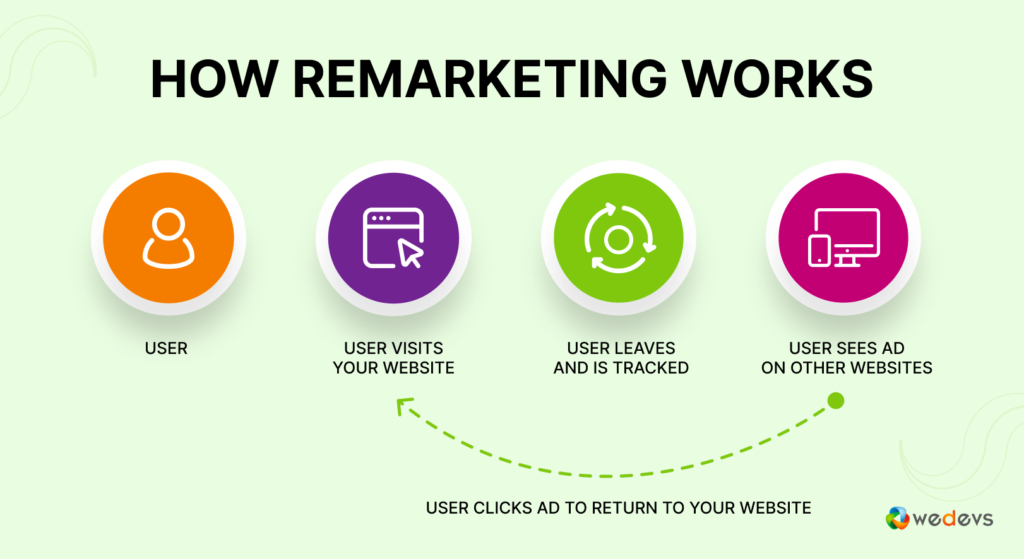
These are the steps involved in a remarketing campaign:
• A shopper visits your site
• They leave without buying
• Your tracking tools tag the visitor
• They see your ads on social media, Google, or other sites
• They click and return
• They complete the action you want
So, this is how a remarketing campaign works!
Remarketing vs Retargeting: Let’s Clear the Confusion
People often mix up remarketing and retargeting. They sound similar, but they’re not the same.
Retargeting focuses on ads. Remarketing covers everything you do to re-engage someone, including email, SMS, or even phone calls.
So, it's safe to say that every retargeting is remarketing, but not all remarketing is retargeting.
Let's check this remarketing vs retargeting comparison table to clear your confusion:
| Remarketing | Retargeting |
|---|---|
| Refers to any marketing strategy that involves reaching out to individuals who have already interacted with your brand in some way | Refers specifically to the practice of targeting individuals who have interacted with your website or digital ads |
| This includes email marketing, ads, phone calls, or any other marketing channel | Primarily focused on serving targeted ads to users who have previously visited your website or engaged with your ads |
| Can be both online and offline | Primarily an online marketing strategy |
| Targets users based on past interactions with your brand, regardless of the specific action they took | Targets users based on specific actions they took on your website or within your digital ads |
Note: In general, Retargeting refers to paid retargeting ads. As this post is all about remarketing, so, we are emphasizing the procedures of the remarketing campaign. But as we have already cleared that- retargeting and remarketing have lots of similarities and marketers use both terms, sometimes, interchangeably.
5 Major Types of Remarketing That You Should Know About
As we have mentioned earlier, every retargeting is a type of remarketing, but not all remarketing falls under retargeting. When we say retargeting, we're referring to any paid advertisement.
On the other hand, remarketing includes any campaign you run, including paid ads, to bring back customers who are interested in your product or service.
Here are 5 types of remarketing that as a marketer you must be aware of:
1. Email Remarketing
Email remarketing is the process of collecting emails from your potential customers and targeting them with a personalized email campaign. You can collect emails through a signup form, checkout page, popup, subscription form, and so on.
One of the reasons why this approach is successful is because it targets customers who have already shared their contact information with you. Since they are already familiar with your brand, they are more likely to consider making future purchases.
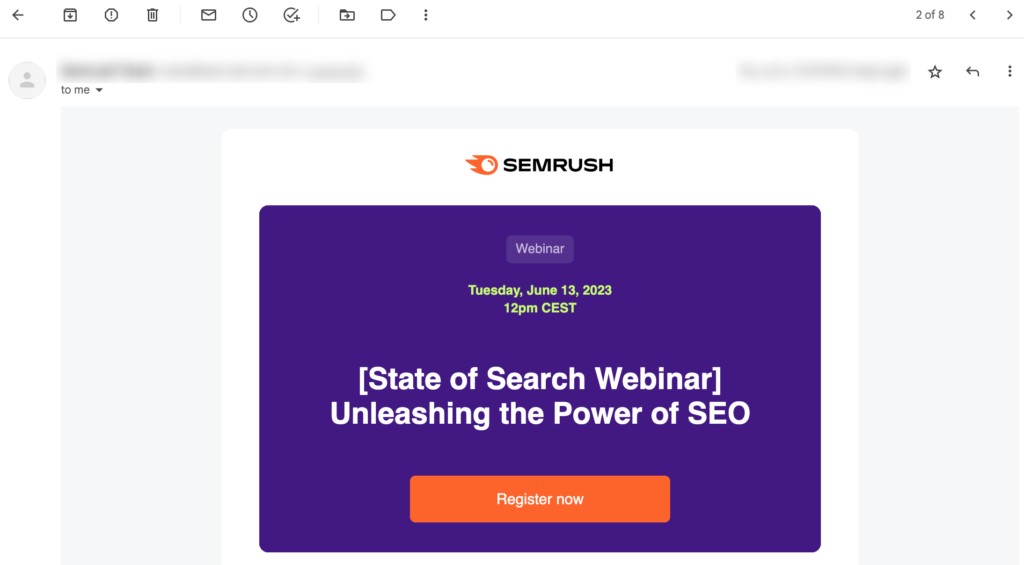
Furthermore, email remarketing is a cost-effective method because it leverages existing data that you have readily available.
2. Search Engine Remarketing
Search remarketing, also known as search retargeting, is a form of paid advertising that specifically targets individuals while they are searching for specific keywords on Google. This is one of the most used tactics for remarketing.
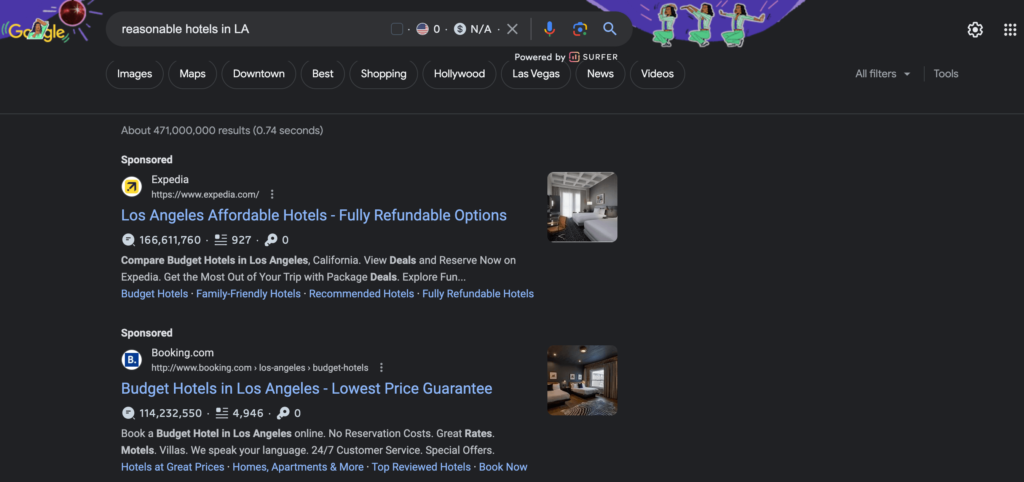
If you run a search engine remarketing campaign on your brand keyword “reasonable hotels in LA” (let's assume), searchers will see your ad on top of their search engine result page while they search for that specific or related keyword with a “sponsored” label beside it.
3. Display Ads Remarketing
Display remarketing is a very common type of remarketing ads. These ads are highly personalized and use the Google Display Network to appear on websites other than your own. When someone visits a website that participates in Google’s ad network, they may see targeted ads based on their previous Google searches.
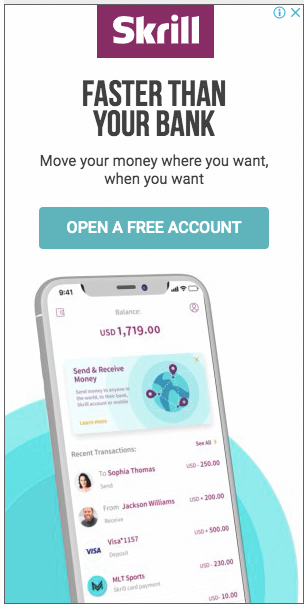
You can create lists of keywords and phrases related to your products or services, and you can target relevant searchers with this list of keywords.
4. Dynamic Remarketing
Dynamic remarketing is a powerful technique that allows you to connect with potential customers by displaying customized ads tailored to their previous interests.
Here's how it works: Let's say a customer visits your website and explores a specific product page. Later on, you can use dynamic ads to showcase items from that very page to capture their attention.

What makes dynamic ads special is that they appear differently to each viewer, catering to their unique preferences. This personalized approach significantly boosts conversion rates and engagement.
5. Social Media Remarketing
One of the benefits of using social media for remarketing is that you can access detailed analytics about your followers and customers. This information can be used to target ads more effectively, and can also help your business measure the success of marketing campaigns.

Like search engine remarketing, social media marketing also shows campaigns with “promoted” labels.
Honorary mention:
Apart from online remarketing campaigns, there offline remarketing campaigns as well. Here we are mentioning two popular offline remarketing types:
- Phone calls: You have to collect contact numbers of your non-converted or already converted customers and then target them with direct phone calls.
- Personalized messages: Like phone calls, here too you need your customers' contact numbers. Then send them personalized messages to get them back again.
Benefits of Remarketing for Your eCommerce Store/Marketplace

Remarketing is a powerful way for an eCommerce store to reach potential customers who have already shown an interest in your products. Here are some of the benefits of remarketing:
Remarketing gives you a second chance to turn interested visitors into customers. Here’s why it works so well:
• You reach people who already liked your products
• You spend less than broad advertising
• You stay top-of-mind even after they leave
• You show ads based on their exact behavior
• You get better ROI because the audience is warmer
Overall, remarketing is an effective way to reach potential customers and increase conversions for your eCommerce store.
How to Set up a Remarketing Campaign in Google Ads for WordPress Stores or Marketplaces

Creating remarketing campaigns using Google Ads is a straightforward task. You just have to follow 5 steps to get your job done. Here are these steps:
- Create a Remarketing List
- Add a Tracker on Your Site
- Create a Remarketing Campaign
- Launch Your Remarketing Ads
- Monitor Your Remarketing Campaign Performance
If you have previous experience in using Google Ads, this tutorial will be very easy for you. Having said that if you haven't used Google Ads before, no worries, follow this guide to launch your first-ever remarketing campaign. In case anything seems to you problematic, you should let us know through the comment box. We would love to help you out.
So, without any further delay, let's get started!
Step 01: Create a Remarketing List
The first thing that you will require to launch your remarketing campaign is to create a remarketing list. How would do that?
Well, log in to your Google Ads account and then navigate to Tools and Settings -> Shared Library -> Audience Manager.
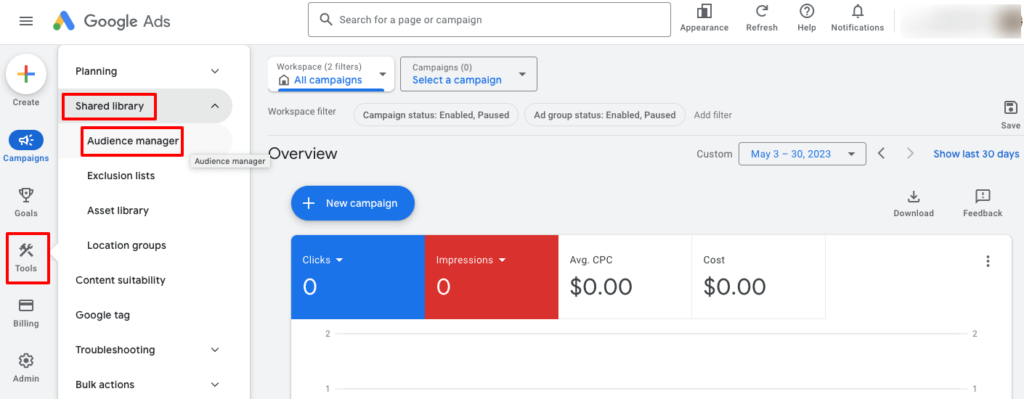
Next, click the option to add a remarketing list. When you click the “+” button, it will open a drop-down menu where you can choose what kind of list you’d like to create. The options are:
- Website Visitors
- App users
- YouTube visitors
- Custom list
- Custom combination

If you’re setting up a remarketing campaign to target website visitors, name your list and fill out the information in the form provided.
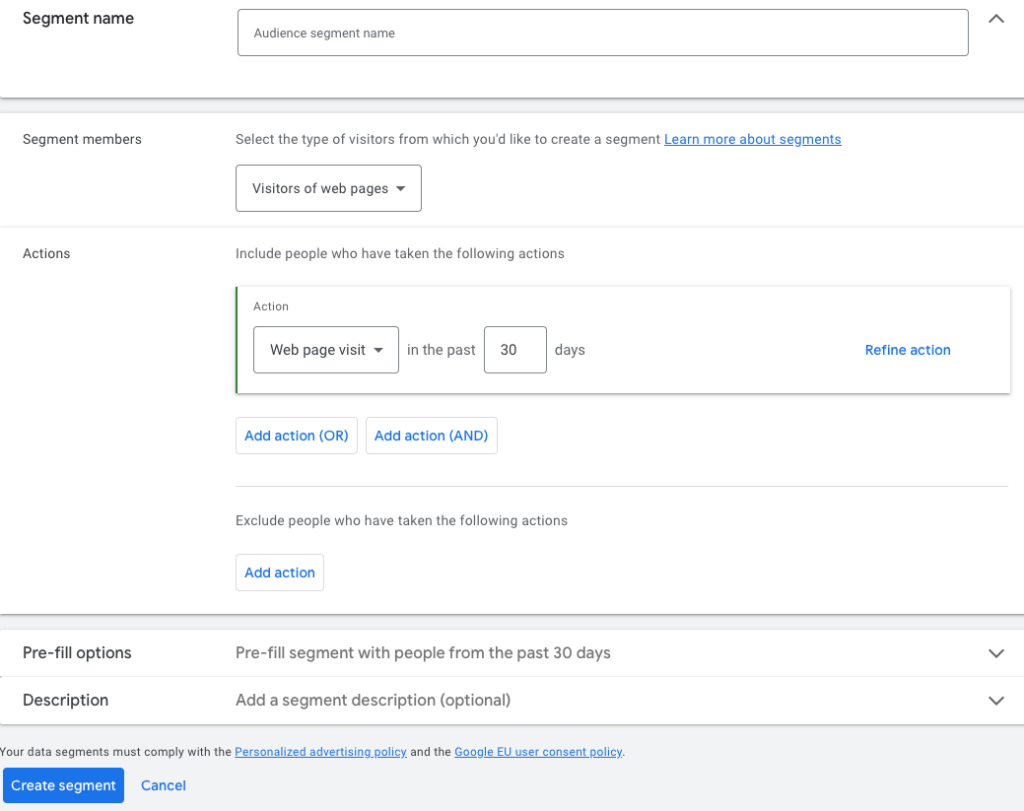
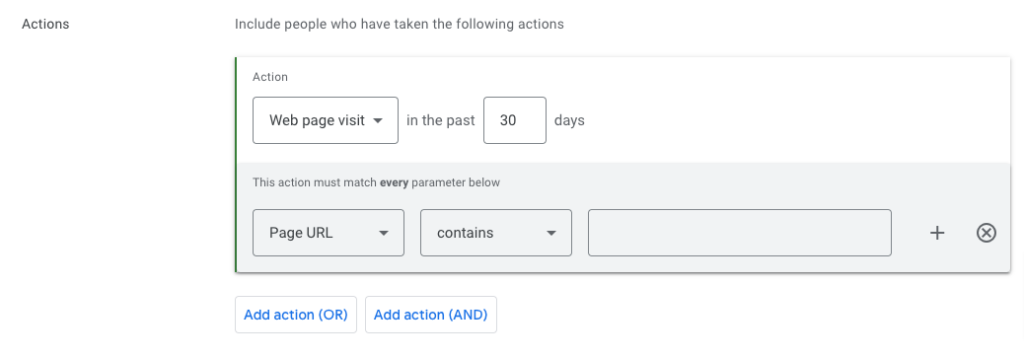
Once you’ve chosen the type of list you want to create, add the URL for the page that the remarketing campaign will apply to (i.e., your checkout page, a particular product page, or a landing page).
Once you are done, just click the “Create segment” button to complete this step. Now move on to the next step.
Step 02: Add a Tracker on Your Site
When you are planning for remarketing, it is very important to target only those prospects who have visited your site but didn't purchase anything. To target these prospects, you will require a tracker. Otherwise, you won't be able to differentiate who are your already converted customers and who are non-converted customers.
To track your prospects either you can use Google Analytics or a WordPress plugin. We are going to show you both the ways.
a) Track Your Users with Google Analytics
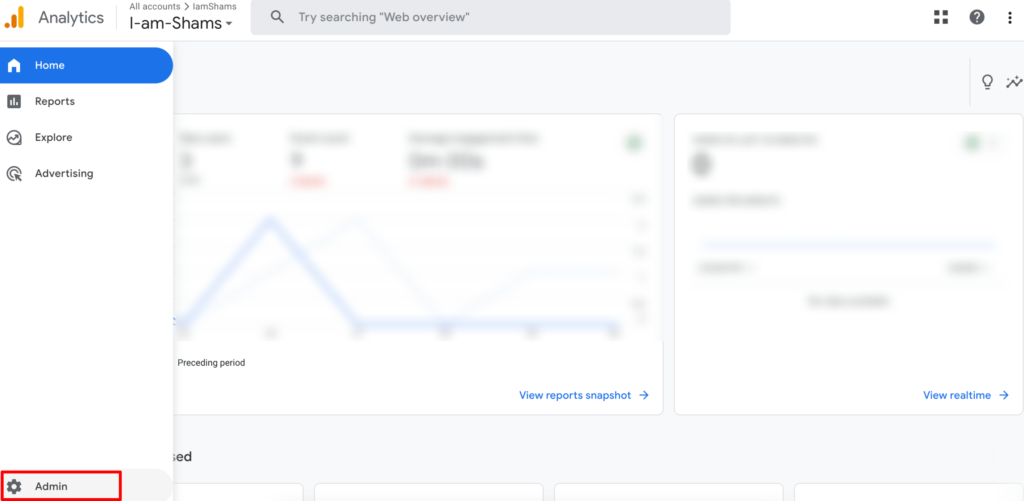
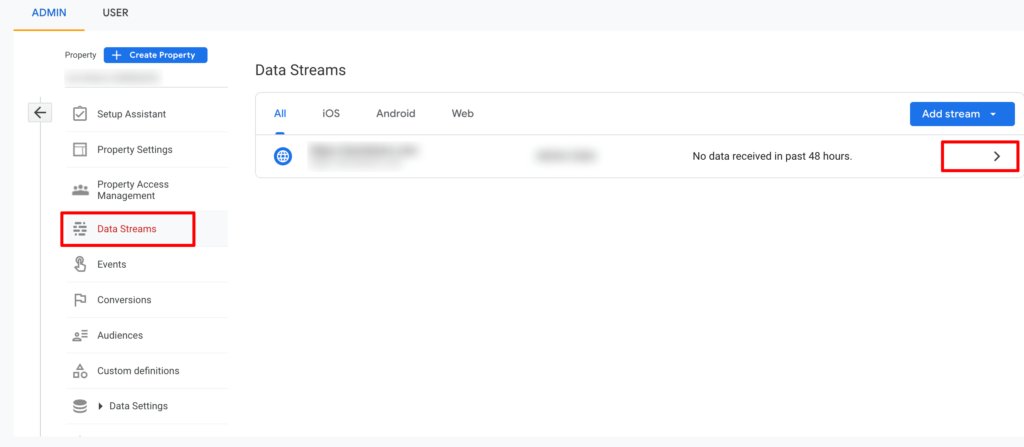
Go to your Google Analytics account and click on the Admin option.
Now click on the Data Streams and you will be redirected to the data streams list. Then click on your site stream from the All tab.
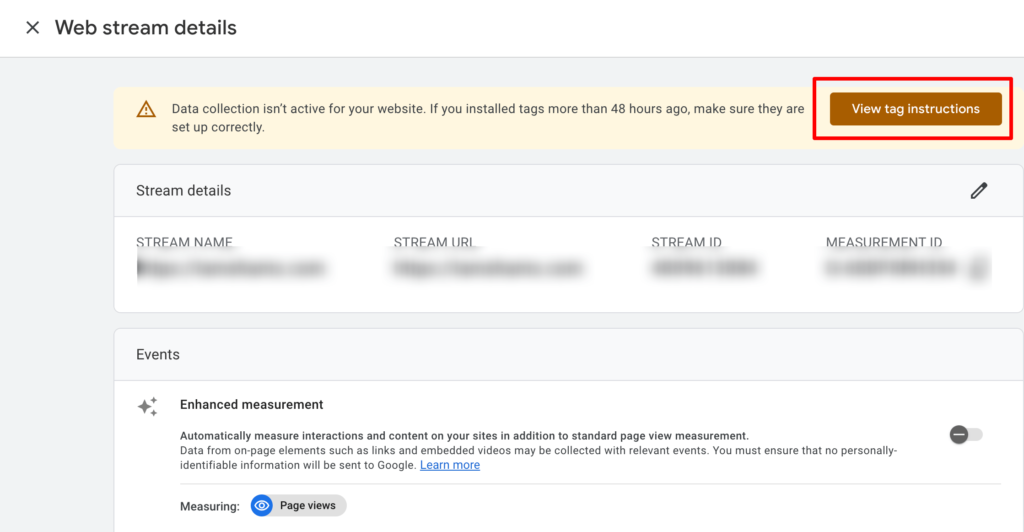
A new window with your site stream details will appear, click on the “View tag instructions” option from the same window.
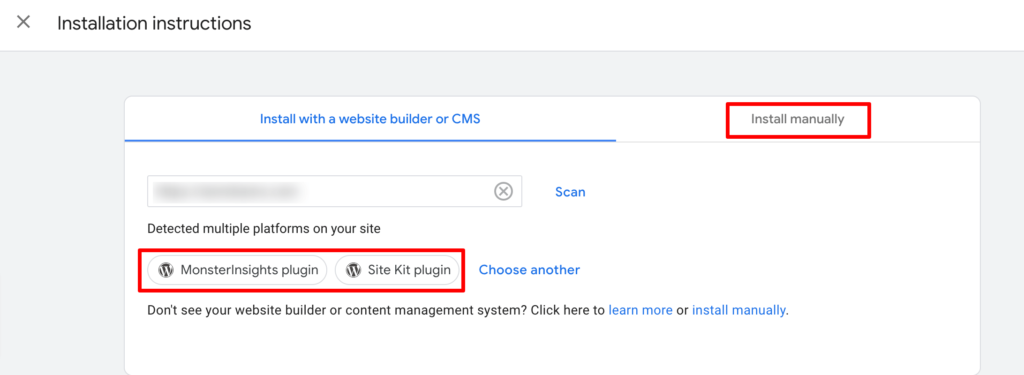
In the next screen, you'll find ways to install the tracking ID on your website. If you're using plugins like MonsterInsights or Site Kit, you can choose the option from this screen and complete the process within a few clicks.
Or, if you want to do it manually without using an extra plugin, you can do that as well. Click on the “Install manually” option from this interface.
After clicking on the “Install manually” option, you will get the code to copy. Now copy the code and paste it to your site.
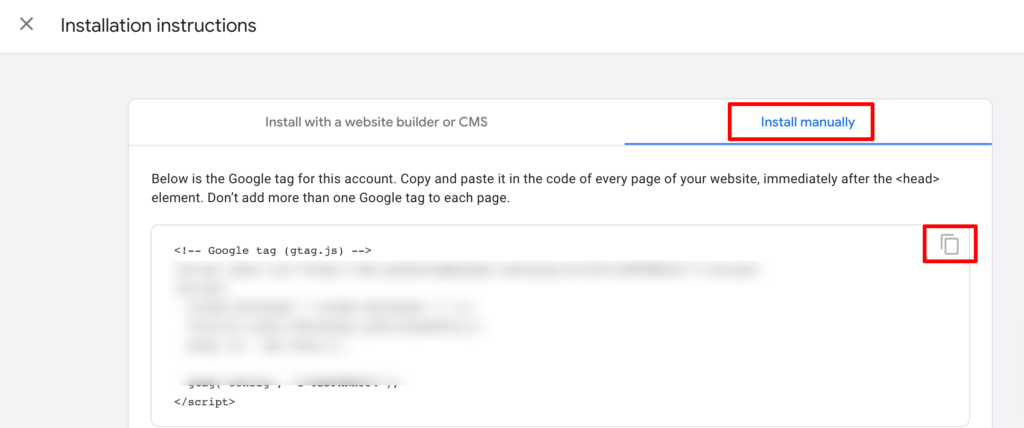
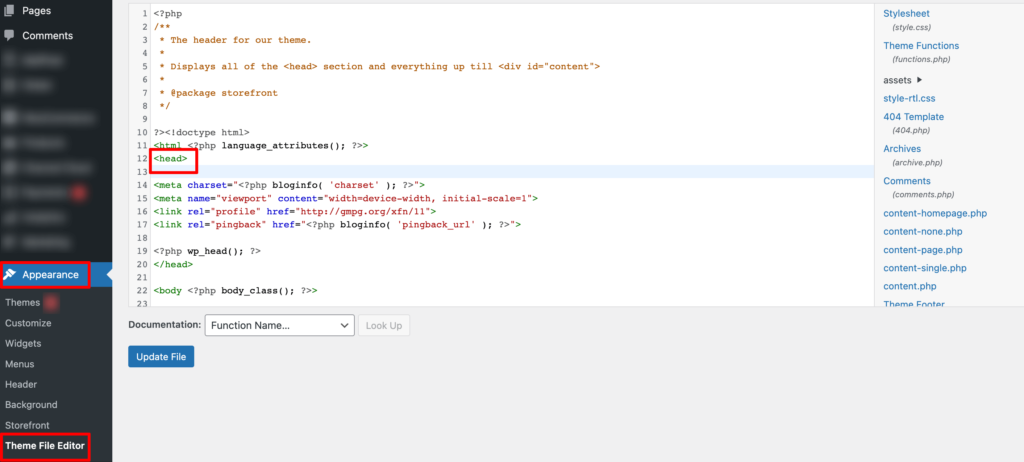
To paste the code, navigate to your WordPress dashboard -> Appearance -> Theme File Editor, then paste the code under the “head” tag. When you're done, don't forget to click the “Update File” to save all the changes.
Congratulations! You've successfully completed the process to track your site users using your Google Analytics account.
b) Track Your Users with a WordPress Plugin
You can easily track who is your converted and non-converted customers using a WordPress plugin called WooCommerce Conversion Tracking. On top of that, this plugin will help you to monitor how your campaign is performing.
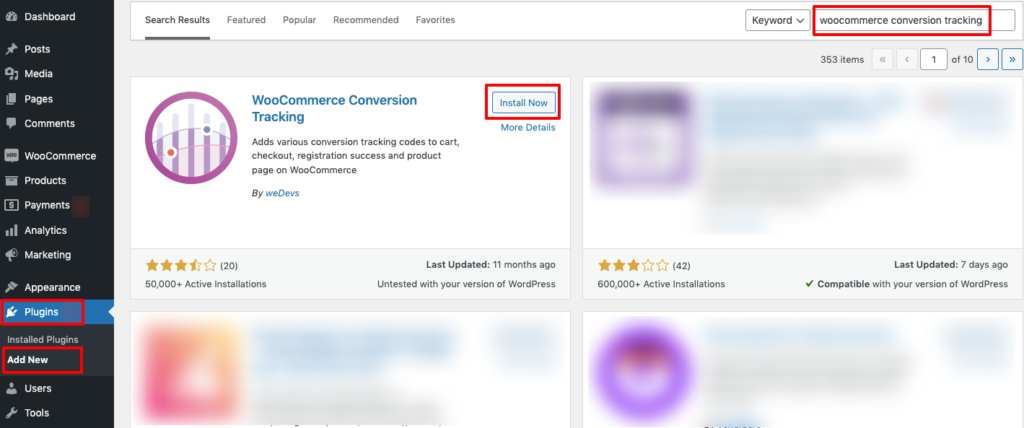
Go to your WordPress dashboard, then navigate to Plugins -> Add New and search for the plugin “WooCommerce Conversion Tracking“. Afterward, click on the Install button to install and Activate button to activate the plugin.
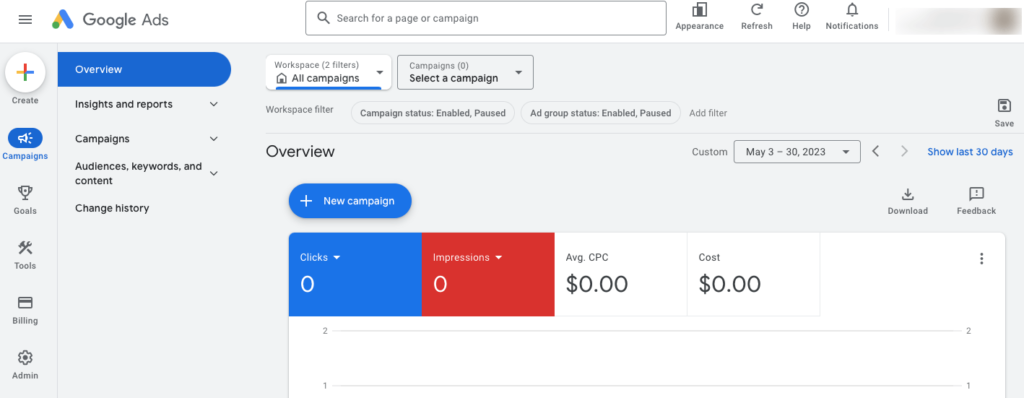
Now login to your Google Ads account. Once you do that, you will be redirected to the following page:
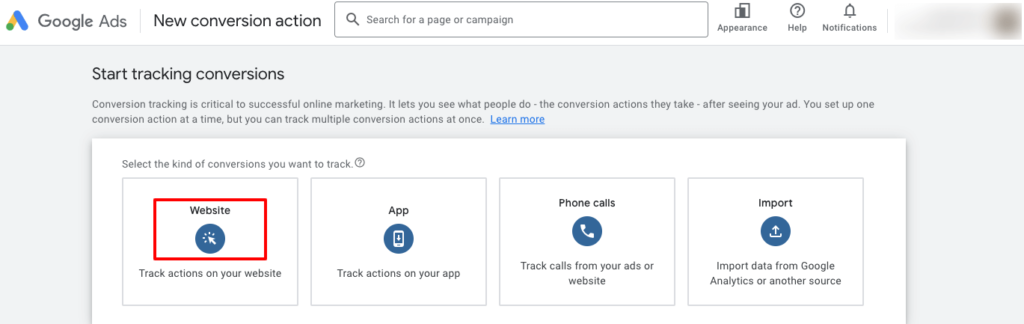
Hit the “+” sign and then click on the “Conversion action“.

Now click on the “Website” option.
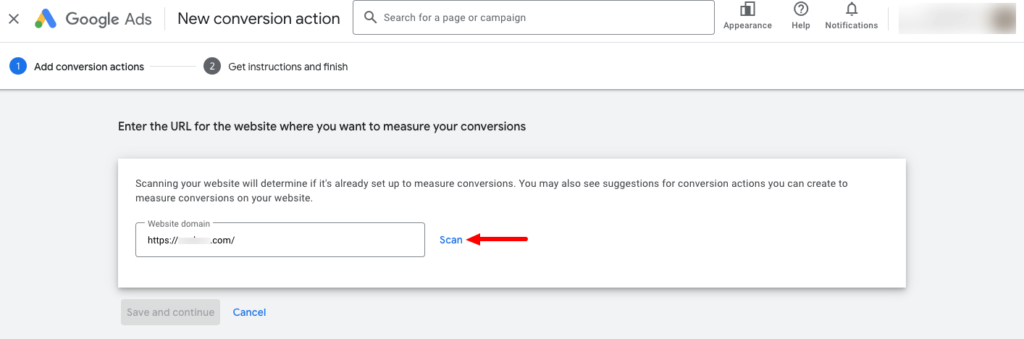
In this stage, you will be asked to scan your website. Insert your domain URL in the box and then click on the Scan button.
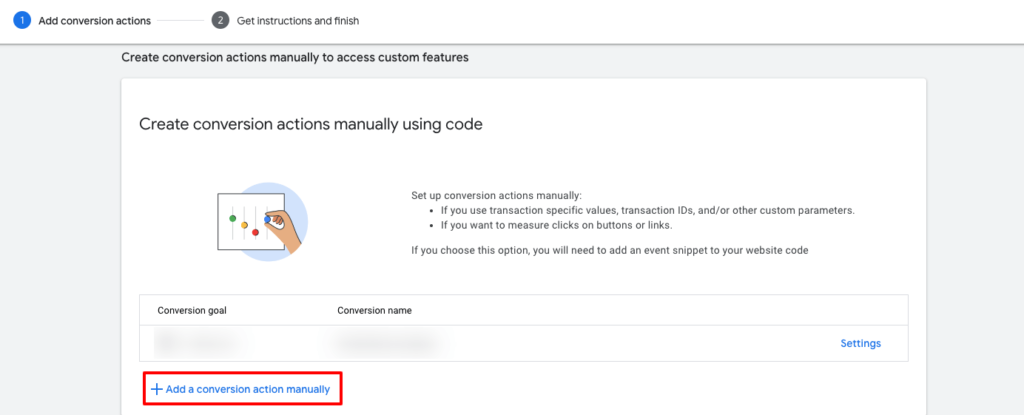
After scanning your site, you will get an option to add conversion action manually. Click on the marked option.
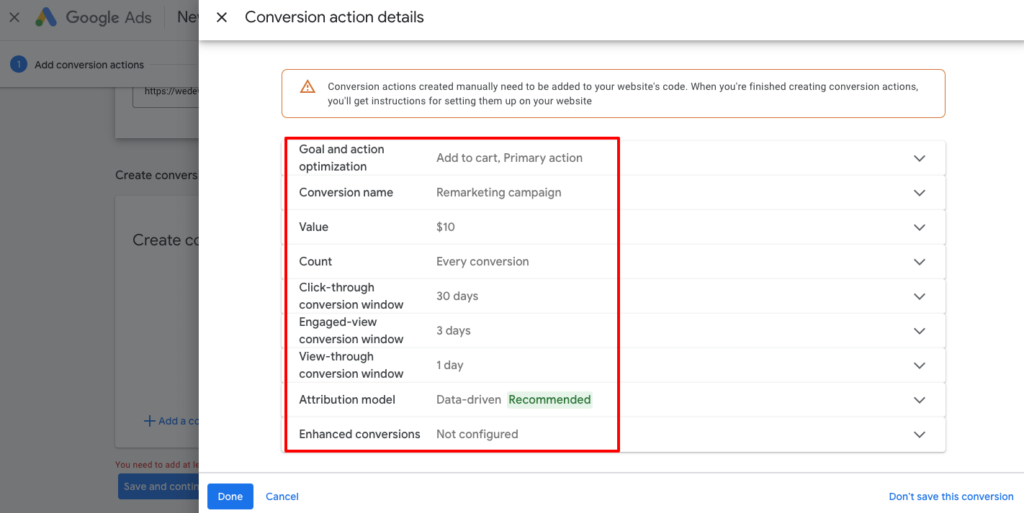
There you'll find several options to configure:
- Goal and action optimization: This is the action you’d like to track. For example, when a user subscribes to your newsletter, makes a purchase, adds a product to a cart, submits a contact form, and more. Here, we are going to select ‘Add to cart’ as the goal.
- Conversion name: Give it an easy-to-remember name.
- Value: Google Ads lets you choose the same value for each conversion, assign different values for conversions, or don’t use a value for conversion action. We are using the ‘Use the same for each conversion’ option and enter a value of $10 for this tutorial.
- Count: Now you have to choose how many conversions to count per click. You can use the ‘Every’ option in an eCommerce store and count each purchase as a conversion.
After selecting these options, simply click the ‘Done’ button at the bottom.
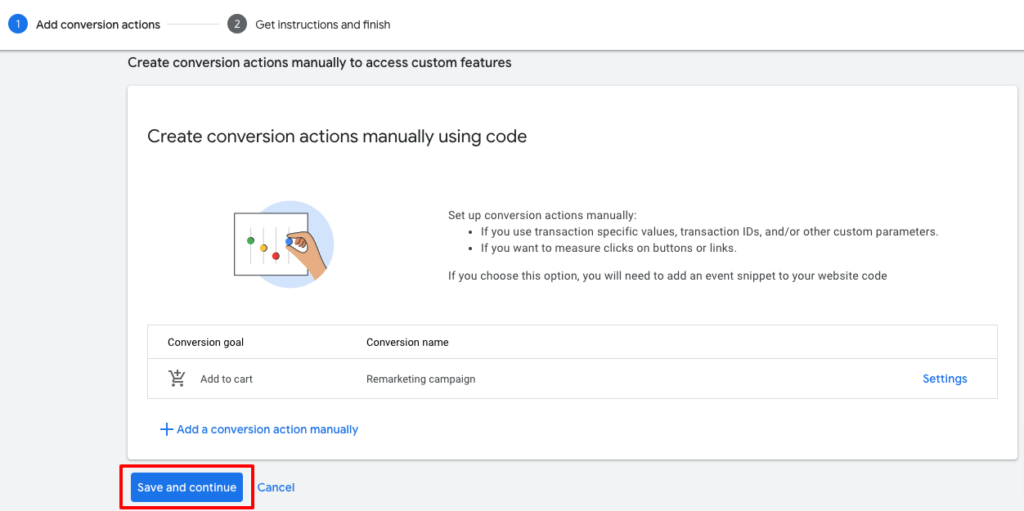
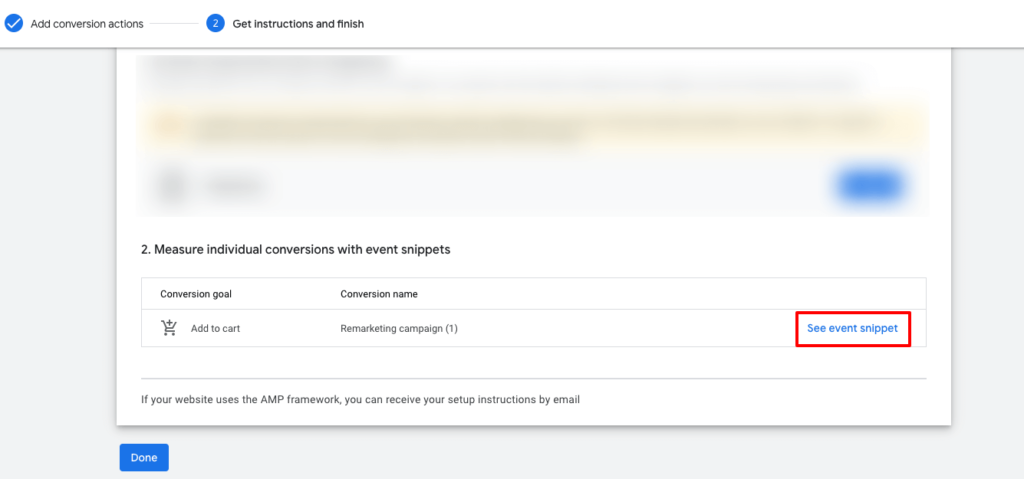
You can now see your conversion action under the “Create conversion actions manually” section. Go ahead and click the “Save and continue” button to get instructions for adding the tracking codes for conversion action to your site.
There you will find an option named “See event snippet“, click on that.
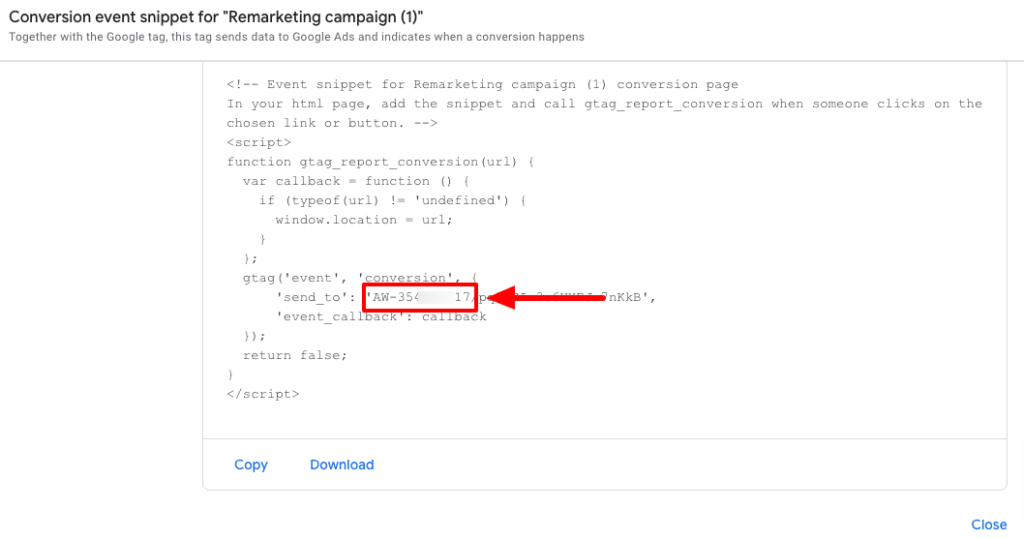
There you'll find your Account ID. Follow the screenshot to get your ID. Now copy that ID and get back to your WordPress dashboard.
Login to WP Admin Dashboard -> WooCommerce -> Conversion Tracking. Then, turn the toggle button on to activate Google Ads functionality.
Next, paste the Account ID in the given field.
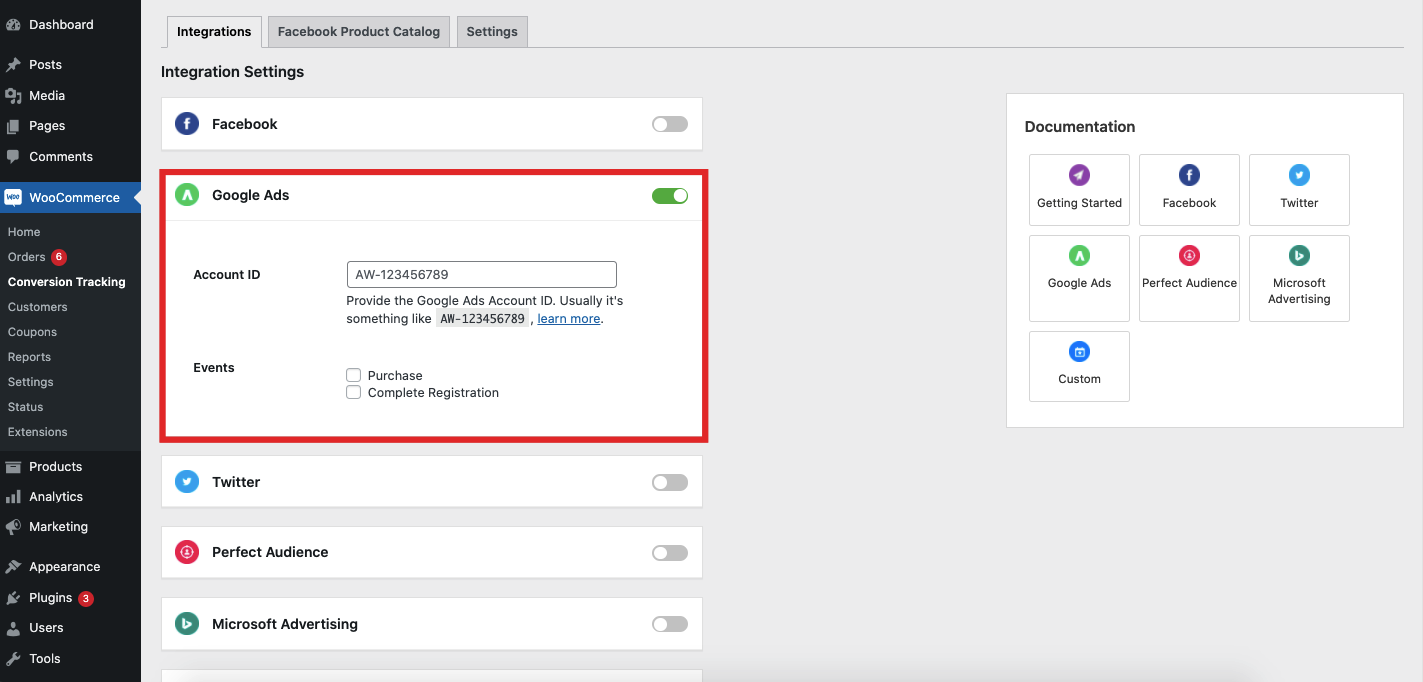
Now hit the Save Changes button and this is how you should track your customers who have already purchased something from your eCommerce store and who have left your site without buying anything.
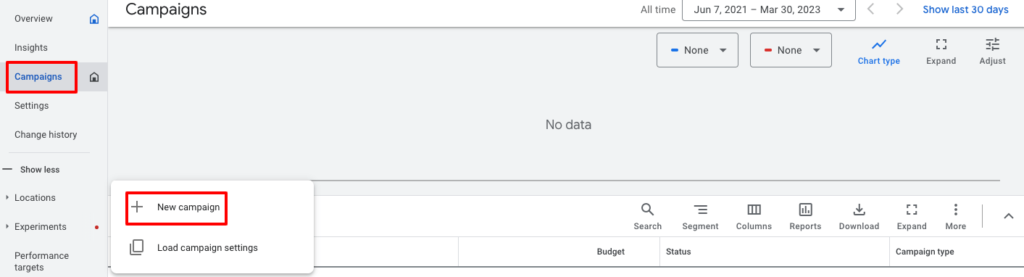
Step 03: Create a Remarketing Campaign
To create a new campaign, click on the Campaigns option from the left sidebar of your interface. Then click the “+” sign to create a new campaign.
Now select an objective to tailor your experience to the goals and settings that will work best for your campaign. You should choose a campaign objective that matches your goals.
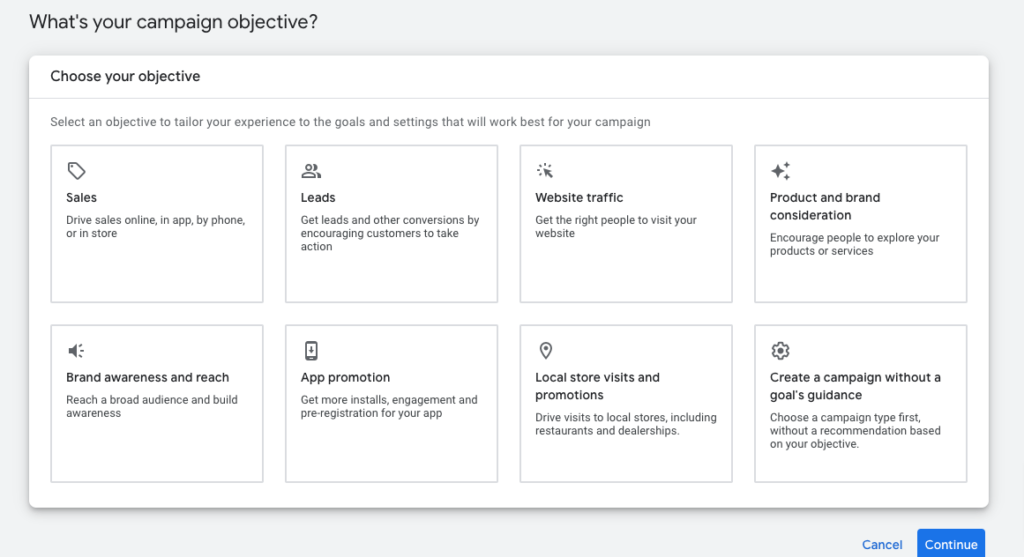
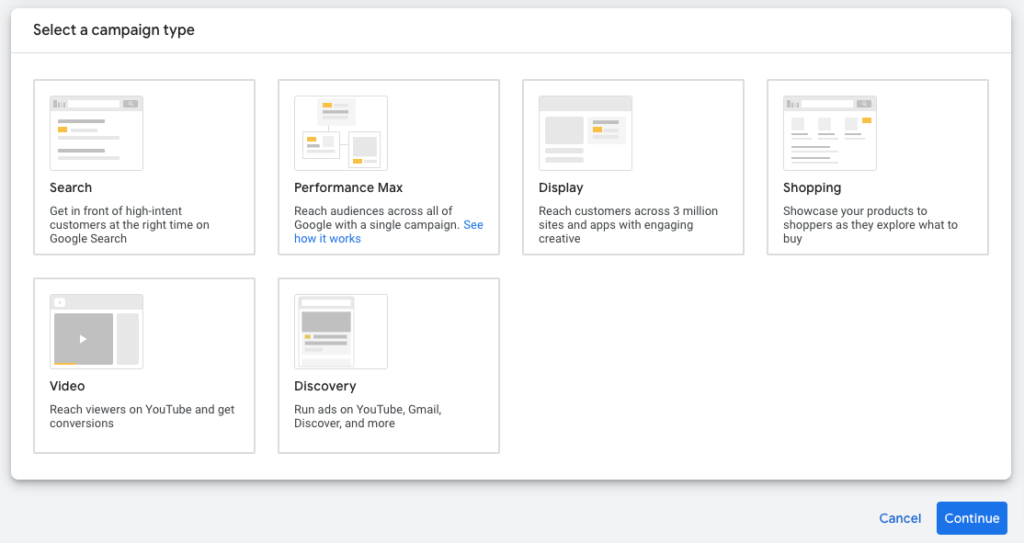
You’ll be prompted to choose the type of campaign you want to run. The easiest option here is to choose display remarketing, but you can also select search remarketing or any other type that matches your goals.
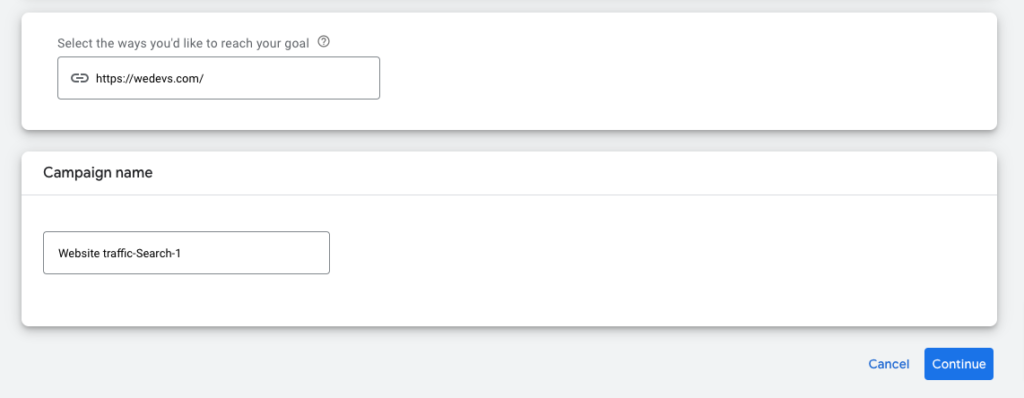
Now insert your website URL and give a name to your campaign to complete this step.
Step 04: Launch Your Remarketing Ads
In this step, you have to create the visuals and copy for your ad campaign, as well as the budget and timeframe. Do this as you would for any other type of ad campaign and hit Publish when you’re ready for it to go live.
Here are the settings that you have to configure:
- Bidding: Select what you want to focus on like Conversion, Conversion value, Clicks, etc. Also, you can set a target cost per action (optional).
- Network: There are two networks- the Search and Display networks. You can choose one or both.
- Locations: Now choose your target location. You can choose any region that you want, e.g., the USA.
- Language: You are free to choose more than one language here.
- Audience: This is the audience segmentation part. Here you need to identify a few things about your target audience like how they have interacted with your business, who they are, what their interests and habits are, and a few more things.
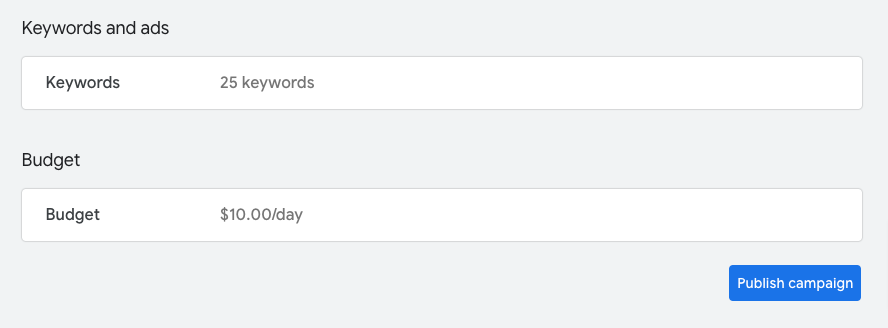
- Keywords: Keywords are words or phrases that are used to match your ads with the terms people are searching for. You can set a range of keywords here.
- Budget: Set your average daily budget for this campaign.
That's all!
Now review all the information that you have inserted to run this campaign. If everything is okay, you can press the “Publish campaign” button to publish this campaign.
Congratulations! You have successfully published your first-ever remarketing campaign.
Step 05: Monitor Your Remarketing Campaign Performance
After launching your remarketing camping, it's time to check its performance.
First of all, check the page view. Google Analytics will show you whether there has been an increase in visitors to specific pages on your site. If you’re running an ad on a specific product page, you’ll be able to see if the number of visitors has increased since running your campaign and where they’re coming from.
Then check the conversion rate. As remarketing campaign aims to get back your prospects who visited your site but didn't purchase, so conversion rate should be increased.
Stay on top of your campaigns by regularly checking their success, tweaking elements that aren’t performing so well, and testing each campaign until it’s getting the results you want.
Examples of Successful Remarketing Campaigns
Here we are going to discuss three successful remarketing campaigns so that you can take inspiration from these examples while creating your own remarketing campaign:
i) Spotify
Spotify uses traditional display remarketing to reach people as they browse other sites on the web. After seeing the ad, people can easily click the CTA button to get three free months of Spotify Premium. The offer speaks to traditional Spotify users, who have yet to upgrade to the premium version.

This works because the offer is simple and the ad reaches users who already enjoy the free version.
ii) Casetify
The next example on our list is from a tech accessory brand- Casetify. This remarketing ad includes product photos of phone cases. In addition, the ad contains a direct link to the Casetify site, so potential buyers can easily click to complete a purchase.

The image-first design helps shoppers remember the exact product they viewed.
iii) Nike
Nike is a well-known brand around the world. This remarketing ad lets you scroll through several pairs of sneakers “suggested for me” based on your previous activity on Nike’s website. And it includes a call-to-action (CTA) button to direct you back to Nike’s site to finish shopping.

Dynamic ads feel personal, so viewers feel like Nike knows their taste.
A Few Common Queries on Remarketing for eCommerce Stores
a) What are the best practices for remarketing campaigns?
Some best practices for remarketing include segmenting your audiences based on behavior, creating targeted and personalized ads, testing and optimizing your campaigns regularly, and avoiding bombarding your audience with too many ads.
You should also make sure to comply with relevant privacy laws and regulations, such as GDPR and CCPA.
b) What is the role of remarketing?
Remarketing plays a crucial role in digital marketing for eCommerce store owners. It helps to target customers who have already shown interest in their products or services by visiting their website, but for some reason, did not complete the desired action, such as making a purchase.
c) What are the components of remarketing?
The components of remarketing include creating a target audience, setting up a tracking code, creating a remarketing campaign, and measuring the performance of the campaign.
d) What is remarketing in eCommerce?
Remarketing in eCommerce refers to the process of reconnecting with customers who have shown interest in a product or service on the eCommerce store's website but have not completed the desired action.
Through remarketing, eCommerce store owners can encourage these customers to return to the website and complete the desired action, leading to increased sales and revenue for the business.
How to Use Remarketing for eCommerce Stores- Key Takeaways
Remarketing is a proven strategy for every eCommerce owner to improve their overall sales. If you haven't applied this hack for your online store, now this is the best time to do that. Because now you know what is remarketing, how remarketing works, remarketing vs retargeting, and types of remarketing.
So, without any hesitation, launch your remarketing campaign following these three steps:
- Create a Remarketing List
- Create a Remarketing Campaign, and
- Launch Your Remarketing Ads
Also, we have added three successful remarketing examples so that you can take inspiration while setting up a remarketing campaign using Google Ads.
Having said that if you face any problem while creating your first-ever remarketing campaign for your eCommerce business, feel free to let us know through the comment box below. We would love to help you out. Good luck!