7 Steps on How to Build a Website with ChatGPT in 2026
Creating a website used to require coding skills, but now it's much easier for anyone.
With tools like ChatGPT, anyone can build a website without any technical experience. Just provide instructions, and it will generate the code for you.
If you're feeling unsure about the prompts or instructions to create a website with ChatGPT, that's okay! This easy step-by-step guide will help you from picking a domain name to publishing your site. We promise, it's simpler than you think!
So, get ready with your computer and follow our prompts to create your first-ever website with ChatGPT!
What Is ChatGPT and How It Works as a Website Builder
ChatGPT is a conversational AI developed by OpenAI. It’s designed to generate human-like text based on your input. But it can do a lot more than just chat.
When it comes to websites, ChatGPT can help you plan your site, write your content, suggest layouts, and even generate basic HTML/CSS code. It won’t host your site or give you drag-and-drop tools—but it’s a smart assistant that can speed up the whole process.
Many people are now using ChatGPT as a kind of AI website builder. It’s not a full platform like Wix or WordPress, but it works well when paired with other tools.
Can ChatGPT Really Create a Website?
If you're wondering, “Can ChatGPT create a website?”, the answer is yes and no. Don't be confused. Let us explain it to you!
ChatGPT can help with:
- Choosing a name and niche
- Writing homepage and about page copy
- Creating navigation structure
- Generating HTML, CSS, and even JavaScript snippets
- Suggesting SEO keywords and meta tags
What ChatGPT can’t do:
- Host your website
- Provide a drag-and-drop builder
- Design complex layouts
- Integrate third-party apps
So no, ChatGPT can’t build and publish a full website alone. But it can give you everything you need to do it yourself, faster and cheaper.
Now let's find out how you should use ChatGPT to build your website with ease!
How to Build a Website with ChatGPT: 7 Easy Steps for You

We'll show the entire journey of creating a website using ChatGPT in 7 simple steps. These steps cover everything from creating a ChatGPT account to making your site accessible to the world. First, take a quick look at the list, then we'll describe each point in detail:
- Set up Requirements
- Set up the Basics
- Install WordPress on Your Control Panel
- Install Required Plugins
- Choose a Suitable Theme
- Create Essential Pages
- Customize Your Site
Feel excited? Awesome. Now let's get into the details!
Prerequisite: Create a ChatGPT Account
Hold on, please. Again? Yes! For a few seconds.
Before jumping into the main steps, you'll need a ChatGPT account. But no worries. Creating a ChatGPT account is a straightforward process.
First, visit the ChatGPT website and find the “Sign up” option, usually, it's at the top right corner of the homepage. Click it to start the registration process.
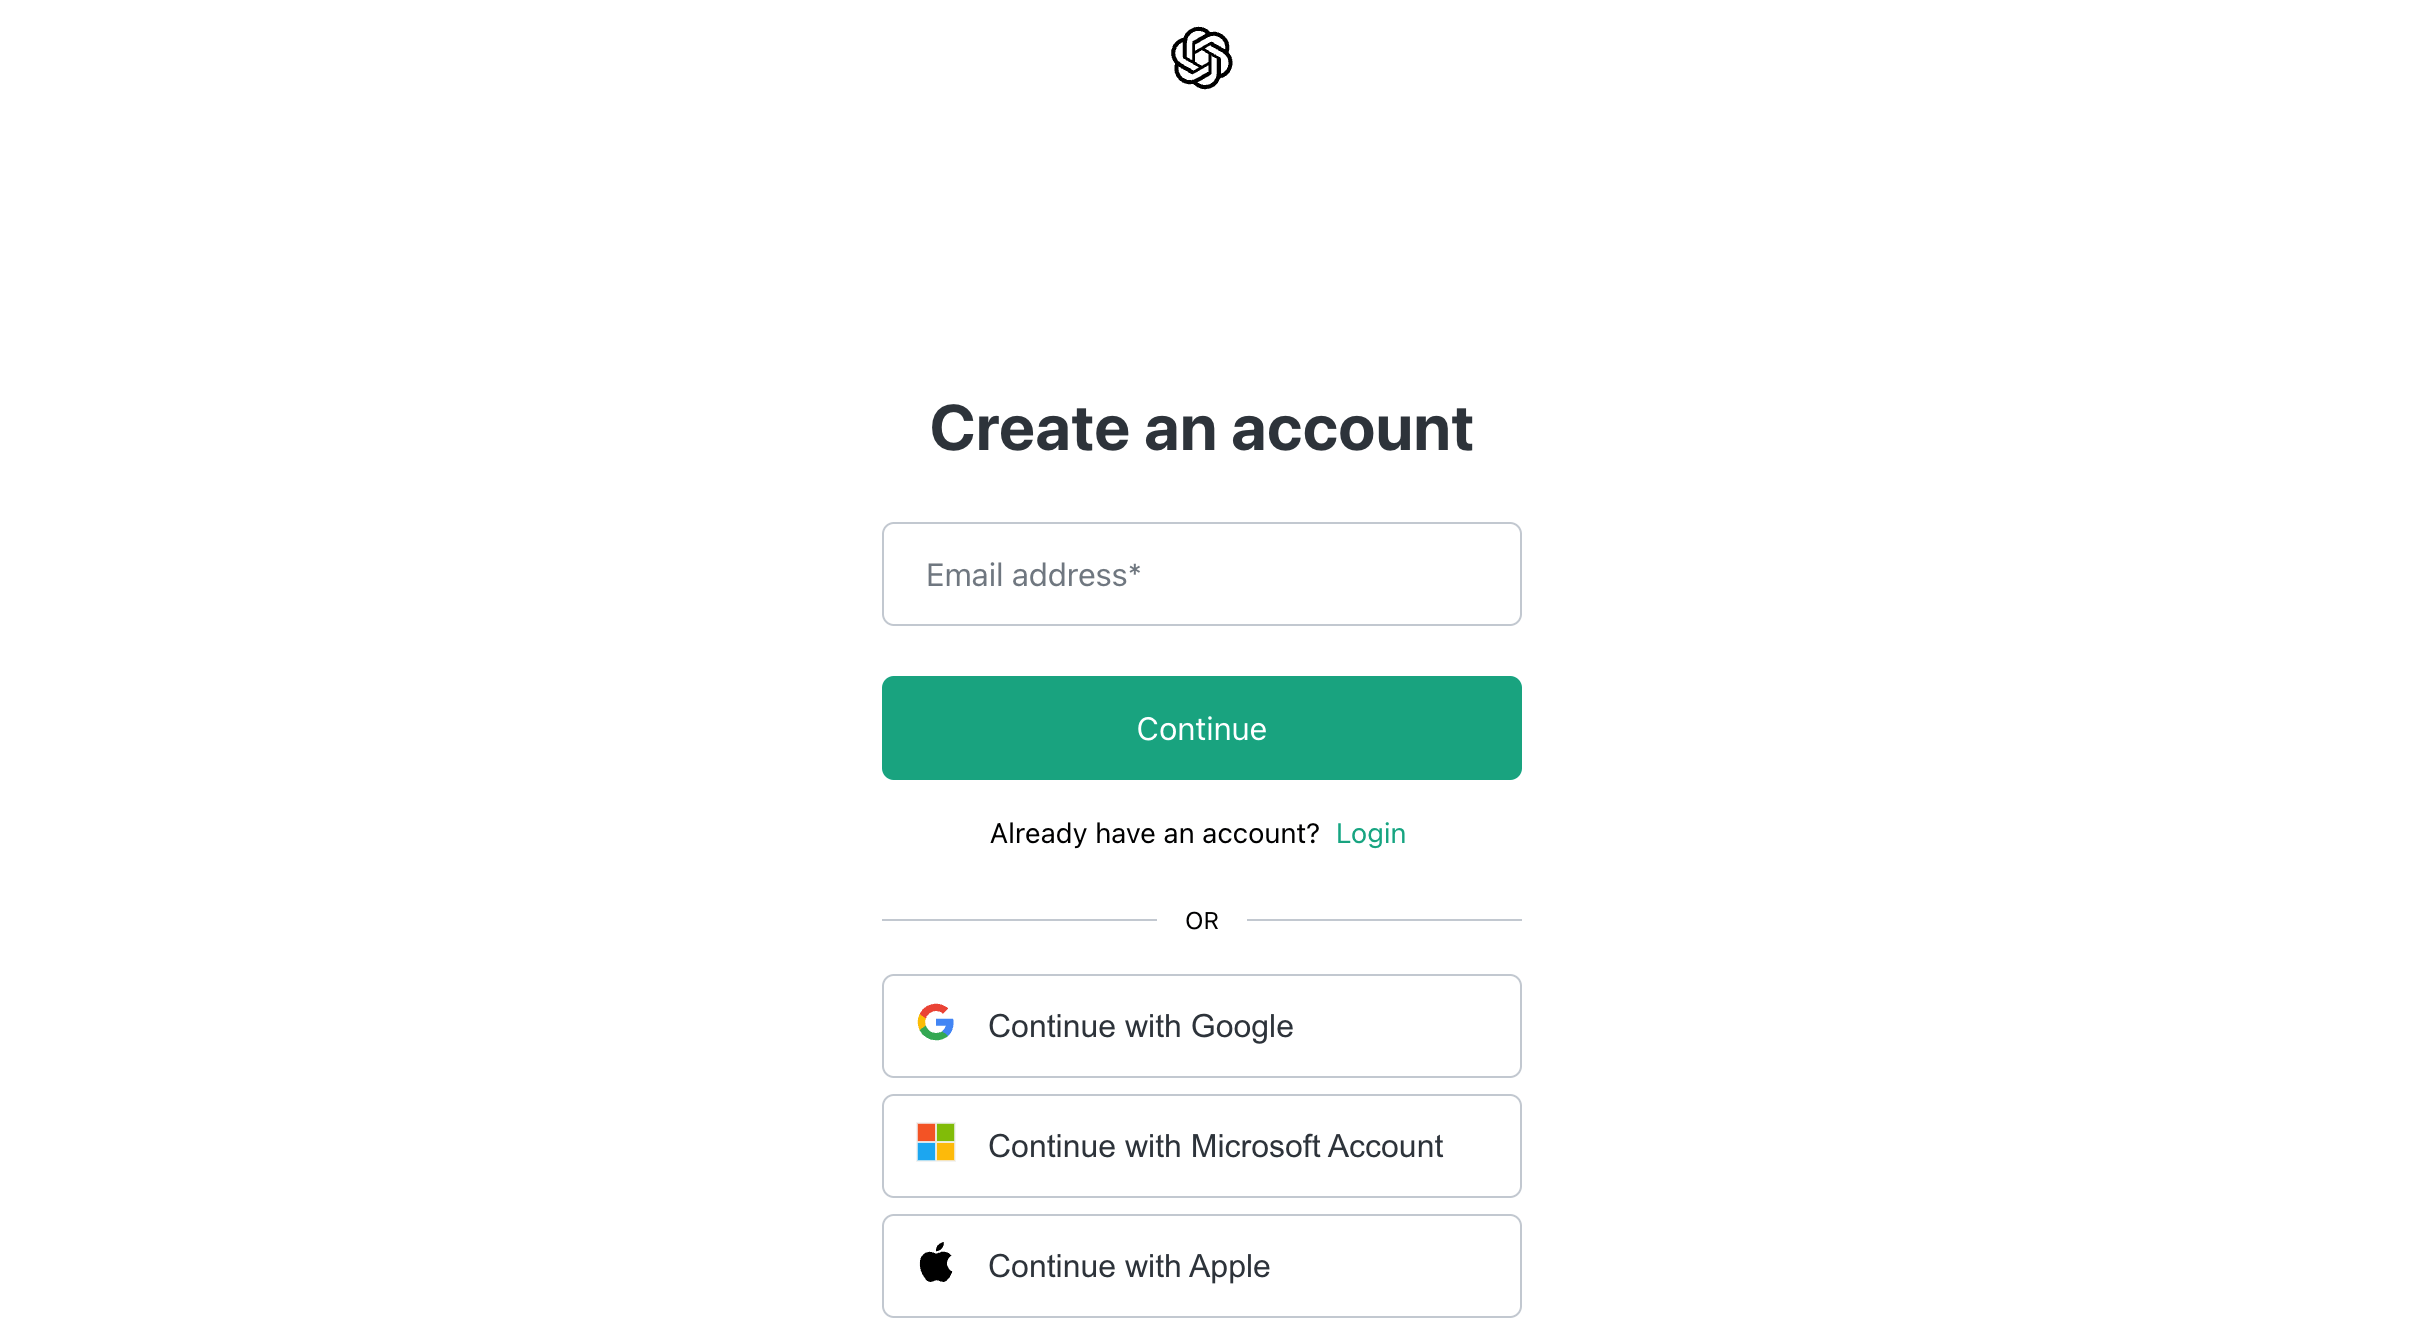
You will need to provide your email address and create a secure password. After that, check your email for a confirmation link from OpenAI. Click the link to verify your email. Once verified, you can log in to your new account.
Now let's create your website using ChatGPT!
Step 1: Set up Requirements
Before diving into building your website, it's important to set up your requirements. This helps ensure that your site meets your needs and resonates with your audience.
Let's assume you are a blogger and you want to create a blogging website for you using ChatGPT. Let's find out how you can set up requirements for your site:
a) Identify Your Objectives
Start by defining the main goals for your website. Ask yourself questions like, “Do I want to share personal stories, provide tutorials, or review products?” Having clear objectives helps you determine the type of content you need and how to structure your site.
You can use ChatGPT to help clarify your objectives. Try this prompt:
ChatGPT, help me identify the main objectives for my blogging website. I want to focus on [insert your general idea, e.g., lifestyle, travel, technology].b) Describe Your Audience
Understanding who your audience is can shape your website's content and design. Consider the demographics of your visitors, such as their age, interests, and online behavior. This knowledge allows you to create targeted content that speaks directly to their needs and preferences.
You can use this prompt to identify your target audience:
ChatGPT, who should my target audience be for a blog about [insert your blog topic]? What are their interests and online habits?c) Specify Essential Features
Think about the features your blogging website needs to serve its purpose. This could include categories for different topics, comment sections for reader engagement, or social media sharing options.
Use ChatGPT to brainstorm these features with a prompt like:
ChatGPT, what essential features should I include on my blogging website about [insert your topic]? How can these features enhance user experience?d) Set Design Preferences
Your website's design plays a critical role in attracting and retaining visitors. Decide on the overall look and feel you want. This includes selecting a color scheme, typography, and layout that aligns with your brand identity.
Research other websites for inspiration and think about what styles resonate with your target audience. You can use this prompt to identify design preferences:
ChatGPT, suggest design preferences for a blogging website focused on [insert your topic]. What colors, fonts, and layouts would appeal to my target audience?e) Choose a Platform
There are several platforms to create your website. For example, you can use custom coding, any SaaS, or a CMS solution to get your job done. You can use ChatGPT to choose the best solution for you as per your expertise.
Use this prompt to find the best platform for you:
ChatGPT, I'm not a technical person. So, which solution should I use to create my site?In this blog, we are going to use WordPress as our platform to create a website using ChatGPT. Because WordPress is the best CMS platform for many reasons and it's way better than its alternatives for a beginner who don't have much technical knowledge.
Step 02: Set up the Basics
Setting up the basics is a vital step in launching your website. This involves registering your domain and purchasing a hosting plan.

Here's how to approach each task, along with how ChatGPT can assist you:
a) Register Your Domain
Your domain name is your website's address on the internet, so it should reflect your brand and content.
When choosing a domain name, keep it short, memorable, and relevant to your blog. Use ChatGPT to generate ideas or check the availability of your desired domain name.
You can use this prompt:
ChatGPT, suggest some domain name ideas for my blogging website about [insert your topic]. What should I consider when choosing a domain name?Once you have a list of potential names, visit a domain registrar, such as GoDaddy or Namecheap, to check availability and register your chosen domain.
b) Buy a Hosting Plan
A hosting plan allows your website to be accessible on the internet. There are various hosting options available, including shared, VPS, and dedicated hosting.
Each has its advantages depending on your needs and budget. To find the right hosting plan, ask ChatGPT for recommendations tailored to your blog. You might use this prompt:
ChatGPT, what type of hosting plan should I choose for my blogging website about [insert your topic]? What factors should I consider when selecting a hosting provider?ChatGPT can help you understand the pros and cons of different hosting types and suggest reliable hosting providers like Bluehost or SiteGround. Once you've decided, visit the chosen provider's website to purchase your hosting plan.
Step 03: Install WordPress on Your Control Panel
Installing WordPress is a crucial step in setting up your blogging website. Many hosting providers have an easy installation option for WordPress in their control panels. This makes the process simple for beginners.
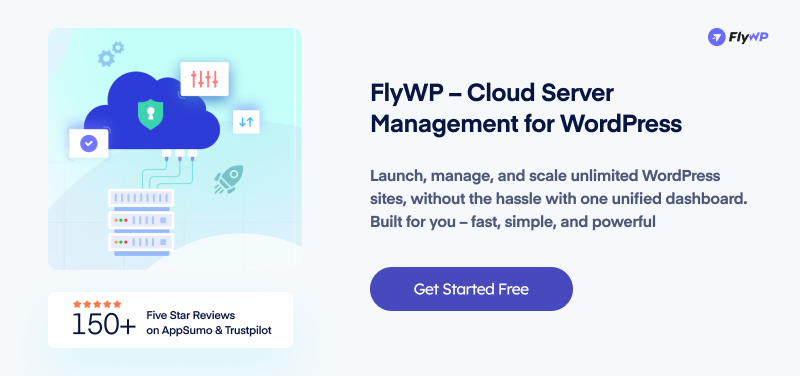
Follow these steps to get started:
- Access Your Control Panel: Log in to your hosting account and navigate to the control panel (often called cPanel). Look for the section labeled ‘Website‘ or ‘Softaculous Apps Installer,' where you'll find options for installing various software, including WordPress. Click on the ‘WordPress‘.
- Fill in the Installation Details: You will need to enter some information, such as the name of your site, a brief description, and your admin username and password. Choose a strong password for security. This information will be used to manage your WordPress site.
- Complete the Installation: Click the ‘Install‘ button. The process usually takes just a few minutes. Once complete, you will see a success message, along with your WordPress login URL.
Use the admin username and password you set earlier to log in to your new WordPress dashboard. From here, you can start customizing your site, adding content, and selecting themes.
To make this process smoother, you can use ChatGPT to answer any specific questions you have. For instance, if you're unsure about the installation steps, try this prompt:
ChatGPT, can you guide me through the steps to install WordPress on my hosting control panel?This way, you can have a reliable source of information to assist you as you set up your WordPress site.
Step 4: Install Required Plugins
If you don't know exactly which plugins you should install, you can use ChatGPT to get the list of the required plugins. Use this prompt to get the list:
ChatGPT, what essential plugins should I install for my blogging website? What are their benefits?However, here we are sharing a list of the required plugins for your blogging website:
- Yoast SEO: This plugin helps optimize your content for search engines. It offers suggestions for improving SEO and readability, which makes it easier for your blog to rank higher in search results.
- Akismet Anti-Spam: Akismet protects your blog from spam comments. It automatically checks comments and contact form submissions against a global database to filter out any spam.
- Wordfence Security: This plugin provides security features to safeguard your site. It includes firewall protection, malware scanning, and login security measures to keep your blog safe from threats.
- UpdraftPlus: UpdraftPlus is a backup plugin that helps you schedule and store backups of your website. Regular backups are crucial in case of data loss or site issues.
- WP Super Cache: This caching plugin speeds up your website by creating static HTML files from your dynamic WordPress site. Faster load times improve user experience and SEO.
- Social Media Share Buttons & Social Sharing Icons: This plugin allows you to add social sharing buttons to your blog posts to make it easy for readers to share your content on their social media platforms.
- Contact Form 7: This plugin enables you to create customizable contact forms for your site. It's an effective way for visitors to reach out to you directly.
- Google Analytics for WordPress by MonsterInsights: This plugin connects your website to Google Analytics to allow you to track visitor behavior and gain insights into your blog's performance.
- Smush Image Compression and Optimization: Smush optimizes your images for faster loading times without sacrificing quality. This helps improve overall site performance.
How to Install a Plugin
To install a plugin, go to your WordPress dashboard -> Plugins -> Add a New Plugin. Then search the plugin name and install the plugin from the search result. After installing the plugin, simply activate the plugin by clicking on the activate button.
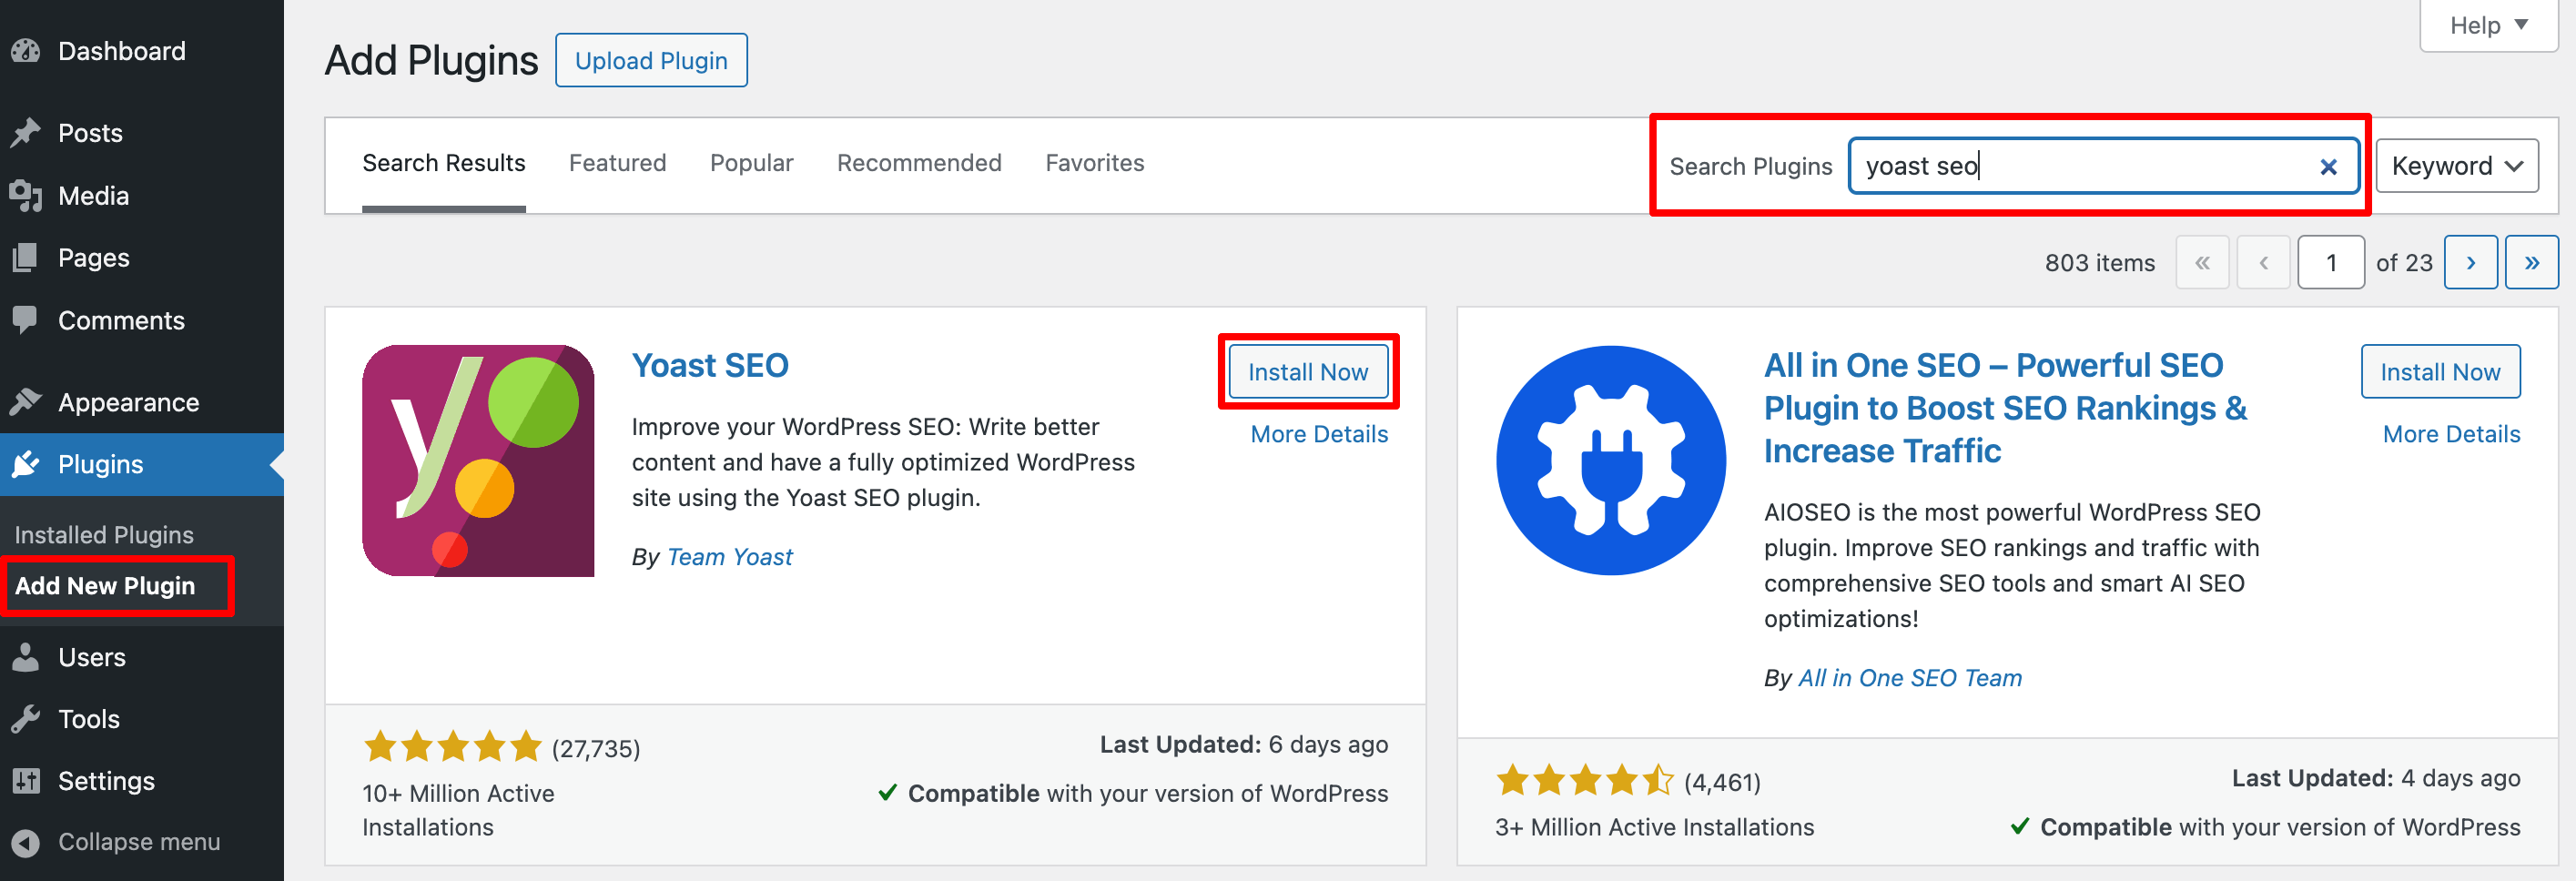
Following this procedure, install the required plugins for your website one by one. Once you're done with the step, jump to the next step.
Step 05. Choose a Suitable Theme
Selecting the right theme is key to establishing your blog's identity and creating a visually appealing and user-friendly experience. To find the most suitable theme for your site, ChatGPT can help you. Let's find out how!
a) Define Your Style and Needs
You should start by identifying the style you dream of for your blog. Are you looking for something minimalistic, bold, or image-focused? You can use ChatGPT to generate ideas based on your blog's niche with this prompt:
ChatGPT, suggest some WordPress theme styles for my [insert blog topic, e.g., food, travel, tech] blog. I want it to look [describe style, e.g., modern, clean, or colorful.b) Find Themes with Relevant Features
Some blogs need specific features, like a large homepage slider for images or a grid layout for easy navigation. ChatGPT can recommend themes that offer these functionalities. Try asking:
ChatGPT, what WordPress themes include a [feature like grid layout, slider, or built-in social sharing] and would work well for a [blog topic] blog?c) Compare Free and Premium Options
ChatGPT can provide insights into the differences between free and premium themes for your blog type. Use a prompt like:
ChatGPT, what are the pros and cons of free vs. premium WordPress themes for a beginner blogger?”Using ChatGPT's recommendations, you'll be able to quickly narrow down your choices and pick a theme that best suits your blog's style, purpose, and audience.
Step 6: Create Essential Pages
Your blog needs a few foundational pages to guide visitors and create a professional look. These essential pages provide information about you, explain your content, and help users navigate the site.
Use these tips to create essential pages for your website:
a) About Page
The About page is where you introduce yourself and share the story behind your blog. This is a great place to build trust with your readers. ChatGPT can help you brainstorm content that resonates with your audience by using prompts like:
ChatGPT, help me write an About page for a [type of blog, e.g., travel, food, lifestyle] blog. I want it to be friendly and share my passion for [topic].Using this prompt, you'll get output something like this:
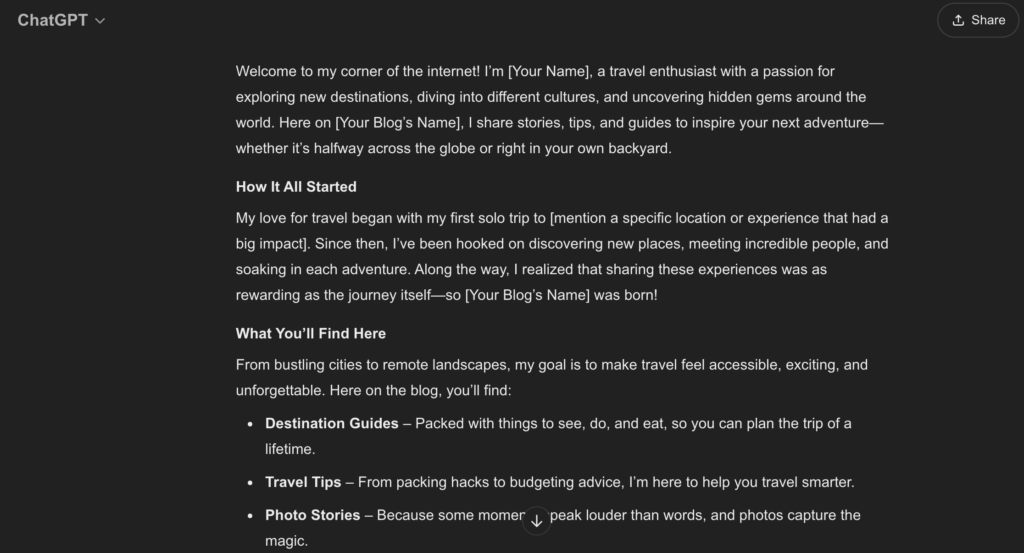
You can design this page using the Gutenberg drag-and-drop feature. You can also generate code for this page using ChatGPT. Use this prompt to generate code for your About page:
Generate code for this About page. Use the Gutenberg code format to generate code since it's a WordPress website.Here is the output:
<!-- wp:heading {"level":1} -->
<h1>About Us</h1>
<!-- /wp:heading -->

<!-- wp:paragraph -->
<p>Welcome to <strong>[Your Blog Name]</strong>!</p>
<!-- /wp:paragraph -->

<!-- wp:paragraph -->
<p>Hey there, fellow wanderer! I’m <strong>[Your Name]</strong>, the heart and soul behind <strong>[Your Blog Name]</strong>, where every adventure has a story, and every story inspires the next journey. My love for travel started <em>[briefly mention a moment, e.g., "on a solo trip to the mountains," or "with a family road trip"]</em>. Since then, I’ve been chasing new horizons, experiencing diverse cultures, and meeting incredible people from all walks of life.</p>
<!-- /wp:paragraph -->

<!-- wp:heading {"level":2} -->
<h2>Why I Travel</h2>
<!-- /wp:heading -->

<!-- wp:paragraph -->
<p>For me, travel is more than just a getaway – it’s a way to understand the world and my place in it. Whether it’s tasting local street food, wandering through historic towns, or hiking up rugged trails, each experience adds a new chapter to my story. I started this blog to share not just the destinations, but the memories, lessons, and unforgettable moments along the way.</p>
<!-- /wp:paragraph -->

<!-- wp:heading {"level":2} -->
<h2>What You’ll Find Here</h2>
<!-- /wp:heading -->

<!-- wp:list -->
<ul>
    <li><strong>Inspiring Stories:</strong> From solo adventures to unforgettable journeys with friends and family, I bring you the heart and soul of each destination.</li>
    <li><strong>Travel Tips & Hacks:</strong> Real, practical advice to help you travel smarter, stress-free, and with more confidence.</li>
    <li><strong>Destination Guides:</strong> A mix of popular spots and hidden gems that will give you an insider’s look at places you might want to add to your bucket list.</li>
    <li><strong>Cultural Insights:</strong> I dive into local customs, traditions, and foods, giving you a taste of each place’s unique vibe.</li>
</ul>
<!-- /wp:list -->

<!-- wp:heading {"level":2} -->
<h2>Join the Journey!</h2>
<!-- /wp:heading -->

<!-- wp:paragraph -->
<p>My goal is to create a space where fellow travel lovers, adventurers, and dreamers feel at home. Whether you’re planning your next trip, looking for travel tips, or just daydreaming about faraway places, I’m so glad you’re here. So, pull up a seat, grab a coffee (or a suitcase), and let’s explore the world together – one journey at a time.</p>
<!-- /wp:paragraph -->

<!-- wp:paragraph -->
<p>Feel free to reach out or connect on social media. I’d love to hear your travel stories, too!</p>
<!-- /wp:paragraph -->

<!-- wp:paragraph -->
<p>Happy travels,<br>
[Your Name]</p>
<!-- /wp:paragraph -->
Now copy this code and paste the code above into the “Code Editor”. To access the code editor, create a new page and follow this screenshot. First, click on the 3 dots and then you'll find the Code Editor option. Click on it and then paste the code.
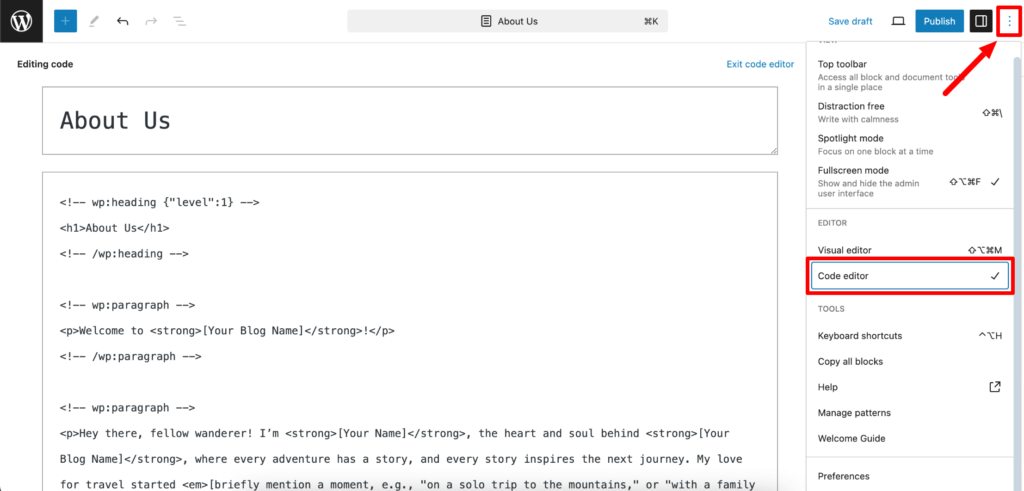
Also, don't forget to replace placeholders like [Your Blog Name] and [Your Name] with your actual blog details.
Just a heads up: If you want to use any text editor other than WordPress, you can choose a text editor and paste this code. It will work on any platform.
b) Contact Page
A Contact page lets readers, potential collaborators, or brands reach out to you. It usually includes an email address, social media links, or a contact form. For a more personalized touch, you can ask ChatGPT to draft an engaging introduction for your Contact page:
ChatGPT, write a welcoming introduction for my Contact page. I’d like it to invite readers and brands to connect with me. Also include an email, direct call, and Google Map to contact me. Here is the output of this prompt:
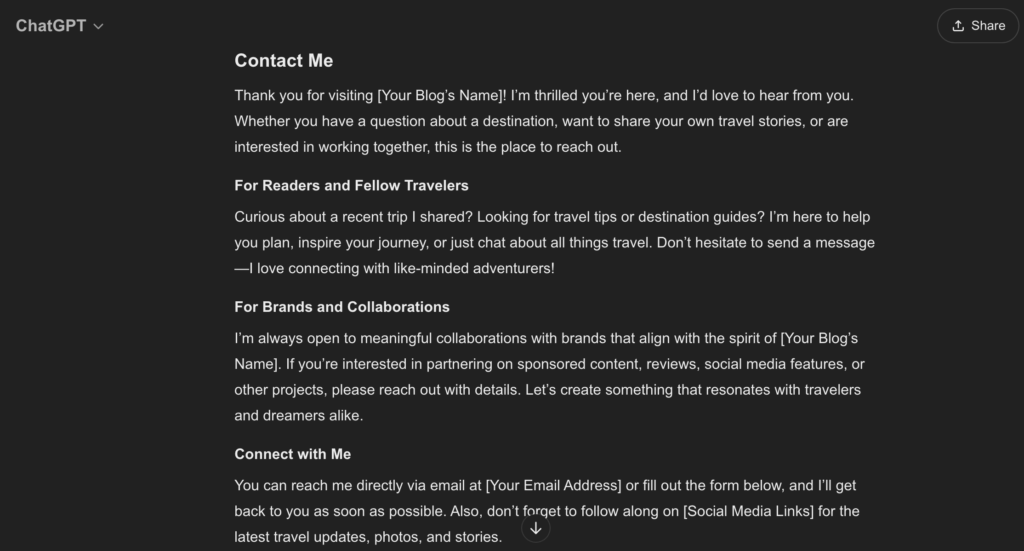
c) Blog Page
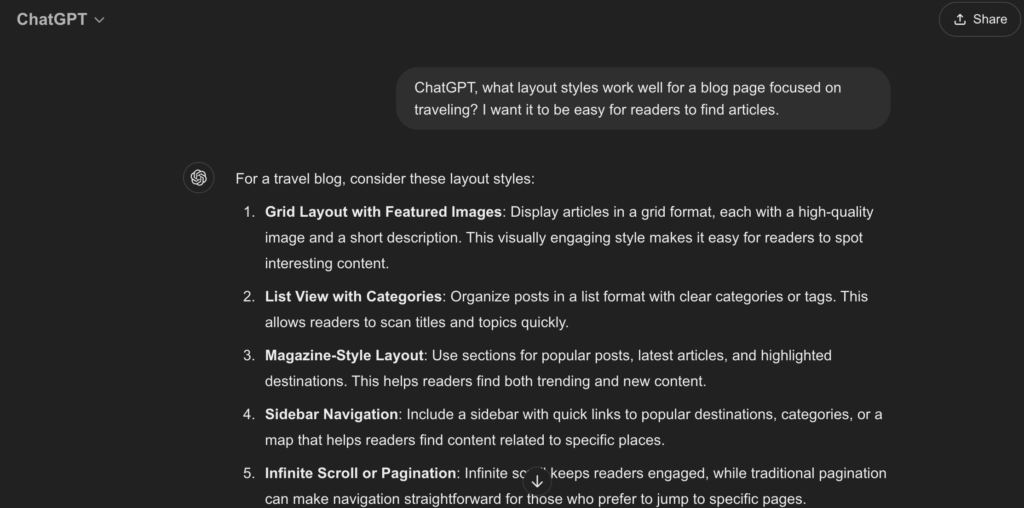
This is the main section where your blog posts are displayed. Use this prompt to create a blog page:
ChatGPT, what layout styles work well for a blog page focused on [your blog's topic]? I want it to be easy for readers to find articles.It'll show you several layouts like Grid Layout, Magazine-style Layout, Map-based Layout, etc. If you want to use the Grid Layout for your travel blog website, simply choose that layout from the list.
d) Privacy Policy Page
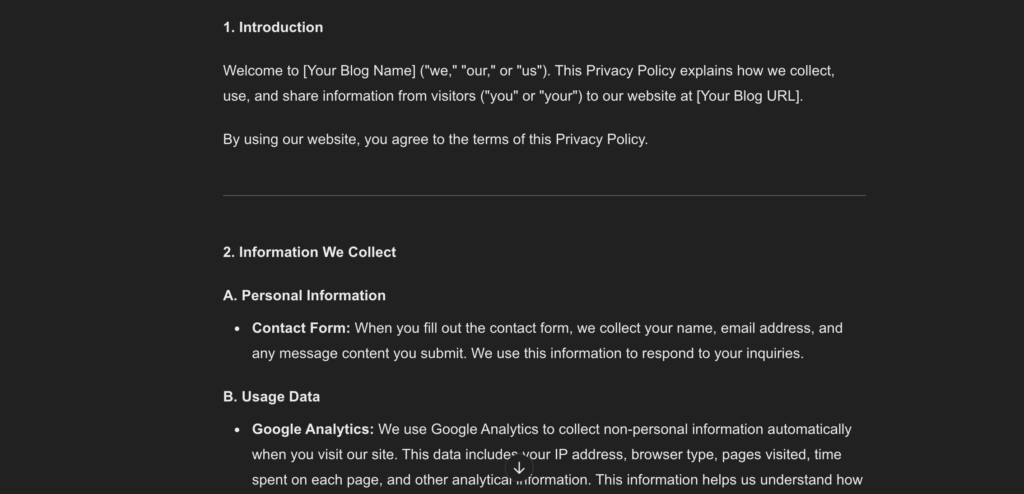
A Privacy Policy page is often required, especially if you collect any user data (like through contact forms or analytics). ChatGPT can help simplify legal language to make this page understandable. Try:
ChatGPT, write a basic Privacy Policy for a blog that uses Google Analytics and a contact form.Here is the output of this prompt:
e) Other Pages Specific to Your Blog
Apart from all the pages that we've mentioned here, you might require a few more pages based on your requirements. If you aren't sure about which pages you should create, you can use this prompt to get your job done:
ChatGPT, suggest some useful additional pages for a [type of blog].Step 07. Customize Your Site
Customizing your blog gives it a unique look and aligns it with your brand. Adjusting colors, fonts, layouts, and other details can make your site feel inviting and professional.
Now check how ChatGPT can help you through the customization process:
a) Define Your Color Scheme and Fonts
Your color scheme and fonts create the visual personality of your blog. ChatGPT can suggest color palettes that suit your blog’s theme and niche. Try a prompt like:
ChatGPT, suggest a color scheme for a [type of blog, e.g., wellness, tech, food] that feels [tone, e.g., calming, modern, vibrant].For fonts, ask:
ChatGPT, recommend font pairings that would look good on a [type of blog].b) Organize Your Navigation Menu
A clean and intuitive menu helps visitors find key pages and content quickly. Ask ChatGPT for guidance on menu items relevant to your niche with a prompt like:
ChatGPT, what essential menu items should I include on my [type of blog]?c) Add Widgets for Extra Functionality
Widgets can enhance your blog by adding elements like recent posts, social media links, or search bars. ChatGPT can help you decide which widgets might be helpful based on your site’s purpose. Try:
ChatGPT, what widgets should I consider adding to my [type of blog] to improve user experience?Index Your Site on Search Engines
To enable search engines to find your website, you'll need to activate indexing. ChatGPT can help you with these essential steps:
- Set Up Google Search Console: Start by setting up Google Search Console. It's a free tool where you can manage your site's presence on Google.
To get started, use this ChatGPT prompt:
ChatGPT, guide me through setting up Google Search Console to index my WordPress blog.- Submit Your Sitemap: A sitemap provides search engines with a map of your site's pages which helps them index your content faster.
To generate and submit a sitemap, ask ChatGPT:
ChatGPT, how can I create and submit a sitemap for my WordPress site to Google Search Console?Bonus: Things ChatGPT Can't Do for You While Creating a Site
While ChatGPT is a great tool for guidance, content ideas, and even some technical help, there are a few things it can't directly handle in the site-building process:
- Hands-On Website Building: ChatGPT can't physically set up or configure your site. While it can walk you through steps like installing WordPress or setting up plugins, you'll still need to carry out the actions yourself within your website's dashboard.
- Designing Visual Elements: ChatGPT can help with style suggestions, color schemes, and general design advice. However, creating custom graphics, images, or layouts requires design software and skills that ChatGPT doesn't possess.
- Direct Domain and Hosting Management: Purchasing, setting up, and managing a domain or hosting account are processes that require direct interaction with hosting providers. ChatGPT can suggest hosting providers or guide you through the registration process but cannot perform the tasks on your behalf.
- Monitoring and Maintenance: ChatGPT can't actively monitor or maintain your site once it's live. Regular updates, security checks, and backups are essential, but they need to be handled through plugins, a webmaster, or your own management tools.
Most Common FAQs on Building Websites Using ChatGPT
1. Can I use ChatGPT to build an eCommerce website?
Yes, but only for basic parts. It can write content and code, but not handle payments or inventory. Use it with platforms like WordPress or Dokan Cloud for full eCommerce features.
2. Is ChatGPT better than website builders like Wix ADI?
No. ChatGPT gives specific text and code. AI builders like Wix ADI produce full layouts and handle publishing. Use ChatGPT for customization and code. Use Wix ADI for a fast, no-code launch.
3. Can ChatGPT create a website for free?
Yes, you can plan, write content, and generate code using ChatGPT’s free tier. But you’ll still need (free or paid) hosting, a domain, and a platform to publish your site.
4. What are the limitations of using ChatGPT as a website maker?
ChatGPT doesn’t provide design previews, hosting, or app integrations. It can produce somewhat generic code and may not handle complex layouts. You still need tools like WordPress, Framer, or Dokan Cloud to complete and scale the site.
How to Build a Website with ChatGPT – Ending Note
So, was it difficult to build a website with ChatGPT? No, right? It's actually easy to create your site if you can properly follow this step-by-step guide.
What are you waiting for? Following this tutorial, design and publish your site with ease!
- Use ChatGPT to plan your site layout and content
- Generate code (HTML/CSS/JS) for pages or features
- Test your code with tools like Replit or CodePen
- Choose a website builder (Carrd, Framer, WordPress)
- Publish and go live
Want to use ChatGPT for marketing purposes? You are recommended to read our blog – ChatGPT for eCommerce, to make more sales.
Now, if you have any further queries on how to build a website with ChatGPT, you can share them with us using the comment box below. We would appreciate your efforts. Happy website building!

