
How to Create Kitchen Appliances Marketplace Using Dokan Multivendor Plugin
Welcome to our step-by-step guide on how to create a kitchen appliances marketplace with WordPress!
Creating an eCommerce store is easy when you have a platform like WordPress. WordPress is a multipurpose CMS platform and it has 60k+ plugins to customize your site for your specific needs. WooCommerce is the official eCommerce plugin for WordPress that lets you create online stores with ease.
WooCommerce has a market share of 64.03% in the eCommerce category regarding all platforms.
And you can turn your WooCommerce single store into a multivendor marketplace using Dokan Multivendor plugin. Dokan is the most popular plugin with more than 60,000 active installations, 35+ modules, and countless amazing features.
So, you need to install both WooCommerce and Dokan Multivendor to run your marketplace on WordPress.
We are going to show you how to create your Kitchen Appliances Marketplace from scratch. But first, let's start with-
Market Size of the Kitchen Appliances: A Big Business Opportunity
Kitchen appliances are a staple of modern-day homes, offering convenience and ease of use to millions of households worldwide. The market for kitchen appliances has seen significant growth in recent years. The demand is increasing from consumers for smart, energy-efficient appliances that can make cooking and food preparation faster, easier, and more enjoyable.
According to a recent report by Grand View Research,
The global kitchen appliances market size was valued at USD 230.6 billion in 2020 and is expected to grow at a CAGR of 4.4% from 2021 to 2028.
The market for kitchen appliances is diverse, encompassing a wide range of products, from refrigerators and ovens to blenders, toasters, and coffee makers. The trend of healthy eating and home cooking has led to an increase in demand for appliances that can help users prepare fresh, nutritious meals quickly and easily.

The rise of eCommerce and online shopping platforms has also made it easier for consumers to access a wider range of kitchen appliances from around the world. It has opened new markets and business opportunities for manufacturers and retailers.
With the market expected to grow steadily in the coming years, now is the time to invest in this lucrative and expanding industry.
Now let's see the steps on how to create a kitchen appliances marketplace.
6 Steps to Create Kitchen Utensils Marketplace with Dokan Multivendor

Creating a marketplace using the Dokan Multivendor Marketplace plugin is quite easy. You can do it in 6 easy steps.
We are going to go over those steps on how you can create a marketplace using Dokan.
Note: We are assuming you have already purchased your domain and hosting.
- Install and Activate Dokan
- Install a Dokan Compatible Theme
- Configure Basic Settings
- Upload Products and Configure Admin Shop
- Allow Vendors to Register
- Publish & Promote Your Marketplace
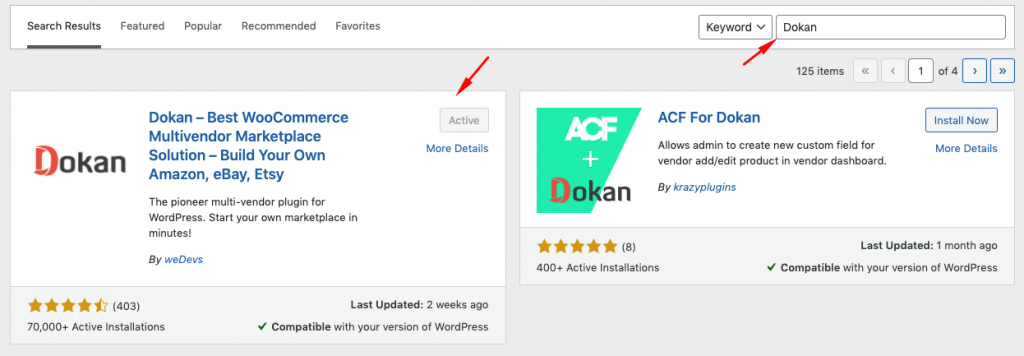
Step 1: Activate Dokan to Create Multivendor Marketplace

Step 2: Install a Dokan Compatible Marketplace Theme
After installing Dokan, you need to install a Dokan-compatible theme that compliments your marketplace.
Although any theme that is compatible with WooCommerce is also compatible with Dokan. However, Dokan has its own theme “Dokani” that you can use for your convenience.
But if you want you can find other themes in WP-Admin–> Appearance–> Themes.

Step 3: Configure the Basic Settings of Dokan
After installing and activating dokan, now you need to configure all the basic settings. You will find all the settings options at WP-Admin–> Dokan–> Settings.
From here you need to:
- Set up your store terms and conditions
- Create store categories for vendors to add different categories
- Allow vendors to upload new products
- Create new tags
- Set new product status
You can learn all about Dokan settings by reading our detailed guide on Configuring Dokan Basic Settings
You can select the pages for the vendor dashboard, order page, store listing, and terms and conditions page.

Don’t forget to click the Save Changes button after configuring all the settings. Otherwise, you will lose all your settings.
Moreover, you need to configure your permalink settings as well. Go to WP Admin → Settings → Permalinks → Permalink Settings → Product Permalinks. Select the check box “Custom Base” for product permalinks and write “/product” on the box.

Now the most important aspect. You have to set your commission rate.
Go to WP Admin Dashboard → Dokan → Settings → Selling Options → Admin Commission.
You’ll find different options to insert the percentage or fixed amount. Dokan supports various types of vendor commissions.

Dokan also enables you to set the category base commission rate for the vendors. So you can define individual commission rates for different vendors.
Enable Payment Gateways
Having various payment gateways is a big bonus. Payment gateways help make the transaction process smooth and build trust among customers.
Dokan supports all WooCommerce-compatible payment gateways. You will get a wide range of choices to make the transaction process easier on your marketplace.
With Dokan Lite you can use non-adaptive payment gateways like PayPal, bank account transfer, cash on delivery, etc. And the Pro version supports adaptive payment solutions like Stripe Connect and MOIP.

Enable Withdraw Methods for Vendors
Another important part of running an interactive online marketplace is to ensure a smooth withdrawal system. Dokan helps you take care of this section as well.
Go to WP Admin → Dokan → Settings → Withdraw Options. Here you’ll find options to customize the withdrawal method and set the minimum balance a vendor needs to make a withdrawal limit.

Step 4: Upload Products and Setup Admin Shop (Optional)
If you want to earn some extra money, you can create your own store on your marketplace. All you need to do is enable yourself for selling.
Go to Dokan–> Vendors. There you need to enable selling by toggling the button. You can upload your products by navigating to WordPress Backend → Products → Add New.

Vendors need to upload products from the front end. They need to navigate to, WordPress Dashboard → Visit Site → Vendor Dashboard → Setting. Your registered vendors will upload products this way.

Step 5: Allow Vendors to Register on Your Marketplace
After adding all the functionalities and configuring your marketplace, you can invite vendors to signup for your marketplace. To make sure vendors can signup into your marketplace, enable the “Anyone can register” option from WP Admin–> General–> Settings. So, it will open the default registration form for vendors to signup.

Or you can create customized registration forms with the necessary fields, especially for your marketplace.
For vendors to start selling, you need to enable selling status from Dokan–> Vendors.

Also, if you want the vendors to upload their products, then you need to change the product status from Dokan–>Settings–> Selling options. You need to enable the New Vendors Product Upload

Here is the preview of the kitchen appliance marketplace-

Step 6: Promote Your Online Marketplace!
Your marketplace is ready. Now you need to promote your marketplace so that more and more vendors can signup for your marketplace.
Here’s what you can do to promote your kitchen appliances marketplace:
- Use email marketing
- Look for potential vendors and customers on different platforms and forums
- Publish blogs and informational content
- Take the help of promotional videos, social media, and more. Here's a detailed guide for you with 15+ strategies to increase sales.
Use Dokan Modules and Features to Add Advanced Functionalities to Your Marketplace
If you followed the tutorial above, then you have created a kitchen appliance marketplace with all the basic functionalities. However, in order to stand out from the competition and compete with the big brand marketplaces you need some extra functionalities.
Fortunately, the premium version of Dokan offers some extraordinary modules along with amazing features that will help you set yourself apart. Here are the modules you need to activate in order to create a successful kitchen appliance marketplace-
Delivery Time Module
Delivery is a big part of the marketplace. After placing an order on the online store, a customer expects the delivery within a certain period of time. Almost 88% of customers are willing to pay for faster delivery services. The standard time is a maximum of 5-7 days in the country, and 28 days outside of the country. However, failing to deliver products in time can be a massive downfall for any online store.
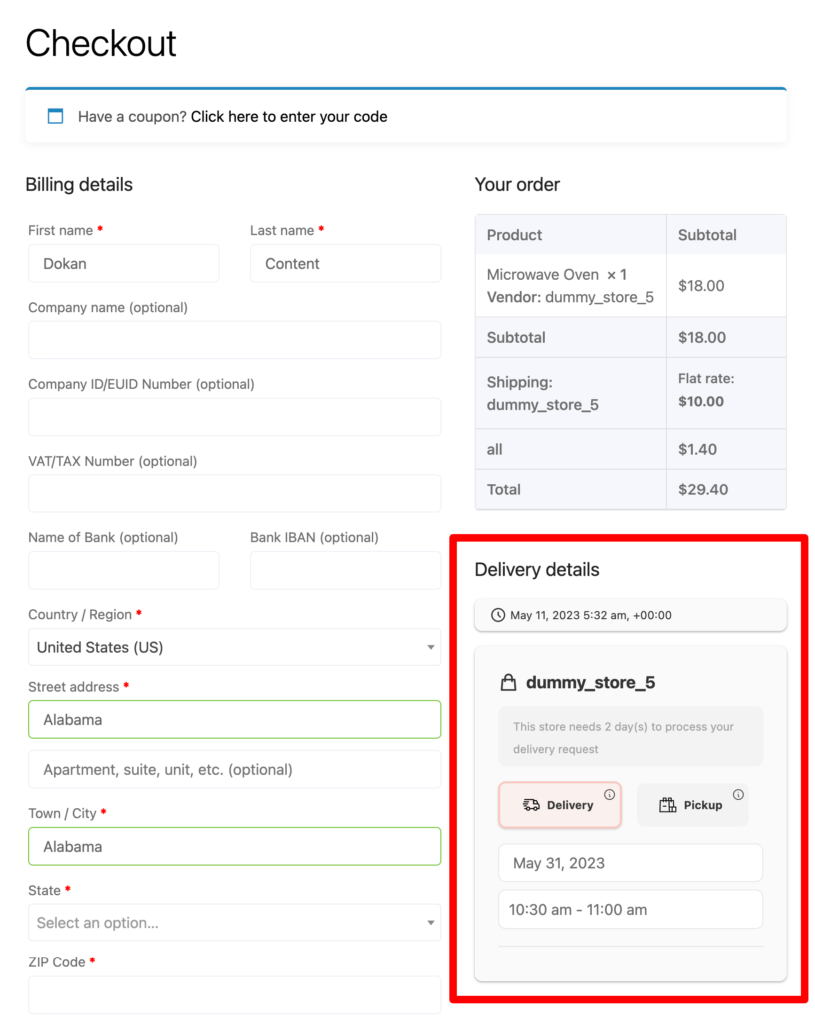
The Dokan Delivery Time module will help you overcome this problem. The module will let users choose their own delivery time and date. The module has features including-
- Customers can select the delivery date and time from the checkout page
- Vendors can select individual Opening times, Closing times, Time slots, Order per slot for each delivery day to increase delivery and logistics efficiency
- Buffer system. Vendors can specify the time they need to deliver the products. And the delivery date and time will appear taking this buffer time into account
- Same day delivery option is also available
- Time slot and order per slot system. Vendors can specify a time slot and also select how many orders they can receive in that time slot. After the time slot is filed, that time slot will disappear
- Delivery time calendar. Vendors can easily know the timing of each delivery so that they don't miss out on any.
Product Addon Module
Using the Product Addon module of Dokan, you can sell extra products as an add-on. Customers will be able to buy a set of cooking gloves along with the kitchen set they are purchasing and pay extra for the kitchen gloves only.
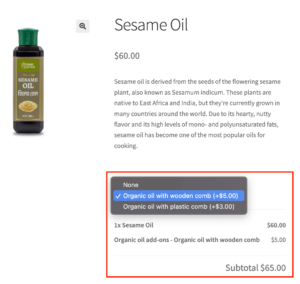
This will give you the option to earn extra money, increase your average order value, and decrease the size of your inventory. Also, you can provide more options for the customers without being pushy.
Product Advertisement Module
Using the Dokan Product Advertisement module, vendors can feature their products on top of the shop page. This module will help vendors advertise their products and reach more customers. Whereas as an admin you can earn extra money by selling the slots to advertise the products.
It is normal to have the same kind of kitchen appliance products in the marketplace. This module will give vendors an edge in displaying the products on top of the shop page.

Min/Max Order Module
This module will help vendors and admins control the customer's orders in a positive way. Vendors can set a minimum or maximum quantity/amount on orders. for example, if there is a product on the marketplace that is highly popular, then vendors can put a limit on the order quantity so that only one customer doesn't buy the whole inventory.
All in all, this module will help marketplace users,
- Establish minimum and maximum order quantity and amount
- Set minimum and maximum quantities rules for individual products
- Set different figures for the category and grouped based products
- Add different conditions for variable products
- Exclude orders from minimum and maximum order rules and more.
Single Product Multiple Vendor Module
The Single Product Multiple Vendor is a much-needed module when you want to allow different vendors to sell the same product in your marketplace. Also, compare prices among sellers for a single product and the seller can add/sell the same product at a different price.
Different studies show that customers always want to buy the product which is available at less price. Various vendors of a marketplace follow a similar concept.
Create Your Kitchen Appliance Marketplace Today
You may have thought that creating a marketplace will be complicated. But hopefully after reading our step-by-step guide, you have become an expert in creating your own marketplace.
Just follow the guide step by step and you will have yourself a working kitchen appliance marketplace.
And if you face any trouble in creating a marketplace then do let us know in the comment section.