

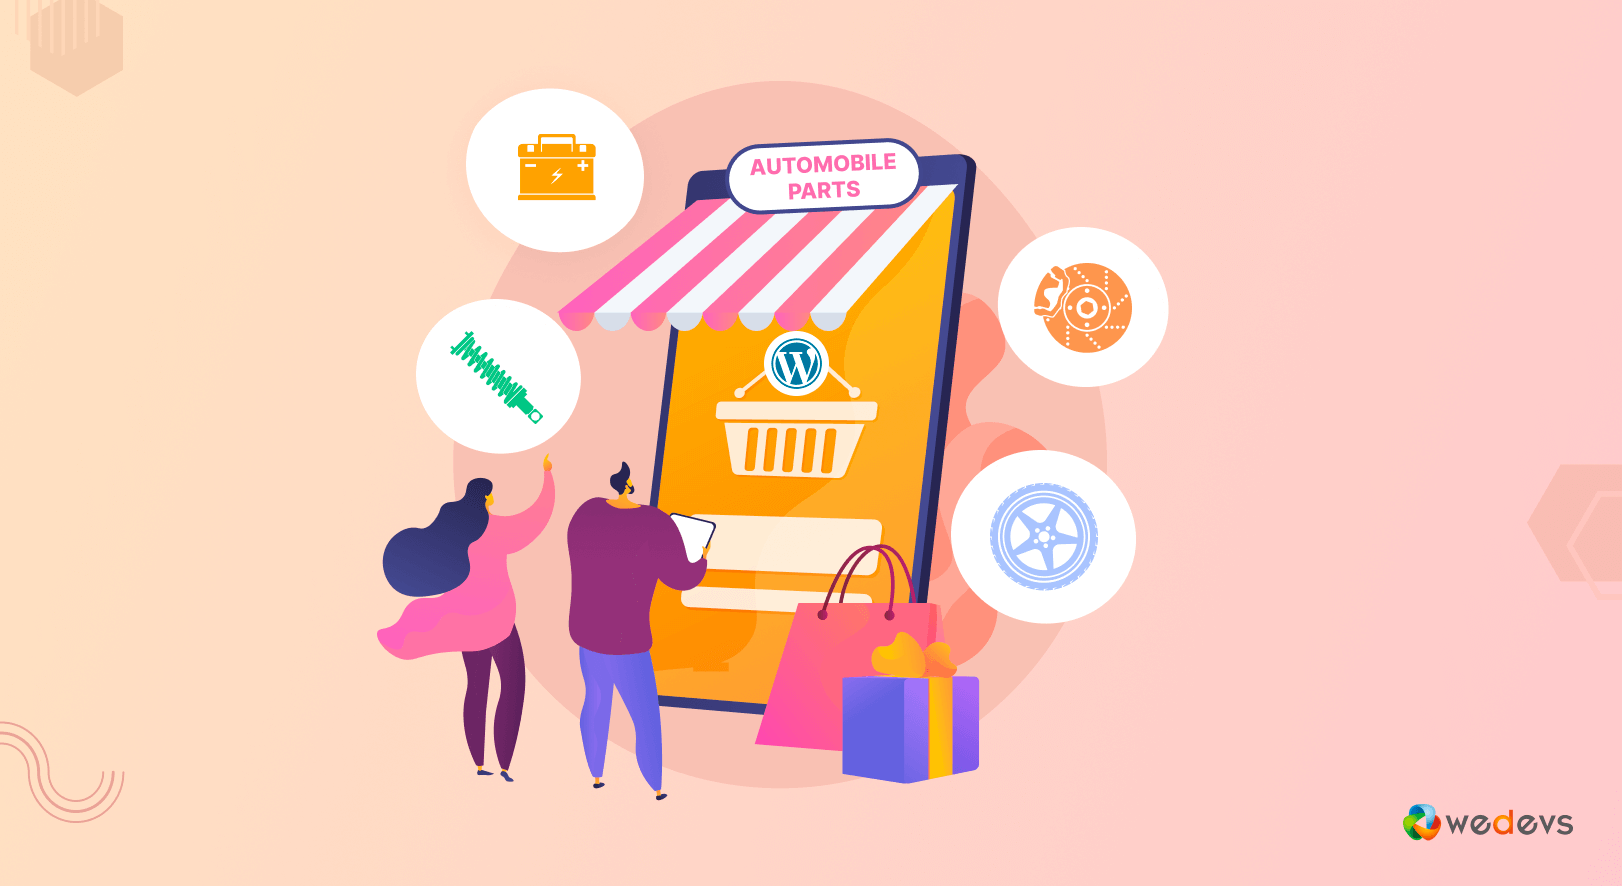
How to Create a Bike and Car Parts Marketplace in WordPress (Step-by-Step)
Are you planning to create an online marketplace for car and bike parts? Look no further! In this tutorial, we will guide you through the process of building your very own car and bike parts marketplace using WordPress.
In today's digital age, the automotive industry is booming, and so is the demand for car and bike parts.
According to recent statistics by Transparency Market Research (TMR), the global automotive aftermarket is projected to reach a staggering $1.03 trillion by 2025.
This presents an incredible opportunity for entrepreneurs like you to tap into this growing market and establish your own online presence.
By leveraging the power of WordPress, the most popular content management system on the web, you can easily create a feature-rich and customizable marketplace. WordPress offers the flexibility and scalability you need for your marketplace. Whether you want vendors to register or sell alongside others, WordPress has got you covered.
So, without any further delay, let's directly jump into the process of creating an online car and bike parts marketplace-
Prerequisites of Creating a Car & Bike Parts Marketplace
For creating a car and bike parts marketplace, there are several prerequisites that you need to have in place. Make sure you have:
- A creative domain name with a dedicated web hosting
- A ready WordPress website with WooCommerce installed
- Dokan multivendor plugin
If you haven't managed these prerequisites yet, don't worry. Here we are mentioning a couple of blogs that will help you to get these things done:
- Top 15 Reliable Managed Hosting for WordPress and WooCommerce Sites
- How To Create a Website For Free in 5 Easy Steps
Once you are ready with your WordPress website, then follow the below instructions:
Step 01: Install Dokan Multivendor- A WordPress Marketplace Plugin
To turn your WordPress site into a multivendor marketplace, you have to install a WordPress multivendor plugin. When we are talking about the multivendor plugin, there is nothing that can beat the Dokan plugin.
Dokan is the number 1 multivendor plugin for WordPress websites. This is the most popular and feature-rich plugin that is easy to use without any major learning curve.
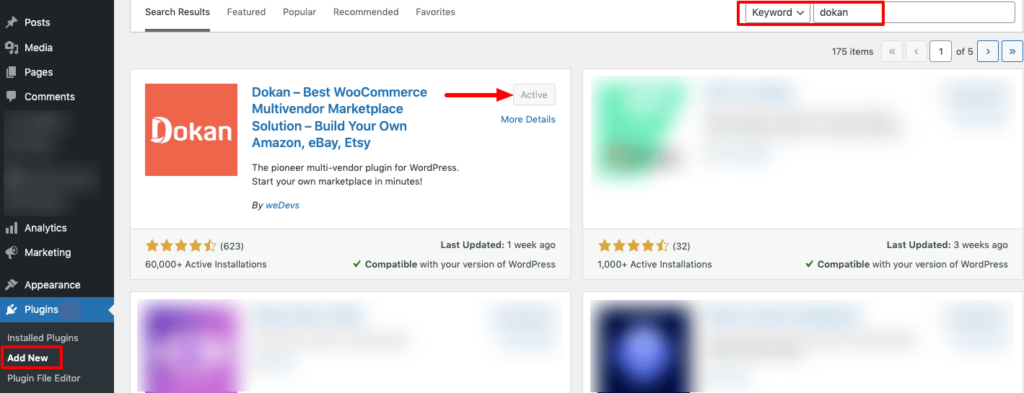
Installing Dokan is as simple as installing any other WordPress plugin.
- Navigating to Admin Dashboard -> Plugin -> Add New -> Click the search
- Type Dokan -> Install -> Activate.
Dokan will also provide a setup wizard that will help you easily set up your marketplace. Configuring Dokan is very easy by using its own Wizard.
If you still have any confusion, you can go through this video tutorial on Dokan installation–
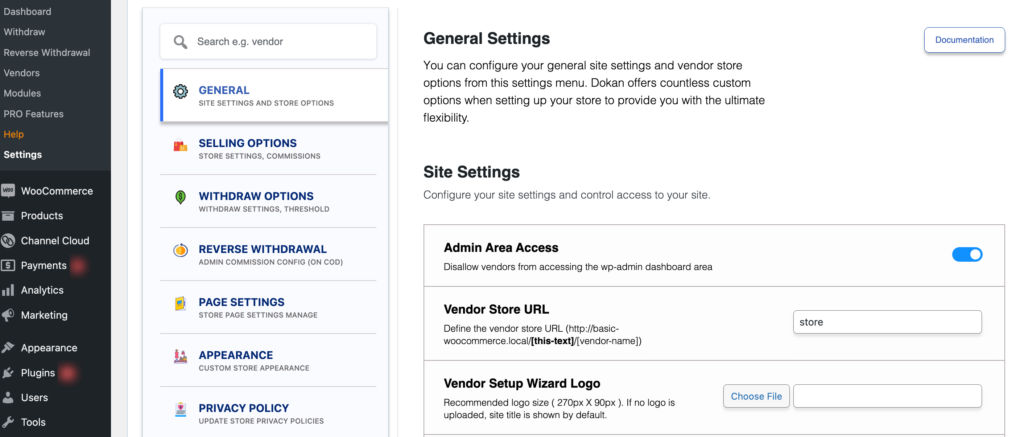
Step 02: Configure Dokan Plugin General Settings
Dokan is a WordPress plugin that allows you to easily create any type of online marketplace. Before customizing your marketplace, you need to configure a few built-in general settings in Dokan.
To access the general settings of the Dokan multivendor plugin, navigate to, WP Admin -> Dokan -> Settings.
There you'll find all the general settings like-
- Select store category
- Enable vendors to display their products
- Create essential tags
- Setup the new product status
- Choose withdrawal methods
- Set minimum withdrawal limit, and
- Include commission terms and rates.
Under every tab, you'll see several setting options to personalize your bike and car accessories marketplace. Check out our blog on Dokan multivendor plugin settings to get a complete idea of Dokan settings.
Once you've done with all the changes, hit the button “Save Changes”.
Step 03: Install a Well-Suited Theme for Your Marketplace
There are two options for you. Number one, you can install a Dokani theme that is dedicated and designed for Dokan powered marketplace, and number two, you can choose a third-party theme and use it on your marketplace.
The good news is any theme that is compatible with WooCoomerce is also compatible with Dokan multivendor plugin. That means you have the ultimate flexibility to choose any theme that complements your marketplace.
You can also take a look at our collection of Dokan Compatible Themes to explore your options.
If you want to avoid the hassle of choosing a third-party theme, you can easily use the Dokani theme. It is created by the same team behind the Dokan plugin, also, it's completely free to use.
Key Features of the Dokani Theme:
- Responsive, lightning-fast, and SEO-friendly
- Handles all technical aspects of your site's design effortlessly
- Enhances your visual appeal and captivates visitors
- Supports a wide range of useful widgets
- Fully compatible with popular page builders
If in case, you need help installing your WordPress theme, check this Ultimate Guide to WordPress Themes.
Step 04: Setup Admin Shop & Upload Products on Your Store
Before we proceed with this step, it's important to note that it is optional. If you do not intend to sell products on your marketplace as a seller, you can skip this step. However, if you wish to earn money by selling car and bike parts on your marketplace, you can create your own store by following this step.
This will enable you to not only earn commissions from your marketplace but also generate revenue through direct sales.
To sell your own products, you need to set up a mini store. First, enable yourself to add products to the marketplace.
In order to make yourself a vendor, go to WordPress Dashboard -> Dokan -> Vendor. Then turn on the toggle bar to enable the admin for adding products to the marketplace.
Now, it's time to decorate your mini store and upload new products.
There are two ways to upload products to your store: you can upload them from the frontend or from the backend.
First, Let Us Show You How to Upload Products Using the Frontend
Go to WordPress Dashboard -> Visit Vendor Dashboard -> Products. Then click on the Add new product.
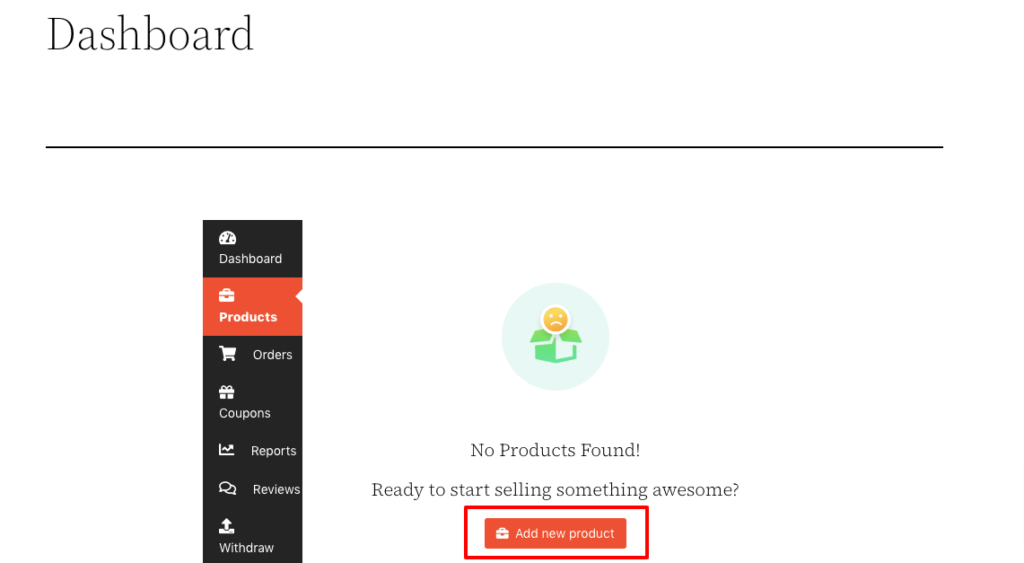
Now set the product details and click on Create Product to save the product.

You have to add a few more details related to the product. After fulfilling these fields, click on Save Product to complete the process.
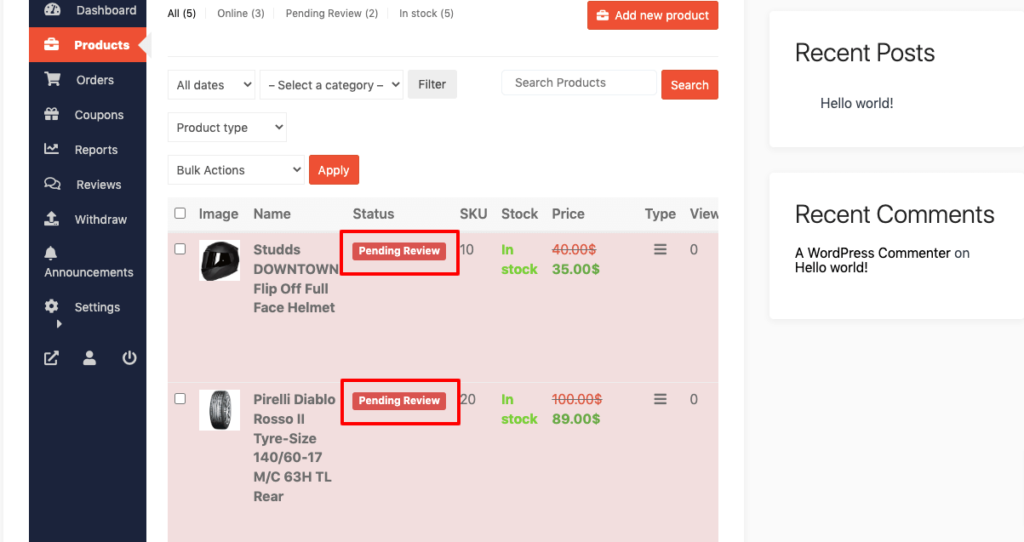
Now if you visit the Products tab, you'll find all of your newly added products are with pending status. Because the admin needs to approve these products to make them public.
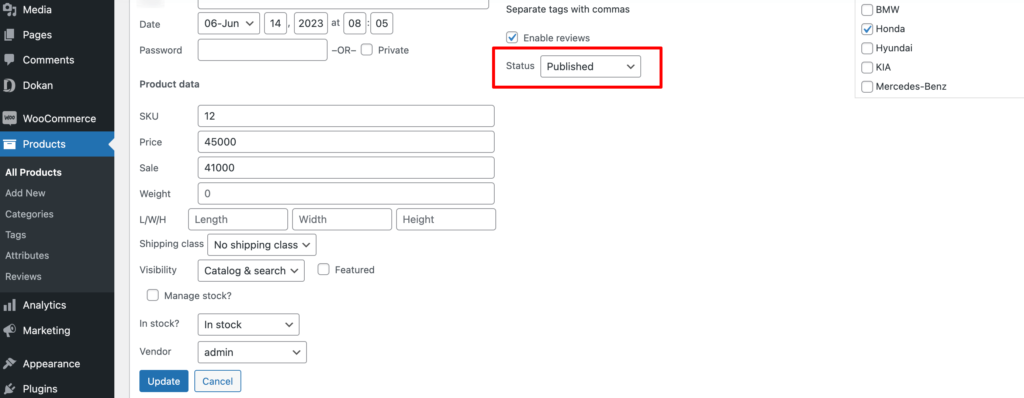
Now as an admin, visit your backend and approve these products to make them public. Click on the Products option, then click on the Quick Edit. There you will find the Status option. Choose the Published option and click the Update button to approve and publish the pending products.
This is how you can add products from your frontend as a vendor. Now let us show you how to add products from the backend.
Go to your WordPress dashboard -> Products -> Add New to add upload new products.
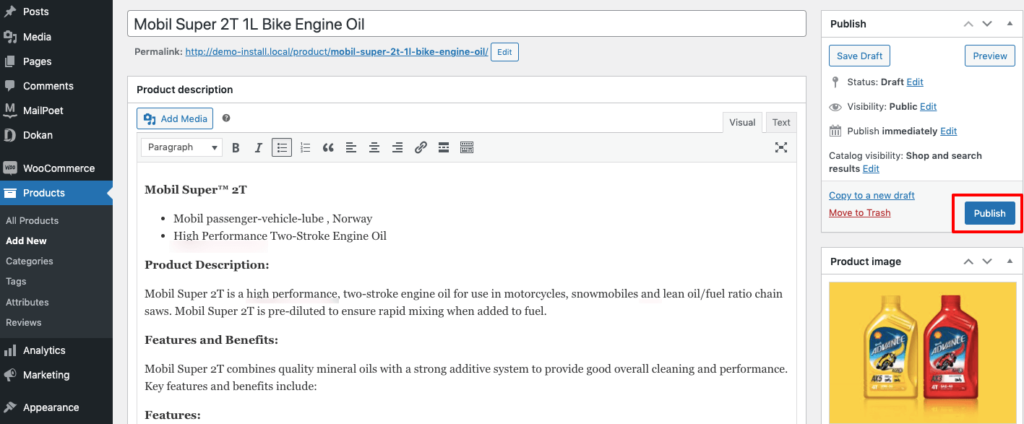
After inserting all the product-related information, finally, click on the Publish button to make the product accessible to everyone.
That's it!
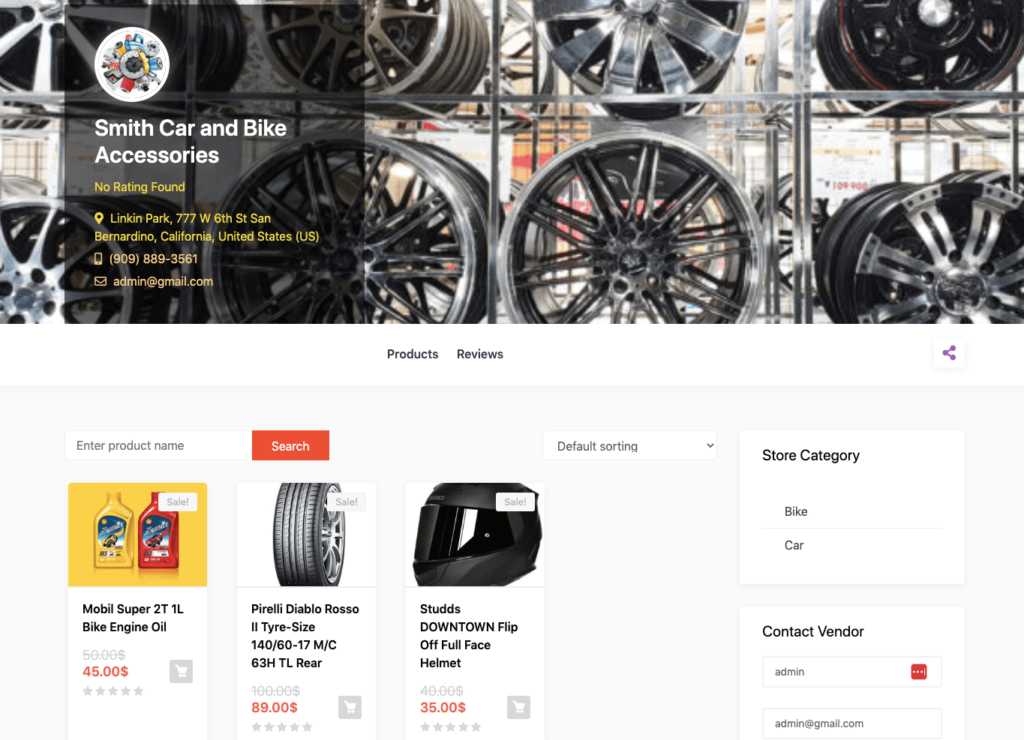
You can customize your store design by going to Vendor Dashboard -> Settings. From here you can update your store name, address, opening & closing time, etc.
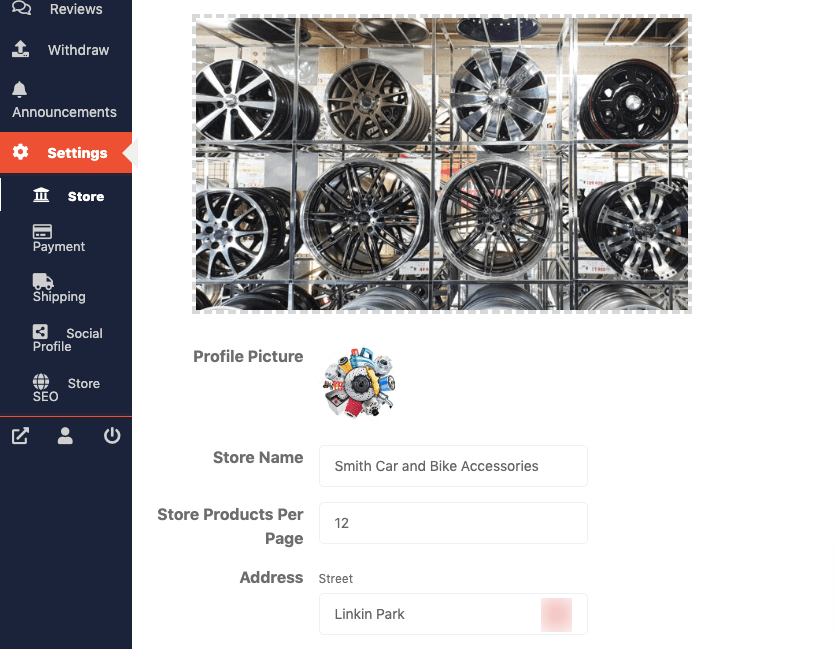
After doing all the customizations, your store looks like the below-
Special Note: Setting up the admin's shop is not mandatory unless you intend to sell your own products.
Step 05: Allow Vendors to Sign up on Your Marketplace
All the basic configurations are done. Now it's time to open your marketplace for third-party vendors.
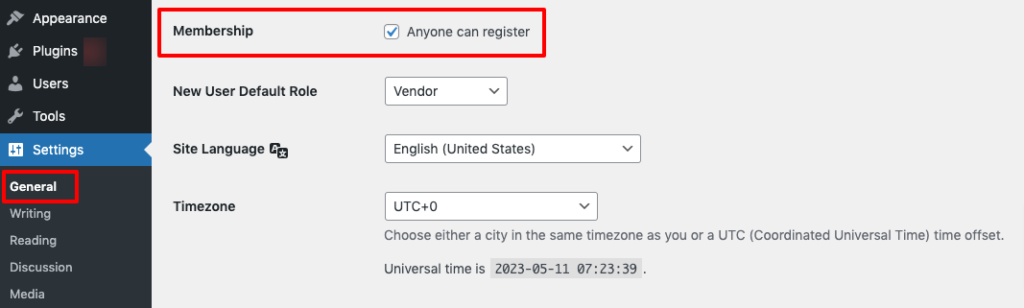
First, you need to enable the “Anyone can register” option. In order to do this, go to WordPress Dashboard -> Settings -> General -> Membership. And put the check mark on it.
Also, don't forget to save the changes that you have made now by clicking on the “Save Changes” button.
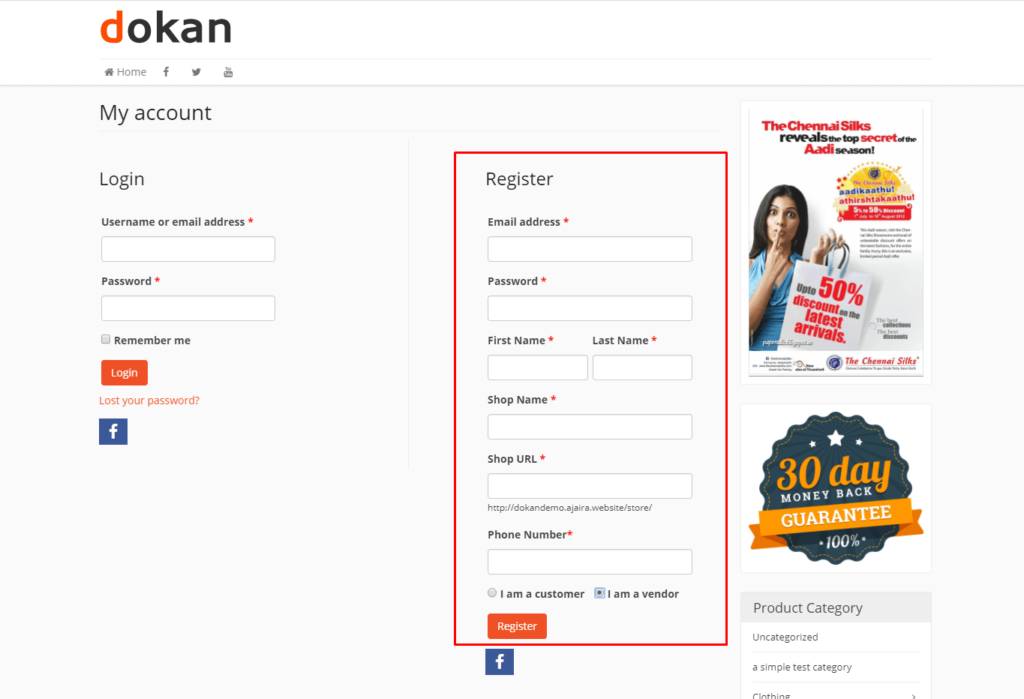
Now vendors can fill up the registration form to sign up in your marketplace-
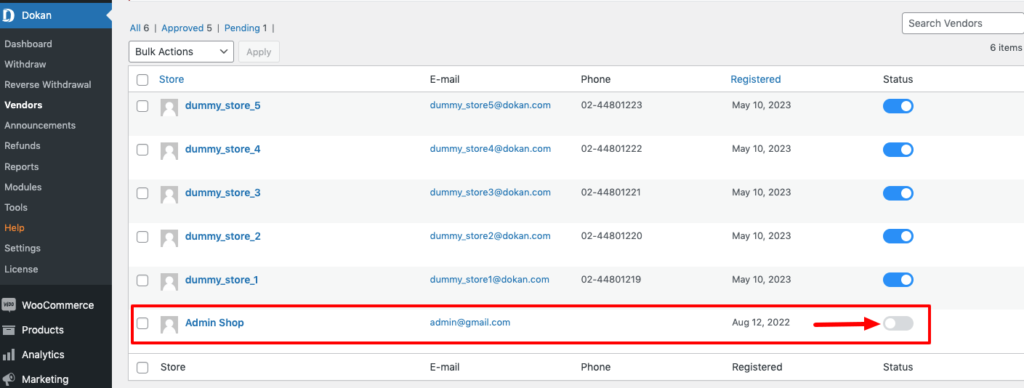
As an admin, you have the ability to review and manage all vendor registration requests from the backend. Take a look at the profiles of potential vendors and selectively approve those who meet your criteria to sell their products on your site.
Navigate to your WordPress dashboard then click on the Visit Stores to check all the registered stores on your car and bike parts marketplace.
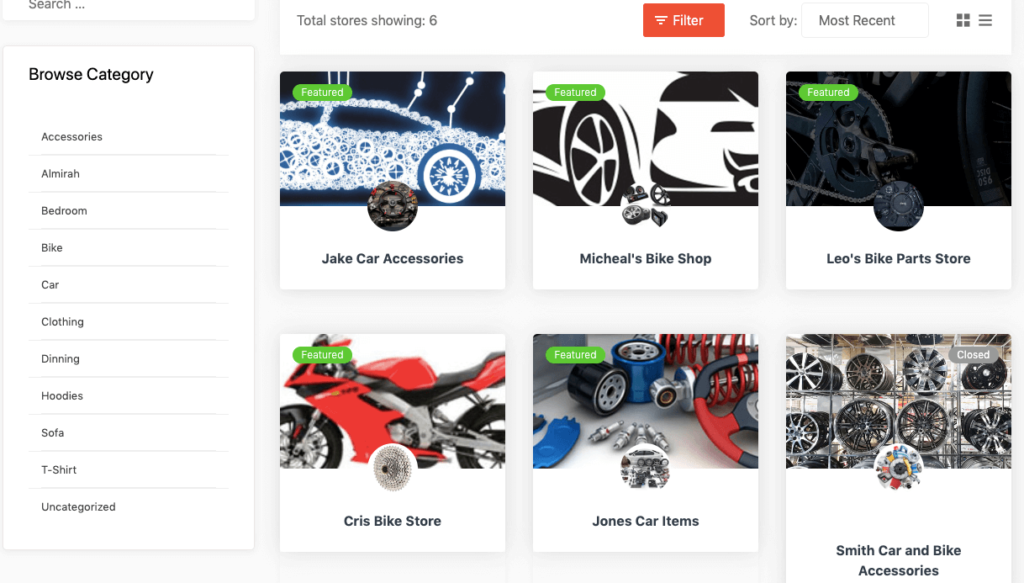
Once approved by the admin, vendors gain the freedom to create their own stores with unique URLs. Dokan also provides each vendor with an individual vendor dashboard, empowering them to effortlessly upload, manage, and successfully sell their products.
The store customization process for vendors is the same as we've shown above for an admin. From the frontend dashboard, a vendor can easily set up his shop.
Attracting vendors to your marketplace may pose a challenge, but there are effective strategies to employ. Send invitations to your vendor community and promote your marketplace actively. Additionally, offering incentives for early registered vendors can be an enticing idea to encourage participation.
Check these articles also on the niche-specific marketplaces to build you one-
- How to Create A Clothing Store Marketplace
- How to Build An Organic Products Marketplace
- How to Create a Sports Marketplace
- How to Create a Home Decor Marketplace
- How to Build a Hotel Booking Marketplace
Step 06: Leverage Dokan Advanced Features to Optimize Your Bike and Car Parts Marketplace
Once your marketplace starts growing, you will need some advanced features to seamlessly run your marketplace. Here we are going to discuss the top 5 features that you should implement on your online car and bike accessories marketplace to give your customers a better user experience.
a) Vendor Review
Vendor Review is a fantastic feature that allows customers to rate and post reviews on any store page. It's all about giving them a voice and the power to share their thoughts and experiences. This not only helps your vendors but also builds trust among potential buyers.
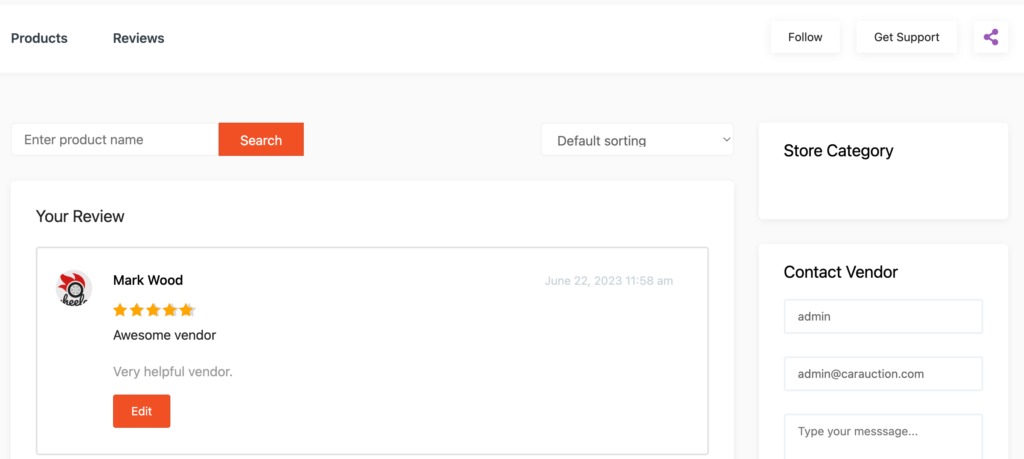
When customers rate vendors, it boosts the credibility of their stores. Imagine browsing through different stores and seeing real customer ratings and reviews. It's like having personal recommendations from fellow shoppers! These ratings and reviews provide valuable insights, helping buyers make more informed decisions and feel confident in their purchases.
b) Return and Warranty Request
The return and Warranty Request module is all about building trust and giving your vendors the ability to provide customized return and warranty options for the products they sell to customers.
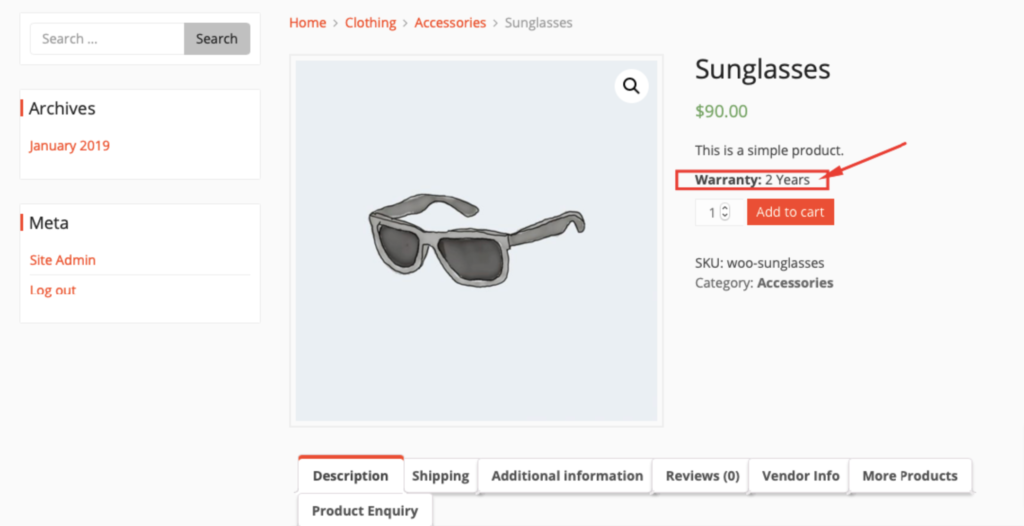
With this module, vendors can now offer tailored return and warranty policies to their customers. It's a great way to showcase their commitment to customer satisfaction and build trust in their stores. By giving customers the assurance that they can easily return or request warranty services for their purchased items, you're creating a safe and reliable shopping environment.
c) Dokan Live Chat
The Dokan Live Chat module allows your vendors to provide instant and real-time support to customers through popular platforms like Facebook Messenger, WhatsApp, Talk.Js, or Tawk.to. Gone are the days of waiting for email responses or playing phone tag. Now, your vendors can engage with customers directly and address their concerns promptly.
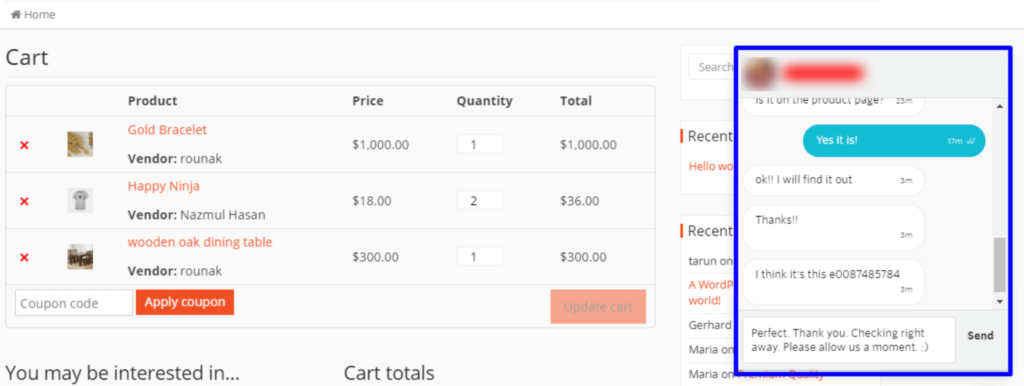
By offering this seamless communication channel, you can create a convenient and efficient way for customers to reach out for assistance. Faster resolution of issues leads to happier customers, increased trust, and ultimately, more sales.
d) Rank Math SEO
Rank Math SEO provides an easy-to-navigate front-end dashboard that allows vendors to optimize their product listings for search engines.
By leveraging this feature, vendors can make strategic SEO improvements, such as optimizing meta tags, adding keywords, and enhancing product descriptions. These optimizations help their products rank higher in search engine results, attracting more organic traffic to your marketplace.
e) Vendor Analytics
With Vendor Analytics module, your vendors can access detailed store analytics right from the dashboard. It helps them to make data-driven decisions and improve their performance.
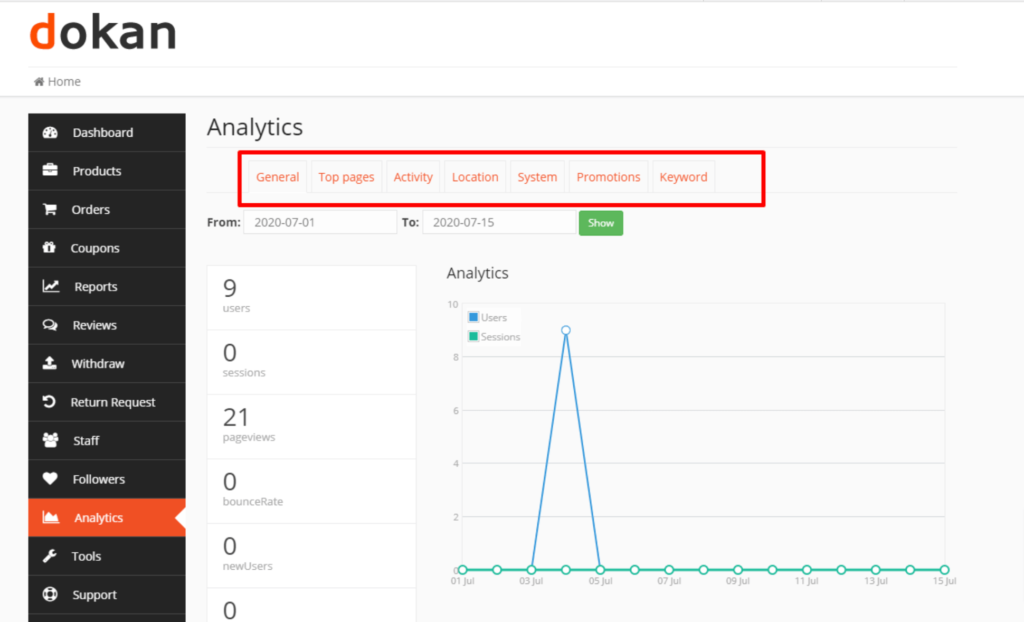
They can track important data such as sales, revenue, conversion rates, customer behavior, and much more. Armed with this valuable information, vendors can analyze trends, identify areas for improvement, and make informed decisions to optimize their store's performance.
Bonus: How to Find Vendors for Your Bike and Car Parts Marketplace

After launching your bike and car parts marketplace, the first challenge that you have to address is to find and convince vendors to register on your marketplace.
Follow these tips to find and convince vendors selling products on your marketplace:
- Promote your marketplace: You can promote your marketplace through social media and online forums so that people can know about your marketplace. Even you can launch paid ads to attract new vendors to your marketplace.
- Tell your friends offline: Word of mouth is one of the most proven tricks to promote anything. You can join different seminars or even tell your friends about your marketplace.
- Offer better incentives than your competitors: As you are a new player in the market, you should offer lucrative incentives so that vendors choose you over your competitors.
- Make a smooth onboarding process: Many of your vendors won't bother signing up on a new marketplace if it's not straightforward or easy to sign up. So, make sure you're asking for fewer documents while onboarding your vendors and the process is smooth enough.
We have a detailed blog on how to manage and convince vendors for a newly created online multivendor marketplace. You can check this below-mentioned blog to get more detailed information.
How to Find and Convince Vendors for Your Multivendor Marketplace
FAQs on How to Create a Bike and Car Parts Marketplace
To start, you'll need to install WordPress on your hosting platform. Then, choose a suitable WordPress theme and consider using a dedicated marketplace plugin like WooCommerce. Then install Dokan to set up your marketplace. Customize your website's design, layout, and branding to create a unique look and feel for your marketplace.
WordPress offers various payment gateway plugins that can be integrated into your marketplace. Popular options include PayPal, Stripe, and WooCommerce Payments. Set up your preferred payment gateway to securely process transactions and handle customer payments.
If you want multiple vendors to sell on your marketplace, consider using a plugin like Dokan. This plugin provides dedicated vendor management features, allowing vendors to register, create their own stores, manage inventory, and track sales. As the marketplace admin, you can oversee and moderate vendor activities.

How to Create a Bike and Car Parts Marketplace – Key Takeaways
Creating an online bike and car parts marketplace is not without its challenges, but with dedication and perseverance, you can create a thriving online business. So, roll up your sleeves, embrace the power of WordPress, and embark on this exciting journey of creating a successful online marketplace for bike and car enthusiasts.
Follow these simple 6 steps to get your job done with ease:
- Install Dokan- A WordPress Multivendor Plugin
- Configure Dokan Plugin General Settings
- Install a Well-Suited Theme for Your Marketplace
- Setup Admin Shop & Upload Products on Your Store
- Allow Vendors to Sign Up on Your Marketplace
- Leverage Dokan Advanced Features to Optimize Your Bike and Car Parts Marketplace
After publishing your marketplace, you are not done. You have to promote your marketplace. Follow the 7 tips that we have shared in this blog to attract vendors and customers to your marketplace.
That being said, if you have any further queries related to how to create a bike and car parts marketplace, feel free to let us know through the comment box below. We would love to address your queries at our earliest convenience. Thank you!