How to Start an Online Thrift Store – The Complete Guide for Beginners
A thrift store is a popular concept all over the world. People looking to buy great second-hand products often visit their local thrift store and purchase items at a discounted price.
A thrift store sells gently used clothing, furniture, and other household items at a discounted price.
But the main problem with physical thrift stores is, they are very chaotic and unorganized. People must go through piles of clothes or other items to find the right one.
That problem can be solved with an online thrift store. As the products can be sold in an organized way in an online store. That is why most entrepreneurs are looking to learn how to start an online thrift store.
In 2022, the global market value of secondhand and resale apparel was estimated to be worth 177 billion U.S. dollars. This value is projected to rise rapidly in the coming years, almost doubling in size from 2022 to 2027, reaching a value of 351 billion dollars.
Statista
If you want to leverage the opportunity of opening an online thrift store, then this guide is for you. We are going to show you how to start an online thrift store with som easy steps. At the end of this blog you will become an expert.
Let's start with-
Important Things to Consider Before Starting an Online Thrift Store
Before you start your online thrift store, you need to get some basics right.
Otherwise, you will be wondering “Where are my customers?”, ” I have set up a nice online store, why isn't anyone coming and buying my products?”.
So, here are the pre-requisites for starting a thrift store online-
- Find your niche
- Establish your brand
- Set up shop, Choose a Platform
- Source products
- Authenticate Products
- Store your products
- Take great product photos
- Price your products
- Set up shipping
- Create a marketing plan
Let's get into the details, shall we?
1. Find Your Niche
Determine the specific market segment or niche you want to cater to within the thrift store industry. This could be vintage clothing, accessories, home decor, etc. Knowing your target audience will help tailor your products and marketing efforts.
In order to find your niche-
- Conduct market research to identify gaps or opportunities within the thrift store industry.
- Consider factors such as demographics, trends, and personal interests when choosing your niche.
- Explore subcategories within the thrift market, such as vintage clothing, retro accessories, or upcycled furniture.
- Analyze competitors to understand their strengths and weaknesses and find your unique selling proposition.
Good to Know: You can follow this subreddit to know what kind of products people are buying in their thrift store.
2. Establish Your Brand

Develop a unique brand identity that resonates with your target audience. This includes choosing a memorable name, designing a logo, defining your brand's values, and creating a consistent aesthetic across your website and social media platforms.
To create a brand-
- Define your brand's mission, vision, and values to establish a strong foundation.
- Develop a brand personality that resonates with your target audience, whether it's quirky, sophisticated, or eco-conscious.
- Choose a brand name that is memorable, reflective of your niche, and available as a domain name for your website.
- Design a logo and visual identity that communicates your brand's aesthetic and values consistently across all channels.
3. Set up Shop, Choose a Platform
Decide on the platform you'll use to host your online thrift store. Options include setting up your website using platforms like Shopify or WooCommerce, selling on established marketplaces like eBay or Etsy, or utilizing social media platforms like Instagram or Facebook.
Before choosing a platform-
- Evaluate different eCommerce platforms based on factors like ease of use, customization options, and transaction fees.
- Consider starting with a hosted platform like Shopify or BigCommerce for simplicity, or a self-hosted solution like WooCommerce for more control.
- Customize your online store to reflect your brand's identity, using templates, themes, and plugins to enhance functionality and aesthetics.
- Ensure your website is mobile-friendly and optimized for search engines to improve visibility and accessibility.
4. Source Products from Reliable Vendors
Establish reliable sources for obtaining inventory. This may involve visiting thrift stores, estate sales, garage sales, or working with wholesalers and distributors. Ensure that the items you source align with your chosen niche and brand.
You can source products by-
- Establish relationships with suppliers, thrift stores, wholesalers, and individual sellers to acquire inventory.
- Attend thrift store sales, estate auctions, and flea markets to discover unique and affordable items.
- Negotiate favorable terms with suppliers to ensure competitive pricing and reliable product availability.
- Consider diversifying your product sourcing channels to maintain a varied and appealing inventory.
5. Authenticate Products
Verify the authenticity and quality of the products you acquire, especially if dealing with high-end or designer items. Familiarize yourself with authentication techniques or consider partnering with experts if needed.
To verify products-
- Educate yourself on authentication techniques specific to your niche, such as identifying vintage clothing labels or authenticating designer handbags.
- Invest in tools and resources to aid in product authentication, such as magnifying glasses, UV lights, or authentication guides.
- Partner with experts or utilize authentication services for high-value or specialized items to instill confidence in your customers.
6. Store Your Products

Organize and store your inventory in a way that allows for easy access and efficient management. Consider investing in storage solutions like shelves, racks, or bins to keep your items organized and in good condition.
To manage inventory-
- Allocate space for storing inventory in a clean, organized, and secure environment.
- Invest in storage solutions such as shelving units, garment racks, or storage bins to maximize space and protect items from damage.
- Implement inventory management systems to track stock levels, monitor product movement, and streamline fulfillment processes.
- Regularly audit inventory to identify slow-moving items, prevent stockouts, and optimize product selection.
7. Take Great Product Photos
Capture high-quality images of your products to showcase them effectively to potential customers. Use good lighting, clean backgrounds, and multiple angles to comprehensively view each item.
To get great product photos-
- Set up a dedicated photography area with ample natural light or studio lighting equipment to capture high-quality images.
- Use a clean, neutral backdrop to highlight the product and minimize distractions.
- Experiment with different angles, compositions, and styling techniques to showcase each item's unique features.
- Edit photos to enhance brightness, contrast, and color accuracy, ensuring that images accurately represent the product.
8. Price Your Products

Research market trends and competitor pricing to determine the optimal pricing strategy for your products. Consider factors such as condition, rarity, and brand reputation when setting prices.
To price your products-
- Research market trends, competitor pricing, and customer preferences to determine optimal pricing strategies.
- Consider factors such as product condition, brand reputation, rarity, and perceived value when setting prices.
- Implement dynamic pricing strategies, such as discounts, promotions, or bundle deals, to stimulate sales and maximize profitability.
- Regularly review and adjust pricing based on market dynamics, customer feedback, and inventory turnover rates.
9. Set up Shipping
Choose shipping carriers and methods that align with your budget and customer expectations. Calculate shipping costs accurately and offer transparent shipping options to your customers.
The best way to set shipping is-
- Select shipping carriers and services based on factors like cost, reliability, speed, and coverage.
- Calculate accurate shipping rates based on package dimensions, weight, destination, and shipping method.
- Offer flexible shipping options, such as standard, expedited, or international shipping, to accommodate diverse customer needs.
- Provide tracking information and delivery updates to enhance transparency and customer satisfaction.
10. Create a Marketing Plan
Develop a comprehensive marketing strategy to promote your online thrift store and attract customers. This may include social media marketing, email campaigns, influencer partnerships, and SEO optimization.
In order to create a marketing plan-
- Identify target customer demographics, preferences, and behaviors to tailor marketing efforts effectively.
- Develop a multi-channel marketing strategy encompassing social media, email marketing, content marketing, influencer partnerships, and search engine optimization (SEO).
- Create compelling content, including product showcases, tutorials, testimonials, and behind-the-scenes glimpses, to engage and captivate your audience.
- Utilize analytics tools to monitor and analyze marketing performance, identify trends, and optimize campaigns for maximum impact and ROI.
These are the basics you need to cover before starting your online thrift store.
How to Create an Online Thrift Store Using WooCommerce in 5 Steps
If you have checked all the prerequisites of the list, now it is time to learn how to start an online thrift clothing store or any other products.
We are going to use WordPress, more specifically, WooCommerce. Why?

If you have zero/amateur-level coding or technological knowledge, then WordPress is the best platform to start building your website. And if you want to turn that website into an online eCommerce store with all the functions like add to cart, shop page, payment gateways, etc, then you can use WooCommerce.
According to Statista, it is the leading eCommerce software platform with an overall market share of 39%.
WooCommerce is a WordPress plugin that adds eCommerce functionalities to new or existing websites.
If you want to know more about WooCommerce, then you can read this guide which will give you a full overview of WooCommerce.
Now, let's see the steps of starting an online thrift store using WooCommerce.
We are hoping that you have already installed WordPress on your site and chosen a hosting and domain name.
The steps are-
- Install WooCommerce
- Choose a Compatible Theme
- Configure WooCommerce General Settings (Payment gateway, Shipping, Tax)
- Setup Your Store and Upload Products
- Promote Your Online Thrift Store.
Now let's see the details-
1. Install WooCommerce
First, you need to install the WooCommerce plugin from your WordPress dashboard. Or you can download the plugin from WordPress.org. This is as simple as installing any other WordPress plugin.
Go to WP-Admin–> Plugins–> Add New and search for WooCommerce. Then install and activate the plugin.

After installing you need to go through a setup wizard where you need to put your store address, select a payment gateway, types of products you will sell, shipping, etc.
2. Choose a Compatible Theme
Next, you need to choose an eCommerce-compatible theme. A theme will give your thrift store a professional look and increase the user experience.

Most of the WordPress eCommerce themes are compatible with WooCommerce and you can choose anyone that suits your brand. The beauty of these themes is, that all of them are customizable. You can use the drag-and-drop feature to customize the design further.
But, if you don't want to do any kind of customization, then you can opt for a premium theme.
3. Configure WooCommerce General Settings (Payment gateway, Shipping, Tax)
After you have set up your theme, now it is time to configure the WooCommerce settings.
You will find all the WooCommerce settings in WP-admin–> WooCommerce–> Settings.

From there, you can configure your shopping options, taxes, timezone, and store currency as well.
Also, from the settings options, you can select the available payment methods like cash on delivery, bank transfer, PayPal, Stripe, etc.
There is a complete guide on WooCommerce customization you can read to get the full idea.
4. Setup Your Store and Upload Products
You are almost done. Now it is time to upload your products and start selling.
You can sell both physical and digital products through WooCommerce. As this is a thrift store, most people sell physical goods.
To upload a product, go to Products–> All Products–> Add New. Then write the product name, description, pricing, shipping, inventory number, etc, and publish your product.

You will find all the products live on the shop page.
You are done.
5. Promote Your Online Thrift Store & Make Happy Customers
Now it is time to promote your thrift store. The competition is fierce and without promotion, it is very tough to stand out unless you are selling something unique or come with a great marketing strategy.

You can use the usual channels to get started like-
- Email marketing
- Social marketing
- Content
- Forum marketing, etc.
Prioritize customer satisfaction by offering responsive communication, hassle-free returns, and personalized shopping experiences. Build trust and loyalty with your customers to encourage repeat business and positive word-of-mouth referrals.
To provide customer service-
- Establish clear communication channels, such as email, live chat, or phone support, to address customer inquiries promptly and professionally.
- Offer flexible and hassle-free return and exchange policies to instill confidence and trust in your brand.
- Personalize the shopping experience by offering recommendations, personalized messages, and exclusive offers based on customer preferences and behavior.
- Solicit feedback from customers through surveys, reviews, and social media to identify areas for improvement and enhance overall satisfaction and loyalty.
This is how you can launch and promote your online thrift store.
Turn Your Thrift Store into a Marketplace to Diversify Your Product Categories

Why a marketplace? The answer is in the heading, to diversify your product categories.
Many sellers have goods to sell but don't have a proper platform or audience to sell to. That is where you come in.
By turning your online store into a full-fledged multivendor marketplace, you can onboard many vendors and give them a chance to sell their goods in your thrift store. Not only will you get some extra commission from all the sales, but you will also get a larger product base, a community, and more traffic.
With the Dokan multivendor marketplace plugin, you can turn your WooCommerce store into a marketplace quite easily. Dokan plugin is one of the top multivendor marketplace plugins with 60000+ active installations, 40+ modules, and numerous features tailored for creating and managing a marketplace.

We will show you the steps to turn your eCommerce store into a marketplace.
1. Install Dokan Plugin
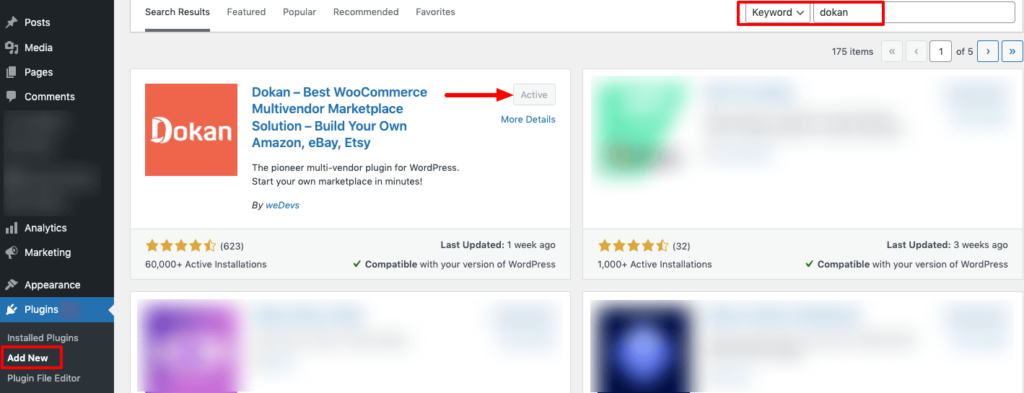
Installing the Dokan plugin is the same as installing WooCommece. Just go to WP-Admin–> Plugins–> Add new and search for Dokan. Then install and activate the plugin.

Next, you have to go through the admin setup wizard where you need to select the vendor store URL, shipping fee recipient, commission fee, order status, payment gateway, etc.
Also, you need to configure the Dokan settings as well.
Note: Every WooCommerce-compatible theme is compatible with the Dokan plugin as well.
2. Enable Vendors to Register to Your Marketplace
After you are done with the configuration, now you need to enable vendors to register on your marketplace. Just go to General–> Settings and enable the “Anyone Can Register” option.

Now, vendors can register. and start selling on your marketplace.
3. Add Advanced Features
If you want to add more advanced features, then you can install the Dokan Pro version to enable the amazing features to your marketplace like-
a. Live Chat
The Dokan Live Chat module will help you add a live chat option to your marketplace. The module has integrations with Tawk.to, TalkJs, WhatsApp, and Facebook. That means you can use these platforms to integrate your live chat and talk with your customers directly.

Activate the module from Dokan–> Modules and configure it to use it on your marketplace.
b. Payment Gateways
Other than the default payment gateways, Dokan has integration with other popular payment gateways. You can use PayPal Marketplace, Stripe Express, WireCard, Mangopay, and RazorPay to accept payments from customers.

You can activate these payment gateways from Dokan–> Modules. Then configure them to add these integrations to your marketplace.
c. Product Ratings and Vendor Reviews
Give the customers the option to add ratings and reviews to the vendor store by adding the vendor review feature. The Dokan Vendor Review module will help you do that.
Just activate the module from Dokan–> Modules and configure the settings so that customers can add reviews to the vendor’s store.
Here is the guide on how to configure the Dokan Vendor Review module.
d. Shipping
Other than the default WooCommerce shipping feature, the Dokan plugin has shipping features as well. You can enable vendor shipping, zone-wise shipping, and even enable shipping status to track the shipment.

By adding the shipping feature, your vendors can ship products anywhere in the world increasing sales.
e. Return and Warranty Feature
The Dokan plugin also has a return and warranty module that will help customers easily return their products without any hassle.
Having an RMA feature for a marketplace is very crucial. It builds trust and also increases brand value.
Create Your Online Thrift Store The Right Way
We are at the end of our article on how to start an online thrift store and hopefully, you have become an expert in creating your own.
If you have any doubt that creating an online thrift store will be difficult at the start of the article, we are sure that it will be gone by the end of this tutorial.
And make sure to promote your thrift store the right way, otherwise, all your hard work will go in vain.
If you want more of this kind of tutorials, don't forget to subscribe to our newsletter.
