How to Utilize WP Project Manager’s Invoice & WooCommerce Order Module to Take Your Business to the Next Level
A wise man once said,
A vision without a strategy remains an illusion.
A business is about having a vision for success. That is why when you start any kind of business you need to have a strategy in place. Which will help you learn from past mistakes, imply it in the present for a better future. You need to always think about ways to take your business to the next level. And if you are considering it, then read along.
When you think about it, any business consists of two things, taking orders from customers and delivering it. Whether it is a service or a product. But, a few know the real struggle that happens between those two things.
Once a customer lands on your website, their journey begins. And it is the responsibility of the company to make that journey as smooth as possible. That is why an order management system is important.
And what better way to manage your orders than the WP Project Manager's WooCommerce order module along with the Project Invoice module.
Confused? Well, how else you are going to keep track of your orders if you don't have the proper invoicing system.
So, today we are going to show you the steps on how you can set up and utilize those two modules with ease and take the step towards the next level and also the functionalities of these modules.
Setting Up WP Project Manager’s WooCommerce Order Module
WordPress Project Manager is one of the best project management software out there in the WordPress industry. It has some unique functionalities and extensions that not only help the project managers but also make sure the company is functioning properly. If you have an eCommerce store then you should acquire the WP Project Manager to make sure it runs smoothly.
WordPress is not an eCommerce platform right out of the box. Well, of course, you could add some PayPal buttons with a theme or design but that won't provide you any shopping cart facilities. That's where WooCommerce comes in. With its advanced functions, it creates the dream eCommerce store for you.
What WP Project Manager does is, it uses the WooCommerce Order module that creates the perfect integration with WooCommerce itself. Thus, providing you with the perfect order management system for your eCommerce store.
This integration will let you,
- Manage your product sales more efficiently
- Assign sales manager for any particular product
- Automatically create duplicate projects for each order
- Track every order until it's being completed
- Manage your inventory efficiently
This will help the eCommerce site owners, Sales managers, Inventory managers, and all related to the store.
How To Set Up The WooCommerce Module
Step 1: So, to set up the module you need to,
- Install and configure WooCommerce
- Create a store and some products
- Install and configure WP Project Manager PRO
- Create a minimum of 2 projects; with or without task lists.
Step 2: Go to Admin-> WP Project Manager-> Modules and enable the WooCommerce order module.
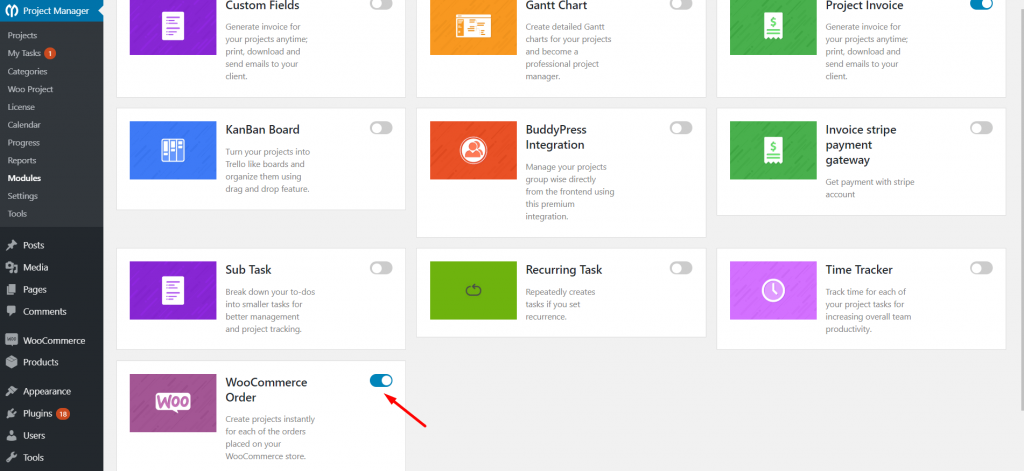
Step 3: Next, you will see a menu named “Woo Project” in the sidebar when you navigate to WP Admin-> Project Manager. Now click on it.

Step 4: Now it is time to assign projects. That means you need to put products under projects you have already created. For example, you can add all the t-shirts, shirts, pants, etc under the clothes project.
Check the ‘Create‘ radio button, select your desired products and users for whom you want to assign the project. Use the Add New button to create as many projects and products you like.
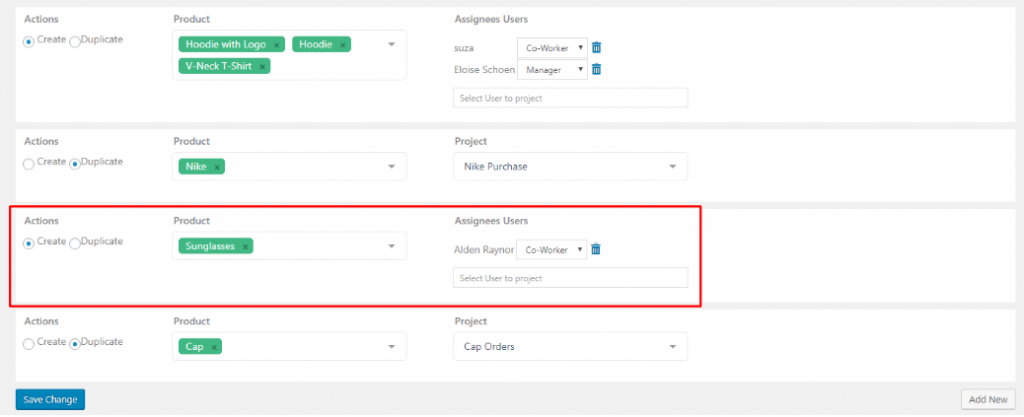
However, if you want to create a project with some previously created project format and tasks each time a product is bought, then you should choose Duplicate. But if your client needs a customized service, then you may select Create; but that will only create a blank project. You will have to add the tasks yourself.
To know all the details check out this documentation and clear all your confusion about setting up the WooCommerce module.
However, for your convenience we are going to answer some questions you might have regarding the module.
FAQ's Regarding the WooCommerce Module
If you choose the create action while assigning the project, then whenever a customer buys a product, the project will be created under that product's name. For example, if you add sunglasses to the project and choose the create action, whenever a customer buys sunglasses, a project named sunglasses will be created.
The Duplicate action just creates a new copy of an existing project that was specified by the admin. Now, when a customer places an order for a cap a duplicate project named Cap Orders will automatically be created in the projects:
The Create option will let you assign a person to that project.
How to Setup the Invoice Module of WP Project Manager
As a project management software with invoicing WP Project Manager offers you the opportunity to track the orders of your products. Evidently, inefficient invoice management is considered as one of the biggest mistakes of project management. Without proper invoicing, it becomes difficult to handle the finances of a company.
We just mentioned about the use cases of the WooCommerce order module. However, if you can integrate the invoicing along with it, it can become a well-balanced system. Every project created from purchasing will have an advanced invoice system if you enable the Project Invoice module of WP Project Manager.
If you think about it, only using the Order module will create a half-hearted system. You will create projects of course, but what about finances? How are you going to track the cash flow from your order?
So in a way you will be,
- Automating your invoice system
- Keeping track of your cash flow
- Creating a balanced system for your orders
- Tracking every sales record
It will not only help you as a site owner but you will get maximum results form your finance manager as well.
Configuring The Project Invoice Module
Step 1: Enable the Project Invoice module from Admin-> WP Project Manager-> Modules.
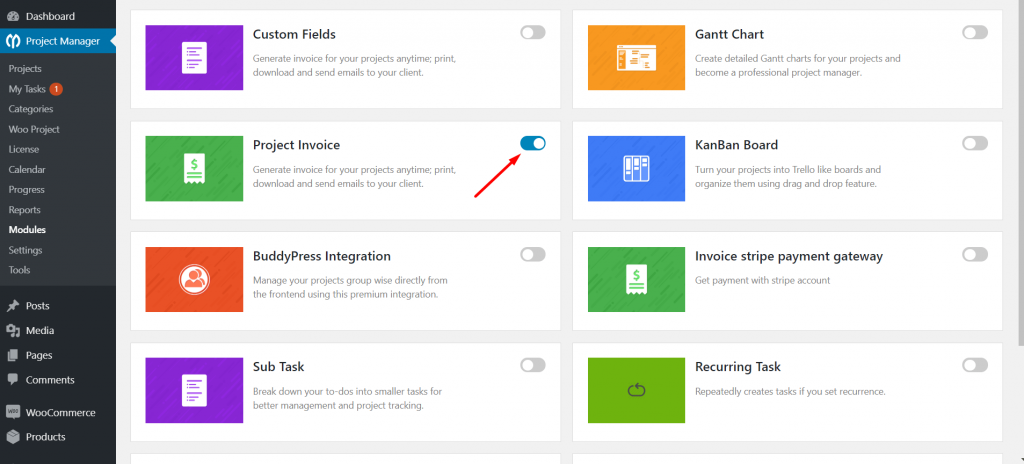
Step 2: You need to update your settings per your needs. To change the settings go Project Manager → Settings → Invoice. You will find all the options you will need to modify your settings.

- Theme Color: Customize the color of your theme
- Currency: Choose the currency you want to charge your customers in
- Payment Gateway: Choose the payment gateway you want to use
- PayPal Email: Use your PayPal email address
- Enable Sandbox: The PayPal sandbox mode is for programmers to test payment software before running real transactions
- Organization and Address: Enter your organization name and address.
Remember to hit the Save Changes button to before you go to another page.
Step 3: Now that we are done with modifying the settings, we are going to create an invoice.
- Choose a project you want to create an invoice for.
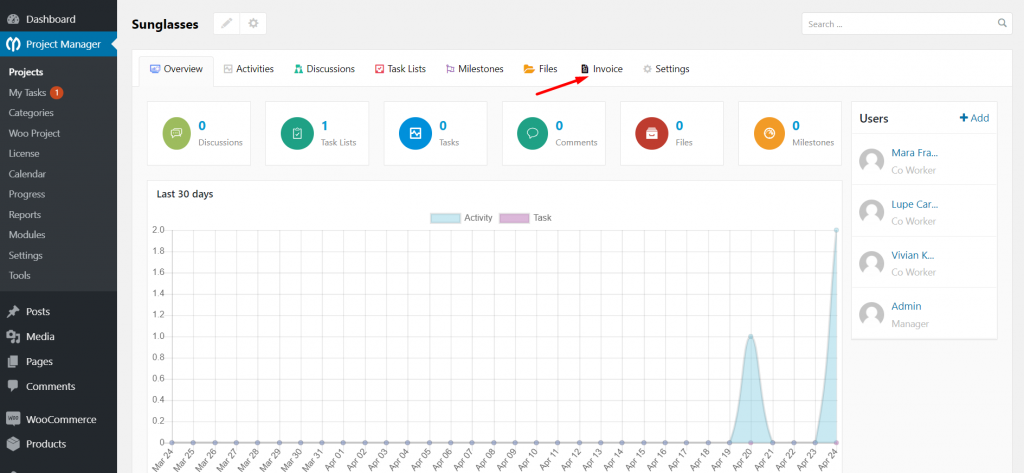
- Click the Invoices tab.
- Click the Add New button to create an Invoice.

Note: When you create an Invoice, at the bottom you will see an option called Initial Invoice Entry. Here you will find two options.
- Task: In this part you will add the task name. But these tasks will be charged by the hours. So you have to put the charging rates according to hours
- Name: Here you will add the name of the tasks you are going to charge for.You can add as many items as you want, add unit price and quantity. The invoice will automatically calculate the amount at the bottom.
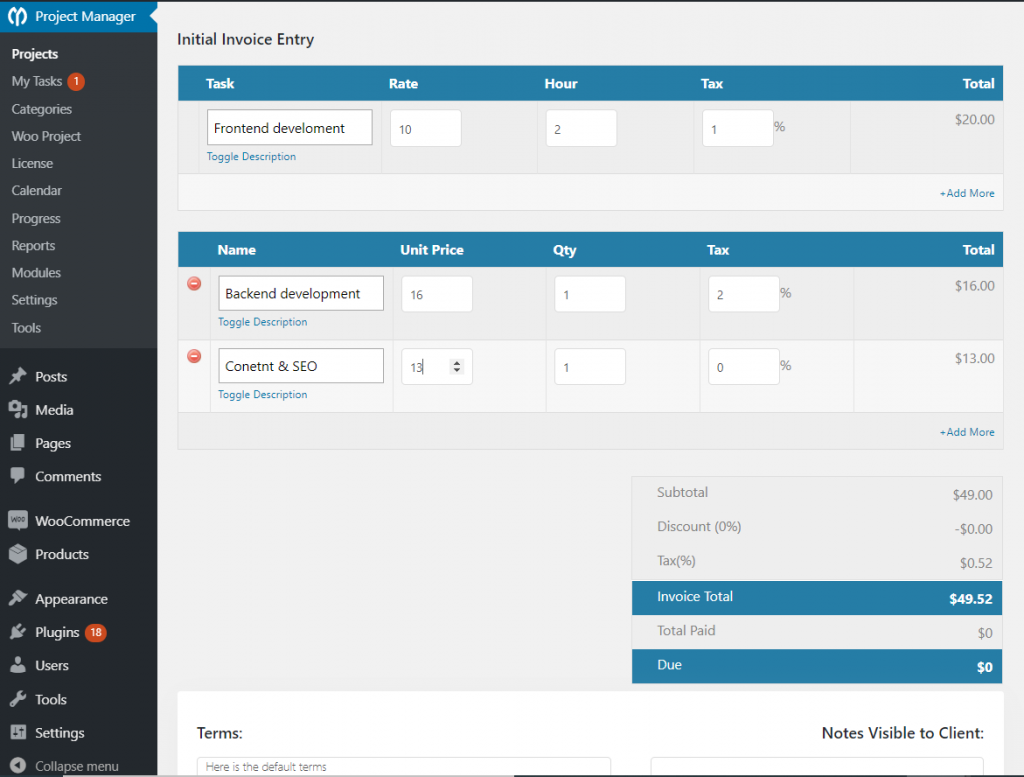
That is how you are going to configure the Project Invoice module of WP Project Manager. This is how this project management software with invoicing works.
Here is the documentation if you have any confusion left or if you want to know more details.
FAQ's For the Project Invoice Module
1.Does the invoice can be published from front-end?
Ans: Yes. Here is how it goes.
- Create a new page. Name it Invoices.
- In the new page, just type in the shortcode
[pm_invoice] - Publish the page.
2.How to mark the invoice as paid?
Ans: To mark the invoice as paid, go to Projects, and select the project for which you want to mark the invoice as paid. Go to the Invoices tab. From the list, click the correct invoice that you want to mark as paid. The full invoice will be shown. Click the “Enter Payment” button. You are done.
Ending Note
There is always the next step.
Whether in business or in life there is always a chance to evolve. It is up to us whether we take it or not. The choices of life is up to you but if we talk about business then we can surely show you the ways.
Therefore, if you are thinking of taking your eCommerce store to the next level then you must consider using the WooCommerce order module along with the project Invoice module. It will not only help you take control of your business but also help take your business to the next level. It will also help you retarget your lost customers.